I originally wanted a 200 but decided on a Tundra for some reason. I figured it was a simple vehicle and I would have liked to have had a bed for my real estate gig. So I bought a Tundra Regular Cab. It was neat, we had some adventures, had 35s and a lift. But as it turns out, I don't like trucks. So I sold it after a few months of ownership and bought what I originally wanted, a 2013 Toyota Land Cruiser. I've owned several dozen vehicles over the years with ownership rarely exceeding one year, I won't post up the list as I'm fairly certain I've forgotten most. Lets just say everything from a $500 '92 Mazda MPV to an off the showroom floor BMW M4.


Purchased sight unseen from a dealer in KCMO with 97k miles. It had full service records so I figured all was gravy. Flew out, drove it back to Utah the next day (with a nap in the back along the way, those heated rear seats were lovely to sleep on). When I got it home I found it had the cam tower seal leak. After several weeks of angry emails and phone calls to Jay Wolfe Toyota of KC (avoid these pricks), they eventually covered the cost. I still don't regret the purchase but I certainly wasn't pleased with a number of issues with Jay Wolfe.

A set of Rock Warrior popped up for sale locally with new KO2s and the lug nut kit so I jumped on the deal.

The interior lights were dreary. So I went over to superbrightleds.com and ordered the full lot.

Then the SRS light and passenger airbag light was giving me issues. Poked around techstream and TIS and narrowed it down to the passenger seat belt assembly.
SRS/Seatbelt Lights
$350 later it was ordered. All that for the one little sensor at the bottom of the belt. Thanks Toyota.

I began looking around for what kind of armor I wanted. The ARB/TJM thing wasn't my style, I wanted a specific set of boxes checked for whatever bumper I bought. I was talking with Jason @reevesci about sliders and suspension, I already had my order in for those and we were talking about him building me a bumper but my funds were a bit low at the time. Occasionally while driving around Utah I'd pass an accident and think to myself, if only some inattentive driver would rear end me, just enough damage to have a nice payout to get a new steel bumper. Lucky me. The kid in the CRV basically buried my hitch into this engine block. I'm pretty sure I scared the piss out of the kid since I came out of my vehicle and up to his window "rather upset" But it was only cosmetic damage to the 200 (the body shop guys were nice enough to include the hitch crossmember in the estimates) So the total cost was nearly $4000.


So I PM'd Jason and made arrangements to get the big girl gussied up with steel. I can't say enough good things about Jason's customer service. He drove out and picked up my 200 for god sakes, how great is that? Constant emails and correspondence throughout the build process were fantastic. Customer service goes a long way with me and I was beyond impressed. Plus, the bumpers turned out far beyond my expectations. He fabbed up his sliders with a little modification, a slight upward angle. As for the bumpers, I basically gave him a general idea of what I wanted and had him run with it. It ended up getting a very high clearance front bumper with a built in Rigid 20in Flood/Spot hybrid and two Rigid spotties (D-Series Midnight) on either side. The rear has a dual swingout, one side hold the spare tire, telescoping worklight (Rigid DSS Dually) and a Hi-Lift mount. The other arm is a dual purpose arm. It can hold either a 2nd spare carrier or a tray that can hold 4 jerry cans or one jerry can and a Yeti 35 (or similar), also below the tray is a lockable toolbox for recovery gear or whatever. Also, two aux brake/reverse lights in the bumper as the spare sort of covers the OEM lens. The Rigids, aside from the 20in which I had from my previous 4Runner, were bought from the Mud sponsor MRT @MRT Motorsports. Amazing price and shipping time. I'm planning on getting with Chas here soon for an order for some Bubba Rope. Jason also had some drawers also come in from Australia that I jumped on too.
Trail Tailor- Custom Armor Build plus a few things


In addition to my stuff. The 200 was also used to mock up some new parts for the community. Beefy recovery points, RLCA skids, tailgate storage, skid plates, ect..


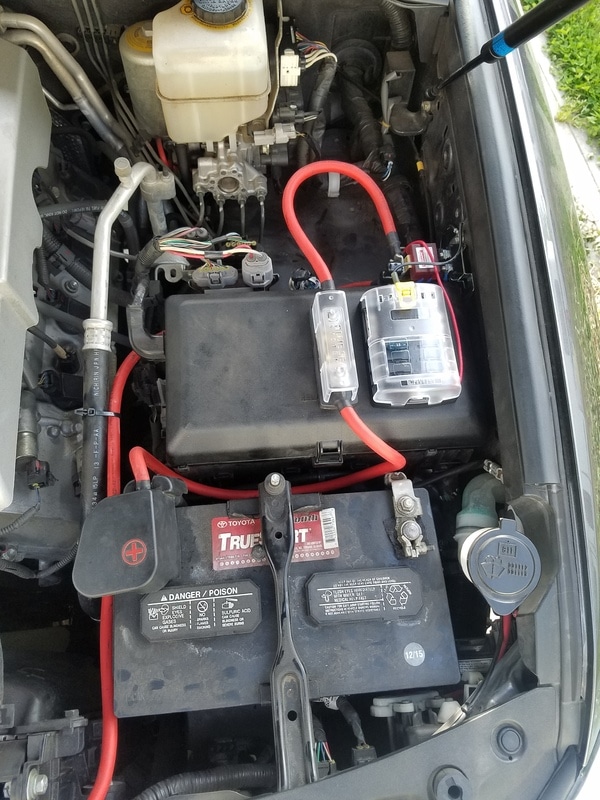
While the 200 was away I started planning and buying parts for my 2nd battery system. I'm an amateur astrophotograher for fun, so I need a fair bit of electricity to power all of the equipment. Piecing everything together was kinda fun. All in it came to $1200ish but a lot of that was the GoPower inverter/charger/switch that's definitely overkill for my purposes. I still have a 200W solar setup in my Amazon cart that I want too but I need to pay for some other stuff first. Plus, I'd like to see how this big ass group 31 performs first. Amazon and their damn one click ordering is dangerous stuff.
- Redarc Dual Sensing isolator
- Go Power 2000W Inverter/100A Charger/Auto-switcher
- Duracell 31DTMAGM Deep Cycle AGM 20 amp hour rate: 105
- Wingnut Marine Battery Terminal Posts
- Pico 15ea 2 AWG battery terminal/lugs
- 25ft of both red and black Marine grade 2 AWG wire (comes with more terminals and shrink tubing)
- 25ft of both red and black Ancor Marine Grade 16 AWG wire
- 2ea Blue Sea Systems ANL Fuse Block
- 3ea 200A Blue Sea ANL Fuses
- 120pcs Wirefy Heat Shrink Connector Kit
- 4A USB Charger Receptacle 15A with two 3 prong outlet (Home outlet style)
- Outlet box
- 2ea Blue Sea Systems 6 circuit Fuse Block (one each for front and rear)
- 15A male plug (for shore power/charging)
- 30A male to 15A female plug (incase of 30A service)
- 25ft 12/2 household wiring
- 50ft heavy duty extension cord
- Waterproof LED Volt Meter Gauge
- AirOnBoard battery link switch (to manually connect/jump both batteries)
- Quality crimpers for small and large AWG (these will save many angry moments)
- Jegs universal group 31 tray
Some of the goods:

Purchased sight unseen from a dealer in KCMO with 97k miles. It had full service records so I figured all was gravy. Flew out, drove it back to Utah the next day (with a nap in the back along the way, those heated rear seats were lovely to sleep on). When I got it home I found it had the cam tower seal leak. After several weeks of angry emails and phone calls to Jay Wolfe Toyota of KC (avoid these pricks), they eventually covered the cost. I still don't regret the purchase but I certainly wasn't pleased with a number of issues with Jay Wolfe.
A set of Rock Warrior popped up for sale locally with new KO2s and the lug nut kit so I jumped on the deal.
The interior lights were dreary. So I went over to superbrightleds.com and ordered the full lot.
Then the SRS light and passenger airbag light was giving me issues. Poked around techstream and TIS and narrowed it down to the passenger seat belt assembly.
SRS/Seatbelt Lights
$350 later it was ordered. All that for the one little sensor at the bottom of the belt. Thanks Toyota.
I began looking around for what kind of armor I wanted. The ARB/TJM thing wasn't my style, I wanted a specific set of boxes checked for whatever bumper I bought. I was talking with Jason @reevesci about sliders and suspension, I already had my order in for those and we were talking about him building me a bumper but my funds were a bit low at the time. Occasionally while driving around Utah I'd pass an accident and think to myself, if only some inattentive driver would rear end me, just enough damage to have a nice payout to get a new steel bumper. Lucky me. The kid in the CRV basically buried my hitch into this engine block. I'm pretty sure I scared the piss out of the kid since I came out of my vehicle and up to his window "rather upset" But it was only cosmetic damage to the 200 (the body shop guys were nice enough to include the hitch crossmember in the estimates) So the total cost was nearly $4000.
So I PM'd Jason and made arrangements to get the big girl gussied up with steel. I can't say enough good things about Jason's customer service. He drove out and picked up my 200 for god sakes, how great is that? Constant emails and correspondence throughout the build process were fantastic. Customer service goes a long way with me and I was beyond impressed. Plus, the bumpers turned out far beyond my expectations. He fabbed up his sliders with a little modification, a slight upward angle. As for the bumpers, I basically gave him a general idea of what I wanted and had him run with it. It ended up getting a very high clearance front bumper with a built in Rigid 20in Flood/Spot hybrid and two Rigid spotties (D-Series Midnight) on either side. The rear has a dual swingout, one side hold the spare tire, telescoping worklight (Rigid DSS Dually) and a Hi-Lift mount. The other arm is a dual purpose arm. It can hold either a 2nd spare carrier or a tray that can hold 4 jerry cans or one jerry can and a Yeti 35 (or similar), also below the tray is a lockable toolbox for recovery gear or whatever. Also, two aux brake/reverse lights in the bumper as the spare sort of covers the OEM lens. The Rigids, aside from the 20in which I had from my previous 4Runner, were bought from the Mud sponsor MRT @MRT Motorsports. Amazing price and shipping time. I'm planning on getting with Chas here soon for an order for some Bubba Rope. Jason also had some drawers also come in from Australia that I jumped on too.
Trail Tailor- Custom Armor Build plus a few things
In addition to my stuff. The 200 was also used to mock up some new parts for the community. Beefy recovery points, RLCA skids, tailgate storage, skid plates, ect..
While the 200 was away I started planning and buying parts for my 2nd battery system. I'm an amateur astrophotograher for fun, so I need a fair bit of electricity to power all of the equipment. Piecing everything together was kinda fun. All in it came to $1200ish but a lot of that was the GoPower inverter/charger/switch that's definitely overkill for my purposes. I still have a 200W solar setup in my Amazon cart that I want too but I need to pay for some other stuff first. Plus, I'd like to see how this big ass group 31 performs first. Amazon and their damn one click ordering is dangerous stuff.
- Redarc Dual Sensing isolator
- Go Power 2000W Inverter/100A Charger/Auto-switcher
- Duracell 31DTMAGM Deep Cycle AGM 20 amp hour rate: 105
- Wingnut Marine Battery Terminal Posts
- Pico 15ea 2 AWG battery terminal/lugs
- 25ft of both red and black Marine grade 2 AWG wire (comes with more terminals and shrink tubing)
- 25ft of both red and black Ancor Marine Grade 16 AWG wire
- 2ea Blue Sea Systems ANL Fuse Block
- 3ea 200A Blue Sea ANL Fuses
- 120pcs Wirefy Heat Shrink Connector Kit
- 4A USB Charger Receptacle 15A with two 3 prong outlet (Home outlet style)
- Outlet box
- 2ea Blue Sea Systems 6 circuit Fuse Block (one each for front and rear)
- 15A male plug (for shore power/charging)
- 30A male to 15A female plug (incase of 30A service)
- 25ft 12/2 household wiring
- 50ft heavy duty extension cord
- Waterproof LED Volt Meter Gauge
- AirOnBoard battery link switch (to manually connect/jump both batteries)
- Quality crimpers for small and large AWG (these will save many angry moments)
- Jegs universal group 31 tray
Some of the goods:
Last edited:


")