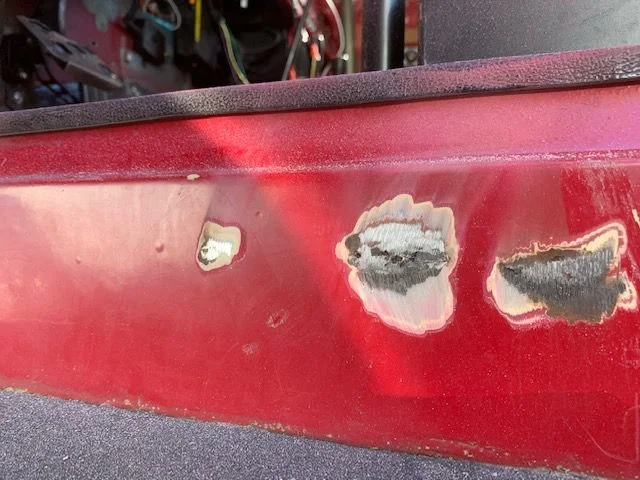
rust bubble repair

This site may earn a commission from merchant affiliate
links, including eBay, Amazon, Skimlinks, and others.

Joined
Sep 17, 2006
Threads
500
Messages
3,171
Location
Santa Rosa, CA
I'm going to attempt my first body repair. This rust bubble has been here since I bought the rig many years ago. So, today, I got out the grinder to see what was there. It's not pretty. It's right on the line where the floor meets this sill. There are some different colors of metal, looking like it's been fixed before. But, the cavity with all the crap in me has me confused. There's a space there? That appears to be holding water. So, assume the the process is, cut it out, cut sheet metal to match, and carefully stitch weld it back in.
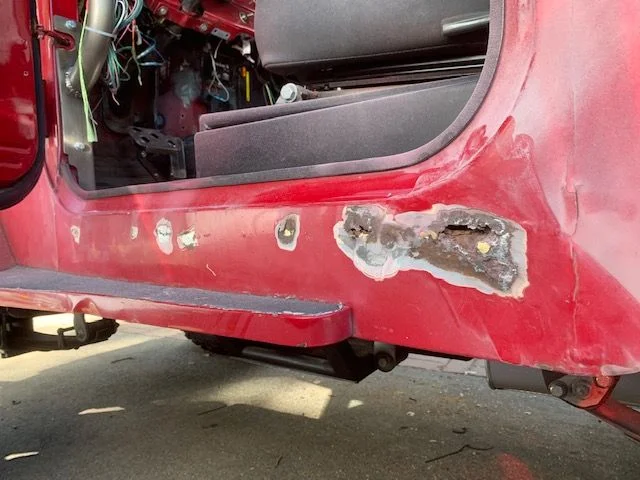
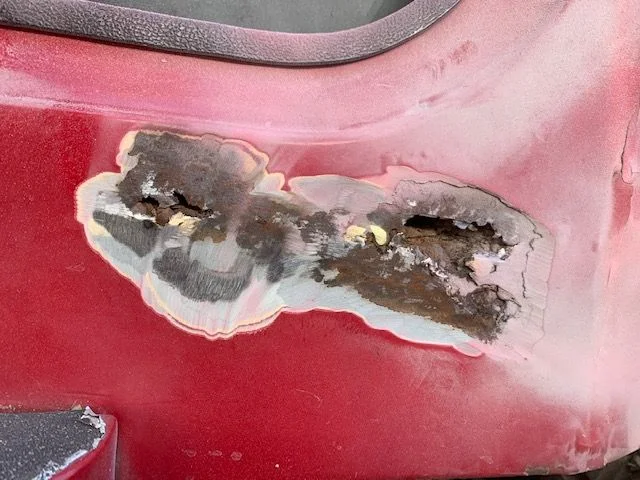
1969342


1969343


1969344
 
Yup, lots of fun. Just started doing this on my ‘63. Rust has probably been there since ... ‘65? Lol. Here’s a pic of mine (waviness is from bad pano photo technique) with the rocker cut out - pic is rotated upside down to match your pics - this is a 45 fixed cab so it’s sitting on its roof supports. Good luck, some of my floor needs replacement also.
01FA6328-24B5-43FF-A87B-BF2935AAA6D6.webp
 
Thanks for the info.

So, clearly, water is collecting in that void in the rocker - what do you do about it to keep it from happening.

And, should I open mine up that much? Or just the areas where there is rust?
 
Thanks for the info.

So, clearly, water is collecting in that void in the rocker - what do you do about it to keep it from happening.

And, should I open mine up that much? Or just the areas where there is rust?

Be careful, if you start looking for more rust, you’ll find it. It looks like the seam at the B pillar is packed with filler?
 
That's not a bubble. That's the entrance to the dreaded rabbit hole.
 
That is Pandora’s Box. Slap some bondo back in there, try to match the paint, be done. Otherwise, you are starting a full body restoration.
 
Yes, the bottom of the B pillar seam has filler and some rust.

There is filler all over this tub. And not a little. Even this rocker, which looked pretty flat, had a lot of filler. The back of tub is a loss, so, I'm moving towards replacing the tub from the B pillar/seam back. But that's a ways away right now. I'm just trying to stabilize this spot.

I'm hoping I can save/keep the tub from the B pillar/seam forward. the floor pans are okay, the fire wall is okay.

I don't want to just shove a bunch of bondo in there. I want to use this as a way to learn how to do basic body work.
 
In all actuality that rocker is a pretty simple piece to replace.

Compared to the rest of what you're getting ready to do.
 
Ya, I agree. I figure this is a test for me. If I can't handle this, I shouldn't go on. The spots that are rusted through aren't that bad. But ....

What do I do about all the rust in the void of the rocker - the bottom of the door frame? It's clearly one giant rusty cavity in there. Is there some way I can treat the inside of the rocker, or is my only choice to open the entire thing up like middlecalf did?

And, it's clear that the piece of metal that's doubled up to the rocker near the B pillar is rusted as well.

1969529

So, patching the body metal will just be covering up a giant pile of rust. I guess I have to go under and grind out from the underside as well - right?

And what are the gold colored bits? Original work attaching the two pieces?

Peter
 
Ya, I agree. I figure this is a test for me. If I can't handle this, I shouldn't go on. The spots that are rusted through aren't that bad. But ....

What do I do about all the rust in the void of the rocker - the bottom of the door frame? It's clearly one giant rusty cavity in there. Is there some way I can treat the inside of the rocker, or is my only choice to open the entire thing up like middlecalf did?

And, it's clear that the piece of metal that's doubled up to the rocker near the B pillar is rusted as well.

View attachment 1969529
So, patching the body metal will just be covering up a giant pile of rust. I guess I have to go under and grind out from the underside as well - right?

And what are the gold colored bits? Original work attaching the two pieces?

Peter

The gold is brazing from a previous repair. The outer rocker is 1 piece. All of the rust you are seeing is the inner rocker and floor, once you start cleaning them up the snowball will get bigger. I’m not seeing a lot of metal around the current holes to weld patches to.
 
On metal that’s still mostly solid (and that’s a variable sometimes depending on my eagerness and motivation) I scrap off as much rust as I can, especially flaky stuff, vacuum/blow it out as best as possible, then spray rust converter - very liberally - everywhere. I use a solo hand pump sprayer. I’ll also run a brush with a long handle - akin to a toilet bowl brush, kind of appropriate, eh? - doused with converter in all the channels, nooks and crannies I can. Since this is all internal - will be covered up - it doesn’t need to be topcoated since there is no UV impingement. If I could fill a swimming pool with rust converter and dunk my tub I would.
 
I did that same repair a couple of years ago.

20160926_194844.webp
 
Looks looks like you did it on the frame. Wow.
 
I compare a rust bubble to a iceberg. At least not steering clear of a rust bubble is not as tragic as the Titanic not giving the iceberg a wider berth. But I have a feeling a few FJ40s were lost by what started out as a simple rust bubble repair.
 
Last edited:
Yes, the bottom of the B pillar seam has filler and some rust.

There is filler all over this tub. And not a little. Even this rocker, which looked pretty flat, had a lot of filler. The back of tub is a loss, so, I'm moving towards replacing the tub from the B pillar/seam back.
Change 3/4 tub or the whole tub. You have a lot of work in that 1/4 section between. At least get it sandplasted before the decision.
 
Okay, so more excavation. There are cracks in the bottom of the rocker, but the back and top looks solid. And the crack is only from the back of the door to the frame support. From the frame support to the front of the door is solid underneath.

1969925


1969926


1969927


So, how to I proceed if there is a 3/4 tub in my future. It will probably be next summer before I'm ready to take that on - or the summer after (have to work outside). So, what do I do for now to get me through until then? Just fill it up with POR15 and throw welds and little patch panels everywhere so the rocker is water tight again? There is metal there. When my die grinder gets here tomorrow, I'll be able to get to all the spots I couldn't get to with the cut off wheel.

This is a crack line in the back that's at the floor that I'm hoping I can just clean and weld the **** out of.
 
From what I can tell starting 6/78 the inside of the rocker had three removable plugs on each side. Would think about adding these plugs. Would paint the inside of the hollow rocker space with rust proofing type paint. Then put desiccant pack in the void and replacement based on how humid of a area the cruiser lives. Wish there was a way to do the boxed section behind the front seats in the E-78 tubs.
 
Back
Top Bottom