

Boyd Codrington style respray

This site may earn a commission from merchant affiliate
links, including eBay, Amazon, Skimlinks, and others.

Joined
Mar 27, 2003
Threads
124
Messages
724
Location
Ingerland
I have no experience of touching up body work or respraying. The little I know comes from watching American Hotrod and Boyd's bodywork shop...

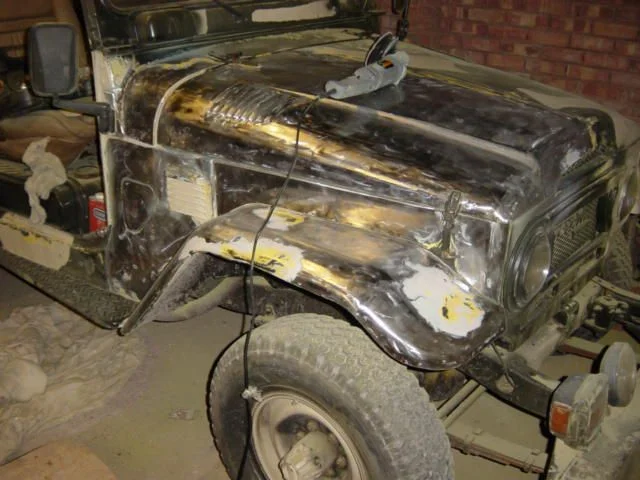
I picked up my BJ40 (with it's cow hide pattern) last week. Whoever painted it must have used household paint and applied it with a stick. Even my untrained eye could see it would need sanding if I was ever to get a good finish. In true Jim Phillips style (not stopping to ask for advice) I got the air full of dust and went to work with the sander.

I am not sure if the result is not quite what Boyd would approve of.

I have used 80 grit sanding discs and then 140 to smooth down further. There is not a lot of rust and the finish is smooth to the touch. I am planning on going over it with some bondo (picked that up from American Hotrod) but just where there are visible dinks. I think I should also rub it with some very fine wet and dry.

Am I going about this the right way? I seem to be going through a lot of sanding discs and they are not cheap (especially the dremmel ones) Is there a trick I might be missing or any advice to be had?

Cheers, Jim
BJ40 002.webp
 
Wow! That must have been an INCREDIBLE amount of work. You are amazingly thorough.
 
140 grit is way to coarse to paint. You want to bring it to 200 minumum, but 400 is a lot better. Atobody shops go to 600 or finer. Cruisers don't require the finest work as you won't (and wouldn't want) get a glassy final finish as on a new car but even so unless you take the time to track down each high and low area along with the slighter imperfections they'll be very obvious when you're done.

You'd better prime it very soon or the bare metal will begin to rust. Once you have it smooth spray with a primer and then block sand it so all of the uneven surfaces will appear. Keep priming then sanding until you can't find ups and downs anymore. It's very tedious and dirty work.

You'd have an easier time if you dissassemble the truck. The finished job will look much better and last longer too. You'll have a better chance to find and treat any hidden rusted parts or areas as well.

I'd have used a paint stripper to get to bare metal rather than sanding. Much quicker, much less messy.

http://www.autobodystore.com/ The guy who keeps this site alive, Lenny, is very helpful and knowledgable. He'll also sell most anything you need. Visit the forums, register and ask questions.
 
Last edited:
After painting my 75 the only advise I can offer is sand some more. If you think you are ready to paint stop and sand for two more days. The paint job will still be there in five years and you will get tired of looking at the stilght gouges int he door frame long before that if you know what I mean.
 
I have ordered some 240 grit to get it down a bit smoother.

Yes, it was dusty. I have used the garden blower to blow the dust out ot the garage. What a choking mess.

I checked with the man who I use for patching up my wife's car everytime she bumps into something - he says it is OK to smoothe the paint using 240 and only go to bare metal where there is obvious corrosion. That may save some time but now I am into it I don't really mind the sanding. I can see it will be lots more work before it is time to respray.
 
Looks awsome!!! One word of cautoion before you paint. Please use a self etching primer on the truck. The extra primer step will allow for better paint adhesion and protect the metal from future rust. It's a pain to spary and you have to use caution (mask and other protection is mandatory)!

Also, make sure after you spray the self etching primer to spary with a sandable primer two coats. Then you'll have to wet sand the primer for a smooth finish. Apply paint and clear...then your done. You'll have to wet sand some more after the clear....you'll be happy!

Take the extra steps for a great finish....It's well worth IMHO.
 
did you really sand it with the hood (bonnet) holddowns and the grill bezel in place? If so, it's kind of amazing and very much the hard way to proceed.

240 grit overall is fine, IMO, for a cruiser finish. The procedure could be to sand completely, then spray etching primer on the bare metal, then spray an expendable 'sanding' coat of primer, then resand using blocks long enough to ride over low spots. The highs will likely go back to bare metal and the lows will not sand the primer until you've gotten the area more or less level. Then more sandable primer and repeat the process. The number of repetitions is dictated by the condition of the surfaces and the levels of your patiennce and endurance. Some fine jobs require as many as twenty go arounds of priming and sanding before the vehicle is deemed ready to paint but that would be overkill here unless you are after something truly unique.

You will only want to do this once (in a lifetime :) ) as it is miserable work. Make your one shot at it be as thorough and good as you can imagine ever wishing it to be. Otherwise accept a lesser level as all that you would want or need. Either way is OK so long as it is a result of your informed decision made prior to the start. If you accept less than you'd really like to have you'll regret backing away from the work.
 
Jim my only advice is even if there is mild rust in there remove the fenders and hood and apron and such, there is probably a lot of surface rust you are missing. Even here in dry not-very-rusty Utah I did the same thing and in a year I had rust back.. I wish I had taken it down all the way.. Just my $.02. Looks good!
100_0263.webp
 
make a stop at napa,get a tac rag,some dawn and a green scruby.after yuou are done with sanding wash the whole cruiser down with dawn using the scruby,after drying take the tac rag and wipe it all down.purpose of all of this is to get all of the grease off.and little particles that you do not see.spot putty is also a good investment/it the little crap that goes a long way.when i da a car down i use to start 180 grit from napa then if im good i move to 220 or higher.if you need to know anything just ask.:D
 
Martin White said:
Wow! That must have been an INCREDIBLE amount of work. You are amazingly thorough.


x 10


maybe a little to much
 
When you purchase the filler, etcher, sealer or primer or whatever you end up laying down on the bare metal, READ the instructions on the container. You might be wasting your time trying to "finsh sand" bare metal and sanding it with finer and finer grades of paper. Most bare metal, in my experience, is prepped with 80 to 180 grit. The rough surface is required for proper adhesion. It doesn't look like it but if its paint, surfacer, or sealer you are talking about, then that's different.
 
If I were going all the way to metal, I would've started with paint remover a la Jasco. Too late now, eh?

If you're putting that much work into it, definitly disassemble all the parts you can up front back to the firewall.

I sure hope you're going to use a correct one-part paint in an original color so as to retain a stock appearance.
 
Get your body work done. 80 grit is fine for use before filler and primer surfacer. After surfacer, sand with 320-400 before top coating. You may want to try a product such as this:
http://www.smartshoppersinc.com/AutomotiveFinishes/Clausen_Primer.html

It will save you the step of having to spray 2 different primers (self etching & surfacer). This stuff is self etching and a sealer/surfacer in one product. Use a guide coat when sanding the surfacer. It will let you see any filler spots that are to low. Use a good quality filler (not bondo). Metal 2 metal or Rage Gold is good. Use a glaze if you have some very small (shallow) defects. Re prime if you use any filler or glaze on top of the surfacer. After final sanding before top coat wash car with dawn liquid detergent and water. Rinse good and let dry. Mask, then just before painting top coat wipe down with a pre paint degreaser. Use 2 clean rags. One is to dry the other is to clean. Wear gloves so as not to put skin oils on surface. Spray your top coat.
 
Jim_Phillips said:
I have used 80 grit sanding discs and then 140 to smooth down further.

Looks familiar.
 
Last edited:
Thanks everyone - that's really useful. I will bookmark this thread as I think I will be coming back to it for some time. I'll update with some more pics as I progress.

Is it such a problem to respray in a non standard colour? I really like an old VW colour call light grey -

http://www.pre67vw.co.uk/colours/default.aspx?p=6

I saw it on an old camper and thought it would be perfect for my project.

Pappy - yours looks great - I can see what I am aiming for. Don't you think in a way it would be nice to leave it as bare metal after all the work!?
 
Back
Top Bottom