
Where did you get that grill? I like the mud guards you attached to the flares. I’d like to be able to have flares but I can’t have anything nice because I break nice things.
Navigation
Install the app
How to install the app on iOS
Follow along with the video below to see how to install our site as a web app on your home screen.
Note: This feature may not be available in some browsers.
More options
Style variation
You are using an out of date browser. It may not display this or other websites correctly.
You should upgrade or use an alternative browser.
You should upgrade or use an alternative browser.
Build Box Rocket 1995 FZJ80 Build
- Thread starter Box Rocket
- Start date
Member Builds and Stories
This site may earn a commission from merchant affiliate
links, including eBay, Amazon, Skimlinks, and others.
- Thread starter
- #962
I bought a used grill and modified it myself. I used a sheet of honeycomb mesh I found on Amazon and the TOYOTA badge for an FJ Cruiser. It takes a bit of work to get the grill cleaned up after cutting out the center, but it wasn't too bad. Mud guards are just some generic ones from a parts store. They're just screwed into the flares. Nothing fancy.Where did you get that grill? I like the mud guards you attached to the flares. I’d like to be able to have flares but I can’t have anything nice because I break nice things.
What did you line your tailgate with?Just realized I forgot to add a post to this thread about the Delta tailgate storage I added a few months ago. I ditched my DIY tailgate storage and replaced it with the relatively new offering from Delta. As you'd expect from Delta, it's a quality piece and very sturdy. I've had a few months now and it's been nice. I'm thinking I may add some carpet to the top surface. The bare aluminum can get a little hot out in the sun and can also be blinding if the sun reflects into your eyes. But other than that, very happy with it.
IMG_8302 by Adam Tolman, on Flickr
IMG_8303 by Adam Tolman, on Flickr
Just realized I forgot to add a post to this thread about the Delta tailgate storage I added a few months ago. I ditched my DIY tailgate storage and replaced it with the relatively new offering from Delta. As you'd expect from Delta, it's a quality piece and very sturdy. I've had a few months now and it's been nice. I'm thinking I may add some carpet to the top surface. The bare aluminum can get a little hot out in the sun and can also be blinding if the sun reflects into your eyes. But other than that, very happy with it.
IMG_8304 by Adam Tolman, on Flickr
IMG_8306 by Adam Tolman, on Flickr
IMG_8307 by Adam Tolman, on Flickr
IMG_8309 by Adam Tolman, on Flickr
IMG_8311 by Adam Tolman, on Flickr
IMG_8313 by Adam Tolman, on Flickr
IMG_8316 by Adam Tolman, on Flickr
IMG_8318 by Adam Tolman, on Flickr I’m
IMG_8304 by Adam Tolman, on Flickr
- Thread starter
- #964
Some Norco sound deadening, a layer of 1/4” closed cell foam, then some marine carpet.What did you line your tailgate with?
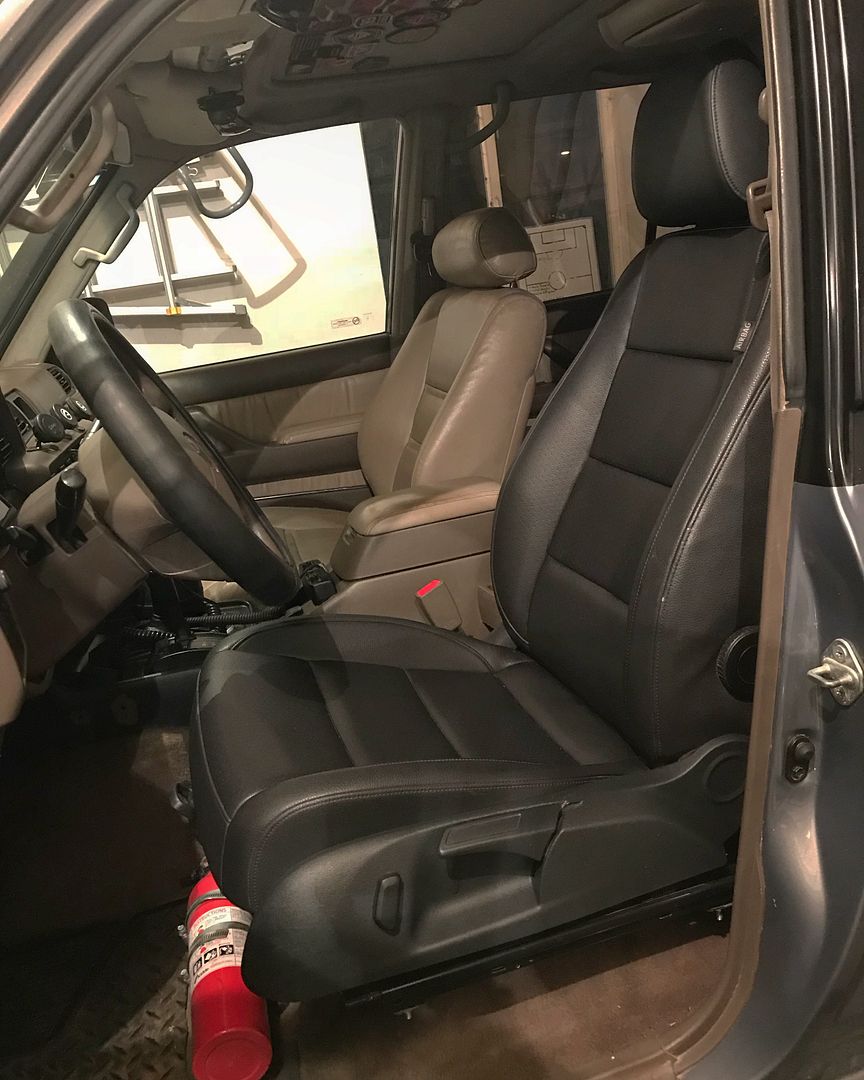
Hello! Apologies if this has been answered somewhere, but I can't find if it has.Halfway through a seat swap. I got a killer deal on these 2011 VW Jetta seats. Leather, heaters. They are a manual slide, but have power recline. The rails are quite a bit wider than the cruiser ones. I did a bit of light hammering to the ridge in the floorboard where the front mount is closest to the ebrake handle because of the rail width. Without a bit of clearancing to that ridge, they sit too close to the door and the door won't close correctly. Driver seat is done and installed. Need to do the passenger seat tonight.
I needed to fabricate new mounts for them, but that was pretty straight forward. I need to hook up the electricals still but drove it to work this morning and the comfort and seating position is so much better for me. The seat bottom is probably about 1" higher than the stock seat bottoms so it will raise the driving position slightly. These seats have a 'tilt' adjustment for the bottom so with that adjusted lower it doesn't feel like you're sitting any higher.


I just picked up some 2012 VW Golf seats that are basically the same as these. Did you ever get the wiring for the recline/heater to work, or have a diagram? I know on the drivers side it'll time out because of the CANBUS stuff, but you can make it work temporarily with a toggle switch.
Thanks
- Thread starter
- #966
I haven’t hooked up the heaters yet. I just ran a separate power lead to the recline switch. It’s all temporary until I actually take care of it correctly. I know someone that has a schematic for it. I’ll get a copy and try to share it.Hello! Apologies if this has been answered somewhere, but I can't find if it has.
I just picked up some 2012 VW Golf seats that are basically the same as these. Did you ever get the wiring for the recline/heater to work, or have a diagram? I know on the drivers side it'll time out because of the CANBUS stuff, but you can make it work temporarily with a toggle switch.
Thanks
It's all good, in the time between when I asked and now I actually figured it out, I bypassed the onboard box on the drivers side and just wired it directly to the heaters and recline so everything works, all without a timeout for CANBUSI haven’t hooked up the heaters yet. I just ran a separate power lead to the recline switch. It’s all temporary until I actually take care of it correctly. I know someone that has a schematic for it. I’ll get a copy and try to share it.
- Thread starter
- #968
Nice. Do you happen to have any pics of what you did? Sounds like a good solution.It's all good, in the time between when I asked and now I actually figured it out, I bypassed the onboard box on the drivers side and just wired it directly to the heaters and recline so everything works, all without a timeout for CANBUS
You got it, I basically just removed the whole box up top and just give 12v to the two left green wires (they merge into one) seen here from the switch for heat. If you want to bypass the box make sure to do it before the two little connectors on the right and the bottom. those are the ones that send the power to the heaters. I think on mine I just cut the green wire from where it connects on the control box and just ran it down to the power and ground for the rest.Nice. Do you happen to have any pics of what you did? Sounds like a good solution.
On the other side it's a lot more simple, it's just the thick Purple/Blue wire for heat, and there's nothing to change on that seat. For whatever reason the control box on the drivers side controls both it and the passenger side for heat. Just give 12v to the Purple/Brown there and it'll heat them up.
I removed most of the hardware on the passenger seat (occupancy sensor box, etc) and it left me with three wires on both seats for power, ground and heat.
The ground for the heaters is supplied by the ground for the seat, so all you have to worry about is power.

- Thread starter
- #971
Definitely time for an update, but not much to report in terms of changes. I replaced my power steering pump yesterday to complete the overhaul of all the steering components that I began a couple years ago. Otherwise, no changes to the truck. It is working great as is so I'm not really messing with it. I would like to replace the carpet this summer and do some better interior sound/heat insulation. Hopefully I can tackle that in the next couple months.Time for an update?
Any updated thoughts on the LED Co-Lights now that it's been a few years? Looking to replace my 9" Lightforce 240's and they have come up as a reasonable upgrade.
- Thread starter
- #973
They're still working great and I have no complaints. The 9" lasers are still pretty incredible if you need a light that throws a beam a looong way. They have updated this light since I got mine and the mid-range LED's in the light have a broader pattern which helps if they're they only lights you have. The spot beams on mine are pretty tight (which I like) but I like having the 4" lights on the roof to fill in all the area between the truck and where the lasers drop off.Any updated thoughts on the LED Co-Lights now that it's been a few years? Looking to replace my 9" Lightforce 240's and they have come up as a reasonable upgrade.
I don't know if I posted anything here but I also ended up getting some of their 6.5" Trailblazer lights for one of my son's trucks but I ran them on the cruiser for a bit (in place of the 9" lasers). I was really impressed with them but only had them on the truck for about a month. Since then they've been on the shelf while we're building my son's truck so I don't have actual long-term feedback on them yet.
They've proven to be good quality lights. No leaks, no fogging/condensation, no issues with any of the lights. So I'm pretty happy with them. And again, in case anyone wonders, I have no "sponsorship" from LED Colight, I've purchased all the lights at full retail.
Here's the size difference. This is the 9" lasers with the clear covers
 Untitled by Adam Tolman, on Flickr
This is the 6.5" Trailblazer. These do not have anywhere close to the distance of the 9" lasers but they are a decent mid-range light with a nice wide pattern and white or amber DRL if you don't need maximum distance from the lights
 by Adam Tolman, on Flickr
- Thread starter
- #974
I've posted most of this in the "what'd you do this weekend" thread but I'm adding it here for the record in the build progress.
First, I did a little cleanup and some minor modification to the rear bumper. Added a pocket step to the wings and changed the rear blinkers on the bumperto a simple LED strip then sprayed it with Raptor liner.
 Untitled by Adam Tolman, on Flickr
Wanted to try to get back to a true 37" tire and decided to give the Maxxis Razr's a try. They are roughly 1" taller than the Kenda 37's and measured out at 36.8". So far they've been good but only have about 400 miles on them. I've got a trip next week that will be several hundred miles offroad so that will be a good test to see how they perform. The Kenda MT's got moved to my son's minitruck.
 Untitled by Adam Tolman, on Flickr
 Untitled by Adam Tolman, on Flickr
 Untitled by Adam Tolman, on Flickr
 by Adam Tolman, on Flickr
 Untitled by Adam Tolman, on Flickr
First, I did a little cleanup and some minor modification to the rear bumper. Added a pocket step to the wings and changed the rear blinkers on the bumperto a simple LED strip then sprayed it with Raptor liner.
Untitled by Adam Tolman, on FlickrWanted to try to get back to a true 37" tire and decided to give the Maxxis Razr's a try. They are roughly 1" taller than the Kenda 37's and measured out at 36.8". So far they've been good but only have about 400 miles on them. I've got a trip next week that will be several hundred miles offroad so that will be a good test to see how they perform. The Kenda MT's got moved to my son's minitruck.
Untitled by Adam Tolman, on FlickrUntitled by Adam Tolman, on FlickrUntitled by Adam Tolman, on Flickr by Adam Tolman, on FlickrUntitled by Adam Tolman, on Flickr- Thread starter
- #975
The next big thing I tackled was trying to hide some of the failing clearcoat on the paint. Decided to do it with vinyl for now until I decide I'm ready to repaint the truck. I kept some of the Moonglow visible on the doors but added the white to the main problem areas and some black on the rear purely for the aesthetic.
 Untitled by Adam Tolman, on Flickr
 by Adam Tolman, on Flickr
Finally, the most recent addition was a Weboost cell booster. I've wanted to try one of these for a while so my trip next week will be a good test.
 by Adam Tolman, on Flickr
 by Adam Tolman, on Flickr
Untitled by Adam Tolman, on Flickr by Adam Tolman, on FlickrFinally, the most recent addition was a Weboost cell booster. I've wanted to try one of these for a while so my trip next week will be a good test.
by Adam Tolman, on Flickr by Adam Tolman, on Flickr- Thread starter
- #977
knifeless tape to remove the extra once applied to the truck. Otherwise just an exacto blade prior to application and cutting seams after application.How did you cut the vinyl?
I'm thinking about wrapping the 200 myself. Do you think your typical goon can handle a vinyl wrap job? Wouldn't need to be perfect, but not so awful that it would be obvious to anyone within 20 feet that an amateur did it.
- Thread starter
- #979
Definitely possible. I watched a lot of youtube videos to learn some tips and tricks. It helped a lot. It's very time consuming and with the 200 you will probably need to remove more things like door handles, lights, other trim etc. to get it right.I'm thinking about wrapping the 200 myself. Do you think your typical goon can handle a vinyl wrap job? Wouldn't need to be perfect, but not so awful that it would be obvious to anyone within 20 feet that an amateur did it.
JohnnyUtah2
SILVER Star
The vinyl wrap looks great! Would you mind sharing a little bit about your mud flaps? I’m thinking about doing something similar. Thanks!