
Is there a specific torque on the bearing lock nut upon installation?? Or is this a gudentite situation?
Navigation
Install the app
How to install the app on iOS
Follow along with the video below to see how to install our site as a web app on your home screen.
Note: This feature may not be available in some browsers.
More options
You are using an out of date browser. It may not display this or other websites correctly.
You should upgrade or use an alternative browser.
You should upgrade or use an alternative browser.
How-to: rear axle rebuild (7 Viewers)
- Thread starter CruiseOrlando
- Start date
This site may earn a commission from merchant affiliate
links, including eBay, Amazon, Skimlinks, and others.
More options
Who Replied?CruiseOrlando
Conveniently Enhanced
- Thread starter
- #42
As I said in the 2nd post:
"Put the lock plate in, and then spin the nut onto it. Once it gets seated, tap it until it's tight, then back it off again. There's (surprise!) a bit of controversy about the preload settings on this... however, you don't have many choices. Here, the phililps screw has to get into one of those four holes. I use a small tool and put it into the screwholes to find where the nut aligns."
So there is a preload on the bearings. But it's not specific, and is more of a procedure vs a specific setting.
indeed - the lock / SST nut is liklely to be either mondo / gorilla grip tight or a bit loose -
maybe you get lucky and are able to set the preload by hand (not tool) tightening firm and then slightly backing off just wee to screw in the phillips lock screw.....
i tried all four holes and nada - twas quite bit a slack - but ran it for a week - broke it down again (hell you dont even need to pull off the tires) and hadnt moved a bit.... havent given a thought since....lest you want to read my old post about not indexing the rear rotor properly and it making a super weird thumps at low speed....
bF
What's the service interval on these rear bearings?
What damn enginerd thought it would be a good idea to use a phillips head set screw?
So I have one that wont come out of each side, if I force it any harder I am going to strip it.
Any suggestions?
So I have one that wont come out of each side, if I force it any harder I am going to strip it.
Any suggestions?
Rivman1243
SILVER Star
A hand impact driverWhat damn enginerd thought it would be a good idea to use a phillips head set screw?
So I have one that wont come out of each side, if I force it any harder I am going to strip it.
Any suggestions?
A hand impact driver
Worked on one side, completely destroyed the other.
Now I can finish the side that came out
and I can get off the fence about what to do with the other
I still say, seriously, a fricken phillips head, cant think of a worse design option
quick somebody, make a replacement part with a torx, allen, square head, or 8mm
Rivman1243
SILVER Star
I have to remove them all the time on household trailers. Half of the time they strip out and the other half they break. We always replace them with torx.Worked on one side, completely destroyed the other.
Now I can finish the side that came out
and I can get off the fence about what to do with the other
I still say, seriously, a fricken phillips head, cant think of a worse design option
quick somebody, make a replacement part with a torx, allen, square head, or 8mm
Could it be that they're not Phillips head but JIS?
I have been corrected, the screw head is JIS
Looks like a phillips head to the eye but with slightly wider curved grooves
diabolically designed to think you have the right tool and assure destruction of the screw head to add hours of fun to you relatively easy project")
In spite of my sarcasm a more serious thank you to the board member who clarified for me, hope this helps somebody
Looks like a phillips head to the eye but with slightly wider curved grooves
diabolically designed to think you have the right tool and assure destruction of the screw head to add hours of fun to you relatively easy project
In spite of my sarcasm a more serious thank you to the board member who clarified for me, hope this helps somebody
Rivman1243
SILVER Star
Im still trying to find JIS screw drivers and bitsI have been corrected, the screw head is JIS
Looks like a phillips head to the eye but with slightly wider curved grooves
diabolically designed to think you have the right tool and assure destruction of the screw head to add hours of fun to you relatively easy project
In spite of my sarcasm a more serious thank you to the board member who clarified for me, hope this helps somebody
thatcabledude
GOLD Star
#3 Phillips bit fits it very well.
Fwiw. The #3 Mikita impact gold bit worked amazingly well on the pesky oil pump cover screws.
danadog
Storm Trooper
JIS screwdrivers and bits are available from McMaster Carr.
Hello Guys! I just did the rebuild and it went very smooth, thanks so much for the info.
I wanted to add something I could not find anywhere.
The reference number or the KOYO bearings for the rebuild, same as Toyota but not in Toyota box.
My car is a Toyota Land Cruiser 94 4.5. Full Float rear axel without locks.
Number are
KOYO JLM104948/10 70052 this is the big one, inner
KOYO Hi-Cap LM102949/10 I14 05 70054
One more thing about the Oil seal. At least in my side of the world (Colombia) this seal comes with a very hight lip on it. this lip goes outside, so after installing it the lip shoes, its a dust seal. just so you know.
Hope everyone has a good time doing this
RFB
97 FZJ80 LIFTED SC DUAL BATTERIES,37s
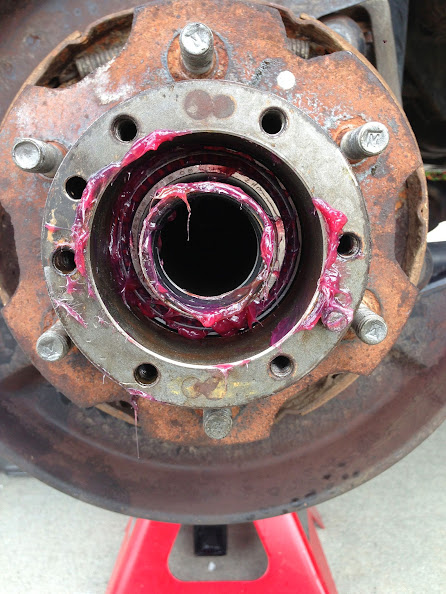
TO EASILY INSTALL THE NEW SEAL USE OLD RACE UPSIDE DOWN(NARROW EDGE DOWN) AND FLIP OVER RACE DRIVER TAPS IT RIGHT IT EVENLY AND FLUSHNow you can put the hub back on the spindle. You can also pack the outer bearing and push that into the hub as well.
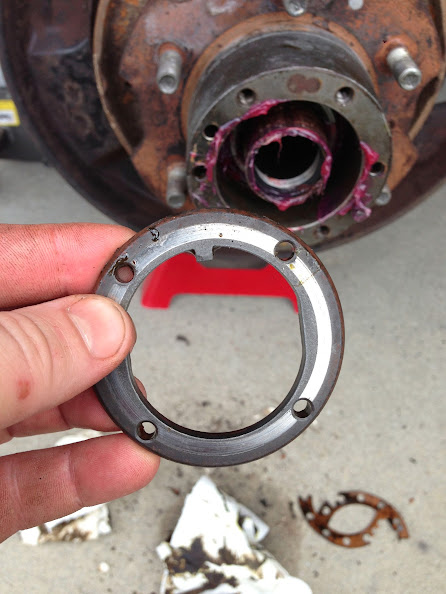
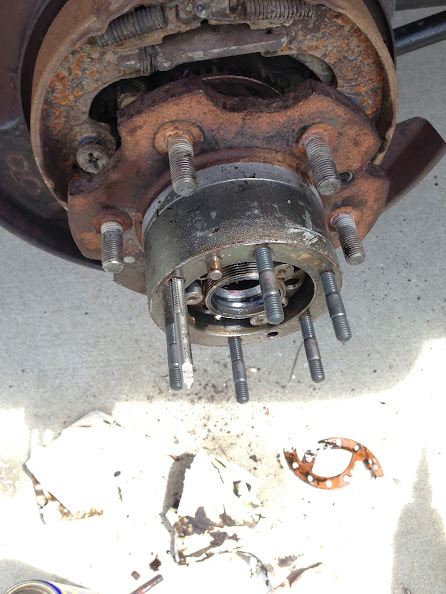
Note the plate lock nut has a tooth on it. This sits in the spindle groove at the 12 o'clock position. Note there are four holes in it as well - these are important. Note they are are around 2, 5, 7 and 10 o'clock positions.
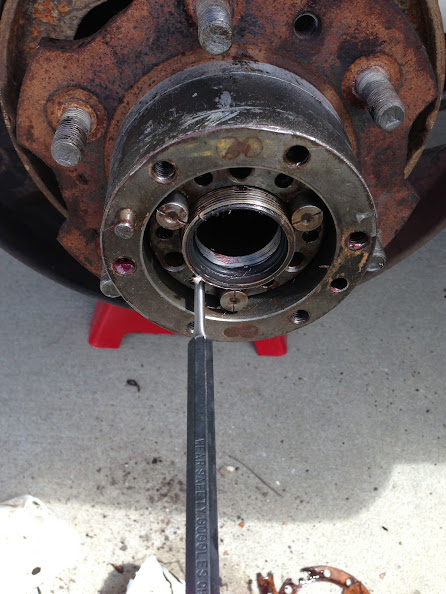
Put the lock plate in, and then spin the nut onto it. Once it gets seated, tap it until it's tight, then back it off again. There's (surprise!) a bit of controversy about the preload settings on this... however, you don't have many choices. Here, the phililps screw has to get into one of those four holes. I use a small tool and put it into the screwholes to find where the nut aligns.
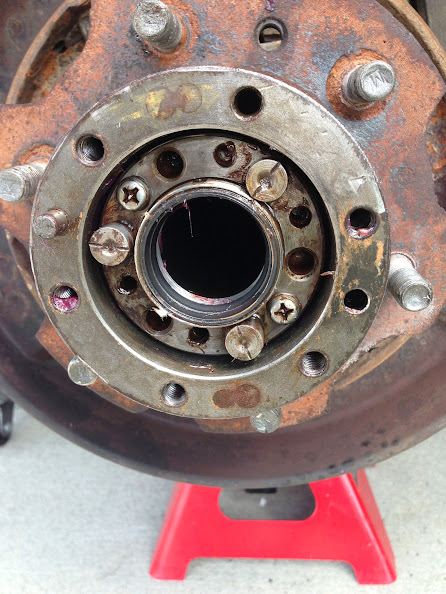
Then I set the nut to the highest preload I can without going crazy, then backing it off to the next available screw slot. You'll know if you got it wrong because the philips screw won't go all the way in - they need to seat into the lock plate.
If you need to put in new studs, now's the time! Please use a tap and re-tap the holes to clean out the junk that's probably in there.
To actually seat the studs, I use the double-nut method. Put two nuts together, then turn until the stud seats. Use locktite if it makes you feel better.
Put the cone washers back in, put your washers on top of that, and torque the nuts down per FSM (26 ft-lbs). Put your disc brake hub back on, and properly tighten those bolts. Then it's back on with the tire... rinse, lather and repeat for the other side!

Using the old race work great to install the new seal. It fits over the rubber seal that would otherwise be damaged and protrudes above the seal enough to use a race driver to tap in the new seal.
Just to post an example of what not to do with the rear axle spindle seal I'll post up some photos. Thanks to @mryanangel and his advice from a question in @clownmidget's thread on the rear axle rebuild also found in the FAQ, I corrected my mistake.
Here are the photos:
This seal I suspect is placed too deep in the spindle. It may have worked but when measuring its depth in relation to the axle it looked like the seal was just inside the distal portion of the axle where it widens out and I assume is there to create the better seal.

Here is a photo of the axle that shows the widened area that compresses the seal and the proper depth of the seal flush with the end of the spindle. Thankfully it isn't too costly a mistake but one easily avoided if you know what not to do.
Just to post an example of what not to do with the rear axle spindle seal I'll post up some photos. Thanks to @mryanangel and his advice from a question in @clownmidget's thread on the rear axle rebuild also found in the FAQ, I corrected my mistake.
Wow 13+ year resurrection.
The rear axle seals should sit flush with the outer edge of the axle tube....dont go jamming them down into the tube.
Here are the photos:
This seal I suspect is placed too deep in the spindle. It may have worked but when measuring its depth in relation to the axle it looked like the seal was just inside the distal portion of the axle where it widens out and I assume is there to create the better seal.
Here is a photo of the axle that shows the widened area that compresses the seal and the proper depth of the seal flush with the end of the spindle. Thankfully it isn't too costly a mistake but one easily avoided if you know what not to do
.
Hello All,
I got distracted and forgot to lock the rear diff. Anyways I realized this when I pulled the driver side rear axle out. Both tires were in the ground when I did this, passenger axle was still bolted in place at the time.
I had to use two bolts to get the axle out from the hub, slowly turning each one through the threaded holes on the outer plate. I was able to get the axle in again to about 1" by hand. To make sure I pulled it out again very slowly and slid it back in easily to the same depth about and 1" away from the hub. Then I used the nuts with the washer minus the coes to put it back in all the way. Then I slowly drove it 20 ft forward and backward. Seems ok. Im assuming I would not be able to get it back in easy if the fork was in the way.
Please confirm if my logic here is correct.
thanks so much!
Ray
Tigerstripe40
SILVER Star
I got a 91 HDJ-81 rear full floater.
I guess those cross point JIS screws as the locking mechanism are normal. I suppose that if these are properly maintained, they are never a problem. But in my case they were SEVERELY over-tightened. I got on them with my JIS Impacta screwdriver and can't get them to budge. Next step an impact driver?
Also, is there room in there to use the hex nut and star washer like on the front end? Seems to me that would be a better solution...
lp2k
Had a couple of drinks.. saw a couple of things
. I got on them with my JIS Impacta screwdriver and can't get them to budge. Next step an impact driver?
Also, is there room in there to use the hex nut and star washer like on the front end? Seems to me that would be a better solution...
Yes I’d try and impact driver and soak with free all
No there isn’t room, you need either the special tool or go to wits end and get their modified 54mm nut tool which has the cuts to fit the rear locking mechanism
Similar threads
Users who are viewing this thread
Total: 8 (members: 0, guests: 8)