Thank You Toyota! ...Fuel Pump Replacement.

This site may earn a commission from merchant affiliate
links, including eBay, Amazon, Skimlinks, and others.

Thanks for great post. Just out of curiosity was the "whining" noise you described obvious? Was the sound coming from area of the part you replaced? Were there any other symptoms of failing pump? Thanks
Yes the whining was quite obvious. Will post pics and more information later. New pump is absolutely silent.
 
What is this "CBT" everyone talks about?
That was a drop in direct replacement right? None of that take yours apart and replace the bad parts stuff right?
 
What is this "CBT" everyone talks about?
That was a drop in direct replacement right? None of that take yours apart and replace the bad parts stuff right?
CBT = Camelback Toyota. @murf is the parts & service manager. He is a great guy, runs the best service department most people have ever been to, and he owns a couple of Cruisers. He treats us well. Contact him for parts and/or service.
 
What is this "CBT" everyone talks about?
That was a drop in direct replacement right? None of that take yours apart and replace the bad parts stuff right?

Yep @brices123 knows what's up. Sorry for not clarifying. That's what made it so much harder to swallow this repair.

I didn't get to see them do it but looked like unplug and remove the pump from the assembly and replace with new. Looked to me like removing the 2nd row seat would have been the most difficult part.
 
Fuel pump started 'whining' last week, so its time to pluck the original out and replace it.

Unlike the Starter on my LX470....the fuel pump is actually easy to replace.

You do NOT have to drop the fuel tank in order to do this repair.

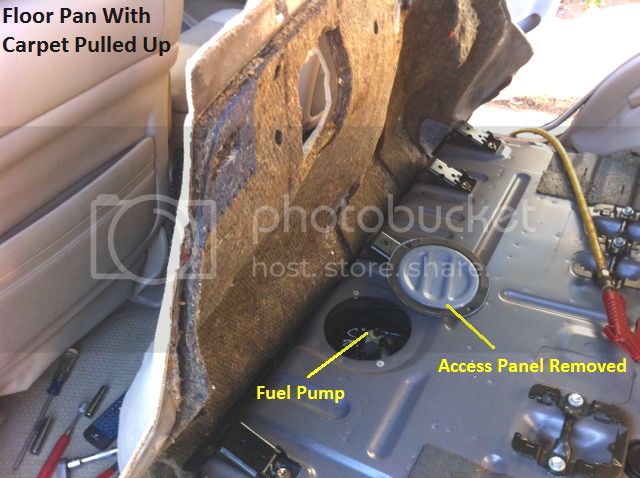
Most folks know there is an 'access panel' under the drivers side 2nd row seat, but I don't know if anyone has actually posted pics or not....so here you go.

You will need to remove both seats in order to get the carpet to lay back far enough to get to the access panel.

LX470%20fuel%20pump1_zps2gh1rjzq.jpg


The panel is held in place by two stainless steel phillips head screws. Remove those and lift the panel straight up to expose the top of the fuel tank.

LX470%20fuel%20pump2_zpseubya5cv.jpg


This will give you easy access to the fuel pump. It will take you longer to take out the seats and roll back the carpet than to replace the pump. Beats the heck out of dropping the fuel tank.

LX470%20fuel%20pump3_zpsuovkgdb9.jpg

Thanks! How many miles did you get out of your original pump?
 
Yep @brices123 knows what's up. Sorry for not clarifying. That's what made it so much harder to swallow this repair.

I didn't get to see them do it but looked like unplug and remove the pump from the assembly and replace with new. Looked to me like removing the 2nd row seat would have been the most difficult part.

Yes, its an easy task to perform (replacing the pump on the assembly that also has your sending unit attached). I have some picsl loaded to my computer, will upload them to photobucket the next day or so. I can do a remedial write up on it here.

Just got some more important things going on right now.
 
CBT best Toyota prices on Mud

No need to bother that MURF guy:rolleyes: if you need just parts order link below

Toyota Parts - Camelback Toyota Parts - Genuine OEM Parts - Free Shipping

CBT pump price $276.94 Best prices, free shipping, and they take PayPal Trifecta :clap:

Funny I had looked that up when I was at the dealer and told him what I could have paid. He just raised his eyebrows, and said "wow". Gee thanks. Ok I need to let it go, or get counseling. I'll bring it to @murf to troubleshoot my P0430 code to make me feel better.
 
OK………..just a quick write up with some pics to aid. This is NOT a ‘step by step’ tutorial, but touches on the main things you’ll need to know in order to replace your fuel pump. It’s really quite simple and once you have the pump/sending unit in hand…it will be readily apparent what goes where. So don’t be afraid.

I won’t go into ‘when’ or ‘if’ you need to replace your pump, too many variables. Mine was making a constant whining sound and I’ve been around long enough to know what happens next. So….I decided to replace mine. BUT….be sure to check your external fuel filter first. If it hasn’t been changed in a long time or you suspect you’ve had a fuel contamination event, I would replace it first.

A fuel pump will fail for several reasons:

1. It has repeatedly gotten hot and now is damaged.

2. It has simply run its course (all electric motors give up eventually).

3. It is straining against a compromised filter, obstruction or pinched fuel line.

My fuel filter apparently was never changed by the previous owner. I have no doubt it is the reason I had to replace the fuel pump.

FF2_zpsbbjlt3rx.jpg


FF3_zpssuhxlier.jpg


Continued next post:
 
The appearance of my Fuel Pump, suggests it was probably the original one. Years of less than clean fuel left its mark on the outside of the pump and filter sock. You can imagine the inside of pump suffered as well. Yes, the filter keeps large particulates out…but it doesn’t stop water or any other liquid contaminate.

FP0_zpsfnii41jb.jpg


Anyway, you’ve decided to change your Fuel Pump….so what do you need? If your sending unit is working then all you will need is a F/P kit (pump and filter sock). It will come with extra seals that you will not use. The pump is used in a variety of vehicles. I’ll recommend the Denso Fuel Pump but other decent pumps are available.

FP1a_zpsaj8k32s2.jpg


Once installed on the assembly, it will look like this:


FP2a_zps60r4yyzj.jpg


Continued next post:
 
At the beginning of this thread…you’ll find pics of the access panel you can use to easily get to the fuel pump (VS. dropping the tank). So that part we know. Now let’s take a look at how to remove the fuel pump assembly and how to disconnect the lines (if yours in not exactly like mine, it will be similar).

I encountered three connections that would need to be removed in order to extract the FP assembly from the tank:

FP3a_zpsfohvwryj.jpg


Two of them are held in place with plastic ‘clips’ the other is a conventional connector with a detent style lock.

Be careful when removing the plastic clips. Be gentle with them….because your fuel pump kit does NOT supply new ones. Mine were not brittle, but yours might be.

FP5a_zps9mupraxe.jpg


Once the clips have been removed, you simply lift straight up on the fuel lines to disengage them.

The wire harness connector (on mine) has two features. First you pry up the hinged cover (presumably supplied to allow back probing of the wires), then you depress the detent lock (not down but straight toward the opposite side) and lift up on the connector ( I used a small screwdriver underneath the base of it).

FP4a_zpsxdy8s5uo.jpg


Continued next post:
 
Last edited:
Now that you have the lines disconnected, it is time to remove the 8 screws that hold the retaining ring in place. The ring not only holds the fuel pump in an oriented position, but also compresses the tank seal (a large O-ring) that resides underneath it. Remove it and set it aside.
FP6a_zpspojjcawd.jpg


Before going any further, take a minute to ‘mark’ the fuel pump manifold. This will let you re-orient it when you reinstall it. If it is not in this position….the sending unit swing arm will either be outside the baffle in the tank or will bind against it. Sounds complicated…it isn’t. Just mark it and match your lines when you reinstall it.

FP7a_zpspiyocf09.jpg


Now for the SAFETY part:

Once you lift the pump assembly out of the tank, you have about a 5” hole exposing whatever fuel (or vapors) is in your tank. You need to cover this immediately with a damp rag and place something on the rag to hold it in place.

FP8a_zps43rudien.jpg


THIS IS NO TIME….to have anything nearby that produces (or can produce) a flame, spark or static electricity!

Continued next post:
 
Last edited:
I used a portable fan situated about 10 feet away to blow air through the vehicle as I worked on it. I had both rear doors and the rear hatch open for ventilation.

Be certain that anyone else around…understands the danger involved and that no one can walk up unexpectedly while you are working on the vehicle at this stage.

Reassembly is of course the reverse of what we have just discussed.

Hope this helps,

Flint.
 
Very cool. After my recent debacle in the Needles and parts south, I am motivated to follow your excellent write up and do this.
Thanks for the motivation and pics. You are one of the reasons we all frequent this forum.
 
How do you keep fuel from coming out of lines when disconnected from pump ?
 
How do you keep fuel from coming out of lines when disconnected from pump ?

The lines are above the fuel level....so it can't/won't siphon. And since we have the PUMP disconnected....fuel is not being transferred anywhere. Follow?
 
When I disconnect one of them it spews fuel.

I quickly replaced line not knowing how long the fuel would be spewing.
 
When I disconnect one of them it spews fuel.

I quickly replaced line not knowing how long the fuel would be spewing.

You had residual pressure in the line if you didn't bleed it off before beginning. And we will assume you have disconnected the battery so no power can be sent to the pump?

Once the pressure in the system is relieved no more fuel will come out (unless you drop one of the lines below the level of the fuel in the tank).
 
Back
Top Bottom