
While I still think you can never have too much power, it would seem my rear axle studs and dowels do not agree. While loose wheel bearings are a common cause for such breakages, as it was for me the first time it happened, the other times the bearings have been perfect yet the locating pins end up getting pulverised.
The first time I became aware of the issue was after noticing 2 of the 6 studs had snapped just after a tricky section of off road track. Hopeful of making it just a few kilometers back to camp for a repair resulted in spitting the axle clean out whilst traversing a rocky area. Once home and with things apart, the loose wheel bearings were the most obvious cause. Still, I thought there must be a stronger option for the pins and studs. So after some research, I drilled 2 extra 7mm dia dowels and fitted 6, grade 12.9, 8mm x 40mm x 1.25 socket head cap screws (SHCS). And for the best part of a year, all went well.
But over the last 6 months I noticed a couple of axle dowel pins walking out after a bit of driving (on and off road) so I'd tap them back in with a hammer and check the SHCS's for tension. Often they'd be loose but the bearings were always tight when checked soon after. Just recently I pulled the rear axles to check the bearings and take a closer look. That's when I noticed on one axles 2 dowels had snapped and one SHCS was slightly deformed. One the other axle, 3 dowels were stuffed and 2 SHCS were bent. With not enough time for a proper repair I replaced the bent SHCS and only one of the 4 damaged studs, leaving me with 2 pins in one and one in the other. Where the pins had snapped had also deformed the top edge of the hub they seated in so I knew it was far from ideal but it'd have to do for the time being and I'd just take it gently... or so I told myself")
As an aside, at Xmas I had a Detroit locker fitted in the rear to replace the ARB. I should point out that while I love the Detroit infinity times more than the ARB and I highly recommend them, it would be remiss of me to not admit the Detroit does place added strain on the axles. In normal situations / otherwise standard vehicles, I highly doubt it's an issue to even consider, but when you up the power and torque like I have, and use it, otherwise non issues can become real ones. However, I've come to accept that with great power comes great responsibility in beefing up everything it breaks in its wake
So last weekend after a great trip away (new MTZ's killed it everywhere I went) I was airing up and noticed some oil spatter on the DS rear wheel. Closer inspection revealed 3 loose SHCS. I managed to tighten 3 of them, snapped the head off one as soon as I touched it and the other two felt too dodgy to tighten, so I slowly backed away from the mess and drove home. Once home it was time for a strip down and a good look at WTF was going on and how to fix it.
Removing the SHCS from the already damaged drivers side resulted in another 2 snapping after a few back out turns. The other three came out ok but were noticeably bent. The two dowel pins were fragmented beyond recognition. Removing even standard snapped off studs from these hubs is a right PITA and the dowel pins are even worse being hardened steel. So this sucker is heading straight for the bin. You can also see the deformation on the hub face caused by the dowel pins being overloaded. Some serious force has occurred to do that sort of damage.

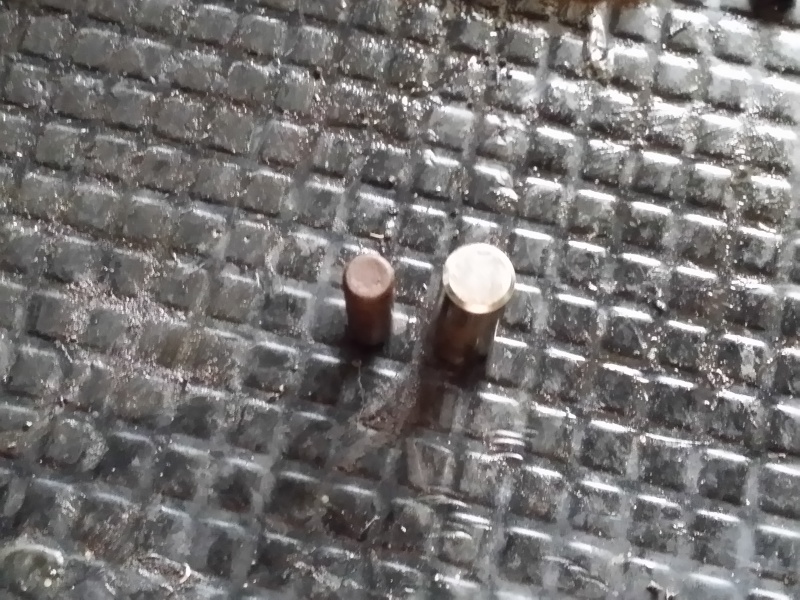
Remnants of a dowel pin. One of eight :roll:

The original (285,000km) axles splines and shaft are in perfect condition, especially considering the punishment they have copped over the years. It's testament to Mr Toyota making a damn good product. But the same can't be said for the axle mounting flange. years of beating on it to loosen the cone washers (I know it's not the right way but it's easier sometimes ) and general wear and tear have taken their toll. They'll be kept as spares now...

After speaking with my diff repair guy for a while, he was adamant that despite all the 6 studs holding the axle in, much of the driven load goes through those two 7mm dowel pins in each axle. He's repaired enough of them to know. But first things first was to check the housing for straightness. I did this by bolting on a bare rim to each hub and placed a mark on the lip. Setting both marks plumb I took a overall measurement. I then rotated each mark 90deg and took the relevant measurements. There was barely half a mm in them and with a tolerance of 2-3mm, it was as good as straight. So on with the next step.
The plan was to drill and tap the existing 6 threaded holes and fit the 10mm studs used in the 100s.

This is the 10mm and 8mm cone washers side by side. It might only be 2mm bigger internally, but there's a s*** load more meat on the bigger 10mm cone washer. And that creates a problem...

Here's the 10mm cone washer in position. If I were to have the axle recesses machined to suit the bigger cone washer, It'd virtually blow out the edge of the axle flange in the process. Toyota solved this on the 100s by using a slightly bigger hub and matching axle flange.

So, what I plan to do is this; The 100s also use 2x 10mm axle dowels instead of the 2 x 7mm pins used on the 80s. Just like I did in the original axles, I'm going to fit 4 new axle dowel pins but use the 100s 10mm pins. At 30% bigger and double the quantity, I'm hedging my bets these pins won't be breaking any time soon.

7mm dowel pin hole to left of 10mm pin shown


I'm also going to stick with the SHCS, for no other reason than they're so much stronger than the standard studs, and they make axle removal so much easier since no hammering is required to remove the cone washers. I also have a little experiment I want to try that might go some way to adding further strength to the whole show. Shown is a 40mm and 50mm SHCS. Regardless of the length, they all have 30mm of thread which is perfect as the hub has a thread depth of 30mm (once you clean them out all the way to the bottom using a bottoming tap)

This is a mock up of how the 40mm SHCS protrudes through the axle flange once the cone washer and spring washer are fitted. While there is a good 27mm of thread to get deep into the hub, the threaded section is also right at the transition point of where all the rotational / shear load is. In my non engineering mind, this also creates a weak point for the bolt since the thinnest part is prone to the most shear force.

So my solution to this is I'm considering the following...
This is a 50mm SHCS in place with a cone and spring washer fitted. Same thread length but longer shoulder. After a bit of measuring, I'm thinking drilling the top 7-8mm of the hub so the last bit of the shoulder seats below the hub surface to offer more strength against shear loads. I'll have to cut about 7-8mm of the end of the thread so it winds into the hub fully, still leaving me with more than enough thread depth for a secure purchase. I'll be testing in the old hub to make sure I can get a firm fit in all 6 studs without any binding, along with the very tight fit I need for the 4x 10mm dowel pins.

In the meantime, my new / 2nd hand hubs and axles turned up today. I'll keep you posted on how things work out. :? :mrgreen: :arrow:

The first time I became aware of the issue was after noticing 2 of the 6 studs had snapped just after a tricky section of off road track. Hopeful of making it just a few kilometers back to camp for a repair resulted in spitting the axle clean out whilst traversing a rocky area. Once home and with things apart, the loose wheel bearings were the most obvious cause. Still, I thought there must be a stronger option for the pins and studs. So after some research, I drilled 2 extra 7mm dia dowels and fitted 6, grade 12.9, 8mm x 40mm x 1.25 socket head cap screws (SHCS). And for the best part of a year, all went well.
But over the last 6 months I noticed a couple of axle dowel pins walking out after a bit of driving (on and off road) so I'd tap them back in with a hammer and check the SHCS's for tension. Often they'd be loose but the bearings were always tight when checked soon after. Just recently I pulled the rear axles to check the bearings and take a closer look. That's when I noticed on one axles 2 dowels had snapped and one SHCS was slightly deformed. One the other axle, 3 dowels were stuffed and 2 SHCS were bent. With not enough time for a proper repair I replaced the bent SHCS and only one of the 4 damaged studs, leaving me with 2 pins in one and one in the other. Where the pins had snapped had also deformed the top edge of the hub they seated in so I knew it was far from ideal but it'd have to do for the time being and I'd just take it gently... or so I told myself
As an aside, at Xmas I had a Detroit locker fitted in the rear to replace the ARB. I should point out that while I love the Detroit infinity times more than the ARB and I highly recommend them, it would be remiss of me to not admit the Detroit does place added strain on the axles. In normal situations / otherwise standard vehicles, I highly doubt it's an issue to even consider, but when you up the power and torque like I have, and use it, otherwise non issues can become real ones. However, I've come to accept that with great power comes great responsibility in beefing up everything it breaks in its wake
So last weekend after a great trip away (new MTZ's killed it everywhere I went) I was airing up and noticed some oil spatter on the DS rear wheel. Closer inspection revealed 3 loose SHCS. I managed to tighten 3 of them, snapped the head off one as soon as I touched it and the other two felt too dodgy to tighten, so I slowly backed away from the mess and drove home. Once home it was time for a strip down and a good look at WTF was going on and how to fix it.
Removing the SHCS from the already damaged drivers side resulted in another 2 snapping after a few back out turns. The other three came out ok but were noticeably bent. The two dowel pins were fragmented beyond recognition. Removing even standard snapped off studs from these hubs is a right PITA and the dowel pins are even worse being hardened steel. So this sucker is heading straight for the bin. You can also see the deformation on the hub face caused by the dowel pins being overloaded. Some serious force has occurred to do that sort of damage.
Remnants of a dowel pin. One of eight :roll:
The original (285,000km) axles splines and shaft are in perfect condition, especially considering the punishment they have copped over the years. It's testament to Mr Toyota making a damn good product. But the same can't be said for the axle mounting flange. years of beating on it to loosen the cone washers (I know it's not the right way but it's easier sometimes ) and general wear and tear have taken their toll. They'll be kept as spares now...
After speaking with my diff repair guy for a while, he was adamant that despite all the 6 studs holding the axle in, much of the driven load goes through those two 7mm dowel pins in each axle. He's repaired enough of them to know. But first things first was to check the housing for straightness. I did this by bolting on a bare rim to each hub and placed a mark on the lip. Setting both marks plumb I took a overall measurement. I then rotated each mark 90deg and took the relevant measurements. There was barely half a mm in them and with a tolerance of 2-3mm, it was as good as straight. So on with the next step.
The plan was to drill and tap the existing 6 threaded holes and fit the 10mm studs used in the 100s.
This is the 10mm and 8mm cone washers side by side. It might only be 2mm bigger internally, but there's a s*** load more meat on the bigger 10mm cone washer. And that creates a problem...
Here's the 10mm cone washer in position. If I were to have the axle recesses machined to suit the bigger cone washer, It'd virtually blow out the edge of the axle flange in the process. Toyota solved this on the 100s by using a slightly bigger hub and matching axle flange.
So, what I plan to do is this; The 100s also use 2x 10mm axle dowels instead of the 2 x 7mm pins used on the 80s. Just like I did in the original axles, I'm going to fit 4 new axle dowel pins but use the 100s 10mm pins. At 30% bigger and double the quantity, I'm hedging my bets these pins won't be breaking any time soon.
7mm dowel pin hole to left of 10mm pin shown
I'm also going to stick with the SHCS, for no other reason than they're so much stronger than the standard studs, and they make axle removal so much easier since no hammering is required to remove the cone washers. I also have a little experiment I want to try that might go some way to adding further strength to the whole show. Shown is a 40mm and 50mm SHCS. Regardless of the length, they all have 30mm of thread which is perfect as the hub has a thread depth of 30mm (once you clean them out all the way to the bottom using a bottoming tap)
This is a mock up of how the 40mm SHCS protrudes through the axle flange once the cone washer and spring washer are fitted. While there is a good 27mm of thread to get deep into the hub, the threaded section is also right at the transition point of where all the rotational / shear load is. In my non engineering mind, this also creates a weak point for the bolt since the thinnest part is prone to the most shear force.
So my solution to this is I'm considering the following...
This is a 50mm SHCS in place with a cone and spring washer fitted. Same thread length but longer shoulder. After a bit of measuring, I'm thinking drilling the top 7-8mm of the hub so the last bit of the shoulder seats below the hub surface to offer more strength against shear loads. I'll have to cut about 7-8mm of the end of the thread so it winds into the hub fully, still leaving me with more than enough thread depth for a secure purchase. I'll be testing in the old hub to make sure I can get a firm fit in all 6 studs without any binding, along with the very tight fit I need for the 4x 10mm dowel pins.
In the meantime, my new / 2nd hand hubs and axles turned up today. I'll keep you posted on how things work out. :? :mrgreen: :arrow:


 . Such is life
