
Navigation
Install the app
How to install the app on iOS
Follow along with the video below to see how to install our site as a web app on your home screen.
Note: This feature may not be available in some browsers.
More options
Style variation
You are using an out of date browser. It may not display this or other websites correctly.
You should upgrade or use an alternative browser.
You should upgrade or use an alternative browser.
HDJ100 - Body off renovation, now with a hot dip galvanised frame *Picture Heavy*
- Thread starter Moridinbg
- Start date
This site may earn a commission from merchant affiliate
links, including eBay, Amazon, Skimlinks, and others.
Big progress on a big project.
What do you feel you will have in this job time and $ by the end?
What do you feel you will have in this job time and $ by the end?
- Thread starter
- #64
I did some calculations a few days ago. I have a spritmonitor account that tracks all expanses on the car - Diesel consumption: 15,99 l/100km - Toyota, Landcruiser, HDJ100 - https://www.spritmonitor.de/en/detail/1014823.htmlBig progress on a big project.
What do you feel you will have in this job time and $ by the end?
The average diesel consumption calculated is heavily offset by lots of offroad

Here is an excerpt of the body off and galvanisation part of the project. Prices are in BGN. Currently 1BGN = 0.63 USD.
I do not pay for most of the labour obviously, but the going rate at the reputable aftermarket Toyota shop here is 35BGN/hour and they estimate that they can do this in about 350 billed hours.
Parts are all OEM, via Amayama.
The above list does not include work on the engine, as I am still waiting on a few invoices for this. Diesel pump & turbo reman + labour will probably be around 7-8k BGN. Labour for removing the body and putting it back is 2500 BGN. Also some 200-300BGN more for petrol driving around for things related to the project.
All in all, the entire galvanisation thing with all additional work - exhaust, intercooler, turbo upgrade, engine overhaul - will cost me about 22 000BGN - ~14 000USD at the going rate.
I have photos from 57 days of work, but I did not take photos every day, so it is more like 65-70 days - 500-550 man hours. My father helped me 15-20 days, some 100-150 man hours more.
And finally, the first bits of work in the new year - I waxed the chassis, again with Dinitrol 4941. Now it's a stealth galv. Probably it will get scraped from the bottom of the rails pretty quickly, but I was mostly interested in covering the top, towards the body, where the unwashable mud gets trapped. Galvanisation corrodes too sooner or later.
very cool and challenging project
- Thread starter
- #66
So I have made pretty much no progress... After lots of delays I got my turbo back from Wink4x4. Very, very poor communication through the whole 2 month ordeal.
Turbo is not spinning smoothly at all and is grinding somewhere
I sent him the video, supposedly it's normal and he has disassembled it twice. Wtf?! Stopped answering mails.
I sent the turbo to a local specialist immediately and they were horrified by the supposed "repairs". Apparently the backing plate between the compressor wheel and housing is bent with a hammer which is why it's grinding.
The VNT, which I specifically asked Remy about, is very badly worn. The local turbo shop actually told me that if they are unable to source a new VNT part they will not work on the turbo at all. So I am waiting on that now.
I went with Remy from Wink4x4 in the first place, because he was recommended on a lot of places and initial communication was pretty good. Local turbo shops are usually horrible and I wanted to avoid a stupid situation precisely like this... The bill was €1066.
The pump and injectors got stuck at export from the UK. Apparently it was considered heavy, they put it in a container to determine what to do and it hasn't appeared in the system ever since.... £2224 there.
I am very nervous.
The only thing I did since last time was to fit a pair of Kings KTRS-79 springs, as my AHC springs were very worn.
news good to learn on WHO ,and WHAT they really do .
i have a CT26 , that is tired , and sooner or later needs some care .
very difficult to find a reliable workshop.
that can work , solve ,and has all tools to adjust a turbo .
as you certainly know , it is not just spare parts that you need , but also a balancing device .
rotor spins at 180/200.000 rpm.
BTW , toyota does NOT supply oem parts for the turbo.
Morid,
Sorry to read that
Have you checked the kinugawa or mambatek turbo offerings on ebay ? They are very competitively priced and offer a number of updates for landcruisers.
I am not affiliated but it seems that the feedback form the toyota supra drift brigade is positive.
They come fully balanced etc.
Sorry to read that
Have you checked the kinugawa or mambatek turbo offerings on ebay ? They are very competitively priced and offer a number of updates for landcruisers.
I am not affiliated but it seems that the feedback form the toyota supra drift brigade is positive.
They come fully balanced etc.
On the Diesel side of the forum, there are also plenty of positive for Gturbo in australia they do kits with ecu.

 www.gturbo.com.au
Toyota Landcruiser HD-G300 Grunter Extreme (Green Wheel Vortex II) - GTurbo
Toyota 100 series 1HD-FTE, 1HD-FT, 1HD-T compatible Gasket Kit Included
- Thread starter
- #70
I finally made some progress! The turbo shop were unable to find nozzle ring for the VNT from their channels. The GT2359V turbo is used in lots of Mercedes from the same years (C220, etc) and some M57 BMWs, but they use a much shorter vanes - 6-7mm, compared to the 9.5mm used on the HDJ100. Compressor wheel is different too. The turbo is often referenced as GTA2359LV in Land Cruiser context. The 9.5mm vanes are practically non-existent. I predict that there will be a great shortage in the coming years, as more cars start hitting the 400k km mark in Europe and start needing turbo repairs. A few nozzle rings are available on Aliexpress of all places, for around ~$50. I finally found a set sold via Midland Turbos in the UK (they had it in stock on their ebay page, but not on the website). It has some resemblance to the Aliexpress sets, but I hope theirs is a better product.

This is the wear on mine. The ring eats through the paddles that rotate the nozzles. As wear progresses, some nozzles stick, some do not move at all any more and boost starts going all over the place. This triggers a vague CEL code along the lines of "Turbo system assembly malfunction" (sorry do not remember the number). Turning the car off and back on resets the nozzles and temporary clears the CEL.

So now the turbo is back with the shop and hopefully they will have it repaired next week.
I got the pump and injectors from the UK. They look like brand new! Great job by Shaun at Shaun Arkinstall Fuel Injection Services - http://diesel-injection-services.co.uk/public/Shaun_Arkinstall_Fuel_Injection_Services.html !! I highly recommend that place. They were super helpful, kept me up to date with progress and issues and presented me with different options along the way. They gave me a bit of a high price for the SCV valve, that is usually the fail point and most common wear item on the pump ~£400. If you shop around you could find it for ~£200. Rest of the prices are UK normal. Service is top notch.

Immediately sent it over to the engine overhaul guys here. They did spectacular work too. Everything was cleaned and washed. Block and head painted. All bolts and brackets were electroplated. The big pieces like manifolds were water blasted. With minor exceptions it looks like brand new!


This is one of the original engine mounts after 400k km and 16 years. 41mm vs 46mm for the brand new one. Spectacularly well preserved for such a heavy engine. The FTE is about 150kg heavier than the 2UZ from the top of my had. The brackets were electroplated with the rest of the engine, but I am replacing them with new.

I put it on the chassis so that it will be easier to store and transport to my mechanic, who is putting everything back together.
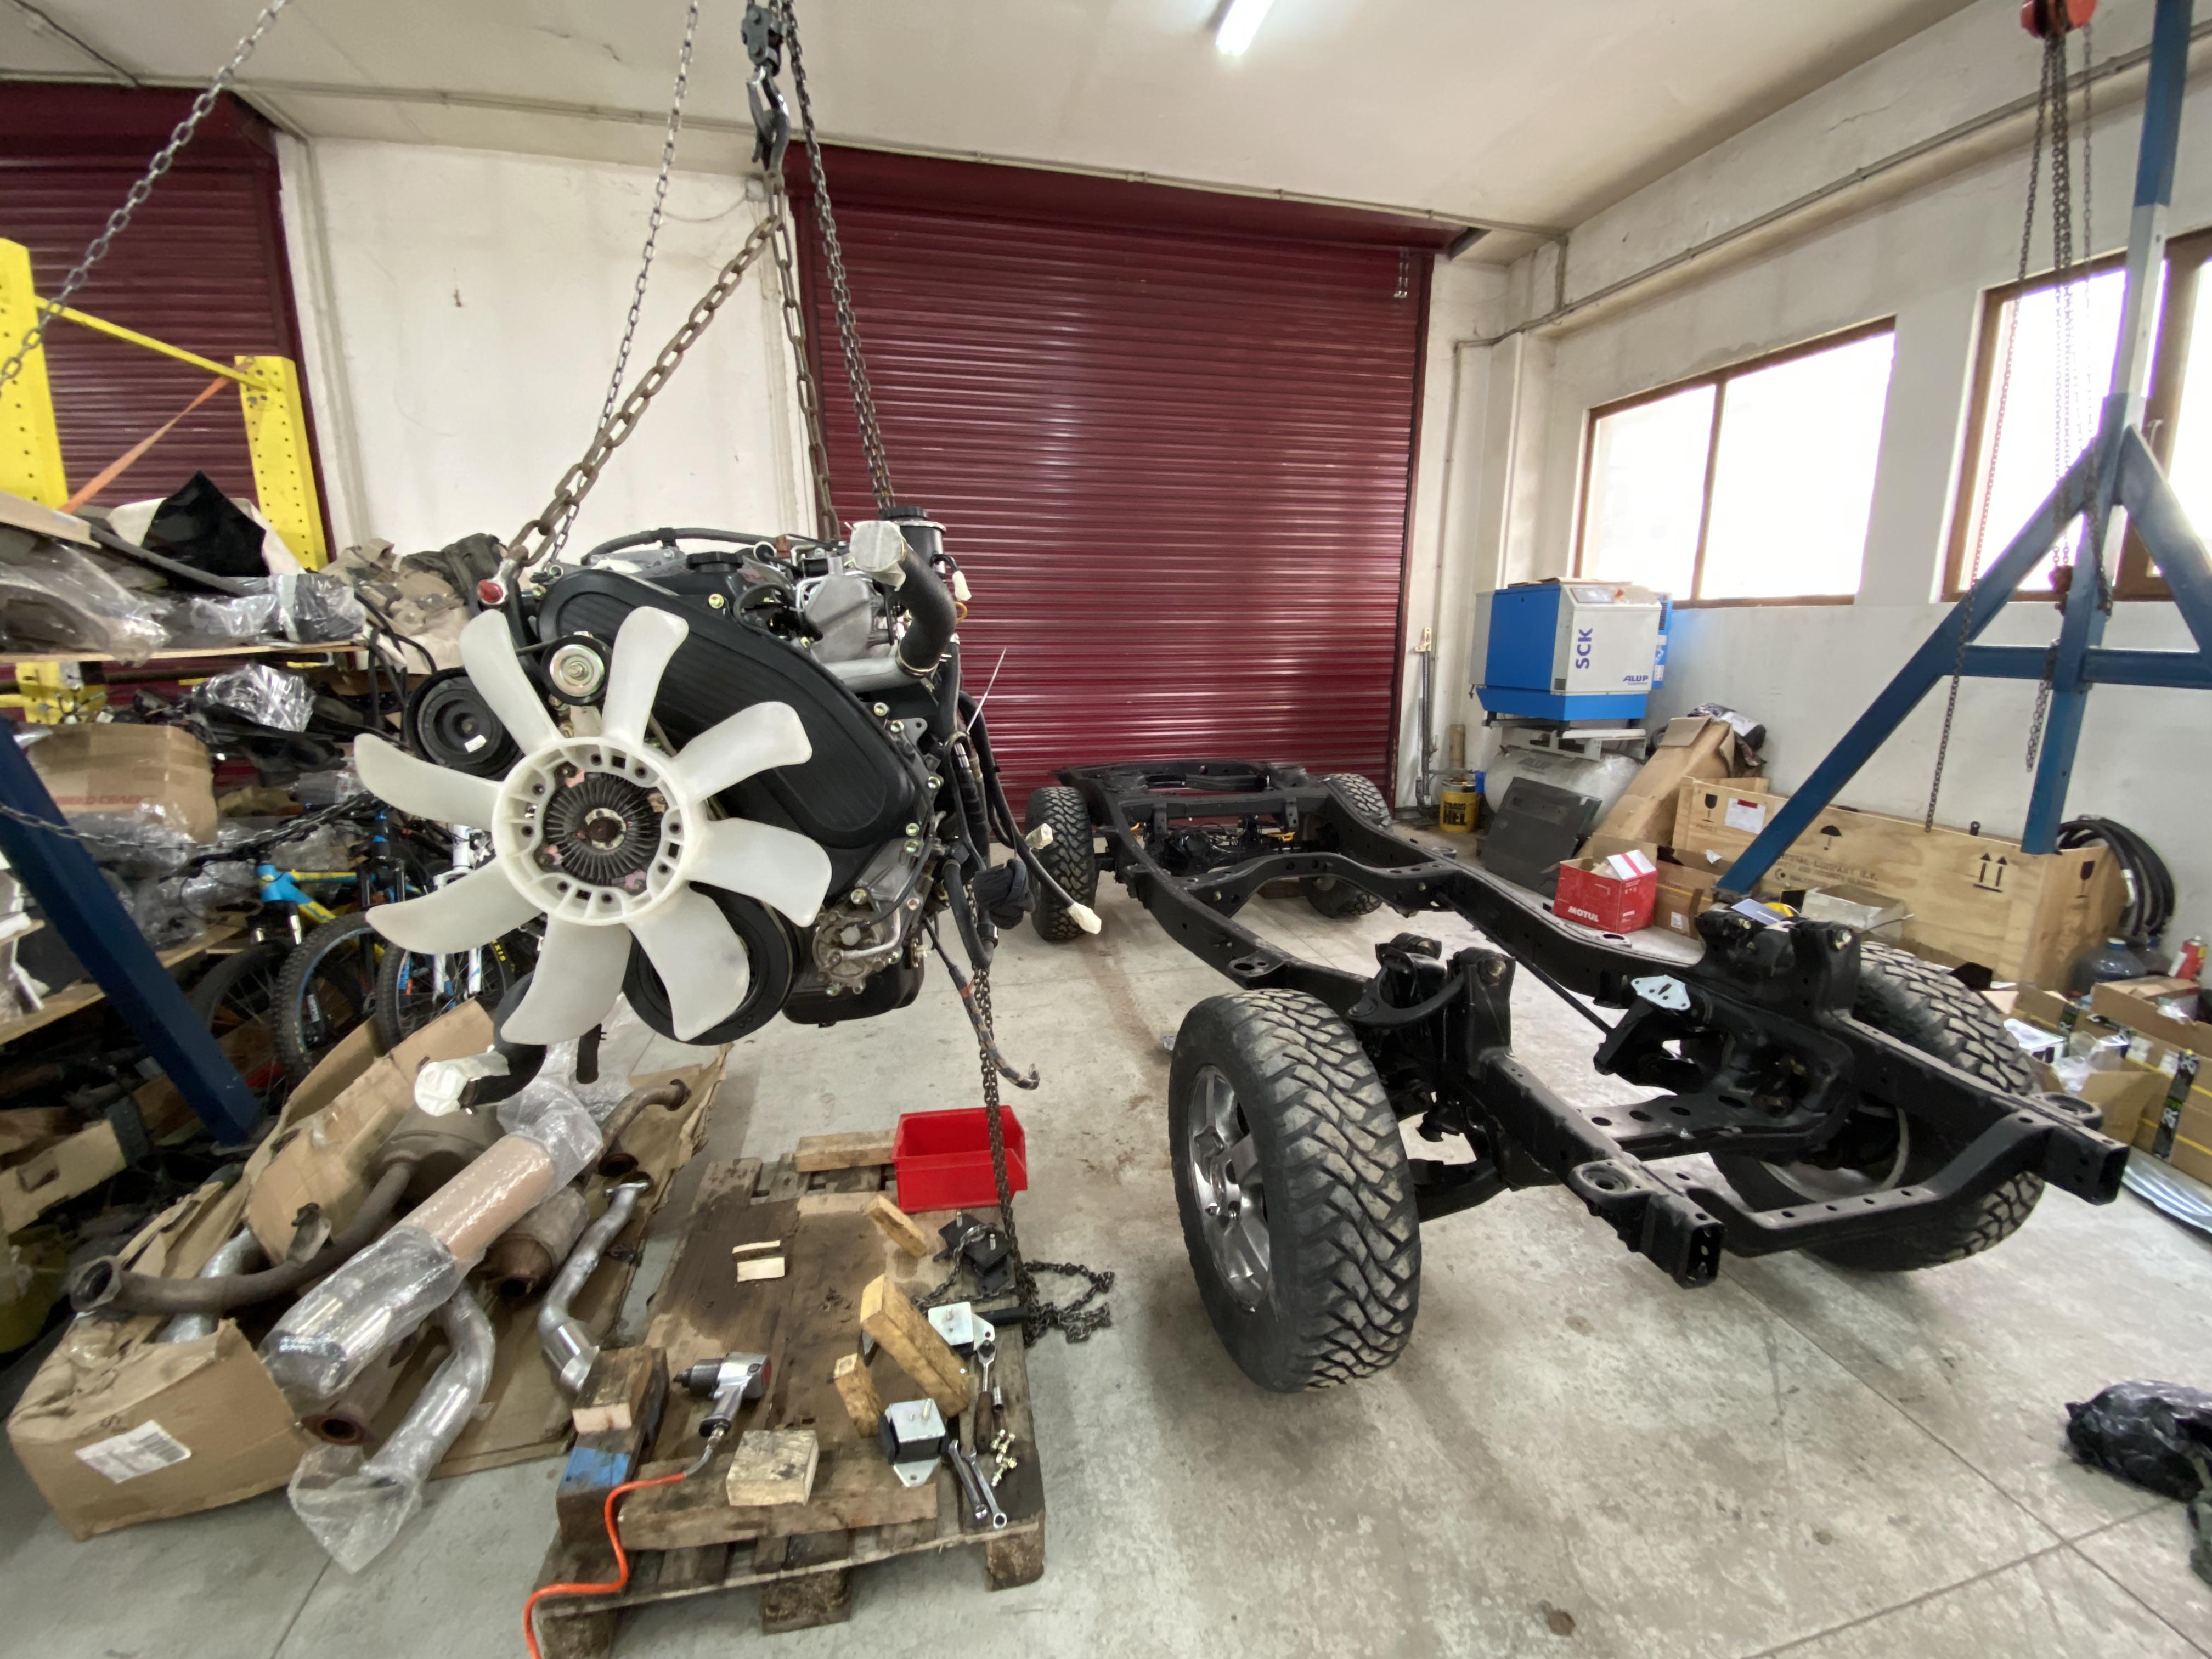


Fingers crossed I will drive this thing soon. In 7 days it will be 8 months since I started this 2 month project
This is the wear on mine. The ring eats through the paddles that rotate the nozzles. As wear progresses, some nozzles stick, some do not move at all any more and boost starts going all over the place. This triggers a vague CEL code along the lines of "Turbo system assembly malfunction" (sorry do not remember the number). Turning the car off and back on resets the nozzles and temporary clears the CEL.
So now the turbo is back with the shop and hopefully they will have it repaired next week.
I got the pump and injectors from the UK. They look like brand new! Great job by Shaun at Shaun Arkinstall Fuel Injection Services - http://diesel-injection-services.co.uk/public/Shaun_Arkinstall_Fuel_Injection_Services.html !! I highly recommend that place. They were super helpful, kept me up to date with progress and issues and presented me with different options along the way. They gave me a bit of a high price for the SCV valve, that is usually the fail point and most common wear item on the pump ~£400. If you shop around you could find it for ~£200. Rest of the prices are UK normal. Service is top notch.
Immediately sent it over to the engine overhaul guys here. They did spectacular work too. Everything was cleaned and washed. Block and head painted. All bolts and brackets were electroplated. The big pieces like manifolds were water blasted. With minor exceptions it looks like brand new!
This is one of the original engine mounts after 400k km and 16 years. 41mm vs 46mm for the brand new one. Spectacularly well preserved for such a heavy engine. The FTE is about 150kg heavier than the 2UZ from the top of my had. The brackets were electroplated with the rest of the engine, but I am replacing them with new.
I put it on the chassis so that it will be easier to store and transport to my mechanic, who is putting everything back together.
Fingers crossed I will drive this thing soon. In 7 days it will be 8 months since I started this 2 month project
- Thread starter
- #73
It's being put back together! Finally!
First time it's moving more than 5 meters in 8 months!


You can see here the AHC bits and pieces. No wonder removing them with the body on when doing AHC delete is such a major PITA. Don't remove your AHC. It's a wonderful system!

Front end Friday!

The back is pretty much empty

I replaced the transmission tunnel insulation. The original is cardboard/cloth like combo that I forgot outside during the winter and pretty much disintegrated. Surprisingly little info online what to replace it with. Finally went with "synthetic rubber" with aluminium face. Good for up to 100C, does not soak water, seems resistant to oils. In a few months when I start working on the interior I will insulate from the inside too. This is to replace the factory insulation outside.

Started overhauling the brake system. It is not as bad as most others I have seen around. Some moisture managed to get into the motor housing, but caught it before it had done any damage to the internals. Changed both bearings, too bad that the gaskets are not serviceable part. I will put some kind of a sealer.

The commutator is not horribly bad, but it's worn. Put it on the lathe to make it round again, so that it won't eat through the brushes, had to take about 0.65mm, so 1.3mm from the total diameter. Brushes have about 50% life let. Not bad for 250k miles.

Turbo looks like brand new.

Exhaust will be quiet the upgrade

A whole lot of missing bolts. Some broke during disassembly, some were lost.
Monday I will probably drop the body at the shop and hopefully some time next week I will be driving again!
First time it's moving more than 5 meters in 8 months!
You can see here the AHC bits and pieces. No wonder removing them with the body on when doing AHC delete is such a major PITA. Don't remove your AHC. It's a wonderful system!
Front end Friday!
The back is pretty much empty
I replaced the transmission tunnel insulation. The original is cardboard/cloth like combo that I forgot outside during the winter and pretty much disintegrated. Surprisingly little info online what to replace it with. Finally went with "synthetic rubber" with aluminium face. Good for up to 100C, does not soak water, seems resistant to oils. In a few months when I start working on the interior I will insulate from the inside too. This is to replace the factory insulation outside.
Started overhauling the brake system. It is not as bad as most others I have seen around. Some moisture managed to get into the motor housing, but caught it before it had done any damage to the internals. Changed both bearings, too bad that the gaskets are not serviceable part. I will put some kind of a sealer.
The commutator is not horribly bad, but it's worn. Put it on the lathe to make it round again, so that it won't eat through the brushes, had to take about 0.65mm, so 1.3mm from the total diameter. Brushes have about 50% life let. Not bad for 250k miles.
Turbo looks like brand new.
Exhaust will be quiet the upgrade
A whole lot of missing bolts. Some broke during disassembly, some were lost.
Monday I will probably drop the body at the shop and hopefully some time next week I will be driving again!
Last edited:
You are doing a truly amassing job. 
I'm wondering if you've more you can share on the brake system. Most importantly the brake master.
Like:
Condition of brake control wire connection points in boots (2 wires from ABS to booster motor).
Staining inside of brake fluid reservoir (none, mild or heavy).
Color of brake fluid when you first found this rig (nearly clear, medium dark, very dark).
How many pump of brake pedal w/IG off, until pedal pressure drops (Topping procedure embossed on reservoir, evacuating accumulator from full charge) today.
How long booster motor runs after accumulator evacuated until accumulator recharged (motor stops) today.
IndroCruise
SILVER Star
It's being put back together! Finally!
First time it's moving more than 5 meters in 8 months!
You can see here the AHC bits and pieces. No wonder removing them with the body on when doing AHC delete is such a major PITA. Don't remove your AHC. It's a wonderful system!
Front end Friday!
The back is pretty much empty
I replaced the transmission tunnel insulation. The original is cardboard/cloth like combo that I forgot outside during the winter and pretty much disintegrated. Surprisingly little info online what to replace it with. Finally went with "synthetic rubber" with aluminium face. Good for up to 100C, does not soak water, seems resistant to oils. In a few months when I start working on the interior I will insulate from the inside too. This is to replace the factory insulation outside.
Started overhauling the brake system. It is not as bad as most others I have seen around. Some moisture managed to get into the motor housing, but caught it before it had done any damage to the internals. Changed both bearings, too bad that the gaskets are not serviceable part. I will put some kind of a sealer.
The commutator is not horribly bad, but it's worn. Put it on the lathe to make it round again, so that it won't eat through the brushes, had to take about 0.65mm, so 1.3mm from the total diameter. Brushes have about 50% life let. Not bad for 250k miles.
Turbo looks like brand new.
Exhaust will be quiet the upgrade
A whole lot of missing bolts. Some broke during disassembly, some were lost.
Monday I will probably drop the body at the shop and hopefully some time next week I will be driving again!
Thank you @Moridinbg for this fantastic, well-illustrated story and congratulations on your persistence and progress with this project! Any more pictures you are able to contribute would be most welcome. If it is not too impolite to ask and when you get to the relevant stage, on the AHC system maybe this request could please include more pictures of some of the rarely seen and not so well understood items – such as the Attenuator below the AHC Pump position, the Control Valve Assembly, more detail of the connections across to the Height Control Accumulator, and the front and rear Height Control Sensors?? Some of these things will be easier to photograph while the body is off – much better than my feeble efforts from under my vehicle with body in usual position.
Also just wondering about your thoughts or comments on the condition of the A750F transmission, Transfer Case, Final Drives etc?? Presumably you have had to draw a line somewhere, in terms of both cost and time.
Anyway, best wishes for a successful start-up in due course!!
Last edited:
This story still keeps me riveted. I vote you do two of these perfect restorations so one can be put in a museum and the other can be driven and used as intended...
...actually maybe 3. One museum, one for you, and one for me.
...actually maybe 3. One museum, one for you, and one for me.
- Thread starter
- #78
It's happening!


When I started the fluid looked clean and new-ish. Don't remember the exact number of pedal pumps until pedal drop, but was within the normal margin as described in other posts here. Booster motor was also running for the normal duration of ~30s with normal slightly buzzing sound.
The connection boots were almost pristine, very little corrosion.

The reservoir was pretty dark at the most common fluid level. I cleaned it with alcohol and then degreaser, followed by 30 minutes rinsing with water and then drying with the compressed air. The reservoir is an absolute pain to rinse! There are a lot of crevices where dirty water and solvents can get trapped.

I have created a Google Photos album with detailed photos of the AHC & brake pipes - LC100 AHC & brakes piping - https://photos.app.goo.gl/pDtpX5U8UFshfgX7A
I also did one for the (diesel) engine bay without the engine (and some missing AC pipes) - Land Cruiser HDJ100 Engine Bay - https://photos.app.goo.gl/QHpXPCL8d6fSJTrs7
Tomorrow I will be dropping the body on the chassis, so if anybody wants any other inside details, should ask here in the next 14 hours
You are doing a truly amassing job.
I'm wondering if you've more you can share on the brake system. Most importantly the brake master.
Like:
Condition of brake control wire connection points in boots (2 wires from ABS to booster motor).
Staining inside of brake fluid reservoir (none, mild or heavy).
Color of brake fluid when you first found this rig (nearly clear, medium dark, very dark).
How many pump of brake pedal w/IG off, until pedal pressure drops (Topping procedure embossed on reservoir, evacuating accumulator from full charge) today.
How long booster motor runs after accumulator evacuated until accumulator recharged (motor stops) today.
When I started the fluid looked clean and new-ish. Don't remember the exact number of pedal pumps until pedal drop, but was within the normal margin as described in other posts here. Booster motor was also running for the normal duration of ~30s with normal slightly buzzing sound.
The connection boots were almost pristine, very little corrosion.
The reservoir was pretty dark at the most common fluid level. I cleaned it with alcohol and then degreaser, followed by 30 minutes rinsing with water and then drying with the compressed air. The reservoir is an absolute pain to rinse! There are a lot of crevices where dirty water and solvents can get trapped.
Thank you @Moridinbg for this fantastic, well-illustrated story and congratulations on your persistence and progress with this project! Any more pictures you are able to contribute would be most welcome. If it is not too impolite to ask and when you get to the relevant stage, on the AHC system maybe this request could please include more pictures of some of the rarely seen and not so well understood items – such as the Attenuator below the AHC Pump position, the Control Valve Assembly, more detail of the connections across to the Height Control Accumulator, and the front and rear Height Control Sensors?? Some of these things will be easier to photograph while the body is off – much better than my feeble efforts from under my vehicle with body in usual position.
Also just wondering about your thoughts or comments on the condition of the A750F transmission, Transfer Case, Final Drives etc?? Presumably you have had to draw a line somewhere, in terms of both cost and time.
Anyway, best wishes for a successful start-up in due course!!
I have created a Google Photos album with detailed photos of the AHC & brake pipes - LC100 AHC & brakes piping - https://photos.app.goo.gl/pDtpX5U8UFshfgX7A
I also did one for the (diesel) engine bay without the engine (and some missing AC pipes) - Land Cruiser HDJ100 Engine Bay - https://photos.app.goo.gl/QHpXPCL8d6fSJTrs7
Tomorrow I will be dropping the body on the chassis, so if anybody wants any other inside details, should ask here in the next 14 hours
This project is incredible. Wow!