So this thread is going to follow the swap of a 4BD1T into an 80 series Land Cruiser (Lexus LX450 in my case).
Truck: The Toyota Land Cruiser/LX450 is in my case a 1997, I got it 3 years ago from a young lady that had owned it for 10 years and driven it into the ground. I spent 5 months going over every system of the truck and rebuilding most of it from engine to axles. The truck comes standard with a 4.5L I6 DOHC engine producing 214hp and 265ft/lbs, although it has good power its offset by the regular 8-10mpg fill ups. My truck came with the factory diff lockers and 4.10 gears. The truck has proved to be extremely reliable and has taken us on some great trips so far.
As she sits now:

Engine: I had got this truck planning on doing a diesel swap, once I got it I started researching all sorts of options from Cummins to Toyota 1HD-t’s. I ruled out the Cummins as I worked at a Cummins performance shop and had done a few 3000mile road trips in them. Great power but just a too noisy for me. The Toyota 1HD-T was the obvious choice but given there extremely high cost for an engine and trans ($9k) I had to give that up that as well. I had read threads on Mud by Doug720, Longbow and one other that did a Mitsu 4B34? swap. That got me looking at the 3.9L 4cyl Diesels both Isuzu and Mitsubishi, I liked that the Mitsubishi as it kept the exhaust and intake on the same sides as the stock engine. In the end Longbows thread on a simple adapter to the older A440F trans (stock in the 91-92 80 series) got me into the 4BD and specifically the 4BD1T. As well as the simplicity of the 4BD with its fully mechanical injection system. After lots of research on the 4BD I knew it was the way I wanted to go. I was looking for a 4BD1T for about 5 months on and off, found a few trucks in the $2000 range. I then got a PM on Mud with someone selling a 4BD1T with no history or other information. It was Proffit cruisers clearing out there inventory. I got the 4BD1T one week after buying it and to my surprise it looked to be in very good shape.
Unloading:

Data plate:

First run:
http://s1048.photobucket.com/user/W...9-384CC03E3642-7685-00000FED2E5FB7AC.mp4.html
Transmission: After deciding that the 4BD1T was the engine I wanted I got on the hunt for a 91-92 80 Series A440F with the AWD t case. I wanted to go with this transmission as it’s an all hydraulic controlled trans mission so I does not need any ECU or wires connected to operate. After a short hunt I found what I needed in LA, it was an A440F with t case and converter for $100 with 200k miles on it and out of a truck that was driving before it was parted. I got the transmission shipped up for $100 by a cruiser guy headed home from LA for the holidays. The guy I got the trans from was good enough to ship my converter off to Road Runner converters in Phoenix AZ for a full rebuild and stall down to 1600 RPM. Thanks to Longbow (Don) for their information and all the information and help along the way.
So that gets me to about present with my journey. The following pages and posts will follow my swap and its components.
Truck: The Toyota Land Cruiser/LX450 is in my case a 1997, I got it 3 years ago from a young lady that had owned it for 10 years and driven it into the ground. I spent 5 months going over every system of the truck and rebuilding most of it from engine to axles. The truck comes standard with a 4.5L I6 DOHC engine producing 214hp and 265ft/lbs, although it has good power its offset by the regular 8-10mpg fill ups. My truck came with the factory diff lockers and 4.10 gears. The truck has proved to be extremely reliable and has taken us on some great trips so far.
As she sits now:
Engine: I had got this truck planning on doing a diesel swap, once I got it I started researching all sorts of options from Cummins to Toyota 1HD-t’s. I ruled out the Cummins as I worked at a Cummins performance shop and had done a few 3000mile road trips in them. Great power but just a too noisy for me. The Toyota 1HD-T was the obvious choice but given there extremely high cost for an engine and trans ($9k) I had to give that up that as well. I had read threads on Mud by Doug720, Longbow and one other that did a Mitsu 4B34? swap. That got me looking at the 3.9L 4cyl Diesels both Isuzu and Mitsubishi, I liked that the Mitsubishi as it kept the exhaust and intake on the same sides as the stock engine. In the end Longbows thread on a simple adapter to the older A440F trans (stock in the 91-92 80 series) got me into the 4BD and specifically the 4BD1T. As well as the simplicity of the 4BD with its fully mechanical injection system. After lots of research on the 4BD I knew it was the way I wanted to go. I was looking for a 4BD1T for about 5 months on and off, found a few trucks in the $2000 range. I then got a PM on Mud with someone selling a 4BD1T with no history or other information. It was Proffit cruisers clearing out there inventory. I got the 4BD1T one week after buying it and to my surprise it looked to be in very good shape.
Unloading:
Data plate:
First run:
http://s1048.photobucket.com/user/W...9-384CC03E3642-7685-00000FED2E5FB7AC.mp4.html
Transmission: After deciding that the 4BD1T was the engine I wanted I got on the hunt for a 91-92 80 Series A440F with the AWD t case. I wanted to go with this transmission as it’s an all hydraulic controlled trans mission so I does not need any ECU or wires connected to operate. After a short hunt I found what I needed in LA, it was an A440F with t case and converter for $100 with 200k miles on it and out of a truck that was driving before it was parted. I got the transmission shipped up for $100 by a cruiser guy headed home from LA for the holidays. The guy I got the trans from was good enough to ship my converter off to Road Runner converters in Phoenix AZ for a full rebuild and stall down to 1600 RPM. Thanks to Longbow (Don) for their information and all the information and help along the way.
So that gets me to about present with my journey. The following pages and posts will follow my swap and its components.
Last edited:

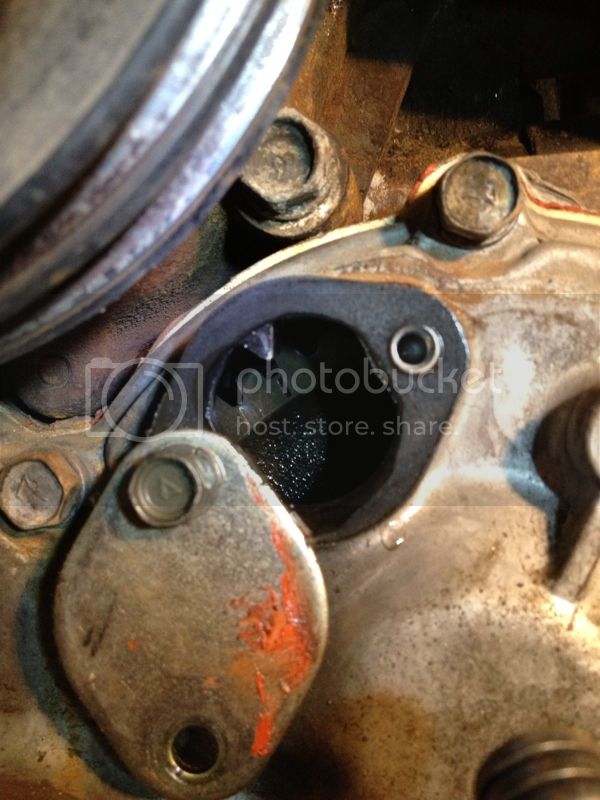


") . Also note the last picture of the gouge to coolant passage getting plugged up with rust…….anyone still not want to run coolant? Oh well then here….
. Also note the last picture of the gouge to coolant passage getting plugged up with rust…….anyone still not want to run coolant? Oh well then here…. ")


