
Navigation
Install the app
How to install the app on iOS
Follow along with the video below to see how to install our site as a web app on your home screen.
Note: This feature may not be available in some browsers.
More options
Style variation
You are using an out of date browser. It may not display this or other websites correctly.
You should upgrade or use an alternative browser.
You should upgrade or use an alternative browser.
Build Holley Sniper/Desmog Install - Tilda Bogue Service Station
- Thread starter wngrog
- Start date
Member Builds and Stories
This site may earn a commission from merchant affiliate
links, including eBay, Amazon, Skimlinks, and others.
- Thread starter
- #22
I always do them cold because, unless it's an early FJ40 it's not super easy to get the valve cover on and off.Re: valve adjustment... done cold it seems...?
I used to recheck them but now I'm pretty certain my method works fine.
I adjust them tight to the shim and leave the shim in while tightening the nut. Then I slide it out. If it won't slide out it's too tight.
Works for me.
These were all right on the exhaust stroke but 1/2 were way off on the intake stroke.
- Thread starter
- #23
I have a fj60 distributor in my 72 F motor. The igniter just went out so had to convert to Chevy. Thinking about switching to DUI. What are your thoughts of fj60 vs DUI
I take the FJ60 ones out too. I'm just not a fan of all the old electronics and mechanicals. This one is the same as an FJ60 as it's a 1981 FJ40.
I send them all to JimC so he has cores for people that want to have theirs recurved and have all the mechanicals repaired.
Also ... this is important. You DONT have to have a late "dented" side engine cover for a DUI on any F, 1F or 2F motor so that's another benefit.
- Thread starter
- #25
Another big part of this install is the fuel pump install.
In the past I've done a few in tank installs but mostly I run the Mosley supplied pump. This pump has not failed me or any of my other installs.
I used to really worry about these in-line pumps based on my old experience slow slow rock crawling where they would heat up and fail. As most know, I live in Mississippi so I push these things hard in hot weather and so far they are all very quiet and very reliable.
This is how the Mosley setup with Corvette regulator/return works
Mosley supplies 5/16" hose to match the stock size.

Right to Left
Pre Filter---------fuel pump------corvette return


Mosley provides a hard line from Sniper to Corvette return that works great if your accessories are stock. This truck has a Chevy alternator that will get in the way so I use a soft line.
A couple things if you will need if you want to go from the sniper to the corvette return with a soft line. This -an to go from soft line to sniper

Get a couple of 5/16 to 5/16 adapters to tap into the stock rubber hoses. If the stock hoses are super hard and brittle take the time to replace the rubber.

Oreilley stocks this sheath to protect your fuel line from chafing and heat

FYI on a 79+ fj40 the feed line is the one closest to the tank. If you ever wonder (if there is gas in the tank) you can blow into the hose and if you hear bubbles that's the feed

I mount the stuff along the passenger rail

This is what the fuel line looks like.

In the past I've done a few in tank installs but mostly I run the Mosley supplied pump. This pump has not failed me or any of my other installs.
I used to really worry about these in-line pumps based on my old experience slow slow rock crawling where they would heat up and fail. As most know, I live in Mississippi so I push these things hard in hot weather and so far they are all very quiet and very reliable.
This is how the Mosley setup with Corvette regulator/return works
Mosley supplies 5/16" hose to match the stock size.
Right to Left
Pre Filter---------fuel pump------corvette return
Mosley provides a hard line from Sniper to Corvette return that works great if your accessories are stock. This truck has a Chevy alternator that will get in the way so I use a soft line.
A couple things if you will need if you want to go from the sniper to the corvette return with a soft line. This -an to go from soft line to sniper
Get a couple of 5/16 to 5/16 adapters to tap into the stock rubber hoses. If the stock hoses are super hard and brittle take the time to replace the rubber.
Oreilley stocks this sheath to protect your fuel line from chafing and heat
FYI on a 79+ fj40 the feed line is the one closest to the tank. If you ever wonder (if there is gas in the tank) you can blow into the hose and if you hear bubbles that's the feed
I mount the stuff along the passenger rail
This is what the fuel line looks like.
- Thread starter
- #26
The "why" on the corvette regulator basically keeps the return out of the heat of the engine bay and shortens its trip back to the tank.
Pay attention to the markings on this thing as to where your hoses go.

Pay attention to the markings on this thing as to where your hoses go.
Definitely like the regulated-filter setup, I run the same combo with the similar/same Walbro 392 on mine.
Minor heads up though, the internal regulator in those can fail/degrade...the original one I installed dipped to 52-54psi instead of holding 60, which does mess with the Sniper as that's also a pretty key 'input'. Easy enough to replace, but something to keep an eye on over time.
Minor heads up though, the internal regulator in those can fail/degrade...the original one I installed dipped to 52-54psi instead of holding 60, which does mess with the Sniper as that's also a pretty key 'input'. Easy enough to replace, but something to keep an eye on over time.
- Thread starter
- #28
Back to INPUTS
Often overlooked is the PCV. It's also very often routed into the wrong place.
Copied from Grok...you can see why a bad PCV will confuse the tiny brain of the Sniper
### Common symptoms of a bad/faulty PCV valve:
- Rough idle or stalling
- Oil leaks (especially valve cover or rear main seal)
- Excessive oil consumption
- Sludge buildup in engine
- Whistling/hissing noises
- Check engine light (codes like P0171, P0174 – lean condition)
- Smoke from the exhaust or oil filler cap
In short: The PCV valve is a simple, spring-loaded check valve that keeps the crankcase clean, reduces emissions, prevents pressure buildup, and recirculates blow-by gases
I prefer the Man-a-Fre kit
 manafrelv.com


Or you can use this plug from the JimC kit on the stock unit.

Fresh PCV and gasket.
Once I install the valve cover I'll connect the two with 3/8" hose around the rear of the cover

I've seen many people run the PCV to this plug in the bottom of the Sniper. That's for the brake booster if you don't use the stock location for some reason. This spot could effect the tune of the Sniper with the PCV fumes.

Often overlooked is the PCV. It's also very often routed into the wrong place.
Copied from Grok...you can see why a bad PCV will confuse the tiny brain of the Sniper
### Common symptoms of a bad/faulty PCV valve:
- Rough idle or stalling
- Oil leaks (especially valve cover or rear main seal)
- Excessive oil consumption
- Sludge buildup in engine
- Whistling/hissing noises
- Check engine light (codes like P0171, P0174 – lean condition)
- Smoke from the exhaust or oil filler cap
In short: The PCV valve is a simple, spring-loaded check valve that keeps the crankcase clean, reduces emissions, prevents pressure buildup, and recirculates blow-by gases
I prefer the Man-a-Fre kit
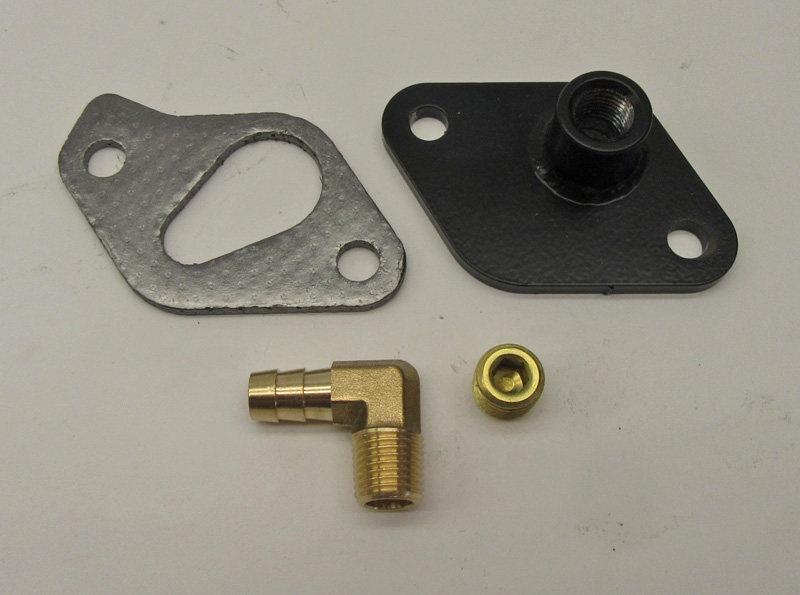
EGR Intake Inlet Block Off Plate Kit for 1980-1987 Toyota Land Cruisers with 2F-Engines - Landcruiser Parts
EGR Intake Inlet Block Off Plate Kit for 1980-1987 Toyota Land Cruisers with 2F-Engines. This kit is designed only to do the intake side of the EGR system.
manafrelv.com
Or you can use this plug from the JimC kit on the stock unit.
Fresh PCV and gasket.
Once I install the valve cover I'll connect the two with 3/8" hose around the rear of the cover
I've seen many people run the PCV to this plug in the bottom of the Sniper. That's for the brake booster if you don't use the stock location for some reason. This spot could effect the tune of the Sniper with the PCV fumes.
- Thread starter
- #29
The original ones Cam experienced with were pretty cheap and I had some leaks. This one he's using now with the -an ends is pretty high end. If you shop these you will see there is a WIDE range of prices which likely translates to quality. This one is pretty expensive. I purchased one to keep here at the shop in case I need it.Definitely like the regulated-filter setup, I run the same combo with the similar/same Walbro 392 on mine.
Minor heads up though, the internal regulator in those can fail/degrade...the original one I installed dipped to 52-54psi instead of holding 60, which does mess with the Sniper as that's also a pretty key 'input'. Easy enough to replace, but something to keep an eye on over time.
Flip your hose clamp around
- Thread starter
- #31
Funny. Thats what happens when you build the hose off the truckFlip your hose clamp around
100%, def a wide variety of quality/price on those. I used the AN-fitting variety to tie into hardlines, and my original one was on the quality end and not the random bargain special. It never leaked, but PSI just eventually dropped off.The original ones Cam experienced with were pretty cheap and I had some leaks. This one he's using now with the -an ends is pretty high end. If you shop these you will see there is a WIDE range of prices which likely translates to quality. This one is pretty expensive. I purchased one to keep here at the shop in case I need it.
I'm sure it just happens, just something to keep tabs on over time.
- Thread starter
- #33
It's actually a post pump fuel filter as well so it likely got some trash in it.100%, def a wide variety of quality/price on those. I used the AN-fitting variety to tie into hardlines, and my original one was on the quality end and not the random bargain special. It never leaked, but PSI just eventually dropped off.
I'm sure it just happens, just something to keep tabs on over time.
Possibly, would have to come from the pump itself though as there's a pre pump filter as well. The entire system including tank and all lines was new as it was a full frame-off as well.It's actually a post pump fuel filter as well so it likely got some trash in it.
The main learning to me was to keep tabs on it - I wish Holley would've just integrated a fuel PSI sensor internally that would log and display in-cab, given it's important to proper EFI performance, but they didn't. The best proxy is to watch learn-percentage/compensation shifting abnormally.
- Thread starter
- #35
One way you can tell if the fuel system is stressed like you experienced or with a clogged fuel filter is the Duty Cycle. If this thing is over 50% it's usually telling you the pressure is down (bottom right)Possibly, would have to come from the pump itself though as there's a pre pump filter as well. The entire system including tank and all lines was new as it was a full frame-off as well.
The main learning to me was to keep tabs on it - I wish Holley would've just integrated a fuel PSI sensor internally that would log and display in-cab, given it's important to proper EFI performance, but they didn't. The best proxy is to watch learn-percentage/compensation shifting abnormally.
Last edited:
View attachment 4029255
Oreilley always has these in stock and make the two wire hook up even easier.
This^^^^. You tossed this out to me a 2-3 yrs ago. Super simple. Makes it easy to add a tach.
100% on the DUI + Live wires.

- Thread starter
- #37
Spent the afternoon wiring up everything.
The directions are good for this but here are my tips to help

Unless you are planning on using a Hyperspark ignition, there is nothing in the 10 pin harness that is used. Ignore that stuff. Everything you will wire is in the main harness.
There are 5 wires.
Purple to the fuel pump.
Yellow to the TACH signal wire (green on 2 wire DUI harness) on the DUI.
****fj60 install. Take the coil negative (black) wire and T it into this wire so the Sniper and the OEM tach work

The red wire on the DUI harness needs switched 12V. I use the larger gauge Black/Yellow wire that fed the OEM distributor.

Positive and negative DIRECT TO THE BATTTERY .... not sure why this is so hard but so many people insist on running these through a circuit breaker. Don't

The top right vacuum plug on the Sniper is the ported vacuum. Use this for the DUI vacuum advance.

Aight. Done for the day and the weekend. Headed into the Ozarks for the weekend. Back on this thing Monday. Getting real close
7 hours today

The directions are good for this but here are my tips to help
Unless you are planning on using a Hyperspark ignition, there is nothing in the 10 pin harness that is used. Ignore that stuff. Everything you will wire is in the main harness.
There are 5 wires.
Purple to the fuel pump.
Yellow to the TACH signal wire (green on 2 wire DUI harness) on the DUI.
****fj60 install. Take the coil negative (black) wire and T it into this wire so the Sniper and the OEM tach work
The red wire on the DUI harness needs switched 12V. I use the larger gauge Black/Yellow wire that fed the OEM distributor.
Positive and negative DIRECT TO THE BATTTERY .... not sure why this is so hard but so many people insist on running these through a circuit breaker. Don't
The top right vacuum plug on the Sniper is the ported vacuum. Use this for the DUI vacuum advance.
Aight. Done for the day and the weekend. Headed into the Ozarks for the weekend. Back on this thing Monday. Getting real close
7 hours today
Last edited:
Amazing how the time adds up to do a clean install.Spent the afternoon wiring up everything.
The directions are good for this but here are my tips to help
View attachment 4029946
Unless you are planning on using a Hyperspark ignition, there is nothing in the 10 pin harness that is used. Ignore that stuff. Everything you will wire is in the main harness.
There are 5 wires.
Purple to the fuel pump.
Yellow to the TACH signal wire (green on 2 wire DUI harness) on the DUI.
****fj60 install. Take the coil negative (black) wire and T it into this wire so the Sniper and the OEM tach work
View attachment 4029947
The red wire on the DUI harness needs switched 12V. I use the larger gauge Black/Yellow wire that fed the OEM distributor.
View attachment 4029948
Positive and negative DIRECT TO THE BATTTERY .... not sure why this is so hard but so many people insist on running these through a circuit breaker. Don't
View attachment 4029950
The top right vacuum plug on the Sniper is the ported vacuum. Use this for the DUI vacuum advance.
View attachment 4029949
Aight. Done for the day and the weekend. Headed into the Ozarks for the weekend. Back on this thing Monday. Getting real close
7 hours today
View attachment 4029956
- Thread starter
- #39
I'm rolling. The desmog stuff takes the most time.Amazing how the time adds up to do a clean install.