
I just did this MOD in Sept of 17 and have only put about 1k miles on it and it appears to be leaking all ready. Is it common for these Duralast remans to be faulty right out the gate? I think I'll take this one back to Autozone but man I'm tired of taking these things off and on. It's like the 10th time in 5 years. lol.
Navigation
Install the app
How to install the app on iOS
Follow along with the video below to see how to install our site as a web app on your home screen.
Note: This feature may not be available in some browsers.
More options
Style variation
You are using an out of date browser. It may not display this or other websites correctly.
You should upgrade or use an alternative browser.
You should upgrade or use an alternative browser.
Finally!!!! Saginaw PS pump conversion kit for FJ60s!!!!!
- Thread starter orangefj45
- Start date
This site may earn a commission from merchant affiliate
links, including eBay, Amazon, Skimlinks, and others.
Leaking from the front seal? With anything rebuilt, there’s the possibility of a bad one. They will exchange it but of course it’s a PITA to swap.
Leaking from the front seal? With anything rebuilt, there’s the possibility of a bad one. They will exchange it but of course it’s a PITA to swap.
I havent figured out where it's leaking from yet. Seams like maybe the top. As in maybe I got a bad cap.
Is this ok?
I pulled the first AutoZone Duralast 7023 ramaned pump and have this here new one going back in. I’m using the same pulley from before but this time it won’t sit flush. This pulley sat dead flush with the shaft on the old pump, this pulley on the new pump has about an 8th of an inch to go. When I pump the last couple pumps on my press the shaft just pushes in that 8th inch. Ie. this is as far as it will go down. Do I proceed? Do I take this pump back? Do I need another new pulley? I read somewhere that it took 3 of these remanned pumos to get right once. Is that 1/8th not going to kill me? @orangefj45 Any suggestions?


I pulled the first AutoZone Duralast 7023 ramaned pump and have this here new one going back in. I’m using the same pulley from before but this time it won’t sit flush. This pulley sat dead flush with the shaft on the old pump, this pulley on the new pump has about an 8th of an inch to go. When I pump the last couple pumps on my press the shaft just pushes in that 8th inch. Ie. this is as far as it will go down. Do I proceed? Do I take this pump back? Do I need another new pulley? I read somewhere that it took 3 of these remanned pumos to get right once. Is that 1/8th not going to kill me? @orangefj45 Any suggestions?
"You get the easy education or the hard lesson". I have no idea who said this...
I text'd with Georg this morning... I broke the new pump. DON'T USE A PRESS, DON'T USE A HAMMER. Get the right tool. The worst part about this... I have the tool in my drawer of pulleys. DoH!
I'm filling this in the "measure twice, cut once" category.
I text'd with Georg this morning... I broke the new pump. DON'T USE A PRESS, DON'T USE A HAMMER. Get the right tool. The worst part about this... I have the tool in my drawer of pulleys. DoH!
I'm filling this in the "measure twice, cut once" category.
...and if you don't have the right tool, you can get it from Autozone with their tool rental program when you pick up the PS pump. Really glad I did that..."You get the easy education or the hard lesson". I have no idea who said this...
I text'd with Georg this morning... I broke the new pump. DON'T USE A PRESS, DON'T USE A HAMMER. Get the right tool. The worst part about this... I have the tool in my drawer of pulleys. DoH!
I'm filling this in the "measure twice, cut once" category.
What’s that large dia pipe crossing over your engine?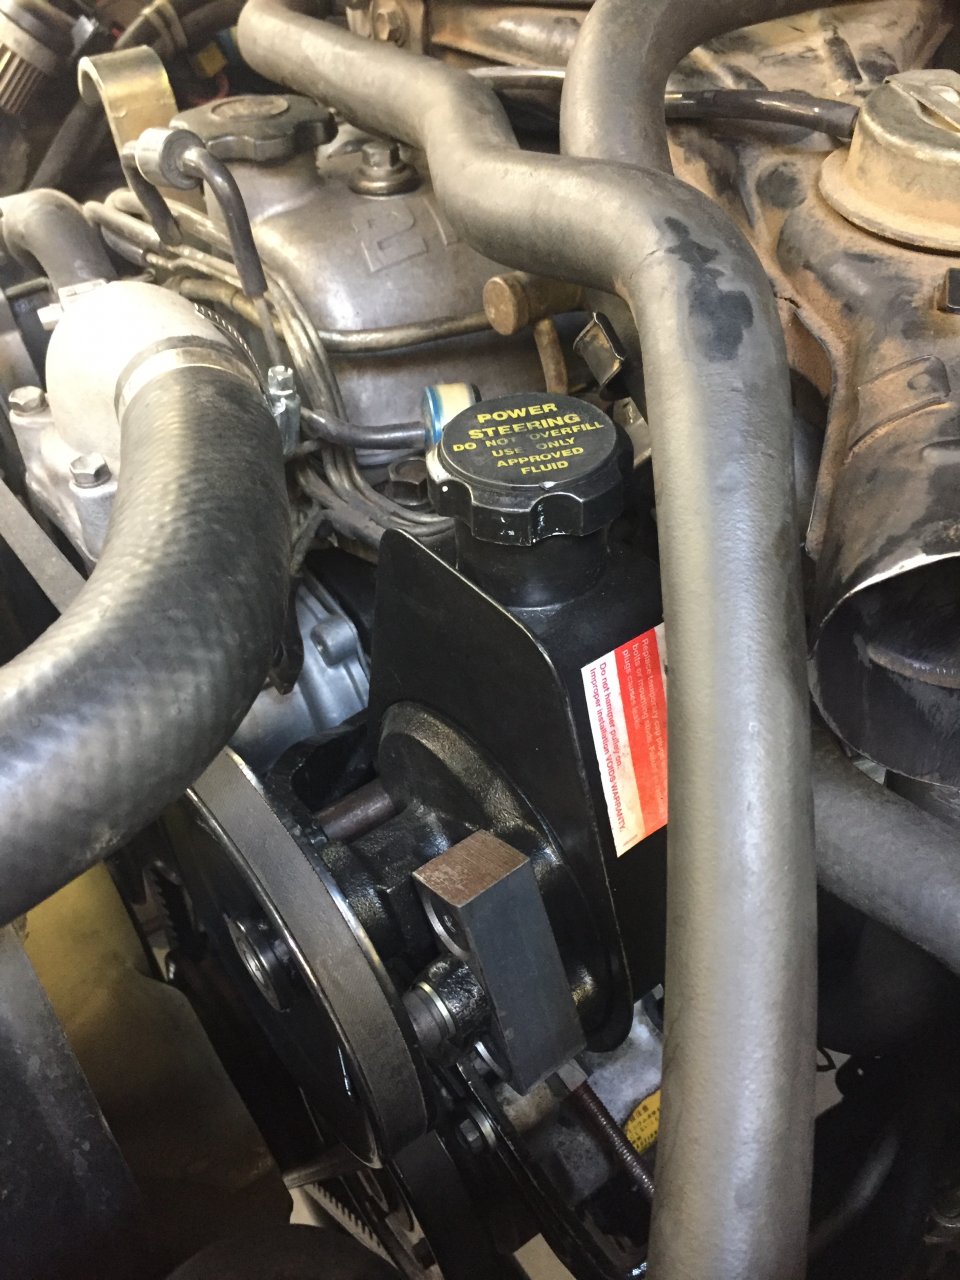
This has been in the works for what seems to be way too long ......
We've built a few prototypes and they've been up and running for a while. Came up with is final design after collaborating with another fellow mudder Brad and then modifying that design slightly a couple of times we've finally come up with a kit we're happy with!!!!
The factory 2F ps bracket is retained and slightly modified to work as a cradle for the sag pump.
The kit costs $129 and consists of:
Adapter bracket, spacer and hardware
Pulley
Belt
And you will need the proper sag ps pump and cap. We've successfully used Autozone pump #7023 from Duralast. And you'll need the cap part # 82581 from Help products.
We can also supply the already modified OEM bracket for $50 but we need your bracket in exchange. If you want to to buy the bracket outright then it's $85. We have some in stock; once we modify them they're bead-blasted and then painted so they're ready to be installed.
Shipping for the kit runs $14 with or without the modified OEM bracket.
We also offer replacement high pressure hose along with a section of low pressure hose for $59.
Georg @ Valley Hybrids
View attachment 1198743
Same here.................
This is what just a few miles of driving and a few parallel park jobs looks like. Not sure if I can wait much longer!

Yikes


- Thread starter
- #291
That’s some serious “rust inhibitor”
Georg @ Valley Hybrids & Cruiser Brothers
Got my kit a while ago thanks Georg!
Did the cutting with a Sawzall and a 14 tpi blade, cut through like butter.......the grinding with my Hitachi angle grinder
Used 4wheelfever's visual instructions, the pump bolted right up and cleared with no measuring!
O'reilly's pump 732-2137, rented their pulley installer kit, putting the pulley on with that was the easiest part
I used Lucas Gun Oil
Both parts @ "room temperature" approx 55 degrees(raining heavily in SoCal today)
Question to Georg:
Kit came with a flare fitting am I suppose to change that on my original hose?
Screws all the way into the new pump about 1/2 way into the Toyota pump


Sorry about the giant images
Did the cutting with a Sawzall and a 14 tpi blade, cut through like butter.......the grinding with my Hitachi angle grinder
Used 4wheelfever's visual instructions, the pump bolted right up and cleared with no measuring!
O'reilly's pump 732-2137, rented their pulley installer kit, putting the pulley on with that was the easiest part
I used Lucas Gun Oil
Both parts @ "room temperature" approx 55 degrees(raining heavily in SoCal today)
Question to Georg:
Kit came with a flare fitting am I suppose to change that on my original hose?
Screws all the way into the new pump about 1/2 way into the Toyota pump
Sorry about the giant images
Last edited:
- Thread starter
- #293
Correct. The fitting supplied with the kit features standard threads so it’ll work with most sag pumps ( unless you source a pump with a metric fitting ).
Georg @ Valley Hybrids & Cruiser Brothers
Georg @ Valley Hybrids & Cruiser Brothers
A perfect fit! Easiest thing I've ever done....still working on the pressure hose.........


Sacto60
1987 FJ60 2" OME 33s
Did you have to take apart the whole front end? Upper hose, shroud, rad, ? Or could you swap out your PS pump otherwise?A perfect fit! Easiest thing I've ever done....still working on the pressure hose.........
View attachment 1900958
View attachment 1900959
Actually I already had the fan/fan clutch/all the belts off.......fan shroud stayed in place........I was replacing a bad water pump when this started......
Update:
Ran the original ps hose(metric threads).....it's Chevy pump(standard threads).....just cranked it down.....no leaks.......
Ran the original ps hose(metric threads).....it's Chevy pump(standard threads).....just cranked it down.....no leaks.......
Whined some and belt squeal at the beginning.....
Last edited:
What he said......I used Valvoline Syn ATF, although in this thread Georg said he uses PS fluid. I 'think' either is fine in the Sag pump.
Mine whined at first also. I then bled it good and the whine went away. When I bled mine I had both front wheels in the air, the engine OFF and SLOWLY went lock to lock 20 maybe 30 times. Check the fluid level often & add as the air is removed.
Worked for me
- Thread starter
- #300
Take your time when you bleed the system!
Easiest way:
If you let the engine run too long, the pump will cavitate and the fluid will foam up and possibly overflow. Then you’ll need to wait for all the air bubbles to disperse before adding more fluid.
Be patient, take your time.
Georg @ Valley Hybrids & Cruiser Brothers
Easiest way:
- Put front axle on jack stands; to take the load off the PS system.
- Fill ps pump almost to the top.
- Start engine, run for 3-5 seconds. Shut it off.
- Fill pump.
- Repeat steps 3 and 4 until fluid level stays constant.
- Start engine and SLOWLY turn wheel for 3-5 seconds. Shut off.
- Fill pump.
- Repeat 6 and 7
- Once fluid level stays even and you can turn the wheel lock to lock you’re done.
If you let the engine run too long, the pump will cavitate and the fluid will foam up and possibly overflow. Then you’ll need to wait for all the air bubbles to disperse before adding more fluid.
Be patient, take your time.
Georg @ Valley Hybrids & Cruiser Brothers