
Navigation
Install the app
How to install the app on iOS
Follow along with the video below to see how to install our site as a web app on your home screen.
Note: This feature may not be available in some browsers.
More options
You are using an out of date browser. It may not display this or other websites correctly.
You should upgrade or use an alternative browser.
You should upgrade or use an alternative browser.
Builds The new FJ 73 Build (1 Viewer)
- Thread starter Alex gee
- Start date
This site may earn a commission from merchant affiliate
links, including eBay, Amazon, Skimlinks, and others.
More options
Who Replied?TLC Norway
woodwelder
Wild thing!! You really have them springs dialed in now!!
TLC Norway
woodwelder
sooo smooth. And that exhaust... it is just pure perfect audio! ")
Wild thing!! You really have them springs dialed in now!!
I have come to the conclusion that a possible name has arisen from the internet, you shall have to rename the
thread - "Wild Thing"! I don't think I've seen a 70 series more fitting of the name. J


- Thread starter
- #168
Got the ram mounted and some what figured.
Had to move the tie rod to the top of the steering arms, and move the drag bar to the top of the pitman arm.
After many revisions I got it just right.
Had to extend out the hard stops as the ram was just short.
Axle side mount.
I added another plate to box off the section once I had I welded to the axle and a tube gusset to the reinforced section
Nice and parallel to the tie rod.
tacked up.
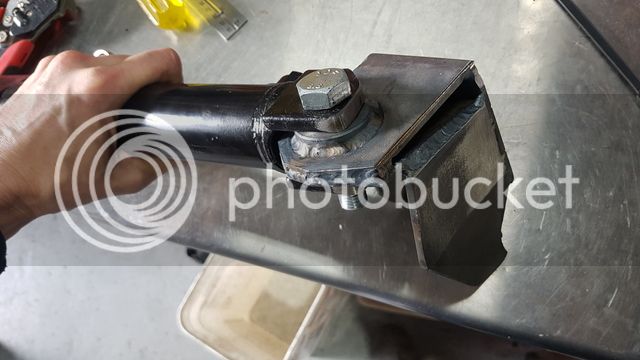
Ram ends shortened redrilled and profiled, would have been much easier with a spherical bearing end ram but what's the fun in that.
Tie rod and drag bar stacked on top and the steering arm. Now the ram will be doing half the work I'm happy with them both being on the top side.
Tie rod end mount.
boxed and gusseted, drain hole cut in the front section.
Had to move the tie rod to the top of the steering arms, and move the drag bar to the top of the pitman arm.
After many revisions I got it just right.
Had to extend out the hard stops as the ram was just short.
Axle side mount.


I added another plate to box off the section once I had I welded to the axle and a tube gusset to the reinforced section

Nice and parallel to the tie rod.

tacked up.

Ram ends shortened redrilled and profiled, would have been much easier with a spherical bearing end ram but what's the fun in that.

Tie rod and drag bar stacked on top and the steering arm. Now the ram will be doing half the work I'm happy with them both being on the top side.

Tie rod end mount.

boxed and gusseted, drain hole cut in the front section.


Wow, pretty heavy duty! I'm curious as to tie rod tube, is it factory? If I remember, 60 guys use 80 series
TRE's and tube because the tube is somewhat thicker. I guess what I'm asking is with all the heavy duty brackets,
will the tube withstand the forces? I agree, spherical rod ends would certainly have made your job a lot easier.
TRE's and tube because the tube is somewhat thicker. I guess what I'm asking is with all the heavy duty brackets,
will the tube withstand the forces? I agree, spherical rod ends would certainly have made your job a lot easier.
- Thread starter
- #170
The new FJ 73 Build
Back on page 5 theres the build on the tie rods and drag bar. Its 1045 bright bar solid 30mm with 5/8 and 3/4 spherical ends.
There pretty robust. Lol.
Back on page 5 theres the build on the tie rods and drag bar. Its 1045 bright bar solid 30mm with 5/8 and 3/4 spherical ends.
There pretty robust. Lol.
sort of missed that part I guess. J
- Thread starter
- #172
All good, that was one of the things I wanted to sort fairly early in the piece.
Didnt like how the drag bar mounted to the tie rod just didnt make sense to me, evrytime you turn the wheel it layed the tie rod end over.
Checked all the clearances at full flex today, had to scallop one plate a little bit but besides that all good,
Just waiting on a 1/4 bsp tap and some nipples and we are good to go.
little knotch for clearance.
Axle side mount.
Clearance of drag link at full up off frame is perfect.And mount is well clear of motor and so on.
looks a little close, but is a godd 15mm
Didnt like how the drag bar mounted to the tie rod just didnt make sense to me, evrytime you turn the wheel it layed the tie rod end over.
Checked all the clearances at full flex today, had to scallop one plate a little bit but besides that all good,
Just waiting on a 1/4 bsp tap and some nipples and we are good to go.

little knotch for clearance.

Axle side mount.

Clearance of drag link at full up off frame is perfect.And mount is well clear of motor and so on.

looks a little close, but is a godd 15mm


- Thread starter
- #175
Saw these for sale a few weeks ago and couldn't let them go.
37 x 14.5 Creepy Crawlers and comp spec et -100 15"steel wheels.
These are custom built stoutest wheels i have seem easily, the beadlock rim is 4mm steel and the spokes mounting face is 10mm plate.
They have been run on a few comp trucks at Willowglen and others.
They had a few leaks and broken bolts so i stripped them down, and gave them a lick of paint.
4mm Beadlock rims.
Had to shave the front calipers and smooth the rear of the wheels and they just fit, no more spacers for me.
Just where the material had stretched from pressing out the holes.
Fatso
Deeeeeeeeeeeeeeeeeep Dish.
New hardware flat black.
Back to the hydro assist, stripped the steering box.
Drilliing to tap 1/4 bsp.this top hole is aiming for a small vein and position is fairly critical, milling machine makes easy work of it.
Internals stripped.
You can see the vein running down the centre of the lower tapped hole, bang on.
Second hole on the side not so critical, power tapping the hole, again 1/4 BSP
Ready to go back together.
37 x 14.5 Creepy Crawlers and comp spec et -100 15"steel wheels.
These are custom built stoutest wheels i have seem easily, the beadlock rim is 4mm steel and the spokes mounting face is 10mm plate.
They have been run on a few comp trucks at Willowglen and others.

They had a few leaks and broken bolts so i stripped them down, and gave them a lick of paint.

4mm Beadlock rims.

Had to shave the front calipers and smooth the rear of the wheels and they just fit, no more spacers for me.

Just where the material had stretched from pressing out the holes.

Fatso


Deeeeeeeeeeeeeeeeeep Dish.

New hardware flat black.


Back to the hydro assist, stripped the steering box.
Drilliing to tap 1/4 bsp.this top hole is aiming for a small vein and position is fairly critical, milling machine makes easy work of it.
Internals stripped.


You can see the vein running down the centre of the lower tapped hole, bang on.


Second hole on the side not so critical, power tapping the hole, again 1/4 BSP

Ready to go back together.


Billyfj7312ht
Should only take ten minutes
Alflex Industries
"Yoga for your car"
"Yoga for your car"
- Thread starter
- #178
A spot of Yoga was needed to sus out the clearances on the front end,
Went to town witht he grinder loosing a heap of sheet metal and trimming the flares down a heap too.
Fender lip trimmed about 30mm up, inner well trimmed.
Flares trimmed.
Ended up something like this, added a little section to deflect crap from the battery.
Somewhat normal from the top view.
On the bump stop tucking 37's
Pretty impressive now with the fat rubber, very sturdy and feels a lot higher than earlier.
Because the front axle is forward about 75mm the bump stop wasnt hitting the old target very well.
Added a bigger reinforced platfrom, am looking at some hydro stops in the future.
Went to town witht he grinder loosing a heap of sheet metal and trimming the flares down a heap too.
Fender lip trimmed about 30mm up, inner well trimmed.

Flares trimmed.

Ended up something like this, added a little section to deflect crap from the battery.


Somewhat normal from the top view.

On the bump stop tucking 37's


Pretty impressive now with the fat rubber, very sturdy and feels a lot higher than earlier.

Because the front axle is forward about 75mm the bump stop wasnt hitting the old target very well.
Added a bigger reinforced platfrom, am looking at some hydro stops in the future.


Similar threads
Users who are viewing this thread
Total: 2 (members: 0, guests: 2)