
On almost every vehicle I have owned I have replaced the radio head unit and all the speakers. Its an easy and inexpensive way to get a lot better sound than stock, especially on an 18 year old truck. I'm not an audiophile and if you are one, you might want to look away!
I set out to first install the speakers and tweeters since my head unit is a couple days behind in shipping. I was planning on rewiring all of them from the doors to the head unit, bypassing the stock amp and using the head unit to power them all. I have done this before on a Scion XB and 2004 Tundra Double Cab, its not fun! When searching for the wiring diagrams and info here, I found out that the speaker wires were the same color from the head unit to the stock amp and still the same color from the stock amp to the speakers. Score! I will just connect everything where the amp is so I don't have to rewire the whole thing!
As of right now, i'm not going to be using the stock sub-woofer or putting in a new one. Increasing the speaker size should add some better mid/bass and honestly, the stock sub didn't do anything noticeable anyways.
Parts:
Pioneer FH-X720BT ($100)

Pyle PL63BL 6.5-Inch 360-Watt 3-Way Speakers (2 Pair) ($16 ea pair)(My LX had 5.25 speakers, so these barely fit)
Power Acoustik NB-2 200-Watt 3-Way Tweeters ($10)(built in crossover)
DKM Double Din Radio DVD Stereo Frame for Lexus Lx-470 ($30)
CURT 59421 22-16 Ga Butt Connectors 100 Per Bag ($9)
PART 1 - Bypassing the amp
1. Remove all the door panels (Door panel removal process)
2. Remove the passenger seat (4 bolts, unplug the harness)
3. Remove the Pioneer stock amp (4 bolts on floor, 2 screws on each side of holding bracket)
4. Orange Plug is harness "D", white plug in green receiver is harness "B", grey plug is harness "C", white plug in white receiver is harness "A"
Left to Right : A - C - B - D
Harness Pin and wire Guide
(Thanks to @nikramos Help - LX stereo wiring clarification, I also fixed the lettering based on the actual wiring diagram)
Harness D:
01 BRN GND1
02 BLU/YEL +B1 (from 20A radio fuse)
03 n/c
04 BRN GND2
05 BLU/YEL +B2 (goes to Head unit)
06 GRY ACC (goes to 15A Cigar fuse)
07 ORG MUTE
08 GRY ACC0 (goes to head unit)
09 WHT +B0
Harness B (wires going from amp to speakers):
01 LT GRN FR+
02 PNK FL+
03 n/c
04 RED RR+
05 BLK RL+
06 BLU FR-
07 VIO FL-
08 n/c
09 n/c
10 n/c
11 n/c
12 WHT RR-
13 YEL RL-
Harness C (wires going to subwoofer):
01 BLU/BLK WF1+
02 BLU/RED WF1-
03 n/c
04 n/c
05 n/c
06 BLU/WHT WF2+
07 BLU/YEL WF2- (I actually used this on instead of D5 and it still worked?)
08 n/c
09 n/c
10 n/c
11 n/c
12 n/c
13 n/c
14 n/c
Harness A (wires coming from the head unit, same coloring at head unit harness):
01 n/c
02 n/c
03 LT GRN FR+
04 BLK RL+
05 RED RR+
06 BLK/RED AMP
07 GRN BEEP
08 BLU FR-
09 VIO FL-
10 PNK FL+
11 NCA SDG1
12 NCA SDG2
13 YEL RL-
14 WHT RR-
We are only concerned with the bolded, red text colored wires
5. Cut the wires on harness "B" leaving about an inch or so left on the plug in case you need to reuse it.
6. Strip and put the pink butt connectors (16-22awg sized) on each of the wires and crimp them down. Tug on it to make sure they are on there (not too hard).
7. Cut out the correct wires from harness "A" and strip the ends
8. Connect the stripped end of the harness "A" wires to the corresponding color that already has the butt connector. Most vehicles I have worked on change the colors from one harness to the next on the same path , so this was refreshing!
9. Now we need to make sure that the constant 12v and ACC 12v gets to the head unit. Both of those wires go to the amp first, then on to the head unit. I searched for which specific wires they were on the forum, but there wasn't a good answer. I got a little help from AllData and figured it out. There are two Blue/Yellow wires and two Grey wires. They both need to be connected/jumped respectively to make sure power gets to the head unit.
Connect D5 and D2 (both Blue/Yellow) together with a butt connector (constant 12v).
Connect D6 and D8 (both Grey) together with a butt connector (ACC 12).
10. That takes care of bypassing the amp and now the speaker wires connect straight from the head unit to the speakers in the doors!
PART 2 - Installing 6.5 inch speakers into 5.25 housing
These Pyle speakers are the number one selling 6.5 inchers on Amazon with great reviews. They aren't Polk or Infinity's but they should be a big improvement over the paper stock speakers and give a little more bass than the 5.25 inch stocks. When you remove the stock speakers, the connectors inside are plug and play with the new speakers using the existing wiring (bypassing the amp from Part 1).
1. With the door panels off, unscrew the three screws holding the stock 5.25 inch speakers to the door box.
2. I reused those three screws and screwed them back into the plastic speaker box making new holes. Be careful not to tighten them flush since the 6.5 inch speaker will bend on the back side since it doesn't fit flush in the opening.
3. Here is the finished product. It is in there snug and tight and it fits behind the door panel perfectly.
4. Repeat the above steps for the other doors (front and rear)
PART 3 - Replacing the stock tweeters
These ended up sounded like s***e! I disconnected them and everything sounds fine. They were $10, so oh well. This section still applies, just get something else!
I purchased these tweeters because they were cheap and had the built in crossover. I didn't want to spend the money on a true component system. I really just wanted some sound coming from higher up to balance our the low placed speakers. I have replaced door speakers like this before and disconnected the A panel tweeter and I could really tell the sound was coming from below and not "everywhere". Its a cheap way to get the best out of the whole system.
1. Remove the tweeter bracket by removing the single screw. Unplug the tweeter harness (black/yellow wiring to white plug)
2. I had to twist the tweeter and the bracket in opposite directions to get the tiny screw unstuck that connects the tweeter to the bracket.
3. Here is the bracket fully removed with the new tweeter.
4. For these specific aftermarket tweeters, the stripped wiring is as follows:
Silver = - negative
Copper = + Positive
5. The stock tweeter wires are as follows:
Black = - negative
Yellow = + positive
5. Strip all wires and connect with pink butt connectors. I had to strip the tweeter wires twice as long as normal so they can be folded in half to make them better fit the connector.
6. The finished product:
7. The tweeters come with adhesive stickers for mounting. I used those to attach them to the bracket and they held really well.
8. Mount the new tweeter back and it should look like this: (it fits behind the cover with no problem and is directed properly)
While I was typing this up, my head unit showed up a day early! I'll be putting that in tonight and will continue the write up with that installation and the final results soon.
I set out to first install the speakers and tweeters since my head unit is a couple days behind in shipping. I was planning on rewiring all of them from the doors to the head unit, bypassing the stock amp and using the head unit to power them all. I have done this before on a Scion XB and 2004 Tundra Double Cab, its not fun! When searching for the wiring diagrams and info here, I found out that the speaker wires were the same color from the head unit to the stock amp and still the same color from the stock amp to the speakers. Score! I will just connect everything where the amp is so I don't have to rewire the whole thing!
As of right now, i'm not going to be using the stock sub-woofer or putting in a new one. Increasing the speaker size should add some better mid/bass and honestly, the stock sub didn't do anything noticeable anyways.
Parts:
Pioneer FH-X720BT ($100)

Pyle PL63BL 6.5-Inch 360-Watt 3-Way Speakers (2 Pair) ($16 ea pair)(My LX had 5.25 speakers, so these barely fit)

Power Acoustik NB-2 200-Watt 3-Way Tweeters ($10)(built in crossover)

DKM Double Din Radio DVD Stereo Frame for Lexus Lx-470 ($30)

CURT 59421 22-16 Ga Butt Connectors 100 Per Bag ($9)

PART 1 - Bypassing the amp
1. Remove all the door panels (Door panel removal process)
2. Remove the passenger seat (4 bolts, unplug the harness)
3. Remove the Pioneer stock amp (4 bolts on floor, 2 screws on each side of holding bracket)

4. Orange Plug is harness "D", white plug in green receiver is harness "B", grey plug is harness "C", white plug in white receiver is harness "A"
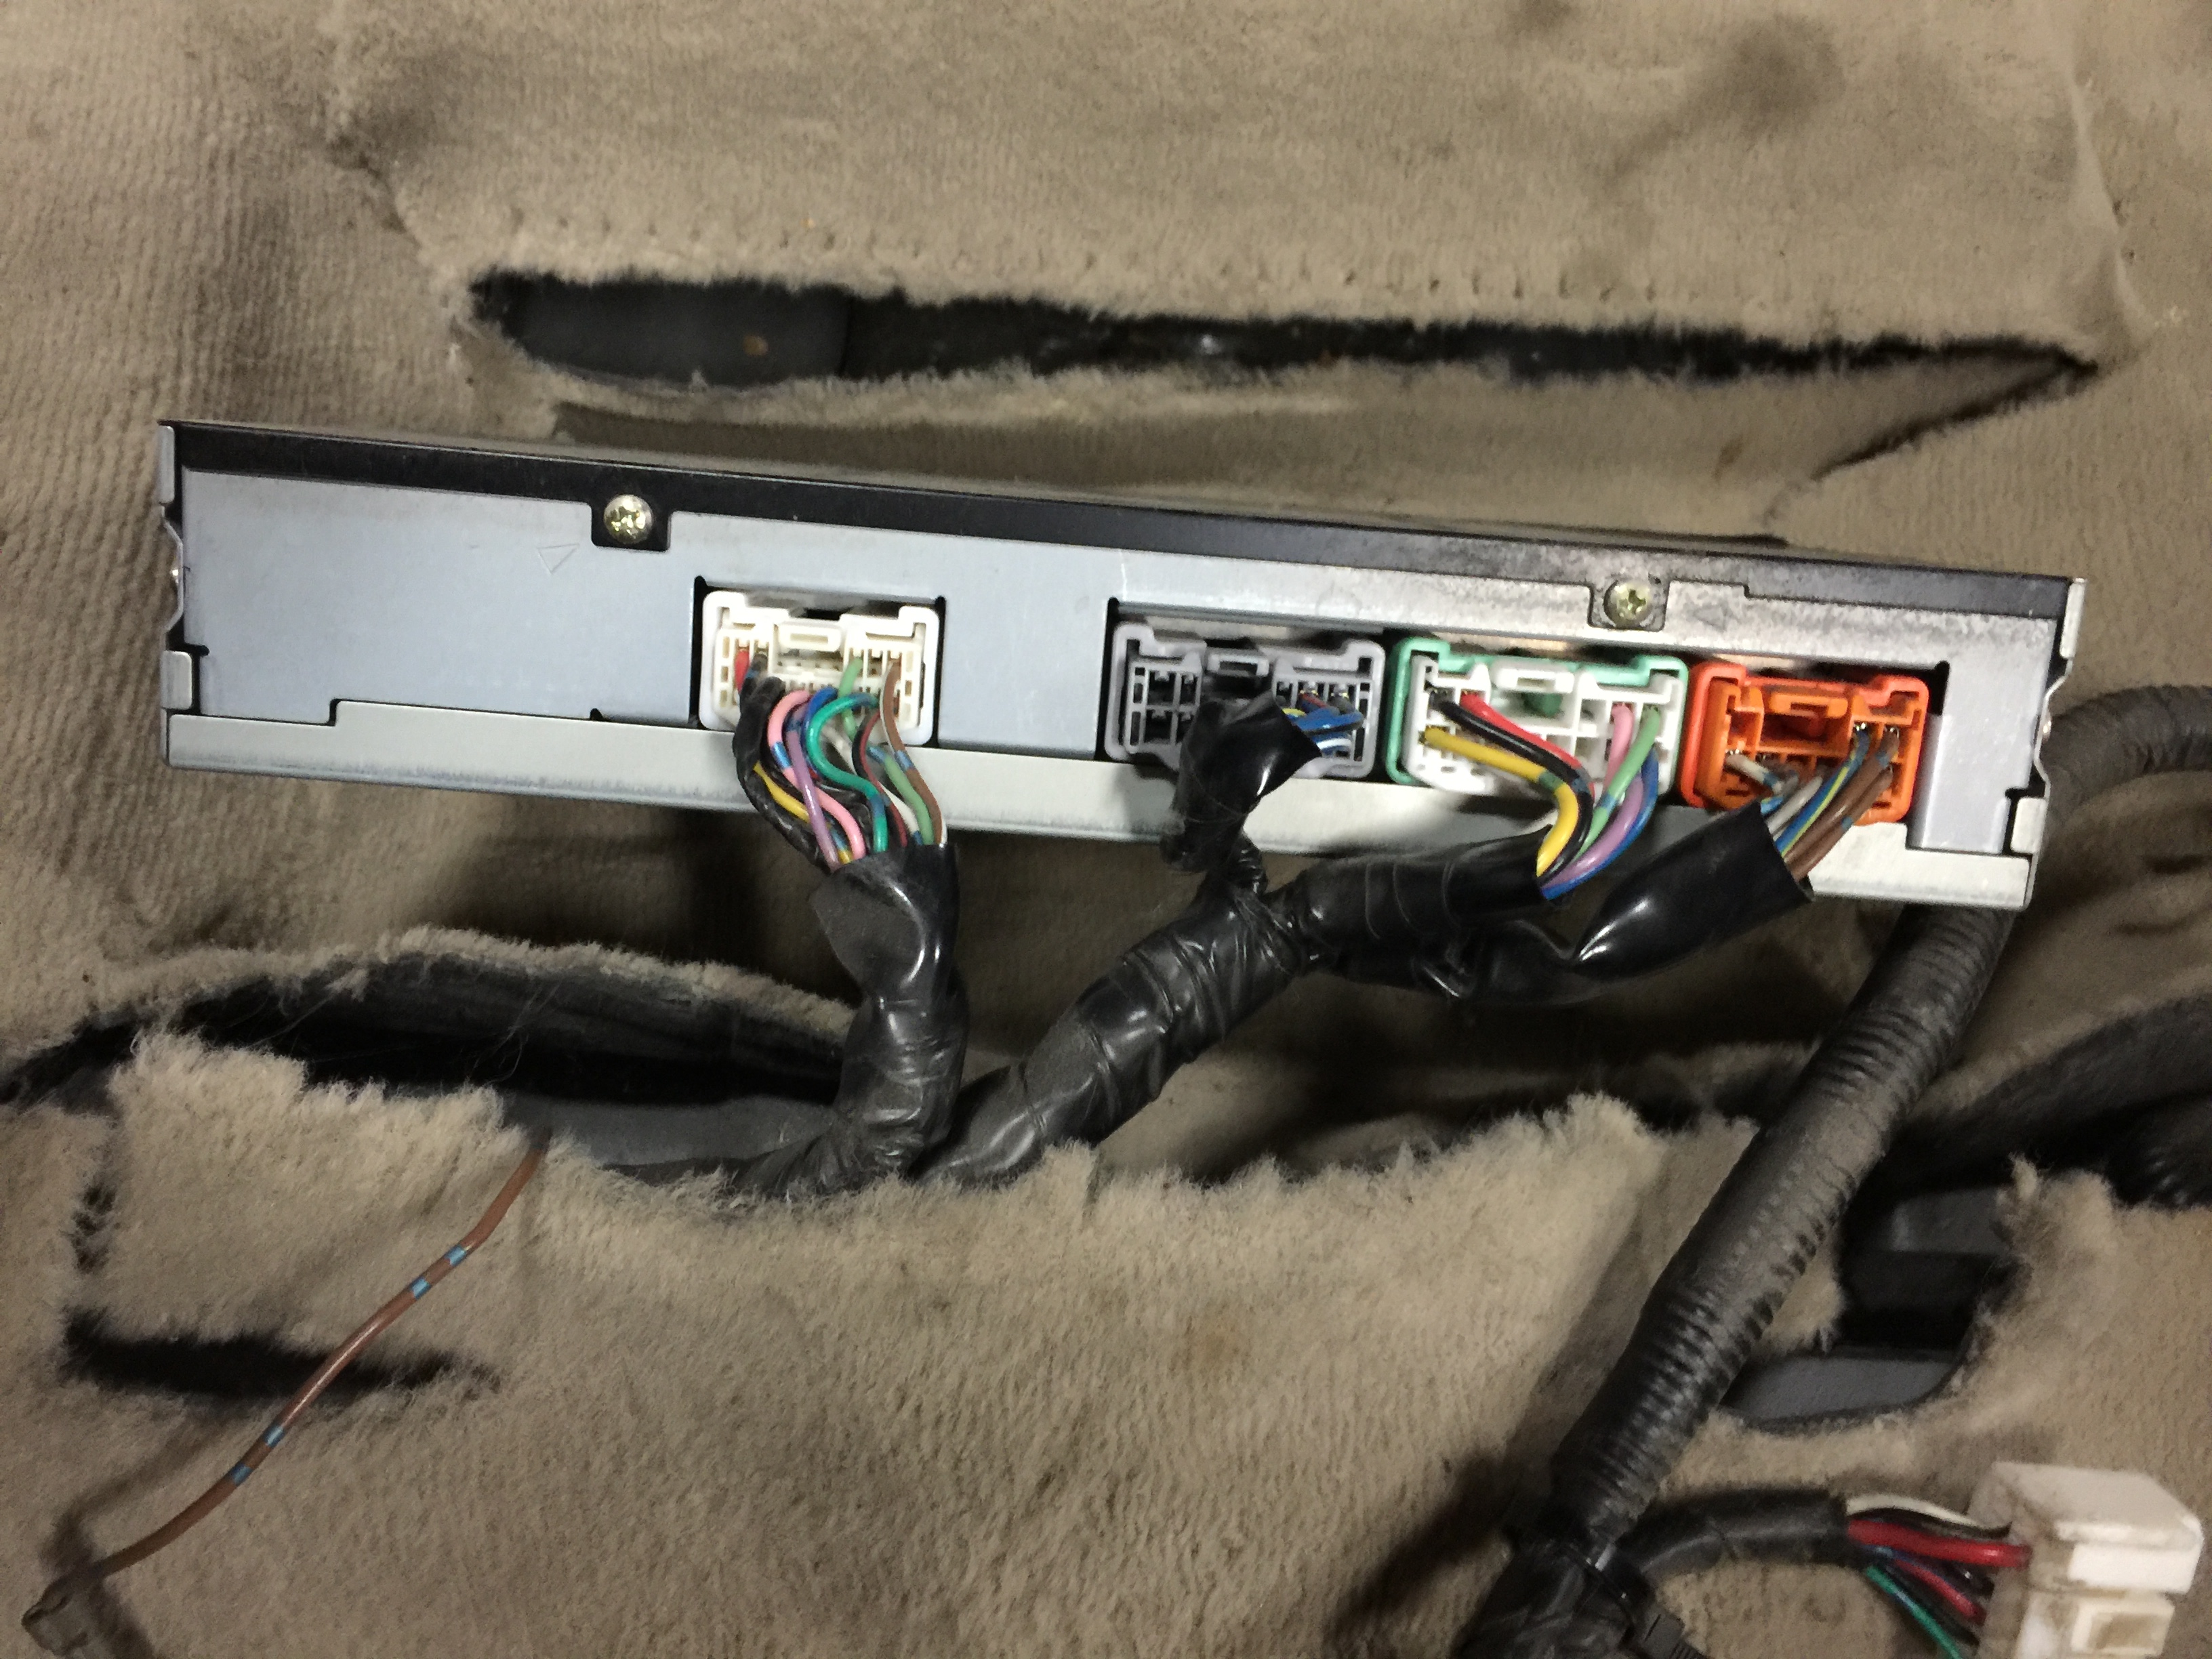
Left to Right : A - C - B - D
Harness Pin and wire Guide
(Thanks to @nikramos Help - LX stereo wiring clarification, I also fixed the lettering based on the actual wiring diagram)
Harness D:
01 BRN GND1
02 BLU/YEL +B1 (from 20A radio fuse)
03 n/c
04 BRN GND2
05 BLU/YEL +B2 (goes to Head unit)
06 GRY ACC (goes to 15A Cigar fuse)
07 ORG MUTE
08 GRY ACC0 (goes to head unit)
09 WHT +B0
Harness B (wires going from amp to speakers):
01 LT GRN FR+
02 PNK FL+
03 n/c
04 RED RR+
05 BLK RL+
06 BLU FR-
07 VIO FL-
08 n/c
09 n/c
10 n/c
11 n/c
12 WHT RR-
13 YEL RL-
Harness C (wires going to subwoofer):
01 BLU/BLK WF1+
02 BLU/RED WF1-
03 n/c
04 n/c
05 n/c
06 BLU/WHT WF2+
07 BLU/YEL WF2- (I actually used this on instead of D5 and it still worked?)
08 n/c
09 n/c
10 n/c
11 n/c
12 n/c
13 n/c
14 n/c
Harness A (wires coming from the head unit, same coloring at head unit harness):
01 n/c
02 n/c
03 LT GRN FR+
04 BLK RL+
05 RED RR+
06 BLK/RED AMP
07 GRN BEEP
08 BLU FR-
09 VIO FL-
10 PNK FL+
11 NCA SDG1
12 NCA SDG2
13 YEL RL-
14 WHT RR-
We are only concerned with the bolded, red text colored wires
5. Cut the wires on harness "B" leaving about an inch or so left on the plug in case you need to reuse it.
6. Strip and put the pink butt connectors (16-22awg sized) on each of the wires and crimp them down. Tug on it to make sure they are on there (not too hard).

7. Cut out the correct wires from harness "A" and strip the ends

8. Connect the stripped end of the harness "A" wires to the corresponding color that already has the butt connector. Most vehicles I have worked on change the colors from one harness to the next on the same path
, so this was refreshing!
9. Now we need to make sure that the constant 12v and ACC 12v gets to the head unit. Both of those wires go to the amp first, then on to the head unit. I searched for which specific wires they were on the forum, but there wasn't a good answer. I got a little help from AllData and figured it out. There are two Blue/Yellow wires and two Grey wires. They both need to be connected/jumped respectively to make sure power gets to the head unit.
Connect D5 and D2 (both Blue/Yellow) together with a butt connector (constant 12v).
Connect D6 and D8 (both Grey) together with a butt connector (ACC 12).


10. That takes care of bypassing the amp and now the speaker wires connect straight from the head unit to the speakers in the doors!
PART 2 - Installing 6.5 inch speakers into 5.25 housing
These Pyle speakers are the number one selling 6.5 inchers on Amazon with great reviews. They aren't Polk or Infinity's but they should be a big improvement over the paper stock speakers and give a little more bass than the 5.25 inch stocks. When you remove the stock speakers, the connectors inside are plug and play with the new speakers using the existing wiring (bypassing the amp from Part 1).
1. With the door panels off, unscrew the three screws holding the stock 5.25 inch speakers to the door box.
2. I reused those three screws and screwed them back into the plastic speaker box making new holes. Be careful not to tighten them flush since the 6.5 inch speaker will bend on the back side since it doesn't fit flush in the opening.
3. Here is the finished product. It is in there snug and tight and it fits behind the door panel perfectly.

4. Repeat the above steps for the other doors (front and rear)
PART 3 - Replacing the stock tweeters
These ended up sounded like s***e! I disconnected them and everything sounds fine. They were $10, so oh well. This section still applies, just get something else!
I purchased these tweeters because they were cheap and had the built in crossover. I didn't want to spend the money on a true component system. I really just wanted some sound coming from higher up to balance our the low placed speakers. I have replaced door speakers like this before and disconnected the A panel tweeter and I could really tell the sound was coming from below and not "everywhere". Its a cheap way to get the best out of the whole system.
1. Remove the tweeter bracket by removing the single screw. Unplug the tweeter harness (black/yellow wiring to white plug)
2. I had to twist the tweeter and the bracket in opposite directions to get the tiny screw unstuck that connects the tweeter to the bracket.
3. Here is the bracket fully removed with the new tweeter.

4. For these specific aftermarket tweeters, the stripped wiring is as follows:
Silver = - negative
Copper = + Positive
5. The stock tweeter wires are as follows:
Black = - negative
Yellow = + positive
5. Strip all wires and connect with pink butt connectors. I had to strip the tweeter wires twice as long as normal so they can be folded in half to make them better fit the connector.
6. The finished product:

7. The tweeters come with adhesive stickers for mounting. I used those to attach them to the bracket and they held really well.

8. Mount the new tweeter back and it should look like this: (it fits behind the cover with no problem and is directed properly)

While I was typing this up, my head unit showed up a day early! I'll be putting that in tonight and will continue the write up with that installation and the final results soon.
Last edited:


