So,
I received my new 100 series tailgate lid on thursday and am really excited to get rid of my drawers and reclaim my third row!
Here's the step by step install with a few things in RED to note.
Step 1:
Remove your carpet/cover. It just clips right off, grasp the edge and work your way around. Your tailgate won't have the shiny spots, thats some sound deadening I had left over when I did the interior of the truck.

Step 2:
Remove the screwed on side covers, unplug the taillight connections, unhook the tailgate latch wired and cut all of the connectors holding the wires to the sheet metal that you are about to cut out.

Step 3:
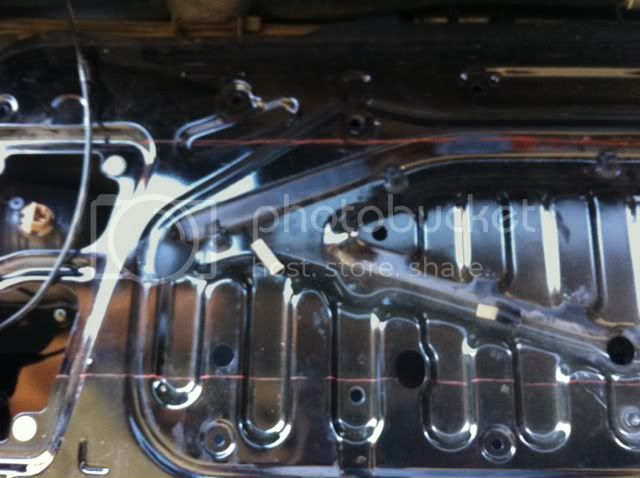
My lid was one of the first so there was no cutting template. (Kevin provides these with his other lids, so I assume they will be forthcoming) I laid out the lid and drew the outline of the opening with a grease pencil (red line)

Step 4:
Note the stuff under where you are about to cut! There are 3 cross members and 2 pieces of "spring" that are under tension. I chose to use a grinder because I have a good deal of experience with one and it cuts through the sheet like butter (MORE ON THAT SHORTLY)

Step 5:
If your lines are drawn and you've checked again to make sure, Cut away! The cross members are deeper than a 5" grinder wheel, so I had to peel the metal back to finish the cuts. THe black rod in the foreground is the spring that assists with the tailgate. I left mine to see if I could figure out how to retain them.


LOOK HERE
Watch the depth of your grinder when cutting the cross members!

OUCH!, Oh yeah, that's all the way through! Fortunately the exterior of my truck is Line-X'd and the cut is behind the tire carrier, a little silicone and I'm good as new... Let my mistake save you some sorrow on your pretty paint job.

Step 6:
Slide the lid on and make sure your hole is correct, if not trim a little more. This is where I monkeyed around on extending my tailgate assist system. The solution is going to be to sleeve them. Kevin may come up with something prettier. I tried an old Mag Lite body and settled on chopping up some old mountainbike handlebar and insulating the rattling with some pool noodle.


Step 7:
Put a little paint on the raw edges, put in some sound deadening material, zip tie all of your wires out of the way and re-connect the harnesses.

Step 8:
Put the lid in place and screw it all together. It is pretty obvious as you go around which bolts go where. The long ones on the outside near the latch and no washer in the center bottom")


All said and done with no call to Kevin and no instructions, It took me 3 hours start to finish. I could do another in less than 45 minutes. there is a ton of room and I can't wait to start stuffing it. I'm not sure how important it was for me to retain the spring assist on the tailgate, but the bars don't keep me from putting anything in and I can still swing them out of the way and back in if need be.
With this and my storage bumper from BIO, I now have seating for 8 once again and can carry everything but the kitchen sink much more stealthily.
I received my new 100 series tailgate lid on thursday and am really excited to get rid of my drawers and reclaim my third row!
Here's the step by step install with a few things in RED to note.
Step 1:
Remove your carpet/cover. It just clips right off, grasp the edge and work your way around. Your tailgate won't have the shiny spots, thats some sound deadening I had left over when I did the interior of the truck.
Step 2:
Remove the screwed on side covers, unplug the taillight connections, unhook the tailgate latch wired and cut all of the connectors holding the wires to the sheet metal that you are about to cut out.
Step 3:
My lid was one of the first so there was no cutting template. (Kevin provides these with his other lids, so I assume they will be forthcoming) I laid out the lid and drew the outline of the opening with a grease pencil (red line)
Step 4:
Note the stuff under where you are about to cut! There are 3 cross members and 2 pieces of "spring" that are under tension. I chose to use a grinder because I have a good deal of experience with one and it cuts through the sheet like butter (MORE ON THAT SHORTLY)
Step 5:
If your lines are drawn and you've checked again to make sure, Cut away! The cross members are deeper than a 5" grinder wheel, so I had to peel the metal back to finish the cuts. THe black rod in the foreground is the spring that assists with the tailgate. I left mine to see if I could figure out how to retain them.
LOOK HERE
Watch the depth of your grinder when cutting the cross members!
OUCH!, Oh yeah, that's all the way through! Fortunately the exterior of my truck is Line-X'd and the cut is behind the tire carrier, a little silicone and I'm good as new... Let my mistake save you some sorrow on your pretty paint job.
Step 6:
Slide the lid on and make sure your hole is correct, if not trim a little more. This is where I monkeyed around on extending my tailgate assist system. The solution is going to be to sleeve them. Kevin may come up with something prettier. I tried an old Mag Lite body and settled on chopping up some old mountainbike handlebar and insulating the rattling with some pool noodle.
Step 7:
Put a little paint on the raw edges, put in some sound deadening material, zip tie all of your wires out of the way and re-connect the harnesses.
Step 8:
Put the lid in place and screw it all together. It is pretty obvious as you go around which bolts go where. The long ones on the outside near the latch and no washer in the center bottom
All said and done with no call to Kevin and no instructions, It took me 3 hours start to finish. I could do another in less than 45 minutes. there is a ton of room and I can't wait to start stuffing it. I'm not sure how important it was for me to retain the spring assist on the tailgate, but the bars don't keep me from putting anything in and I can still swing them out of the way and back in if need be.
With this and my storage bumper from BIO, I now have seating for 8 once again and can carry everything but the kitchen sink much more stealthily.

")
