My skid plate build (1 Viewer)

This site may earn a commission from merchant affiliate
links, including eBay, Amazon, Skimlinks, and others.

Joined
Nov 5, 2005
Threads
25
Messages
670
Location
Napa, California
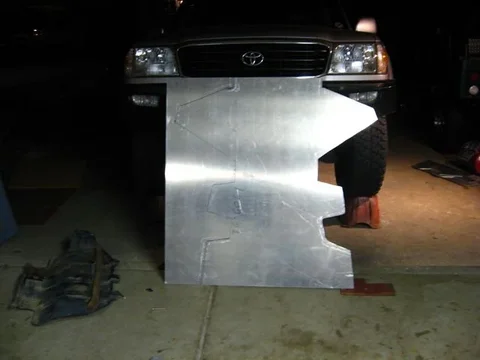
Well, after reading some different ideas on the Front Skid Plate? thread, I said I was diving in. And I have. But as usual, the phone ringing, people stopping by, etc...
But I did start it and here we go. First I re-thought the whole idea and put some thought into Dandon's comment about my aluminum being too thin. He's right about using 1/4" or 6MM for stout hit anything strong. I try to keep my sights on trail, expedition type outings, so I didn't really get into overkill engineering. I stayed with the 1/8 plate T-6061 aluminum so I won't go bashing into some place I should not be with my 100.

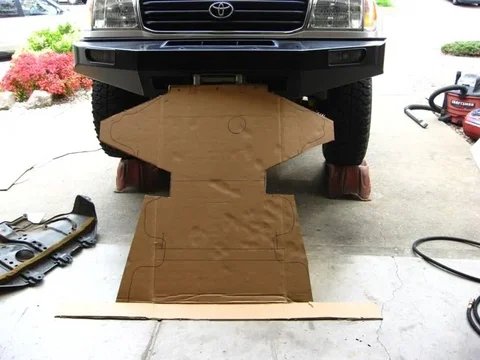
I started out with a cardboard template so I could cut, tape, fold, and fit untill I had the basics down.
skidplate 001LR.jpg

Next I punched holes in it and "bolted it on" to fit it a little more.
skidplate 002LR.jpg

I traced out the final template over to the plate and then started cutting. I sure love that Sawzall, but the blades didn't last with the aluminum clogging up the teeth.
skidplate 003LR.jpg

Enough for tonight, and I hope I can get the bends done tomorrow on a brake.
skidplate 001LR.jpg
skidplate 002LR.jpg
skidplate 003LR.jpg
 
I've only burned up three blades getting half of it cut out.

skidplate 004LR.jpg

So we're off to Home Cheapo in the morning to get some more small scroll blades.
skidplate 004LR.jpg
 
camp....this is looking saweeeeeeeeeetttttttttttt! When your done send me that template k? lol
 
Looks nice! I also agree with you, 3 mm alu can be enough for not-so-hard abuse. And it's way easier to cut and bend than thicker stuff. Al least it will be a thousand times better than the plastic cover.
BTW, how are you going to cut out the holes for oil & oil filter service?
When you're fineshed, I'm sure you can get some $$ back from your cardboard template :)
 
Great work. This is on my list of things to try and tackle. I will keep my eye on this thread. Be interested in seeing how you make your bends. You have access to a break press or do you have a do it yourself way you can share?

Zane
 
looking good !!!!!
i think all us on mud would be glad to send some $$ for you time and get a patern from you.
we have all wanted to do a skid plate and it looks like your on the right path ..
:clap:
 
Wow, I wonder what this template is worth?$?$?$?$

Anyway, day 2 and I told myself I'm not answering the phone today. I started off by running down and buying some more metal scroll blades for the Sawzall and then came home to finish the cut out. If you're doing this, be prepared for aluminum chips to find their way every where. I did have to trim some more and equal out the "wings" a little and create a mirror image at the bend points.

cutoutcomplete.jpg

Next it was off to my local hideout with a box of donuts to use the metal brake. I want one of these so bad and I think it has just jumped passed the plasma cutter on the list of toys to get. The trick here is working your bends outward. Don't do those "simple little ones" out on the ends first, because the rest of the plate won't slide through the brake jaws. And no I didn't do that. (this time)
bend1A.jpg

Draw back number one using T-6 Aluminum is you are limited to 45 degree bends or less as it's brittle. 4046 and up have better hardness, but are likely to crack under 90 degree folds. I now have to figure out some nice angle bracket repairs.
FloorBreak1.jpg

Digging around in the scrap pile I found some aluminum angle to repair this, and I'll find some cool looking screws to line up down the seam.
cutoutcomplete.jpg
bend1A.jpg
FloorBreak1.jpg
 
I didn't get any pictures of the spacers I made for the cross members, but I have some more finish work to do anyway. I saved the broken wing to be attached in a different fashion next week some time. :doh:
Floorbreak2.jpg

Then I set off finding all the hole placement for bolting it on.

floor1A.jpg

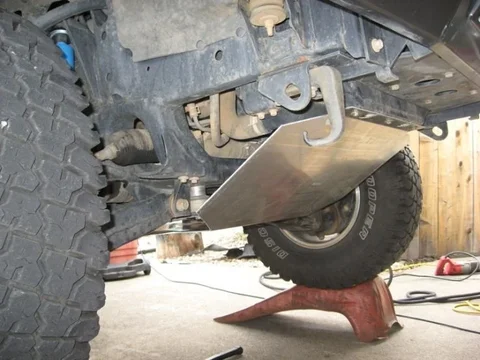
Then it was back to the belly for some more fitting and alignment. First I drilled the front three bolts and mounted the front end to the cross member. After it was hanging on the front, I used old manifold studs in the cross members in the back and swung the plate up and hit the bottom with a dead blow hammer. :idea: This leaves a nice indent where the bolt holes need to be. Pulled it back off and drilled the rest.
underfull.jpg

I still have some finish work and now more ideas on higher strength mounting.
Floorbreak2.jpg
floor1A.jpg
underfull.jpg
 
I think an angle mount down to the face of the plate is gaining some steam in my head, but I have a couple of days at work to think about it. The right front is completely open so I can plan things to do with that. And yes Spressomon, that factory hook looks terrible, but I have plans for that too.

underRF.jpg

The left front didn't quite line up right, so the bracket thing will be for both sides.

UnderLF.jpg


The rear of the plate has a nice overhang to be fitted with the second half of the belly pan when I get a chance for that. Until then, the 1/4 steel plate under the transfer case stays put.

under_rear.jpg
UnderLF.jpg
under_rear.jpg
underRF.jpg
 
Hey campfire - that template is probably worth $2K!!

On a side note, I see you have a lift, but I also see you have the Bilstein shocks.... Do you have the OME torsion bars and rear springs? How you like that set-up? Lose any travel with the Billies?

Don't mean to sidetrack/highjack.. but it's so easy these days!! ;)

Fish
 
thank you for the killer shots..
you could have the broken wing welded in fact you could cut the other one and weld it to and make it look like you did it on purpose.
way to go! !build it your self :wrench:more people should take your approach and make it happen instead of shelling out mass cash or just dreaming/bitching about things that we cant get from australia.
you rock!
 
Hey campfire - that template is probably worth $2K!!

On a side note, I see you have a lift, but I also see you have the Bilstein shocks.... Do you have the OME torsion bars and rear springs? How you like that set-up? Lose any travel with the Billies?

Don't mean to sidetrack/highjack.. but it's so easy these days!! ;)

Fish

A: Rear OME 865 springs, and factory front bars re-indexed 3 splines for the front lift. I really tried to keep the ride soft for my :princess: on the long trailer towing camp trips. The Billies lost me 1" drop in the rear, and 1/2" of drop in the front. But the ride is great with them! I'm planning on doing the Slick Rock Trail off Highway 4 in the Sierra's this summer, so I'll find out about the trail manners then.
 
thank you for the killer shots..
you could have the broken wing welded in fact you could cut the other one and weld it to and make it look like you did it on purpose.
way to go! !build it your self :wrench:more people should take your approach and make it happen instead of shelling out mass cash or just dreaming/bitching about things that we cant get from australia.
you rock!


Already have the "wings" prepped. And stopped by Air-Gas today for prices. $29.32 for a new liner, $347 for the spool gun, $129 for the 100% Argon tank, and they'll throw in a spool of .038 wire.
What a deal!
I did talk to Christo the other day, and he's trying to get his prototypes done soon. Sounds like his will be a nice clean multi-plate design that bolts right on. His are going to be steel, and after buying this aluminum, and can see why. Scrap just went up another .20 cents this week.

Thanks for all the support guys!
 
whats up? show us more :D
how is it going ?
i want to make one to:bounce2:
 
Ya, as soon as you get the template jonah cut one at the same time for me!! ;) I'll call you as soon as I get my Sahara so I can hire your neighbor for the small weld job.

Thanks again for the rear ARB bumper. Buddy at ARB is dialing me in on the replacement parts and I have the tire carrier for sale.

Fish
 
nice!

(what's with the goop on the boot?)
 
Sorry guys, 48 hour shifts keep me out of the loop and I just got home this morning. I let my son drive it and he told me the right side rubs.

Arrrrggguuhhhhhh!!!
Work just called! I'm going back in...
Later dudes...


Oh yeah.
Here you go.

front complete.jpg
front complete.jpg
 
I agree with slee... maybe some holes for air flow??? Keep an eye on the temp of the engine. Holes will also help with mud to drain away and lets you keep an eye for any oil leeks that givs consern....
Good work on the Bash plate, be sure to post some pic's with some dings in it:D...

Cheers Fishy
 

Users who are viewing this thread

Back
Top Bottom