Vintage Air Install

This site may earn a commission from merchant affiliate
links, including eBay, Amazon, Skimlinks, and others.

mmw68

CruiserCrap.com - pimping crap for your cruiser!
Supporting Vendor
Joined
Dec 13, 2004
Threads
326
Messages
3,505
Location
Austin, Texas
Website
store.cruisercrap.com
I finally got the Vintage Air unit installed in my 3FE40. I would not call this a full "DYI", step by step install, but just some pictures and observations.

Step one, Read the instructions! Here is a link to the instructions, which have not been undated for 30 years!

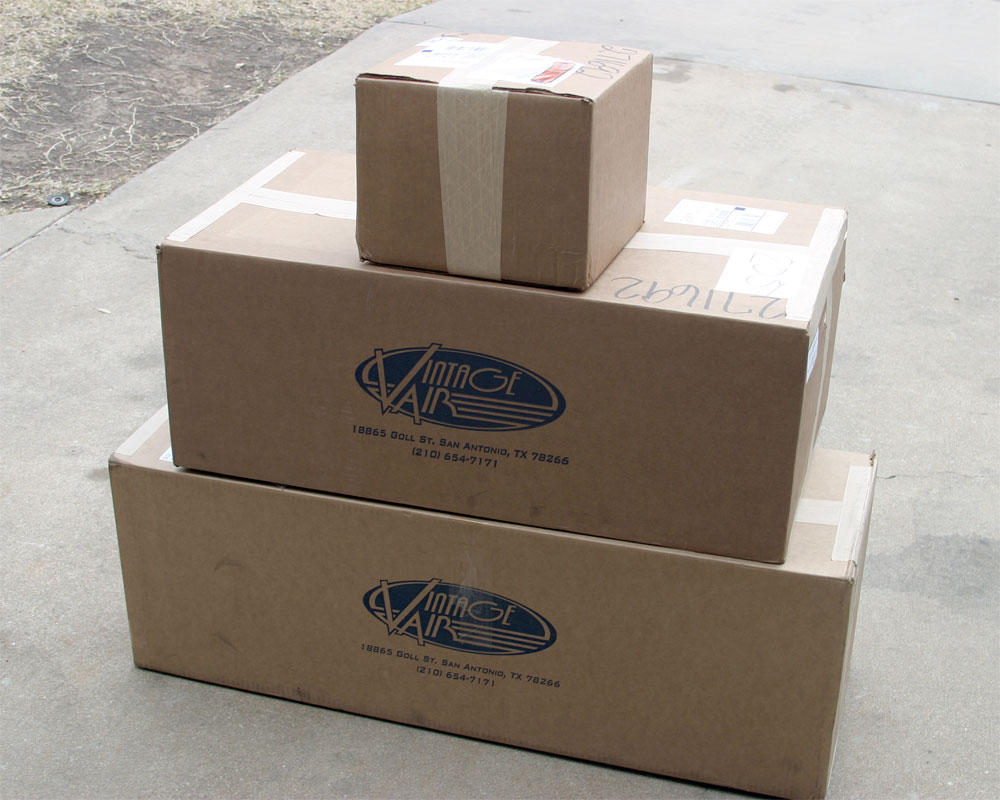
The unit arrive in three boxes to my house, with in a week of ordering it. I ordered it thru www.cruisercrap.com, (yes Iam a dealer now, shameless plug - I give a hefty ih8mud discount.)

boxes.jpg


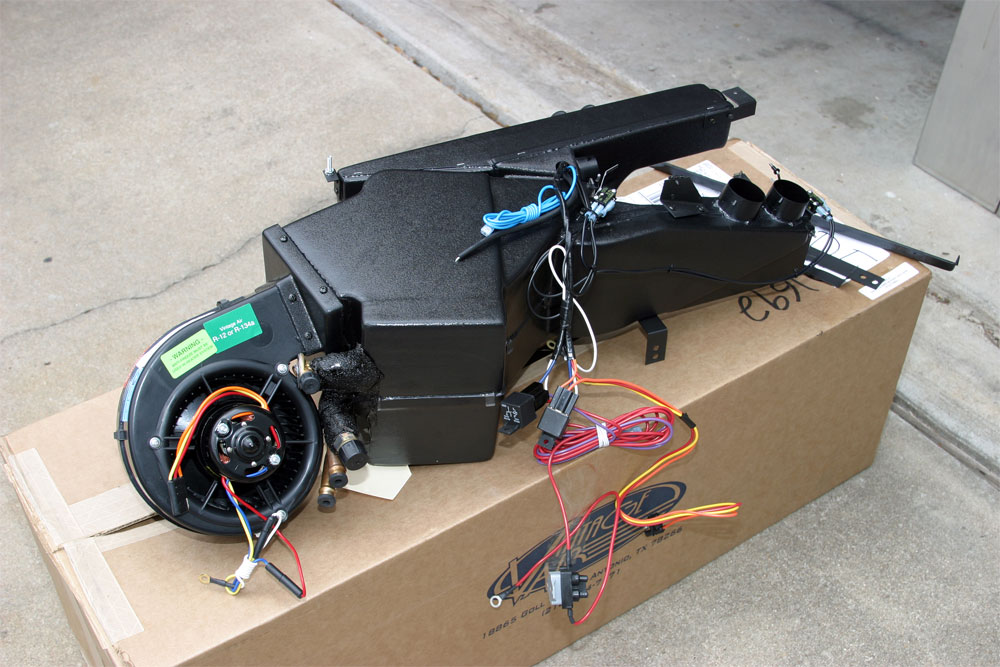
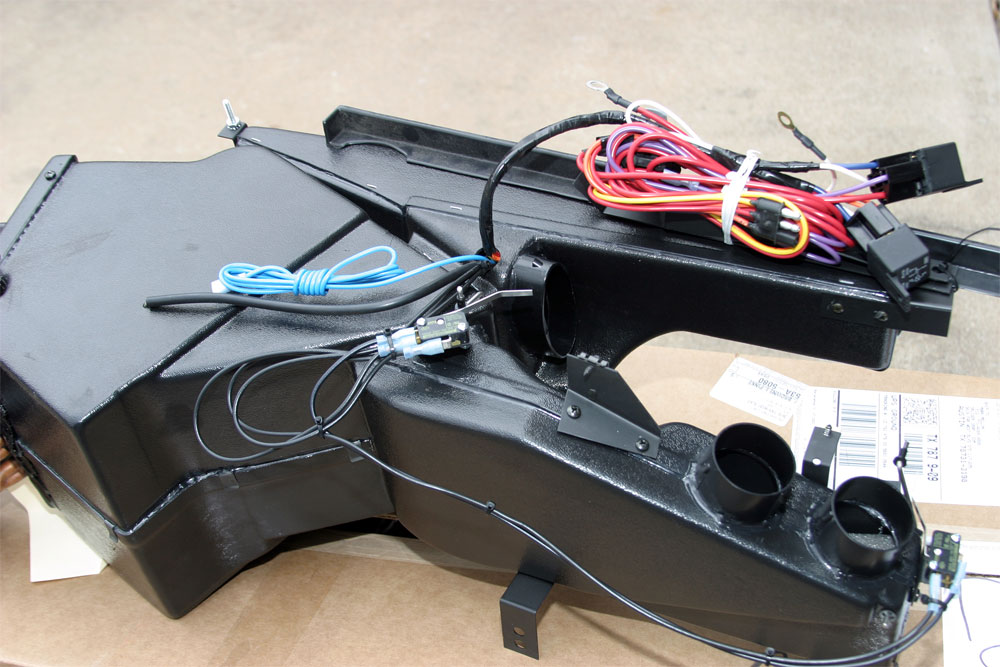
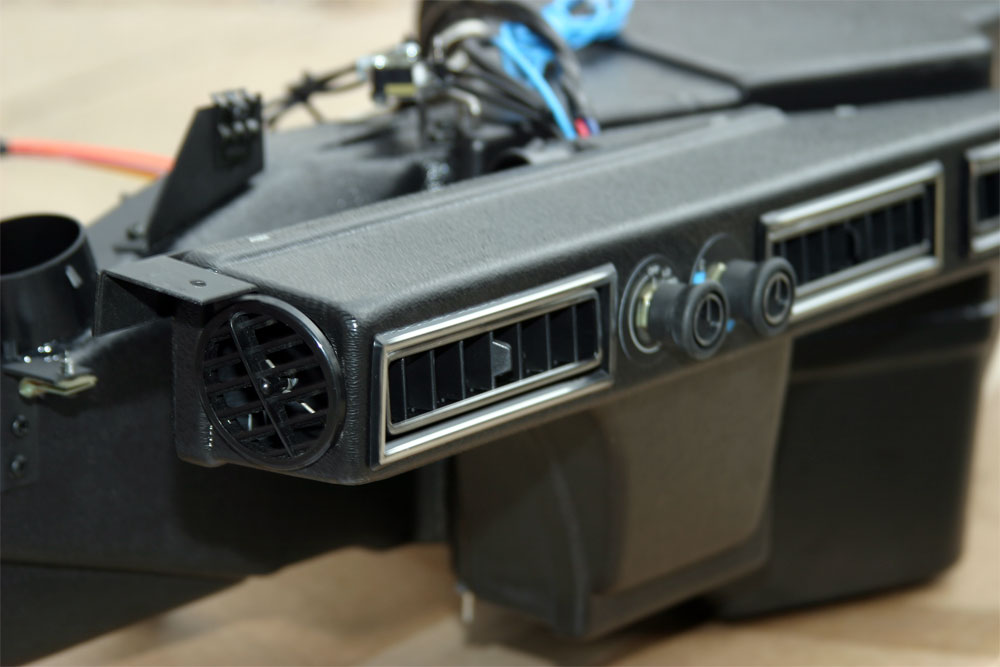
Here are a few shots of the unit:

back.jpg


fan.jpg


rear.jpg


sidevent.jpg


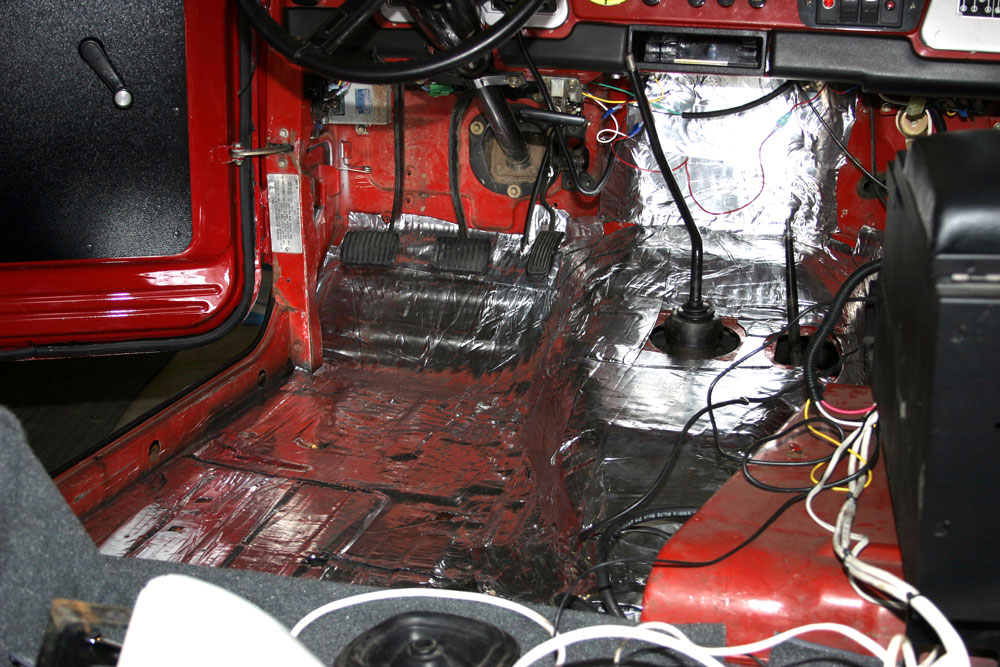
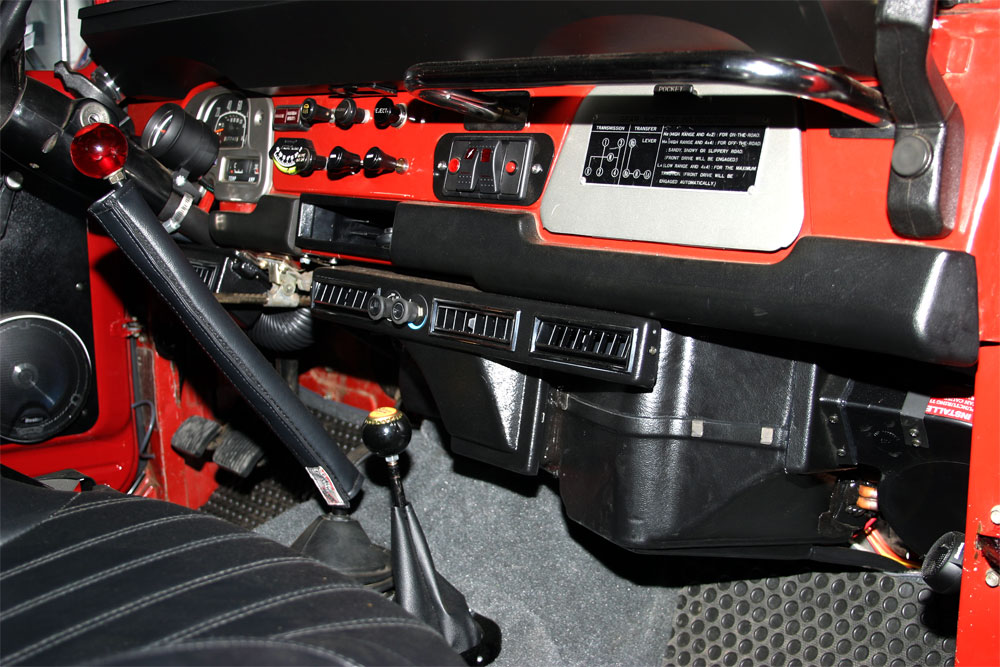
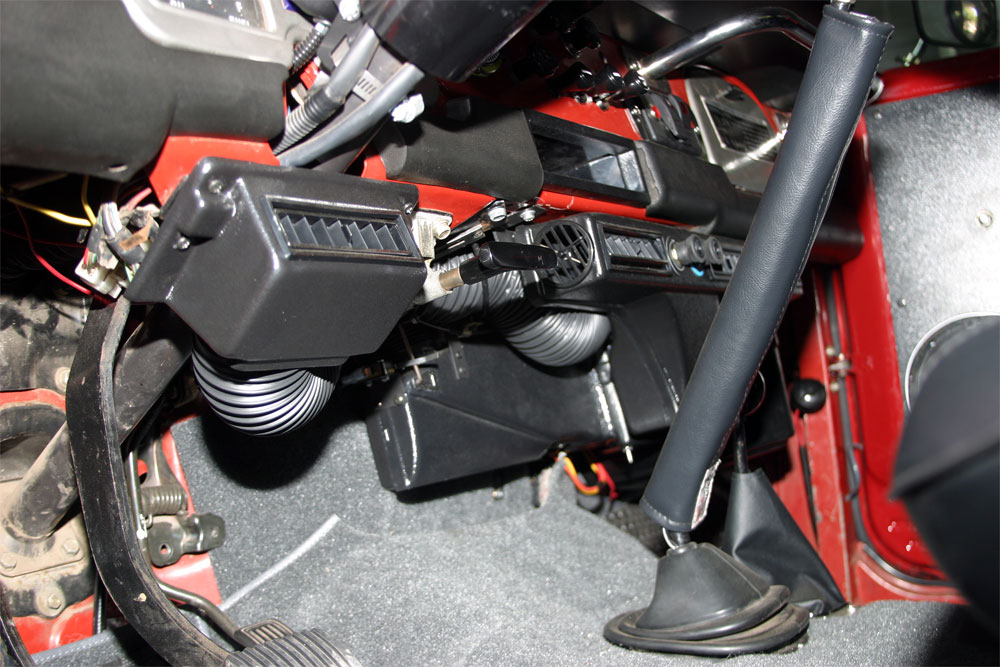
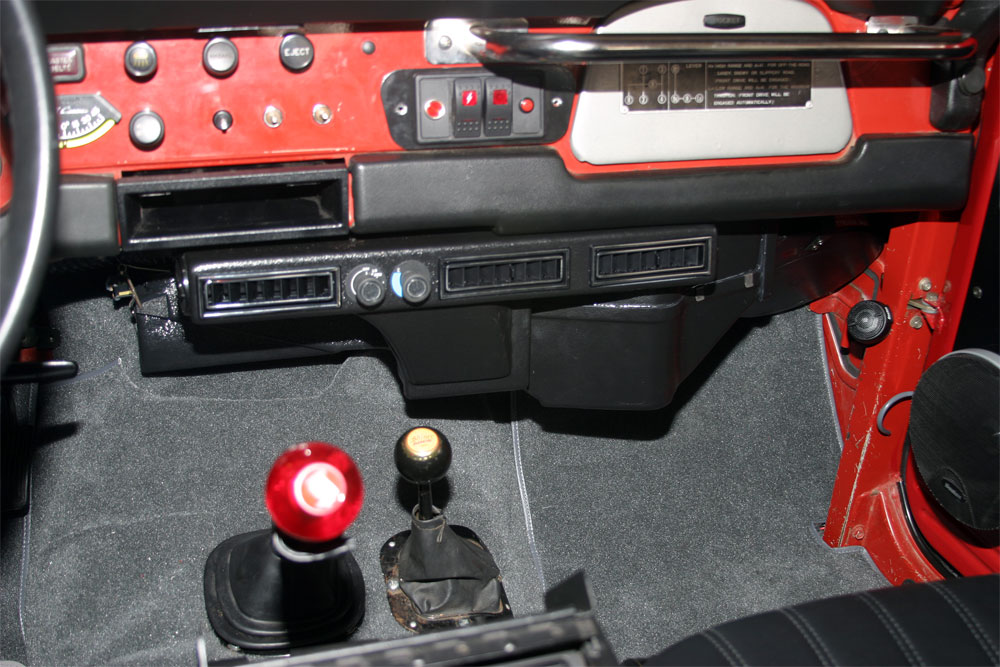
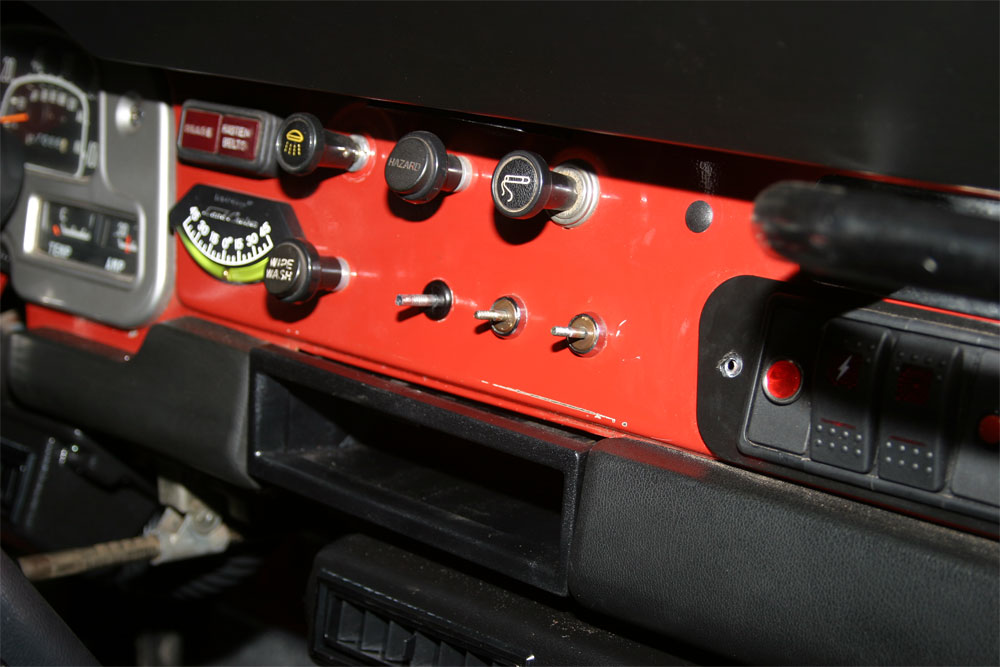
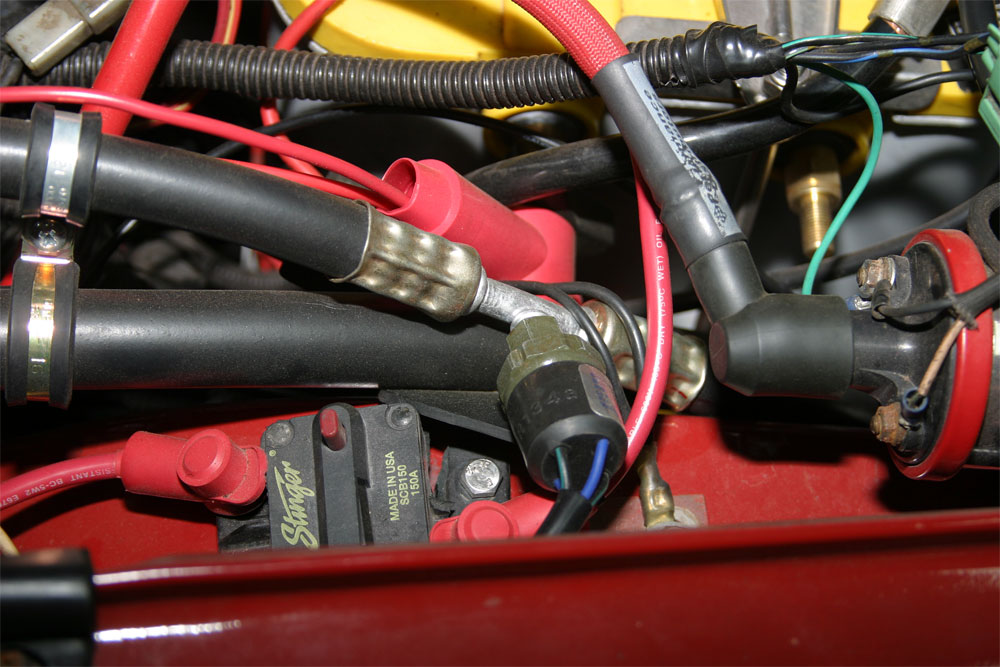
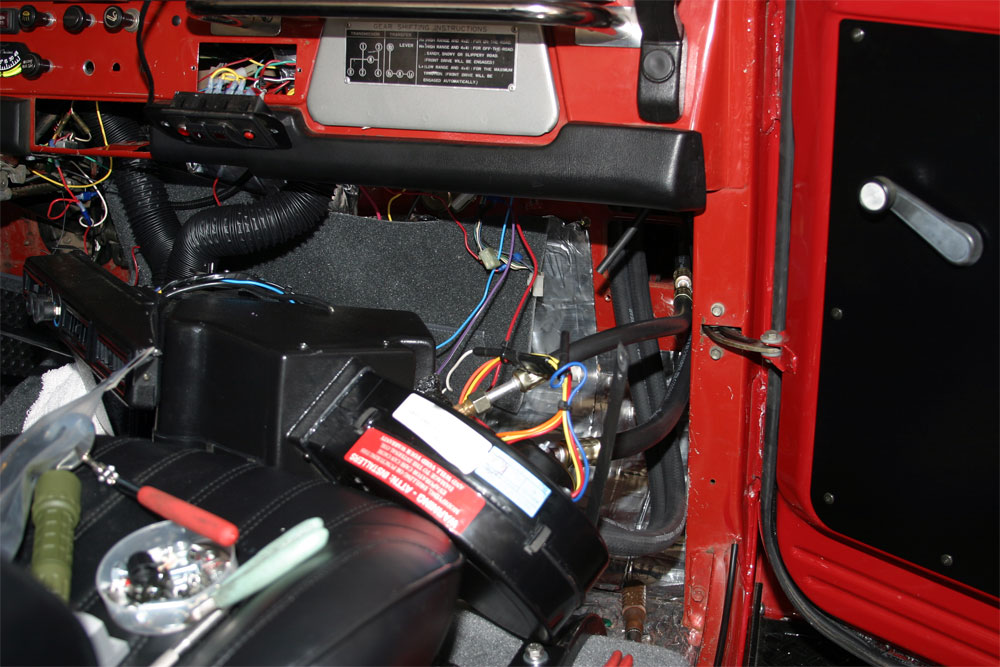
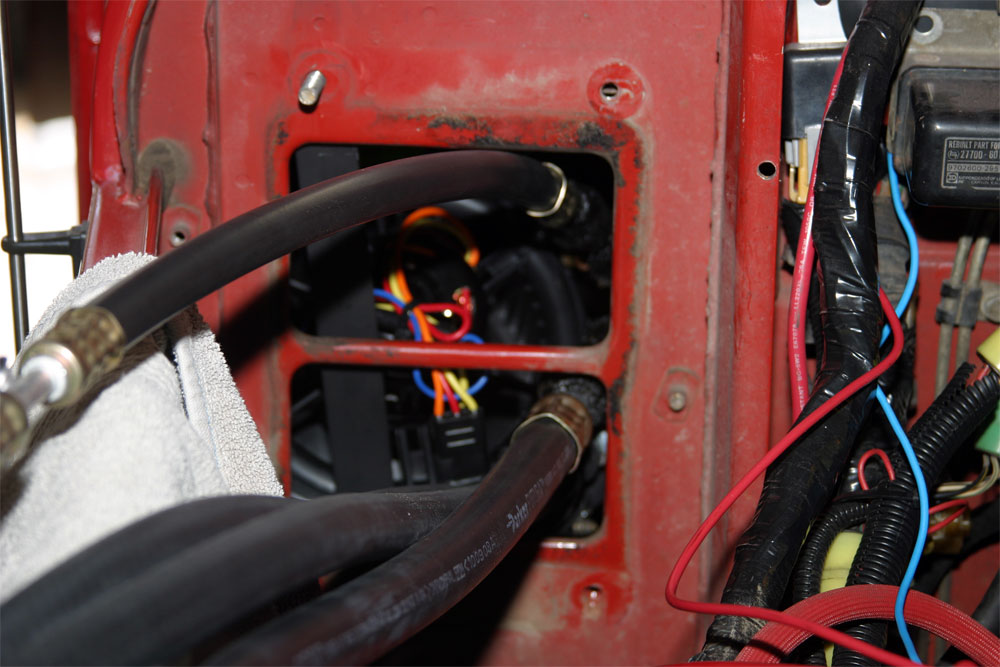
The first thing I did was work in the cab mounting the unit and installing wiring and the pull knobs.

unit_dash.jpg


under_dash1.jpg


dash1.jpg


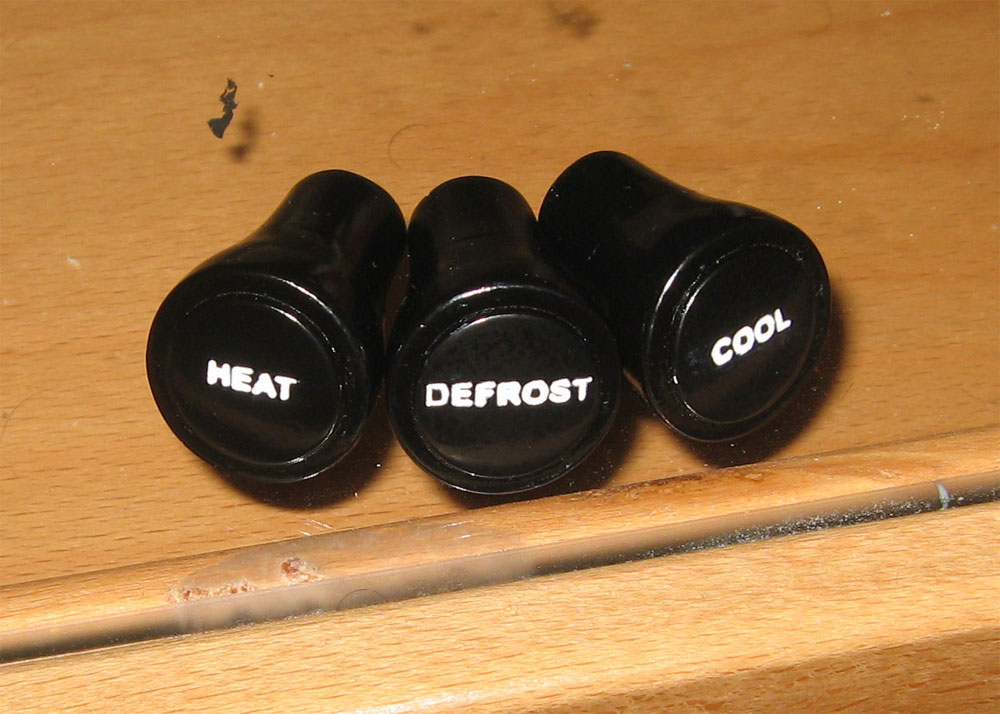
One thing I did not like about the unit is the pull knobs that Vintage Air supplies. The tell you to reuse you warm pull and fresh air knob, and for the cool know, use the supplied Vintage Air knob. To me that did not make sense. They are also not labled, so how do you remember what knob is what?? :hmm:

So here is what I did:

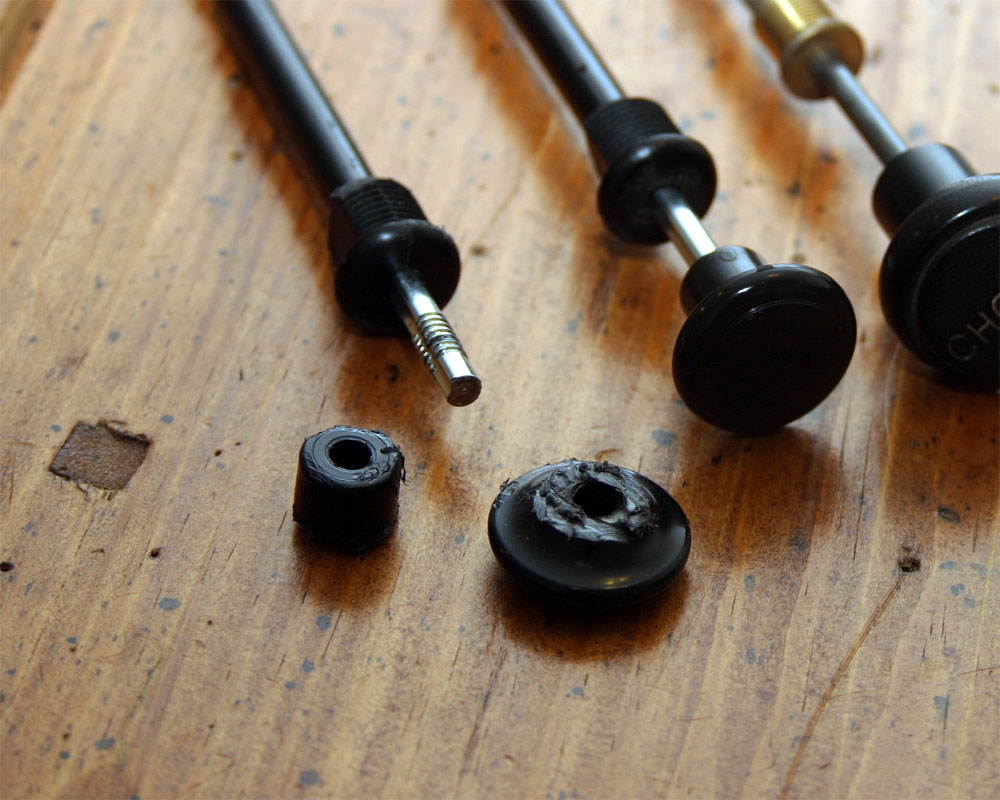
First I took the OEM warm pull /heater knob that controls the hot water valve on the fire wall, and cut the knob off with my Dremel tool. (Vintage Air does supply you a hot water valve, but I went ahead and used the OEM valve.)

I then ordered a extra Vintage Air pull, so I would have two, and cut those knobs off as well.

vaknob.jpg


I then contacted Amaurer for some custom knobs that would fit these pulls. He has the details so - here is a shameless plug for him! :D custom dash knobs sale

knob4.jpg

knobs2.jpg

knobs1.jpg
 
Part II

Next, I focused on the stuff under the hood. First I mounted the compressor, condenser, and dryer. I moved the condenser to the right, just enough so I would not have to notch the radiator support, and I could change out the dryer easily if needed. Thanks to Grant512 for the tips on this. :)

condensor.jpg

vintageairdryer1.jpg


Because of the 3FE engine under the hood, and the way the PO mounted the engine, I had to get creative with the mounting of the compressor and had to go with a electric fan. I also added a trinary switch and a adjustable thermostat control for the engine fan.

The fan is a Spal, and I still have the Stock 2F alternator, and Iam having no issues. I do plan to add a larger Alternator, just have not done it yet.

tri_switch.jpg

spal_fan1.jpg

spal_fan2.jpg

fan1.jpg


We used a OEM 2F compressor bracket, and had to take a 3FE idle pulley and make a bracket for it.

idle_pully1.jpg

idle_pully2.jpg


Once all that was done, the heater hoses and freon lines where all hooked up, and things where charged up.

heaterhose1.jpg

hose_strap_bolt.jpg

hoses1.jpg


OK - that's it! I took my time, and lots of pictures, so I would rate this as a :banana::banana: job, maybe :banana::banana::banana:. I did it over two weekends, Iam sure you could do it all in one long weekend.
 
Nice general write up. I'm looking into this myself. Could you elaborate more on the following?

1. Explain the nob situation. What is wrong with what VA supplies? How did you integrate it with the OE controls? What were the custom nobs for and what did you do with the controls on the VA unit?
2. Where is the drier? Evacuation/charging ports?
3. Why did you determine it necessary to go to an electric fan? Shroud interference with compressor?
4. Aren't the lines extra long to accommodate various compressor mounting locations? If so how did you finalize/crimp the line's seal?
5. Is the compressor supplied with or without oil?
6. How did you so cleverly disguise the void left by removing the OE heater?
7. Any sealing/leaking issues?
8. Total cost of unit and evac/charging?
Did you have to relocate radiator rearward to permit room for condenser between bib and rad??
9.How does it work?
10. Did your truck have the side window defrosters and how does this kit integrate these?
11. How does this unit increase the idle speed of the engine when the compressor clutch engages? Is it necessary?
13. What affect on mileage did the unit have on engine power and fuel consumption?
14. How did you insulate the firewall, tub, tranny hump? Is this necessary or beneficial?
 
Nice.... Could you have used the stock a/c compressor?

Phil
 
I feel like Iam back in high school answering essay questions. ;)

Q:1. Explain the knob situation. What is wrong with what VA supplies? How did you integrate it with the OE controls? What were the custom knobs for and what did you do with the controls on the VA unit?

A:If you look in the last few pages of the PDF instructions, you see that VA asks you to use the OEM warm pull and fresh air knobs. If you use there those knobs the functions labels don’t match watch what the knob actually do with the VA unit. Then you also have to add a third knob defrost– and that would look out of place with the other two. So for all three knobs to be correctly labeled and look OEM I had custom knobs made.

Q:2. Where is the drier? Evacuation/charging ports?
A: Build into the compressor lines, it’s the red/blue cap in the photo:
red_black.jpg


Q3. Why did you determine it necessary to go to an electric fan? Shroud interference with compressor?
A3: Because of the 3FE engine and how the PO mounted the engine mounts, this was my solution. On the Standard 2F Vintage Air unit, you still use the OEM fan set up.


Q4. Aren't the lines extra long to accommodate various compressor mounting locations? If so how did you finalize/crimp the line's seal?
A: I used that standard Vintage Air lines that come with the kit. They are crimped and ready to go. My compressor is located in the same place as it would be on a 2F.

Q5. Is the compressor supplied with or without oil?
A: with oil.

Q6. How did you so cleverly disguise the void left by removing the OE heater?
A: my truck has a carpet kit, and I made sure it went up the fire wall. The VA Unit also does a very good job of hiding the firewall.


Q7. Any sealing/leaking issues?
A: None yet – I still need to work on sealing the hoses where they come into the plastic blower moter box.

Q8. Total cost of unit and evac/charging?
A: I had a Friend do it, so It cost me a case of beer. But it takes 1.8 lbs of 134a, and you could just buy the do it yourself cans from Autozone. I think you can check out a vacuum pump from them as well.

Q8b: Did you have to relocate radiator rearward to permit room for condenser between bib and rad??
A: No I did not, but I wish I had leaned the Radator back just a bit. It’s a tight fit.
Q9.How does it work?
A9: GREAT!! COLD COLD 38 degress from the vents.

Q10. Did your truck have the side window defrosters and how does this kit integrate these?
A: My truck does have the vents, and Iam sure I could tie them in. I have not. The Vintage air kit does tie in the dash vent, and when I’ve use them it blows hard enough to do the side window as well.

Q11. How does this unit increase the idle speed of the engine when the compressor clutch engages? Is it necessary?
A: I asked this question to the Vintage Air people, they don’t think it’s necessary. Iam not doing this and Iam having no issues.

Q13. What affect on mileage did the unit have on engine power and fuel consumption?
A: It a FJ40, the mileage sux anyway! Mine is a 3FE and Iam a lead foot, no I have paid attention. Iam really not sure, but don’t think it would affect it too much?

Q14. How did you insulate the firewall, tub, tranny hump? Is this necessary or beneficial?[/QUOTE]
A: YES insulate that is Basic A/C 101. You really must insulate the car/truck for any aftermarket A/C unit to operate to it fullest. I insulated the entire tub with second skin, then the carpet kit. The 3FE engine is very warm, and before I insulated I could feel the heat from the floor. I don’t feel it any more, and most of the time I keep the Vintage Air set to the low speed.

You can see more pictures in my 3FE40 build thread.
secondskin4.jpg


Here is some more good reading:
A/C Basics

Vintage Air Install PDF
AC Basic 101
A/C General Trouble shooting Guide
Initial Charging Guide
 
Phil,
I was told no buy the Vintage Air folks. The compressors and condensers are designed to work with each other. Iam also not sure ow that would effect the vintage air warranty. I'll get a answers for you.

Nice.... Could you have used the stock a/c compressor?

Phil
 
I didn't see it explicitly explained in the writeup (nice, btw), but what did you use to fasten the condensor in front of the radiator?

when the PO of my rig had the Vintage Air installed in my rig, they used some 'backwoods' engineering, and I would like to undo their fabulous work.

thanks,
--jeff
 
I installed one of these units in my 40 last year. The knobs have bugged me from day one. I have considered doing the same thing you did with the knobs. Do you have a pic of the dash with the new knobs installed? Thanks
 
I used the supplied Vintage Air Brackets. The use these little screws and nuts to attached the bracket to the condenser, then sheet metal screws to the radiator bracket.

bracket1.jpg

bracket2.jpg


I didn't see it explicitly explained in the writeup (nice, btw), but what did you use to fasten the condensor in front of the radiator?

when the PO of my rig had the Vintage Air installed in my rig, they used some 'backwoods' engineering, and I would like to undo their fabulous work.

thanks,
--jeff
 
Has the inside case gotten better it used to be kind of flemsy for a cruiser? Mike
 
Bump.

I would like to hear from FJ40 owners of the Vintage Air system who use it with a soft top and hard or soft doors in TX, FL, AZ, and other HOT regions, and if it still keeps the cab cool in that configuration?

Does anyone have more pictures on how the compressor mounts on the passenger side of a 2F? I had stock AC in my truck but can't remember if I still have any of the brackets around and what I will need to make this work.

Mark if you see this, please shoot me a PM with your Mud price on the unit.

Thanks!
 
Bump.

Mark if you see this, please shoot me a PM with your Mud price on the unit.

Thanks!

Mark is playing in New Mexico this week, with no internet connection. Back this weekend IIRC. Better to send him a PM.
 
Bit of a bump here:

I am seriously considering this in my '74 -

How's it been holding up for you folks, and is the cooling sufficient? (I'm in So. Cal hot zone)

Any complaints, addt'l tips, changes you'd like to see in the kit.

And yes, I'd buy from Mark at Cruiser Crap.
 
I've had Vintage Air in my '79 with a hard top here in Texas for over two years. Here are my observations: When I mounted the condenser in front of my OEM radiator, I started getting higher water temps on very warm days (98 degrees and up) even when the a/c wasn't turned on. I called Vintage Air and discussed it with one of their engineers and was told that every condenser will cause a 10 percent rise in water temp. All four of the control pull-cables should be changed out to the Vintage Air cables. They are much better. Not a big fan of the cheap thin plastic cover where the four hoses come through the firewall. Mine broke at two of the four bolt holes. The metal compressor bracket mounts at a slight angle forward from where it should mount and you can see that the belt is not in perfect alignment because of that. On the two 40's that I have installed VA on, I opened the bolt holes up 5/16" to lean the compressor a little bit up at the nose for better belt alignment. The blower motor and evap housing hang down pretty low on the passenger side, limiting leg room. In general terms the system works well in the FJ40's, until you get on the highway at sustained high speeds and the floor and tunnel gets super hot and then it has trouble keeping up with 98 degree ambient. I assume this would be true for any a/c system. I always buy my VA systems with longer hoses. That allows me to route the hoses where I want them, and then use a bead crimp tool to install the fittings for the compressor, receiver-dryer, and condenser.
 
Last edited:
Thanks for the update, Doug. I did notice that thin plastic cover in the above photos and did not think it would hold up well.

The tip for the longer hoses is a good one.
 
Hello Everyone....I'm new in ih8mud....Right now I'm starting a restoration process to my 1980 BJ40 (diesel)..I read all your post, very usefull. I would like to install one Vintage air system.
Any sugestions of where to buy it, with the longer hoses and the extra knobs (if necesary)
One issue will be the bracket for the compressor for the diesel engine, but my car use to have an a/C system, so I have that bracket (issue covered)
Thanks

Luis

Order it through the guy who built this thread, he is a dealer. ;)
 
That vintage air system looks pretty good. Nice job on your writeup. Just wanted to add a couple nuggets, for the 3FE, the ECU picks up idle when 12v is supplied to the black/white wire that goes to the AC clutch. There was a wider radiator for the trucks that had factory AC.
 
20161004_151557.jpg
Part II

Next, I focused on the stuff under the hood. First I mounted the compressor, condenser, and dryer. I moved the condenser to the right, just enough so I would not have to notch the radiator support, and I could change out the dryer easily if needed. Thanks to Grant512 for the tips on this. :)

condensor.jpg

vintageairdryer1.jpg


Because of the 3FE engine under the hood, and the way the PO mounted the engine, I had to get creative with the mounting of the compressor and had to go with a electric fan. I also added a trinary switch and a adjustable thermostat control for the engine fan.

The fan is a Spal, and I still have the Stock 2F alternator, and Iam having no issues. I do plan to add a larger Alternator, just have not done it yet.

tri_switch.jpg

spal_fan1.jpg

spal_fan2.jpg

fan1.jpg


We used a OEM 2F compressor bracket, and had to take a 3FE idle pulley and make a bracket for it.

idle_pully1.jpg

idle_pully2.jpg


Once all that was done, the heater hoses and freon lines where all hooked up, and things where charged up.

heaterhose1.jpg

hose_strap_bolt.jpg

hoses1.jpg


OK - that's it! I took my time, and lots of pictures, so I would rate this as a :banana::banana: job, maybe :banana::banana::banana:. I did it over two weekends, Iam sure you could do it all in one long weekend.
What did you do with the cooling fan module and the seat belt module on the firewall?
 

Users who are viewing this thread

Back
Top Bottom