
Navigation
Install the app
How to install the app on iOS
Follow along with the video below to see how to install our site as a web app on your home screen.
Note: This feature may not be available in some browsers.
More options
Style variation
You are using an out of date browser. It may not display this or other websites correctly.
You should upgrade or use an alternative browser.
You should upgrade or use an alternative browser.
California Spec?
- Thread starter 2ND78FJ40
- Start date
This site may earn a commission from merchant affiliate
links, including eBay, Amazon, Skimlinks, and others.
- Thread starter
- #21
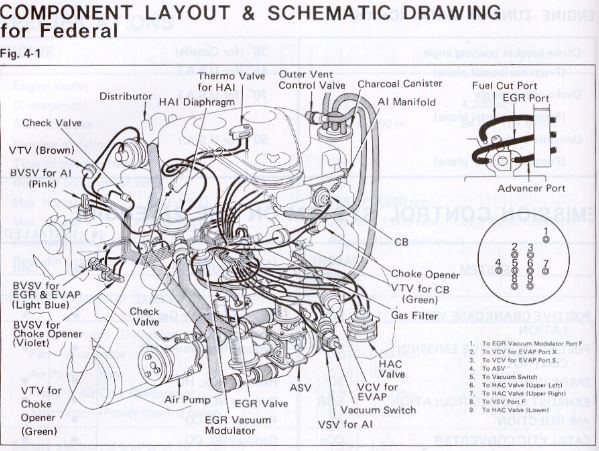
Thanks for the Emissions Tag photo. It appears that mine is the Federal model. Not sure which direction to go since I am already missing several components. This FJ was purchased at auction, site unseen and offered "as is". That said, I am happy with the purchase and currently getting it cleaned up so we can make a list of repairs that need to be made. The engine runs, it is drivable, but not road worthy. I expect I will have many more post on a multitude of subjects....
Thanks to all of you that posted in response. Additionally, I have checked on Bay to Blue Ridge and will likely contact them in the near future. Thanks for that as well!
Few more photos below,


Thanks to all of you that posted in response. Additionally, I have checked on Bay to Blue Ridge and will likely contact them in the near future. Thanks for that as well!
Few more photos below,
wimberosa
SILVER Star
The past history of these things can be an enigma when you own and examine them with getting no past data.
I wonder why it had a paint refresh with no body work...lost the lower back side reflectors (even the holes are filled in) ...and got only partially de-smog'd. I'm sure you'll have lots of mystery issues to solve") Best of luck and it'll be a good adventure.
Best of luck and it'll be a good adventure.
I wonder why it had a paint refresh with no body work...lost the lower back side reflectors (even the holes are filled in) ...and got only partially de-smog'd. I'm sure you'll have lots of mystery issues to solve
Best of luck and it'll be a good adventure.That hose for between the air cleaner and air intake horn is available aftermarket.

Whats not road worthy about it? It looks like a pretty good foundation to me. Id start with making sure it stops and steers well, then focus on getting it running right. Then swap out those terrible wheels for some (still available) oem wheels. Maybe take some time and read through the FAQ in this section to learn more about the platform before planning your next steps. Do you plan to wrench on it yourself or are you looking for a shop to handle things for you?
Air Cleaner Intake Hose for '75 to '78 Land Cruiser FJ40 FJ55
Air cleaner intake hose for 1975 - 1978 Toyota Land Cruiser FJ40 and FJ55.Direct replacement for part # 17882-61010. No longer available from Toyota.
www.cityracerllc.com
Whats not road worthy about it? It looks like a pretty good foundation to me. Id start with making sure it stops and steers well, then focus on getting it running right. Then swap out those terrible wheels for some (still available) oem wheels. Maybe take some time and read through the FAQ in this section to learn more about the platform before planning your next steps. Do you plan to wrench on it yourself or are you looking for a shop to handle things for you?
- Thread starter
- #25
Thanks for the advise and encouragement!
I figure the shiny paint was probably to increase the bid amount... Body work, aesthetics and lift will likely come much later.
Next steps are to de-grease and pressure wash the underside (lots of leaks from transfer case, underside of engine, etc). Fix leaks, add new fluids, go thru front and rear brakes (repair as needed), check out and lubricate the front end (repair as needed) and test drive. All of the above can be performed in house with the help of two mechanics in our shop at work. I will be actively assisting with wrench and their supervision. Will hopefully learn a lot.......
Still need to decide on the emission system (leaning towards de-smog since original components are missing). Once the emission system is corrected, fine tune and re-assess. Mechanic ran compression test earlier this week, not good; front to back 1 - 128, 2 - 111, 3 - 121, 4 - 120, 5 - 121, 6 - 132. So, need to make additional decision on engine.
I will need additional advise on de-smog and possible engine recommendations. If there is a rebuild in the future or swap, it would likely need to be performed outside of our facility.
I will research specific topics to avoid questions that may have already been answered in past forums, and start a new thread if I can't find the info.
This is a retirement project and I am still determined and committed! For now, LOL!
Thanks!
You may gain some insight from this
This thread is the result of many hours of research and questions asked. I am using it to compile the final data for how to desmog a 79-80 FJ40 while still retaining beneficial systems. This is not intended to be a debate on the merits of desmogging your vehicle, those discussions exist elsewhere.
That being said, if any of the following looks inaccurate let me know and I will edit.
The following diagrams show the stock emissions system
 79emission%20schematic...
That being said, if any of the following looks inaccurate let me know and I will edit.
The following diagrams show the stock emissions system
79emission%20schematic...- Toyoland66
- Replies: 27
- Forum: 40- / 55-Series Tech

One of the smoothest running ‘78s I ever worked on had compression numbers like yours.The question is: How does it RUN?Thanks for the advise and encouragement!
I figure the shiny paint was probably to increase the bid amount... Body work, aesthetics and lift will likely come much later.
Next steps are to de-grease and pressure wash the underside (lots of leaks from transfer case, underside of engine, etc). Fix leaks, add new fluids, go thru front and rear brakes (repair as needed), check out and lubricate the front end (repair as needed) and test drive. All of the above can be performed in house with the help of two mechanics in our shop at work. I will be actively assisting with wrench and their supervision. Will hopefully learn a lot.......
Still need to decide on the emission system (leaning towards de-smog since original components are missing). Once the emission system is corrected, fine tune and re-assess. Mechanic ran compression test earlier this week, not good; front to back 1 - 128, 2 - 111, 3 - 121, 4 - 120, 5 - 121, 6 - 132. So, need to make additional decision on engine.
I will need additional advise on de-smog and possible engine recommendations. If there is a rebuild in the future or swap, it would likely need to be performed outside of our facility.
I will research specific topics to avoid questions that may have already been answered in past forums, and start a new thread if I can't find the info.
This is a retirement project and I am still determined and committed! For now, LOL!
Thanks!
Guy brings me his ‘78 back in about ‘95 to work on it and didn’t think to bring me a deposit! I agree to take the truck and tell him to come back the next day with the $$. He gets a ride back home with his designated drop off person. He had parked the truck in the front yard, and I didn’t see or hear it when it came in.
I decide to move it back in front of the service bay in the meantime, and when I start it up I can immediately tell the timing and valves are way out of adjustment. So I decide to take a chance on not being paid and do the valves and timing anyways.
I see him from across the street when he arrives the next day, and I went out and started the 40. He was half way down the driveway to the shop (basically about 20’) before he even realized it was running! He lit up like a Christmas tree, said ‘Now I’m sure I’m at the right place’ and happily shoved a wad of money in my hand.
Point being, your compression numbers may improve substantially with a good valve adjustment. But even if they don’t, it doesn’t mean the engine is on its way out.
My wife and I were riding our tandem in his home town a couple of years later and I saw his 40 on the street, so I steered us over there so I could show her the truck. Billy came out of the restaurant where he was bartending when he saw a couple of unknown Lycra-clad cyclists hovering around his 40. When he realized it was me, he lit up all over again and told me that he hadn’t had to do ANYTHING to the truck in two years except put gas in it.
Days like that really make me enjoy what I do.

Marks Off Road Home Page - https://marksoffroad.net/index2.html
Last edited:
I would suggest you ask your question in this thread first and only start a new thread if you aren't getting any answers. That way you have everything in sort of a master build thread. Not that you aren't welcome to start all the threads you want so please just take that advice as intended, just a suggestion. Most everything has been asked multiple times but it's often difficult to find information via searching so don't stress too much if you can't find an answer without asking.I will research specific topics to avoid questions that may have already been answered in past forums, and start a new thread if I can't find the
Congrats on the 40. Looks like a good basis for a retirement project.
The part number on the carb fan controller is different for the cali application
- Thread starter
- #30
Well, I'm back. I want to thank all the folks that responded to my initial post, great information and very helpful recommendations!
As suggested by WarDamnEagle, I have decided to continue with this original post for all additional questions as I work through the multiple future repairs.
I decided to go the desmog route since my 78 showed up missing the smog pump and air rail. I have attached a before and after photo for reference and have a few lingering vacuum questions related to some additional photos.
1 & 2 - Before & After
My questions relate to the next photos.
3 fitting on plate under carb - What is this and can it be plugged?
4 fitting on intake manifold next to booster hose - Can this be plugged
5 fitting on (vacuum switching valve?) under PCV - Really not sure what this is, can it be removed?
- Thread starter
- #31
One additional photo showing a vacuum port on the air intake. Should this be plugged?
Some of the other Desmog posts mentioned that the carb should be modified and the distributor changed. Any suggestions on how to proceed with that?
Photos of existing carb and distributor included.


Some of the other Desmog posts mentioned that the carb should be modified and the distributor changed. Any suggestions on how to proceed with that?
Photos of existing carb and distributor included.
I think it would be easier to follow if the question was above or below the pic it relates to - hit enter a few times to give some spacing.
Oh and save all the junk you pull off for a while - sometimes people will need that stuff and might buy it.
Oh and save all the junk you pull off for a while - sometimes people will need that stuff and might buy it.
- Thread starter
- #33
Thanks Charlie. I was struggling with the multiple photo uploads and the spacing yesterday. I will attempt uploading only one photo and one question per post.
While performing the desmog on my 78, there is a fitting located on the plate under the carb. What is the purpose of this fitting? Can it be removed or plugged?

While performing the desmog on my 78, there is a fitting located on the plate under the carb. What is the purpose of this fitting? Can it be removed or plugged?
In your second photo of the port at the back of the manifold, on a 60 at least that goes to trigger the AC idle up.
Can probably be plugged
Where's that one going to now? If nothing plug it
Can probably be plugged
Where's that one going to now? If nothing plug it
- Thread starter
- #35
Thanks for the response! I did not see that port until I completed the rerouting per the JimC desmog diagram and started to replace the brake booster and booster hose. The original vacuum tube wrapped around the back of the engine and was not connected to anything. So, not sure where it was originally attached. When I acquired this FJ, many of the original vacuum hoses were either not attached, plugged or missing. That specific hose was headed in the direction of a vacuum control valve located under the PCV on the passenger side of the engine, photo below.
I don't know what that VCV was supposed to control and curious if it can simply be removed?

I don't know what that VCV was supposed to control and curious if it can simply be removed?
wimberosa
SILVER Star
That VCV looks mostly unhooked. I suspect it was routed from the top of your air cleaner (clean air side ...small port you mentioned about capping a few posts back) and the open port you have circled in green on the top of your distributor cap. That's about providing fresh air into your distributor....humidity control...etc. On the 1979, the vcv is mounted on the air cleaner itself but on yours its plausibly mounted where your pic shows.I don't know what that VCV was supposed to control and curious if it can simply be removed?
The 3rd and 4th pic in this post shows how the 1979 vcv is mounted.
Many months to accomplish but the re-smog is hooked up (minus the charcoal cannister since the tub
is not mounted). This has been a serious slog finding all these parts...modifying in some cases
fitting alternates...and finalizing.
In these pics there are some minor mods from OEM.
1) the spaghetti pipe has a mod near the water pump bvsc as one of the pipes was blocked solid and
could not be opened. This was shortened by 4 inches to remove the blockage.
2) The right side of the setup has the alternate blue VCV that city racer supplies which has
the the horizontal ports...
Last edited:
- Thread starter
- #37
Thank you Wimberosa for solving the mystery of the VCV and the reference photos in your post! In reviewing your post, I can't imagine how challenging it would be to restore the emissions system. What an accomplishment!
Now my concern relates to the open vacuum port on the air cleaner and the open port on the top of the distributor. With the setup I have now, there are no other vacuum line going to that VCV that would regulate vacuum control to the distributor. In some other Desmog posts, I have read that a desmogged system may require a different distributor and modifications to the carb. I guess I'll need to research that a little more.
Now my concern relates to the open vacuum port on the air cleaner and the open port on the top of the distributor. With the setup I have now, there are no other vacuum line going to that VCV that would regulate vacuum control to the distributor. In some other Desmog posts, I have read that a desmogged system may require a different distributor and modifications to the carb. I guess I'll need to research that a little more.
wimberosa
SILVER Star
If you are not steering for originality....probably just cap those ports on the air cleaner (clean air side) and distributor could be left open or capped. The system is a bit over engineered to my way of thinking. My distributor had been run with an open port and none of this extra air input into it for years. It looks (uncertain from your pic) like the vacuum advance hanging on the side of your distributor is perhaps a single diaphragm (1 port). I think having that work is a good thing....so I'd check to see if you can put a few pounds of pressure on that to see if it holds. The point here is that you get some extra advancement as the engine warms up. If you run above ~3500' of elevation then the HAC advance is also a nice thing to have working. I outline how to rebuild that vacuum advance in the thread below. If you go with a different distributor (such as an HEI)....please save that distributor you've got or sell it. That particular setup is a bit rarefied.
@NeverGiveUpYota @62Cruiser @duffontap @ducktapeguy @65swb45 @4Cruisers
I'm standing on the shoulders of giants here (see above members) ... but would like to close the loop on definitively how best to fix the diaphragms in vacuum advances. In this case I have a vacuum advance with both carb port and HAC port. I have split both port sides at the lip (which btw is actually pretty simple and took less than an hour opening both sides). I have two types of diaphragm materials on the way but am willing to try others until I nail it with proper...
I'm standing on the shoulders of giants here (see above members) ... but would like to close the loop on definitively how best to fix the diaphragms in vacuum advances. In this case I have a vacuum advance with both carb port and HAC port. I have split both port sides at the lip (which btw is actually pretty simple and took less than an hour opening both sides). I have two types of diaphragm materials on the way but am willing to try others until I nail it with proper...
- wimberosa
- Replies: 22
- Forum: 40- / 55-Series Tech
- Thread starter
- #39
Thanks again for the comments! I am not currently looking for originality, I purchased this vehicle from auction late last year as a retirement project. I had the same model back in the mid 80's and regretfully sold it. Most immediately, my goal is to simply get it in good running condition and get it on the road so we can enjoy for the summer. Currently finishing the breaking system (new front pads and calipers, new rear drums, pads and cylinders, new master and new booster).
I did plug the fitting on the air cleaner and left the open port on the distributor. Also included below, diagram used to reroute vacuum for 1978 desmog (from IH8Mud forum), current photos of new silicon vacuum tubing and photo of the distributor.


I did plug the fitting on the air cleaner and left the open port on the distributor. Also included below, diagram used to reroute vacuum for 1978 desmog (from IH8Mud forum), current photos of new silicon vacuum tubing and photo of the distributor.
wimberosa
SILVER Star
I've never understood why those diagrams cap off and remove the HAC. That has practically nothing
to do with smog and its a useful function at altitude. Perhaps someone could enlighten me.
to do with smog and its a useful function at altitude. Perhaps someone could enlighten me.