Picked up the block last night. It's a heavy booger even just the block/crank/pistons/cam. I've read 800ish lbs for full long block. I believe it.
Had some help from one of my minions to unload it. Learning time about how pulleys make something that heavy, very easy to lift.
Dropped this off at the machine shop to get drill and tapped 1/8 NPT for an EGT probe. No time easier than now. He did it for free because of all the other work I've done with him. Nice working with good ol boys.
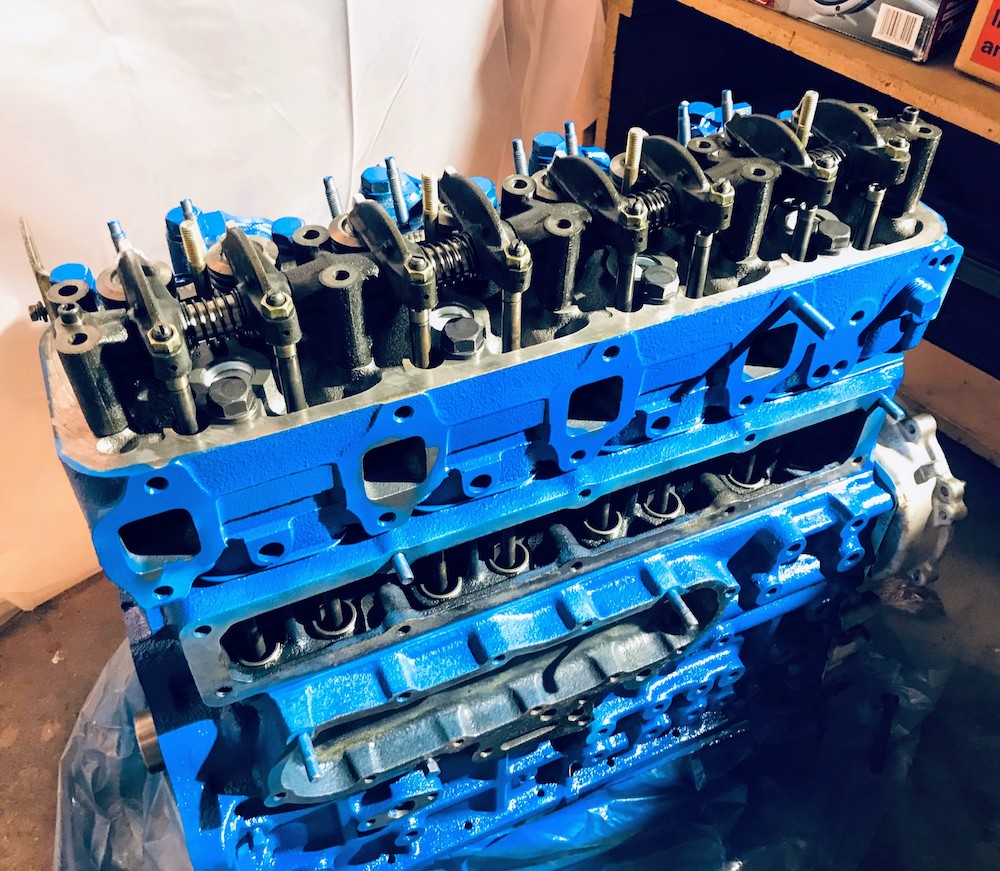
Slapped some paint on. Not the right shade, but I'm not going for concours. I have a little cleanup to do with some lacquer thinner.
lifters, push rods in place and greased/oiled. Put the rocker arm on, but no torqued down. I had an issue with trying to get the rocker arm oil holes to line up right. The only way to get the lock pins to hold it in place put the oil holes facing down on the rocker shaft. I'm assuming thats the way it's supposed to go, because it won't fit any other way.
Got the back timing cover plate on. I have about 2 hours in scraping old paper gaskets off
Permatex Aviation gasket light film then new paper gasket.
New O-rings on the piston oilers and tapped back in. I was going to put the injectors in, but for some reason I can find the "ring packing" for the injectors. I didn't put a whole lot of time into it as I was just trying to get the rest together.
Found them, Not anywhere where I thought I had put them but anyways. I have a fairly good system, all parts in baggies and labeled, pictures of anything tricky, but sometimes things get misplaced.
The other day I got some pre-formed heater hoses to try and match the no longer available ones. I spent a little time at Napa matching hoses which I will detail a little more when I get to that point. My question is I found 2 of these heater valves in my box o parts. I know that the one with the red grommet goes on the firewall and is controlled by temperature valve, but what is the second one for?
This cruiser doesn't have a rear heater or controls. Is this just extra parts or am I missing where it goes?
I'm trying to figure out how the engine hook mounts on the RHD side of the engine? I have longer bolts compared to the back making me think it mounts being or over another mount? @saltycoconuts was nice enough to send me a bunch of engine pictures although he doesn't have the mounts.
So is it safe to say these shackles are on wrong? I got to thinking about it and I don't think there would be anyway to remove these shackles with the gas tank on. I need to remove and flip them the other way so that the nuts are towards the fuel tank.
Is that how they are normally or am I missing something. I've done a few lift kits, but none on a 70 series. I'm not sure that I'll upgrade to greasable at this point as I still need turbo rebuilt and clutch...but you never know. However, I definitely don't want to drop the tank again.
The horizontal plate in front of the shackle has been scabbed-on for some reason. Perhaps a poor man's anti-inversion plate? They would have to be cut off if new OME shackles are fitted. The bolts match this untouched truck.
The horizontal plate in front of the shackle has been scabbed-on for some reason. Perhaps a poor man's anti-inversion plate? They would have to be cut off if new OME shackles are fitted. The bolts match this untouched truck. View attachment 1927336
Yes I believe that is a poor mans anti inversion shackle. Interesting thats the same way on the stock one. I didn't think there would be enough clearance to take the shackle off with the tank in place. Maybe there is room? I haven't installed a lift on one of these so I don't know for sure.
Pilot bearing was stuck and a puller/slide hammer wasn't doing much good either. There are several methods you can use, the most commonly heard of is filling it with grease, using a bolt and hammer then it pressed it out. The issues are it's messy as all get out and annoying to clean up. There are different variations of this method, I chose the bread method.
Step 1: Find a bolt or brass drift that just fits inside the pilot bearing. A 13bt headbolt works perfect for this. Next find your favorite piece of bread or 2. Start stuffing the inside of the pilot bearing with bread. Mash as much as you can in.
Step: 2 Start hammering on the bolt. That pilot bearing will start to pop free.
Step 3: Add more bread and keep hitting that bolt and the pilot bearing will pop off.
Step 4: Easy cleanup. The bread pops out, no mess and you now have a greasy looking cinnamon roll to chow down on if you are hungry.
Testing the thermostat BEFORE installing. Use an old pan (none of your wives fancy pans), boil the thermostat and check temp to make sure it opens at the correct temp. This is an 88C thermostat, and seemed to open right around there according to my thermometer.
Back to engine work. Got it on the stand and flipped over to install the oil strainer, pipe and oil pan. I used a very light film of Aviation Gasket maker by permatex along with the cork gasket that came in the kit. Lightly coat each side and snug down. I used 39inlbs for the torque.
Timing Gears. The manual states to allign the gears. Make sure to oil the gears as you put them in as well. I started with putting the crank pointing mostly up. From there I used the idle gear to get a general idea the adjusted the cam over to mesh correctly. The last step was putting the Injection Pump on and making sure everything lined up.




 I didn't put a whole lot of time into it as I was just trying to get the rest together.


