Diff breather extension (2 Viewers)

This site may earn a commission from merchant affiliate
links, including eBay, Amazon, Skimlinks, and others.

I did mine about six monthes ago without the T and with zip ties instead of p-clamps. They are still holding strong and terminate next to the charcoal canister on the DS fender.

Also, with the breathers, the modification is simple with a pair of pliers to pull the cap off.
 
Oppps, thanks for the clarification, a few more things to finish off.

Cheers, Hugh
 
Beowulf said:

US Spec 80 series Diff, Xfer, and Auto transmission breather extension.
=============================================
Part 1


Adapted and plagerized from:
David Zilm's
http://www.safari4x4.com.au/80scool/tech/breather/Breather.htm

and
George Scolaro's
http://www.geocities.com/george_tlc/breather.html

and
LCool site
http://www.lcool.org/technical/80_series/breathers.html

Background
==========
Toyota has always made a half hearted attempt at providing diff/tranny breathers. Anyhow, a few dollars worth of 1/4" ID fuel line (the cheap low pressure stuff) and some tee and P-clamps will quickly provide peace of mind when crossing water more than ankle deep.

In addition, on the 80 series, Toyota put a spring loaded flapper valve at the end of their front diff breather. When the diff end of the breather hose is unplugged (e.g. when pushing the suspension down to remove/install new coils) a definite hiss of air rushing into the axle housing will be heard. i.e. the axle housing is under partial vacuum. I'm sure this accentuates:
a) ingress of water past seals etc. and;
b) migration of grease from the birfields into the axle/diff housing area
- it certainly can't help!

On US spec 80's it is possible to connect front diff, rear diff, auto, and transfer box breathers into a single breather connection that is mounted high in the engine compartment. A by-product of the modification is that you can make the breathers at the diff ends a bit longer to allow for full droop of the axles without fear of the breather hoses popping off in the future. This modification is required if you plan to install longer shocks like the OME L-series shocks.

Following are a few pictures showing how George routed the lines to connect all these units together.

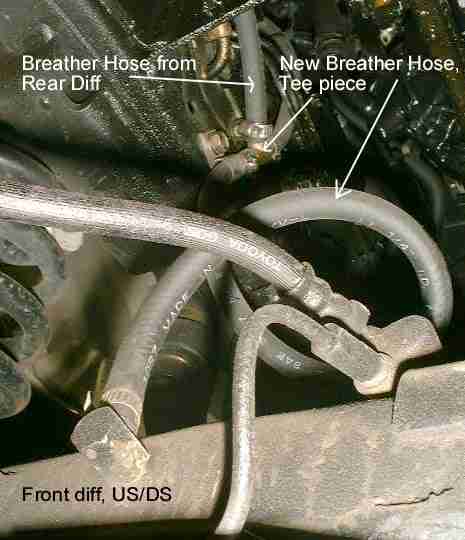
frdiff.jpg


The picture above shows the new longer breather line connecting the front diff to a tee piece that has the breather hose coming from the rear diff. Visible just below the Tee piece is one of the P-clamps holding the new breather hose to the chassis rail. The original front breather hose and termination box is removed from the vehicle. Note the breather hose connecting to the front diff has a spiral to ensure sufficient extra hose to account for maximum axle droop.

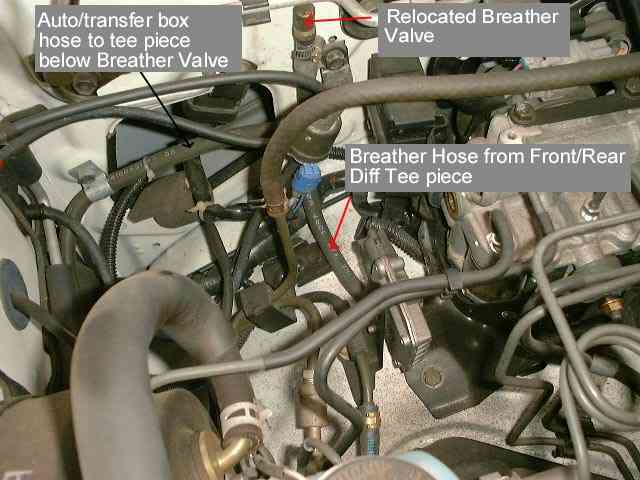
valve.jpg


The picture above shows the completed installation. See George's complete write up for more pictures.

The Breather Valve
==================
The breather valves are designed to permit gas (and liquid) to exit the axle or transfer case housings. A modification needs to be carried out on only one valve. Below is a cross section of the original rear diff breather valve. The valve body is brass, with a steel cap, spring, and rubber flapper.

80%20Series%20Breather%20Valve.jpeg


The 60 series Landcruiser used a plastic body and cap, without either the spring or rubber flapper. You may wish to purchase one of these if you do not wish to modify one of the original breather valves.

The 80 series rear diff breather valve after modification is shown below;

Modified%2080%20Series%20Breather%20Valve.jpeg


Tools
=====
12mm combination spanner
12mm socket
14mm socket
ratchet and extension
sharp utility knife
flat blade screw driver
needle-nose pliers
adjustable pliers
side cutters
safety glasses
ramps, or jack and jack stands

Parts
=====
The following parts are recommended to complete the modification.
Most are available from auto parts shops like NAPA and AutoZone.

25 ft of 1/4" ID rubber fuel line (Cheap low-pressure hose)
10 P-clamps to fit above hose (with 1/2" mounting holes, 10mm)
10 hose clamps to fit rubber fuel line above
3 1/4" brass "T" pieces (the ones with barbs)
8 7" long black wire ties
2 8mm x 25mm 1.25 bolts (or just use wire ties)
hand cleaner
paper towels

(Photo of the parts)

--------------------------------------------------------------------------------

Can you elaberate on how to remove the rubber flap and spring inside the brass breather valve.
S

Breather Outlet
===============
45. non destructively remove one of the original breather valve caps
(See before and after drawings)
46. re-assemble the breather valve without either the rubber flapper
or spring, as per the modified 80 series breather valve drawing
47. remove the breather valve from the original breather hose
48. install the modified breather valve into the open end of the
new breather line in the engine bay (left inner fenderwell)
49. secure the modified breather valve onto the new breather line
using the hose clamp

I found this but do you just pull of the little metal cap?
S
 
>> I found this but do you just pull of the little metal cap? <<

Yes.

-B-
 
what size fuel line is used to extend the diff breathers?? 1/4?
 
I just took the flapper out of the original check valve, left the spring in it to prop up the cap, and mounted it up near the engine air filter. If you use the fuel filter method the inline fuel filters w/clear housings made for lawn mowers are available at auto parts stores and walmart.
 
2mhc0i1.jpg
 
Hi all -- this is my first post. I just bought a 1997 FZJ80 to replace both a '73 International Harvester Scout used for trail riding AND a '69 IHC Travelall used to tow my sailboat. Both of these single purpose vehicles excelled at their intended uses, but I wasn't wheeling the Scout like I used to and the Travelall's 2WD could be a problem at some ramps. I've towed the boat once already and the cruiser did just fine - I think the rig is about 4,000#. It has less torque than the 312 lbs-ft in the 345 CID Scout, but makes up for the difference with the low range xfer case. The 80 is factory locked and should conquer those slippery boat ramps that gave me trouble with the 2WD Travelall. I bought the 80 off the internet without ever having even seen a Land Cruiser up close cuz I couldn't find one within driving distance to check out after several months of looking. How's that for a leap of faith??? I plan to keep the 80 stock for a while until "trail mods" occur :( except for the pin 7 mod and the diff breather extensions. When I wear out my brand new Michelins that came on the truck, I plan to go to the Super Swamper Thornbirds http://www.4wheelparts.com/4wp/products/productLine.asp?cat=TIR&prodline=28&catName=TIRES&man=INTE) which look like the best compromise road/mud tire (The mud lugs don't come into contact with the pavement). I ran Super Swamper 35X12.50's on my Scout with great results.

Before this post gets moved to chat, I want to share my experience with the diff breather extension modification that I just did (axles only -- my hands don't fit the space over the AT or TC). I decided to run separate line to the front and rear breathers as was suggested as an alternative in the main thread on this mod. Looking at the rear axle, it occurred to me that the gas filler area might be an appropriate place for the breather rather that running a line all the way to the engine compartment. I removed the plate sealing off the filler tube and there was plenty of room for the breather in the space behind the fender. The new line runs up from the axle through the existing clamp on the crossmember, then tie-wraps to the overflow tube all the way up to the filler opening. I looped the tube up inside the body, turned it down next the the filler tube to which I tie-wrapped the down-facing breather. Water would have to be up to the rear window to get in. Verrrrrry easy :)

Here's a few pics, including where I mounted my front breather in the engine compartment. Thanks to all those on this board who contribute to the vast knowlege base of the 80 series.

Here's the new tube routed through the existing bracket to the axle:

2nb64pt.jpg


Here's the new hose routed along the overflow tube:

2qa8d8m.jpg


Here's the gas filler tube area with the breather hose looped up into the fender well and tie-wrapped to the filler pipe with the diff breather facing down:

2qxuy6s.jpg


Here's the front axle diff breather extension attached to the firewall with a P-clamp:

2lvhax4.jpg


Here's the breather box relocated to the DS fender well.


2mhc0i1.jpg
 
Nice first post, ok well second,

congrats on the new rig she looks rust free :)
 
Now that you all did this wonderful work...go back out and build in a quick t-connection for the locker actuator breather hose :). It is in the harness and I don't know how long it is stock, but knowing Toyota it is not long enough.
 
wildmanscout said:
Here's the new tube routed through the existing bracket to the axle
Make sure you have enough coil in the breather lines to allow for axle droop. You'll need about 6-8 inches.

-B-
 
Last edited:
Now that you all did this wonderful work...go back out and build in a quick t-connection for the locker actuator breather hose :). It is in the harness and I don't know how long it is stock, but knowing Toyota it is not long enough.

Locker actuator breather hose? How did I miss that? Wildman
 
Nice first post, ok well second,

congrats on the new rig she looks rust free :)

Thanks, RavenTai -- No rust anywhere! I would delete that other fat-finger post, but haven't figured out how. Maybe there was already a reply to it?

Oh yeah, I'm still waiting to be properly welcomed to the board :)flipoff2: ) Wildman
 
Locker actuator breather hose? How did I miss that? Wildman


They are bundled with the harness for the actuators. I haven't traced them up to see how high they go, but t-ing in right at the actuator and running over to the vent at the diff might be the easiest way to go...


oh, and welcome...:flipoff2:
 
the rear actuator breather dumps out near the tool pouch right rear of the cab

I am not sure where the front one goes
 
So is the breather mod so that air can do in and out?

It moves the breather futher upward to help prevent wanter from entering the axle housing. IIRC, it also give you the oportunity to get rid of the flapper inside the breather which some feel can be problematic.
 

Users who are viewing this thread

Back
Top Bottom