Bad #2 Piston & Cylinder. Now What? (1 Viewer)

This site may earn a commission from merchant affiliate
links, including eBay, Amazon, Skimlinks, and others.

UPDATE

It's been over a week. Took a weekend off to canoe down a river, catch some smallmouth, and drink around a campfire.

Sunday, 9/23:
I cleaned out the block from below with oil pump removed. NO detergent, just clean rags, rub to make "sand falling" noise, went from front to back 2 or 3 times until no more "sand falling noise".

Put on new side cover gasket

Cleaned-regasketted & installed oil cooler

Installed distributor & tore up O-ring pretty bad - new one coming.

Installed 5 of 6 pistons. When went to install #2, the nut wouldn't turn all the way up & down the stud on the rod. I wonder if this somehow attributed to the #2 piston failure? Ordered new studs from Cdan.

Lastly, I poured oil on top of the pistons in the cylinders to see if any leaked out. NONE! Hopefully this is a sign that my compression will be good.

Today 10/2: Started looking at posts about the vacuum system and want to clean it out while I wait on parts. A lot of frickin' ackronyms VSV, EGR, etc. Anyhow, I looked at the hard, metal tubes. Took brake cleaner & straw and sprayed threw all the tubes. One is clogged bad on both sides where it hits the hose. How do you unclog these things? I'll keep searching. I believe I'm going to try a small drill & see if I can get clean it out. It appears to be independent of other tubes, so I may find a similar diameter tube & replace it using hoses at the bends. I heard of "jon held" method of cleaning these, but couldn't find it.

Tomorrow 10/3: I have a bad head cold, so am staying home from work tomorrow (other than a meeting). I'm going to get oil pan and valve cover cleaned off & ready for reassembly. I should be totally ready for reassembly this weekend.

That's the poop!

Oh yeah, radiator was bad, so I bought a $200 lifetime warrantee, all aluminum one from buyaradiator.com. I know, "you get what you pay for" but an OEM is 2+ that cost.

And fellow MUDder offered to come by Sunday to help. He's got a FJ55 & doing major work on it. It'll be nice to meet him.
 
Progress - valve cover, oil pan, air plenum

Valve cover was a pain. I ended up with a brass brush on my drill and got the inside really clean. Is this painted on the inside? Silver colored now. Small screw driver and many, many passess to get off old rubber gasket material. Put grommets in, but they aren't staying too good. I assume once I bolt them down they hold in there. Plus new PCV.
P1010093 (800x600).jpg

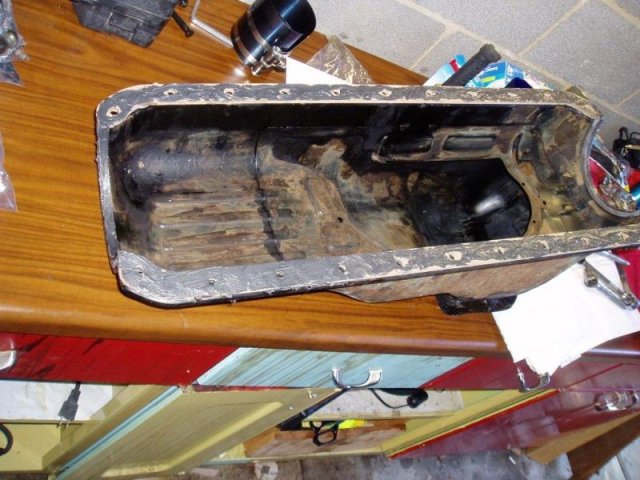
Oil pan was easier. Someone told me hair dryer to get old cork gaskets off and it worked pretty good. B12 wetting a fake brillo pad did the rest. Nice & smooth ready for gasket. I need to put silicon in the corners when I install it. FSM says some part number or equal. Anyone know what I should get? Or how to do it?
P1010095 (800x600).jpg

Air Plenum was tough. I had a clogged vacuum tube so put solvents (B12, PB Blaster, chemdip) in the tube as much as possible. I'm not a patient man, so went at it with a drill bit, drilled thru a 90, cut it off, drill bit again to dislodge clog, drill bit broke off inside. I'm going to need to bypass the vacuum tube when I put it back together. Also, had to make my own gaskets between the plenum to & throttle & other thing (on right with black top). Not too tough to do. used a paper bag for the throttle body. Other thing just used the gasket material.
P1010094 (800x600).jpg
P1010093 (800x600).jpg
P1010095 (800x600).jpg
P1010094 (800x600).jpg
 
Firewall Hoses

One other thing, I put the heater hose in at the firewall while I can get to it. One of the hoses was just a bit smaller diameter than the other ones. I think I'll be alright, used a good hose clamp.
P1010096 (800x600).jpg

I can't think of anything else I can prep. C-Dan told me my piston rod studs should be in tomorrow. I ordered (6) OEM, small, oil filters from him today. I've been using FRAM, but after some research they are the devil (ORANGE FILTER OF DEATH).

I'll be much happier when lower unit is complete (pistons in, oil pan on) and head is on. I should be able to do the rest of the work myself.

Sleep tight,

Joe

PS By the way, I feel a lot better. Going back to work tomorrow. Thanks for your concern!:)
P1010096 (800x600).jpg
 
Mistakes

3 Mistakes so far:

1. Oil pump female: I couldn't find torque numbers in the FSM, so when I put it in, I torqued it down pretty tight (17mm IIRC). In hindsight, I should have put the female in - temporarily installed the oil pump & distributor, then tighten the oil pump making sure the two lined up perfectly.

2. Air Throttle Gasket: I had to cut my own. I cut it for the air plenum side (much less complicated piece). After that, I should have put it on the throttle body side and trimmed it per the throttle body blank. Now I have gasket material possibly where I don't want it. I'm going to leave it as is unless a fellow MUDDER tells me I'll be screwed or it doesn't run right when done. It's easy to get to, so easy to fix later.

3. Assembly Lube: Even though the FSM says use normal motor oil, I think assembly oil would have been better. I've had 5 pistons in for nearly 2 weeks waiting on new rod bolts for the 6th. I should have the 6th ready by tonight. I intend on disconnecting ALL rods from crank, re-lubing everything, especilly the oil galley that oils the rod bearings, then torque to spec.
 
This is awesome!
 
Man I really appreciate the time you take to post in this detail. I am about a month behind you in doing this. SO I get learn from your mistakes;) One of the best rebuild threads out there for sure!

A trick I have used for cleaning tubes. Is chucking up a old clutch/throttle cable housing. With the sheath removed you have a flexible drill bit basically. You can cut and open the tip a bit. It is just firm enough to lean on it some. yet flexible to get around the bends.
:cheers:
 
Commentary only

I really appreciate the comments back. I hope you guys have 3FE 80's & return the favor with pictures if I get stuck putting it back together.

I'm glad you are enjoying the write-up. PAYBACK! Seems like I've been USING the Mud like a leach without any decent feedback. With these comments back, looks like I'm paid-up for a while.

Of course that is IF THIS PROJECT WORKS! If it doesn't work, all you would have learned is DON'T BE AN IDIOT LIKE JCARTER. If this happens, JCARTER will mean F-UP! I can see it now, "I was rebuilding my knuckle and pulled a JCARTER by putting the wrong knuckle on the wrong side." Let's hope NOT.

A lot of early comments back were DON'T BE AN IDIOT, DO A FULL OVERHAUL with new long block or bring block into machine shop for new +0.020 pistons, cleaned crank, new seals & crank bearings, etc. I can still do that. But that's $$$$.

So everyone reading should HOPE IT WORKS! So you too can have the balls like JCARTER & do a decent patch to get another 100K out of her.

As usual, it all boils down to money. The risk is NOT getting stuff in the block replaced or machined, which of course saved money. If it doesn't work, wasted money on new piston & a heck of a lot of TIME.
 
There is nothing wrong with the way you are going about this. You are "overhauling" your engine. Too many people don't know enough about engines and just throw out what they think or heard is the right way to do something. This has been done since the beginning of engines. If the piston to wall clearance is within spec and the bores are not damaged or have vertical scratches, then there is no reason to bore in my opinion. I think you are doing a great job and will have a good running truck when done.
 
I may be heading down this path soon...so thanx for shedding some light on the processes
 
A little help from a new Friend

I posted to my clubhouse, "Gateway Cruisers" (we're in St. Louis with the Gateway Arch, get it?:flipoff2:) something about "Want to see novice work?". So Scrapdaddy who's got a HUGE FJ55 project write-up responded and came by Sunday.
2 jobs are definetly 2-man jobs - Oil Pan & Head. We went to the Auto store & got some black silicon stuff for the oil pan gasket, covered oil pan, laid gasket, covered gasket, & smeared some on the corners per the FSM, then went to put the oil pan on.

Mistake #4: TAKE OFF THE SUPPORTS! There are supports between the transmission & engine, long odd-shaped bracket with 2 bolts at transmission & 2 at engine. We got under there with both supports still on and screwed around with it for a while getting silicon all over our hands and finally pulled it back out, I removed 1 support then got it in. I know, "there's a thread that says to do that" but I've taken SO MUCH stuff off already and got it out without removing these, so didn't. Trust me, 8 bolts is worth the headache!

Installing the head was easy. I was concerned about lining up, but there are raised round things that keep the gasket in place and the head falls easily into place.

We covered the head bolts with anti-sieze and put them on, followed the order of the FSM, 30 ft lbs, 60 ft lbs, then final 90 ft lbs.

Mistake #5: PEACE OF MIND. I hurried a bit with Scrapdaddy being here. As a guest, I didn't want him bored so we jumped on the 2 jobs pretty quick. In hindsight, I should have double-checked ALL bolts of the oil pump assmebly before putting on the oil pan. Also, should have read the FSM about head bolts that says "cover with oil", I squirted oil down the holes, but wish I was more thorough. I'm sure all is okay since I'm thorough by nature, but in the back of my head I see "dry" head bolts (weren't that dry) and hand tightened oil tube. Especially the oil tube since it is a different tool to tighten, but I'm pretty sure I tightened it.

After Scrapdaddy left, I installed the rocker assembly. OIL THE CRAP OUTA EVERYTHING, put in pushrods (no longer in order since machine shop cleaned up and didn't keep order I had when given to them. I recommend each having their own baggy instead of blue tape with a # on it if you bring in for cleaning). Rocker assembly takes a little finess to get it down, also has a bolt order to follow in the FSM.

That was it for Sunday. see pics.
OIL PAN READY FOR INSTALLATION
P1010097.jpg

HEAD GASKET WANTING HEAD
P1010098.jpg

HEAD FINALLY ON! DESERVES A BEER!
P1010099.jpg
I recommend removing cold beer and consuming before you install the valve cover.

Notice bracket on top right with head bolts through it? Those are the "long bolts" when putting together, I had no notes about the long bolts because it was obvious, LOOK AT PICS IN THE FSM! We hesitated a while trying to figure this out.
P1010097.jpg
P1010098.jpg
P1010099.jpg
 
More work last night

Progress summary: Valves adjusted, oil pump turned (not much help), water assembly & manifolds installed.

First thing was to adjust the valves. YOU GOTTA BE KIDDING! This is a PITA. I can't imagine doing this with a hot engine, reaching over stuff, trying to get to the back rockers. Whew! It was tough with it cold. I used the feeler guages and tightened down "loose" where you can barely feel resistance. Loose since cold where hot will expand and will be tight.

Took off the distributor, put oil in (there is a hole in the head for oil to go down) with funnel over hole, manually turned oil pump until oil came to filter spot, installed filter, then with drill pumped oil for a while. I was hoping I'd see oil come out the rockers, but it didn't. Should it? This is a step I thought was a good idea but should have skipped. I'm going to remove & fill the oil filter prior to starting.

Water assembly was straight forward, short hose is a pain, maybe should have put radiator in first?

Manifolds was easy. Took ALL bolts & nuts & swished around with B12 then wiped off dry, then anti-seeze. Set gasket on studs, 1 bolt per exhaust manifold will hold it there, then enough bolts to hold on intake manifold, then put on remaining nuts & bolts.

Trying to figure out the order of reassembly with the FSM is difficult and I dont want to install something in my way where I gotta take it back off to install something else.

2 issues!
1. Oil didn't come out the rocker when manually turned the oil pump. Should it? I mentioned concern about tightening the oil tube.
2. There are plastic cup looking things that go into the intake manifold where the injectors go. Are these to be pressed in? I'll get a pic tonight. Old ones were tight & a pain to get out. Will they seat when I finish the injector installation? I'm afraid to try and bang them in since they are hard plastic and will crack.

Tonight:
Radiator, tighten engine stop cock, other stuff per FSM.
 
Keep up the good work.
 
Not a good night!

F&*%K ME!

MISTAKE #5: Put valve cover on early! I kept it covering the valves, but without the gasket, just for protection. Started putting it back together by the book. Hooked up the wiring harness, then looked & figured I'd better put the cover on. Had to take the wiring harness back off and BROKE OF NEAR ALL MY PLATIC, CLIP, STAY ON THINGS OF INJECTORS! By the way you push those in to unhook, not pull off and watch it go flying.

I'm gonna post to see how important those are. I may be out of commission for a while.

DADGUMMIT! My poor neighbor kids are learning some words tonight!
 
Relax Joe, it is what it is

It's 7AM Saturday morning and I just thought through where I am on the project. I realize I need to relax and do a much better job, for I've been trying to go too fast and screwing things up.

My patience has reached its end, winter is coming, my wife is pissed, & I just miss driving it. But, it is what it is and I need to do it right.

I have 2 things to deal with; 1) exhaust manifold piece & 2) injectors.

Exhaust manifold piece: In with the exhaust manifold nuts & bolts there was this piece (see pic). I don't know where it goes & it sure wasn't obvious. Does anyone know what it's for, where it goes, & if it's necessary?
P1010100.jpg

P1010101.jpg

Injector plugs? When I disconnected the injectors during disassembly, my neighbor told me they only go one way so you can't screw it up. Is this true? I broke the tabs off many of them, I think 4 of the 6, so I'm going to order some new connectors anyhow. But thinking about it, this is pretty important. The "brain" needs to know which cylinder so it can squirt at the right time, right?

Going with what my neighbor said, I figured the plug part on the injector was unique, so I made sure I put the right injector in the right hole.

I'm thinking since the injectors are paired up, there are only 2 types of connectors so you can't cross the pair. Also, on another thread a MUDDER linked me to a connector site for injectors and I believe there at 2 types.

Of course if I'm totally screwed, how do I find out which plug goes with which cylinder?

Any help on this would be greatly appreciated. Sadly, I have to undo a lot of stuff I did. Good thing is that anyone reading this won't make the same mistake.

PLEASE HELP!

Thanks,

Joe
P1010100.jpg
P1010101.jpg
 
Properly place wiring harness before big air intake

I had to take my big air deal back off. I need to clean up the wiring harness that goes near the EGR exhaust input to the head. Also, I need to make sure the injectors are hooked up right.

1&2 injector plugs are brown, 3&4 are grey, 5&6 are gray. I've busted the clips off, so will rig up with wire ties.

Also, there are 2 plastic clips to keep the big wire harness away from the heat. They are gone, old plastic disintegrated when took off. Again, I'm going to rig up with wire ties.

Pics of what goes under the big air deal. I'll come back with pics after I've figured out how to hook up the injectors and rigged some zip ties.
P1010105.jpg

P1010106.jpg
P1010105.jpg
P1010106.jpg
 
Heat tape & wire ties

I'm going to get some heat tape to retape the wiring harness where it get's close to the EGR exhaust pipe that feeds the combustion chamber.

In the pic you can see my zip tie job on my injectors. 3 were broke. This is probably overkill because its a pretty tight fit and I doubt they'd come off. But, next time I'm bumping down a dry creek bed, I'll bump in confidence.

Also in the pic, you can see the wore out harness near the exhaust (tarnished pipe below). I'm going to heat tape it. I'll post another pic when done.
P1010110.jpg
P1010109.jpg

For now, job is on hold. Going to a winery for a buddy's 50th birthday. If I don't go, wife is going to leave me. . . She feels neglected. . .

See y'all this afternoon or tomorrow morning if too drunk.

Joe
P1010110.jpg
P1010109.jpg
 
Way to stay with it.

Long term I would repair those injector plugs. I'd want tohose to be water tight-the reason for the O rings in the first place. Toyota makes most of their electrical stuff available with pigtails which should result in a pro repair.

The heat tape is a very good idea and this exact thing is a problem in later FZJ80s too.

:cheers:
 
Coming along splendidly

Man, those wineries are a killer. Can't handle those 12 hour parties no more.

Woke up hurting about 7AM, but got on it.

Went and got some "cool tape", not a very good pic.
P1010112.jpg

Buddy came by at 11AM (hungover also). It REALLY helps having someone working on it with you. I forgot to take a final pic and it's too dark. Here's what we got done today:
DS: finished wiring clean-up under air chamber, installed air chamber, new EGR (2 discs), hooked up all vacuum lines.
PS: air compressor, power steering,
FRONT: new thermostat (Hint: do this earlier, lot of stuff in the way), new radiator, belts & hoses

Next will be finishing the transmission coolant lines, one is really long with a bolt down, I'll have to figure that out.

Then battery, air filter & plenum to chamber, tune-up (wires, dist cap, rotor), final connections of all, add antifreeze, check transmission level (some came out hooking up coolant lines to radiator)

2 DIFFICULT LAST THINGS: Hook-up exhaust pipes to manifold. I put new catalytic converters with pipes on last summer. NEVER DO EXHAUST WORK YOURSELF! I'm going to have a heck of a time getting the pipes back on the manifolds. IF THERE IS A TRICK, I'M ALL EARS!

I'm going to go ahead and take off the oil pan and check the oil pump bolts & especially the oil pipe connection. I don't remember tightening this and need the peace of mind. I hope I can reuse the gasket.

Oh yeah, I have an issue with a DS electric hook-up on the fuel rail. It's a small eye electric connection that hooks to a strange 2-little bolt thing where the 2 bolts smash the eye. I torqued off the top bolt, so took it off to get a better look. Seems it's insulated from below. The second bolt is still good and can come on and off. I'm going to post a pic to see what it is, then get some thin wire to wrap underneath the bottom bolt and hook it up. It's easy to get to, so will probably order a new one.

That's about it. Still working on it. 2 or 3 weeknights and I shoul be be ready to start it up. YEAH!
P1010112.jpg
 
DESMOG

Now I understand why people do the desmog. There are a lot of things that wear out and can make it run bad.

Don't get me wrong, I'm GREEN as can be with canoeing, fishing, etc. I'm an outdoor enthusiast and don't want a stinky vehicle.

But, how much better is the exhaust with the EGR system on? I can't see why reburning exhaust helps that much.

I would guess the catalytic converters reduce most of the harmful emissions.

In the future, I may take out the whole EGR system. Leave the catalytic converters for sure, but not the EGR.

I need to do some more research!
 

Users who are viewing this thread

Back
Top Bottom