

What is this wire called?

This site may earn a commission from merchant affiliate
links, including eBay, Amazon, Skimlinks, and others.

Joined
Dec 16, 2017
Threads
2
Messages
14
Location
CA
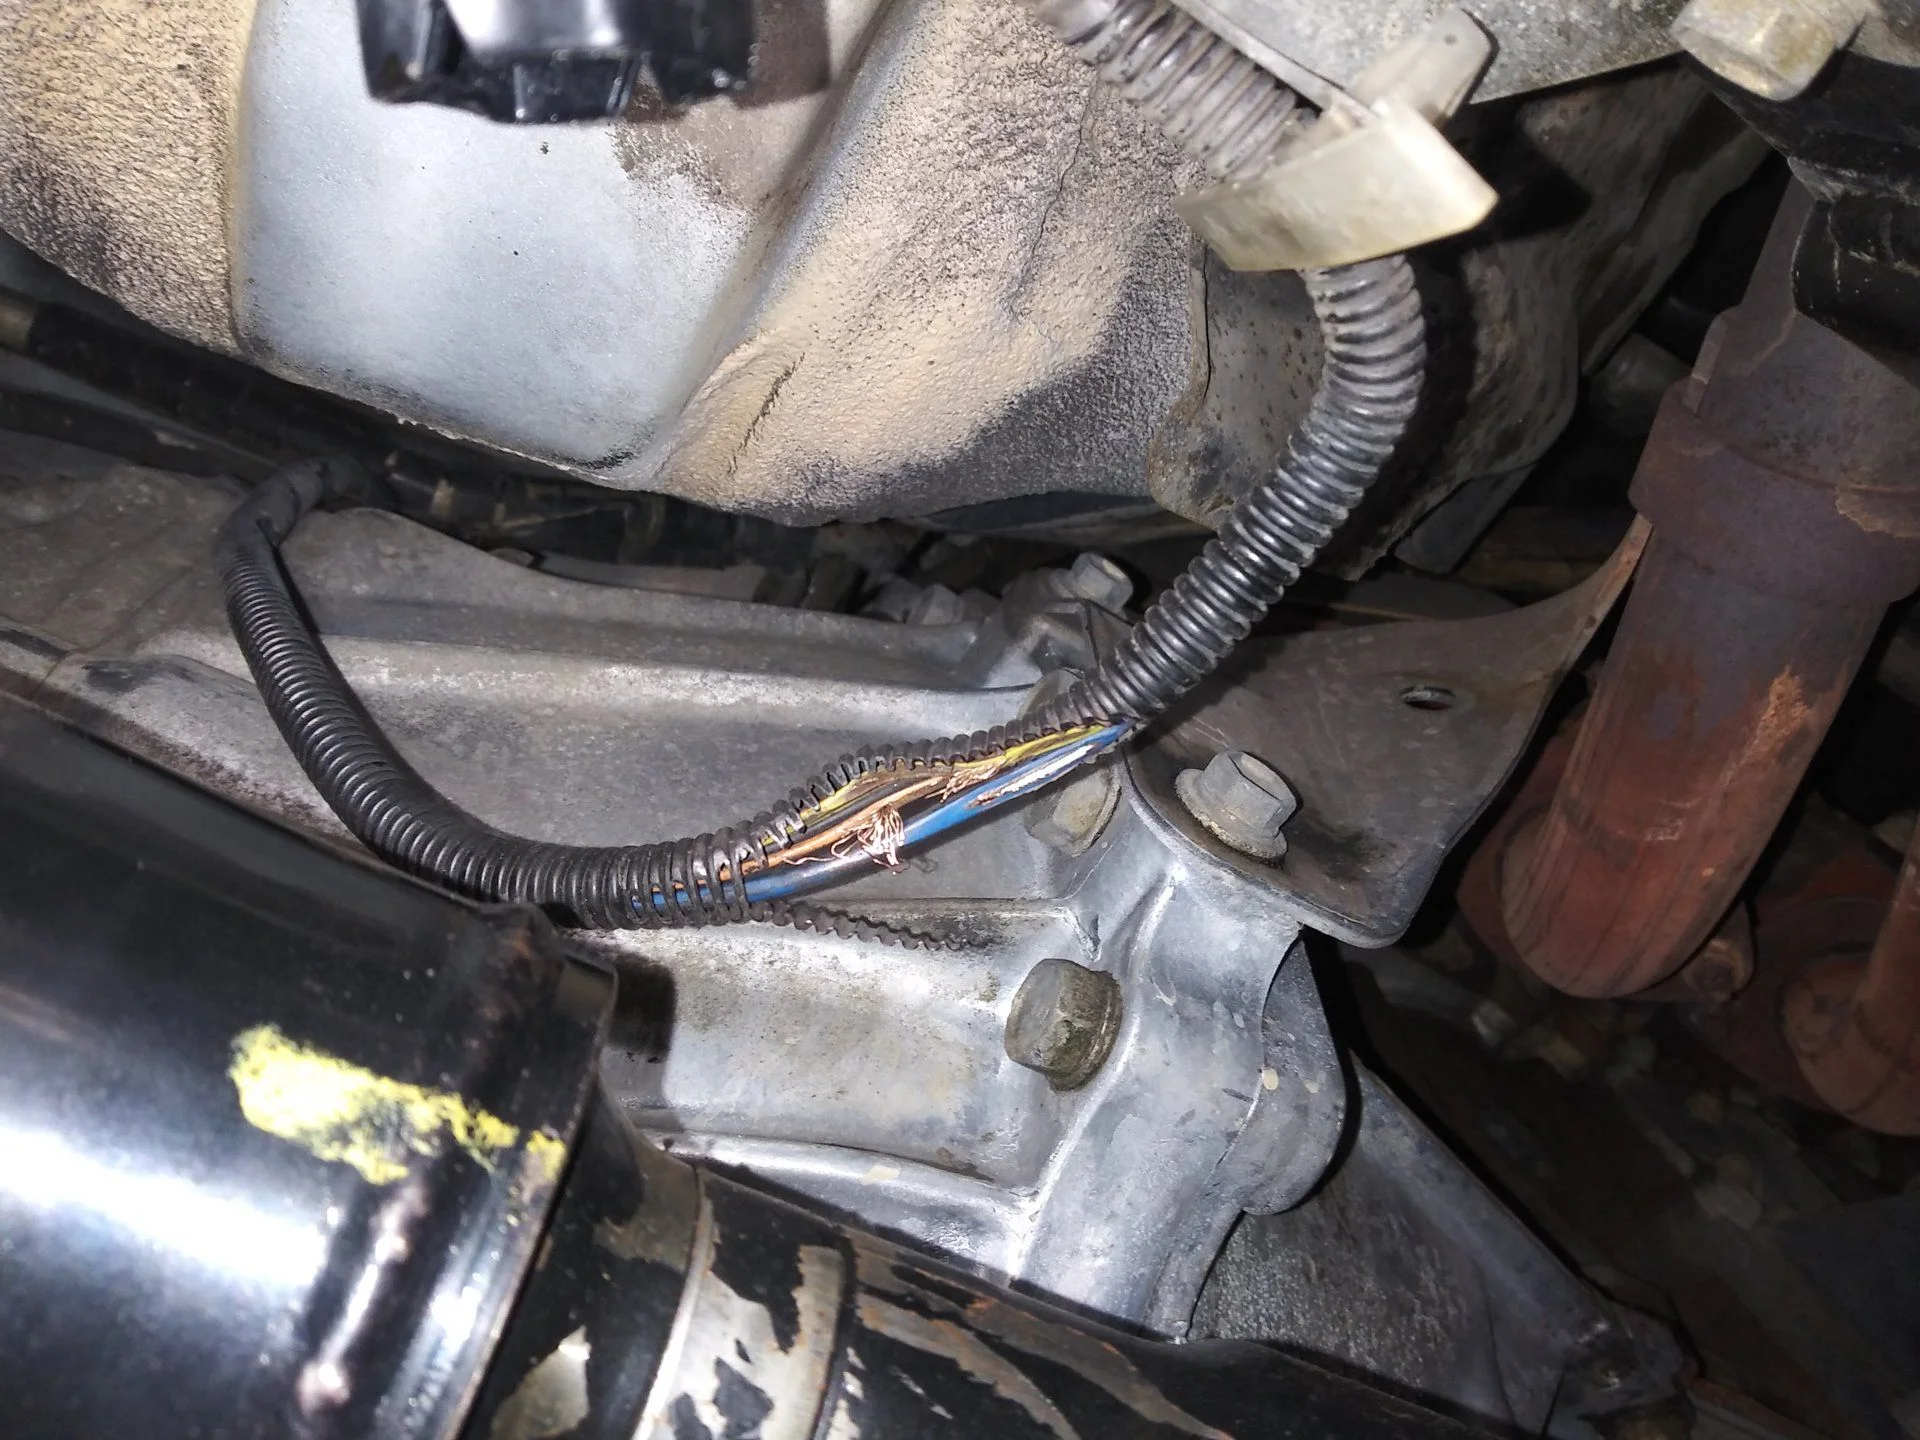
So I have a 94 FZJ80 and it has Code 28, No 2 O2 sensor. I was thinking the sensors are bad and started spraying PB Blaster on the nuts to prep them. Then I noticed this wire was damaged as it appeared to have been rubbing against the front driveshaft. It connects to the O2 sensor's wire that is on the no. 2 front exhaust pipe. Now I think the sensor may not be the cause. What part can I order to replace this broken wire?

Thanks!
1912397
 
Last edited:
You'll just want to splice them, not replace
 
You have more issues than just the one broken wire. If you look closely....besides the broken center wire, you also have exposed wiring as well.

The entire wiring harness does not need to be replaced, the wires can be repaired (spliced or insulated) and then re-wrapped in 'split loom'. Some measure to tie back the harness after repair... would be a good thing.

1912618
 
I haven't soldered anything in 15 years. Thanks for great tips and prompt replies! I will refresh my soldering memory.
 
Lots of mixed opinions on crimp vs. solder, which I'll let you research on your own if you like. I personally would crimp and heat shrink vs. the soldering, but either would do the job.
 
Closer inspection reveals what appears to be burnt wire insulation from prolonged shorting... depending on the wires that were shorting and what the harness attaches to, you may have ruined electronics. Personally I solder and shrink tube most wiring unless it's a utility trailer or a temp fix. Some people talk about failed solder joints, but I haven't had one fail in 20 years of solder repairs....and I've done many.
 
Practise your soldering before you do it on an in-place wiring harness. Exposed copper will have some level of tarnish and any joints need to made well and finished so they last. Sadly Toyata's factory wiring is a lot smaller gauge of wiring that would seem to suit the '4wd truck' nature of the vehicles. Also most wiring harnesses are NLA as new parts.

Old wiring goes hard/brittle due to the copper and the insulation degrading especially if it's not protected by any sort of wrap or sheath. Cheap split-loom has it's problems too.

One good thing when tackling in-place wiring repair is you can have a close look at everything around it and deal with any problems while in there.
 
How did your repair of this harness damage turn out? I’m getting ready to have a similar repair done. Same model, same wire and area, essentially same damage.
 
How did your repair of this harness damage turn out? I’m getting ready to have a similar repair done. Same model, same wire and area, essentially same damage.

I ended up taking it to the stealership and they fixed the wire harness. I am not confident of my electric wire repair skills. Once they fixed it, I triple zip-tied the wire to the bracket which it was originally loosely secured on and now it won't move near the driveshaft.
 
How did your repair of this harness damage turn out? I’m getting ready to have a similar repair done. Same model, same wire and area, essentially same damage.
Mate you could honestly fix this in 10 minutes with some crimps and a bit of wire. If you want to go a bit fancier solder it. Like the other guy said 'in 20 years I've never had a solder fail'. I could probably say the same thing with crimps, as long as you use the right sized crimps it will be fine. Have a look on YouTube if need be.
 
I usually use solder, but for some hard to work in areas I have been using Posi-lock connectors. I first saw them used on mud, but forget by who. They are easier to install than solder or crimps, but harder to deal against water, etc. IMHO (assuming one is using the crimps with the preinstalled heat shrink).

Posi-lock Connectors, 14-16 Gauge, Pack of 5 Amazon product ASIN B00389O50G
I have put a few in my tool roll, too. They also make a tap connector.
 
I usually use solder, but for some hard to work in areas I have been using Posi-lock connectors. I first saw them used on mud, but forget by who. They are easier to install than solder or crimps, but harder to deal against water, etc. IMHO (assuming one is using the crimps with the preinstalled heat shrink).

Posi-lock Connectors, 14-16 Gauge, Pack of 5 Amazon product ASIN B00389O50G
I have put a few in my tool roll, too. They also make a tap connector.
Thanks for the advice. Unfortunately, my driveshaft killed the heavier gauge blue sensor wire. I have neither the skills or patience to properly repair this wire so I’m going to have a friend, co-worker make the repair based on some input from a very knowledgeable Cruiser shop guy. Also, hoping the repair fixes my other issues: random misfire at idle- only when warmed up and fuel mgt system takes over /rich, overfueling condition / ECU reporting sensor temps of 177 then dropping to -36, then resetting and back to 177. Aside from this, truck runs great.
 
Whats the proper method for repairing the blue wire since it is shielded? The shielding is so thin it seems difficult to solder to. Does the shielding wire need to surround the copper core work and it simply be connected?

I had a similar driveshaft abrasion after a trail obstacle broke the harness clip at Fall Crawl this year. The only affected wire was the blue one and it was light damage as shown above. No codes or issues untill i snipped and spliced and got the po125. I should have just used liquid electric tape and called it good but instead caused my own problem :bang:
 
Amazon sells these solder seal with built in heat shrink butt splicers. You simply strip the ends of the two wires, stick them into the butt connectors, using a heat gun melt the solder and shrink all in one step. I'm not sure if Amazon has the highest quality but might be worth a look. After doing this for all the wires, then use a giant thick ass heat shrink tubing around the whole harness, just cause we like to overdo things.

Anyway, this what I've used for smaller projects that aren't exposed to the elements:
Amazon link
 
Whats the proper method for repairing the blue wire since it is shielded? The shielding is so thin it seems difficult to solder to. Does the shielding wire need to surround the copper core work and it simply be connected?

I had a similar driveshaft abrasion after a trail obstacle broke the harness clip at Fall Crawl this year. The only affected wire was the blue one and it was light damage as shown above. No codes or issues untill i snipped and spliced and got the po125. I should have just used liquid electric tape and called it good but instead caused my own problem :bang:

For shielded wire you solder the inner wire as you usually would. You unbraid the shield/braided wire as far back as is reasonable and necessary on each side of your new connection, twist the shielding like standard wire, and solder it as usual. This section of wire won't be shielded, but unless it's near a magnet or other source of interference should not be an issue. Make sure you protect your solder joint as you would any other joint.

The shielding is there to act as a ground or protect against external signals, or sometimes just to add strength to the wire.

Here's a decent reference.
 
Last edited:
Back
Top Bottom