
No updates?
Navigation
Install the app
How to install the app on iOS
Follow along with the video below to see how to install our site as a web app on your home screen.
Note: This feature may not be available in some browsers.
More options
Style variation
You are using an out of date browser. It may not display this or other websites correctly.
You should upgrade or use an alternative browser.
You should upgrade or use an alternative browser.
The Machinist's "Project" Thread: 86' FJ60 [Lots Of Pics]
- Thread starter The Machinist
- Start date
This site may earn a commission from merchant affiliate
links, including eBay, Amazon, Skimlinks, and others.
- Thread starter
- #42
Well, not much has happened since my last post. I got new wiper blades yesterday if that counts.  Its hard to make upgrades when your a full time student and cant find work.
I'll update this thread soon though; I'm going to be ordering a set of 1/4" wheel spacers to alleviate a little tire rubbing, and the MAF extended sway bar links so I can put my sway bar back on.
I'm also thinking about ordering this thermometer to gauge outside temperature. I have a plan for where to flush mount it too.

Its hard to make upgrades when your a full time student and cant find work.I'll update this thread soon though; I'm going to be ordering a set of 1/4" wheel spacers to alleviate a little tire rubbing, and the MAF extended sway bar links so I can put my sway bar back on.
I'm also thinking about ordering this thermometer to gauge outside temperature. I have a plan for where to flush mount it too.
Well, not much has happened since my last post. I got new wiper blades yesterday if that counts.
I'll update this thread soon though; I'm going to be ordering a set of 1/4" wheel spacers to alleviate a little tire rubbing, and the MAF extended sway bar links so I can put my sway bar back on.
I'm also thinking about ordering this thermometer to gauge outside temperature. I have a plan for where to flush mount it too.

Where are you ordering it from and where are you considering mounting it?
- Thread starter
- #44
Where are you ordering it from and where are you considering mounting it?
Amazon.com
There is a little plastic cover that is meant to hold a switch right next to the steering wheel. It pops out from the back leaving a square hole roughly 2x2" so it should be a good fit. I think I am going make a backing plate for the thermometer out of a piece of aluminum plate and drill two small holes for bolts.
- Thread starter
- #45
Just ordered the sway bar links, 1/4" wheel spacers, and the grommet and clip for my hood support rod. 
The list is getting shorter!
New pics on these next week maybe?
The list is getting shorter!
New pics on these next week maybe?
- Thread starter
- #46
The Parts Are Here!
Big thumbs up to Summit Racing and Man-A-Fre for their extremely fast shipping, I ordered my stuff on Tuesday night, the spacers got here either last night, or early this morning, and the sway bar mounts and hood bar clip were here when I got home this afternoon, and I selected free ground shipping for both.
Saturday should be fun.
 new parts by Darrell Vaughn, on Flickr
Big thumbs up to Summit Racing and Man-A-Fre for their extremely fast shipping, I ordered my stuff on Tuesday night, the spacers got here either last night, or early this morning, and the sway bar mounts and hood bar clip were here when I got home this afternoon, and I selected free ground shipping for both.
Saturday should be fun.
new parts by Darrell Vaughn, on Flickr
Last edited:
- Thread starter
- #47
So as I said before I got my extended swaybar mounts and installed them over the weekend along with the little grommet for the hood support rod, the small clip that secures the hood support rod, and a set of 1/4" wheel spacers to make sure that my tierod ends don't rub my tires anymore.
Putting the swaybar back on really improved the handling drastically and I would recommend doing it to anyone that hasn't.
Here's a few pics of the swaybar and mounts, and the new hood support stuff:


Putting the swaybar back on really improved the handling drastically and I would recommend doing it to anyone that hasn't.
Here's a few pics of the swaybar and mounts, and the new hood support stuff:
- Thread starter
- #48
Interior Update Part 2
So after reading Snye's Thread, I decided that I wanted to do something similar with my cruiser. For now I am planning on making new cargo panels from 1/2" MDF that will have cargo doors similar to his. This will help with storage, and be a sturdy replacement for the factory panels that are falling apart; they should look better too.
I also plan on using "QuietCrap" from CruiserCrap while I'm tearing into the interior. And because the carpet will be out for that, I might as well powerwash the crap out of it and get it clean once and for all. I will also replace the old jute padding with some form of foam, I'm still a few hardware store trips away from knowing exactly what though.
If there is any money left after buying all of these supplies, the I might get some new speakers for the rear panels because the one's I have now have a different type of grill screwed to them. If I do get new speakers, I'm not going to spend any more than $45 on them. (I love Amazon!)
Tonight I went to OSH and bought two sheets of 1/2" inch MDF, and started to disassemble the interior. So far I have the passenger side cargo panel out, along with the rear carpet, and rear seats. After I did all of that I realized that its only Thursday, and I will probably be driving some friends around tomorrow, so it looks like I'm only carrying one person in my car!
An hour or so of easy work, and its part way there.
 http://www.flickr.com/photos/darrell_vaughn/6850329361/
Cargo panel, trim pieces, and bolts, all put in a safe place and organized in zip-lock bags.
 http://www.flickr.com/photos/darrell_vaughn/6850329867/
Panel off, and ready to go. Snye cut out the vertical brace, but I plan on leaving mine where they are despite them reducing storage capacity.
 http://www.flickr.com/photos/darrell_vaughn/6850330149/
On my previous interior clean up, I decided that the cargo area didn't need any serious effort,... I have never been more wrong. When I pulled the carpet out spread it out on my driveway, it left behind over a pound of beach sand and dirt... and I didn't even shake it!
 http://www.flickr.com/photos/darrell_vaughn/6850329559/
So after reading Snye's Thread, I decided that I wanted to do something similar with my cruiser. For now I am planning on making new cargo panels from 1/2" MDF that will have cargo doors similar to his. This will help with storage, and be a sturdy replacement for the factory panels that are falling apart; they should look better too.
I also plan on using "QuietCrap" from CruiserCrap while I'm tearing into the interior. And because the carpet will be out for that, I might as well powerwash the crap out of it and get it clean once and for all. I will also replace the old jute padding with some form of foam, I'm still a few hardware store trips away from knowing exactly what though.
If there is any money left after buying all of these supplies, the I might get some new speakers for the rear panels because the one's I have now have a different type of grill screwed to them. If I do get new speakers, I'm not going to spend any more than $45 on them. (I love Amazon!)
Tonight I went to OSH and bought two sheets of 1/2" inch MDF, and started to disassemble the interior. So far I have the passenger side cargo panel out, along with the rear carpet, and rear seats. After I did all of that I realized that its only Thursday, and I will probably be driving some friends around tomorrow, so it looks like I'm only carrying one person in my car!
An hour or so of easy work, and its part way there.
http://www.flickr.com/photos/darrell_vaughn/6850329361/ Cargo panel, trim pieces, and bolts, all put in a safe place and organized in zip-lock bags.
http://www.flickr.com/photos/darrell_vaughn/6850329867/Panel off, and ready to go. Snye cut out the vertical brace, but I plan on leaving mine where they are despite them reducing storage capacity.
http://www.flickr.com/photos/darrell_vaughn/6850330149/On my previous interior clean up, I decided that the cargo area didn't need any serious effort,... I have never been more wrong. When I pulled the carpet out spread it out on my driveway, it left behind over a pound of beach sand and dirt... and I didn't even shake it!
http://www.flickr.com/photos/darrell_vaughn/6850329559/Looks like you're committed now! Nice work. Overall, yours looks much cleaner than mine. I thought I would never get all the dust and dirt cleaned up. Can't wait to see the finished product!
- Thread starter
- #50
It may look clean in the pics, but that section of rear carpet was completely saturated with beach sand, and its everywhere back there. I never got a chance to get the shop vac out tonight, so hopefully it doesn't all slide forward towards me while I'm driving!
- Thread starter
- #51
Coulden't help but post this pic I took as I was about to leave OSH when I got the MDF. This Cruiser was really nice, it had a quality suspension lift and was cleanly built. When I pulled into the parking lot and noticed it I said to myself, "Ok, I'm parking next to this guy!"

Any progress tonight?
I know, I know, mine took me weeks, I just chose to post pics all at once at the end.
Planning on putting a new muffler on mine tomorrow. Current one has a big hole in the bottom. Not sure if I should go with a plain old muffler, glasspack (cheap) or flowmaster (not so cheap).
Good luck with the panels!
- Thread starter
- #53
No progress tonight, I was out with friends. If anything, I took a step backwards by putting the rear seat in again.
I still haven't ordered the QuietCrap yet, and I have no idea how long it will take to ship, so I'm not exactly sure when that's going to get done. I might start on the panels this weekend if I don't sleep all day.
Mine has a 2" exhaust (I think), with a Flowmaster, and it sounds pretty good, I'd be courious to find out how a glasspack would sound though.
- Thread starter
- #54
With the help of my Dad, I was able to make some progress on one of the side panels this evening. We got it roughed out and got started on refining the edges to make it fit right.
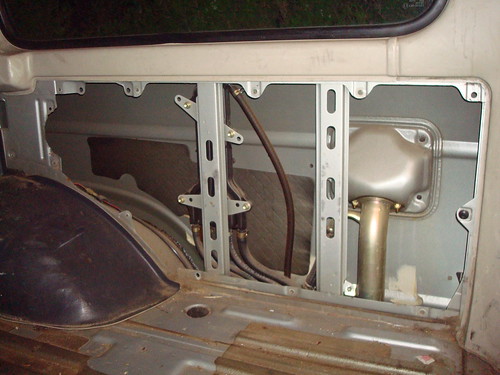
I'm still not exactly sure what I want to do about adding extra storage or not. The problem is that the gas vent lines are attached to a support post right where I want to put a storage door, and I'm not sure I want to cut out those supports anyway. (would it weaken anything?)
While we were at homedepot today I also picked up a a few swatches of carpet, the plan being to use it to upholster the panels with it when they are done.
Nice work. Looks great. I used that same carpet from Home Depot for the rear. Just painted the panels.
As far as cutting the supports, do a search for "wagon gear" and see what everyone says about cutting those out. Have yet to hear any negative consequences.
https://forum.ih8mud.com/60-series-wagons/365120-side-panel-storage.html
Www.wagongear.com/side_panels.html
This is where I got my inspiration.
- Thread starter
- #56
Just ordered 100 sq feet of QuietCrap from CruiserCrap, and now I'm broke. It will all be worth it in the end though!
If anyone in San Jose is looking to hire someone for part time work or if anyone in the Bay Area wants to buy a 2010 Scott Voltage FR20 mountain bike, let me know!
It will all be worth it in the end though!If anyone in San Jose is looking to hire someone for part time work or if anyone in the Bay Area wants to buy a 2010 Scott Voltage FR20 mountain bike, let me know!
LOL... welcome to being a high schooler and having to work to fund your..um... addictions. If you havent already throw the Scott up on the MTBR forums as I am sure you can find someone in the area that would pick it up from you.
And I second looking at WagonGear's stuff, he has instructions on cutting out the supports and relocating the evaporator. Are you not going to add speaker holes for the rear? Maybe put a nice set of 6x9s back there.
And I second looking at WagonGear's stuff, he has instructions on cutting out the supports and relocating the evaporator. Are you not going to add speaker holes for the rear? Maybe put a nice set of 6x9s back there.
- Thread starter
- #58
Yeah... the only time I have money is around my birthday, and christmas. I've had the bike up on craigslist and pinkbike for a while now, plenty of inquiries, but no one serious.
I have a pair of 6x9's that were in it already, but I haven't put the hole in because I might order some new ones from amazon.... if i can get some money....
I was looking at the WagonGear site last night, and I think I may remove one support on each side, and the evaporator seems easy enough to relocate.
I ordered this thermometer off amazon.com . One thing to keep in mind, if the angle of the face of the LCD screen is not aimed up to your face while sitting in the seat, you will have a hard time making out the readout of the numbers. Especially with polarized sunglasses. I had mine mounted in place of the choke pull knob and couldn't read it at all. i moved it to the lower left windshield, just resting there. works much better there to see. put the sensor below and behind the driver headlight.
Well, not much has happened since my last post. I got new wiper blades yesterday if that counts.
I'll update this thread soon though; I'm going to be ordering a set of 1/4" wheel spacers to alleviate a little tire rubbing, and the MAF extended sway bar links so I can put my sway bar back on.
I'm also thinking about ordering this thermometer to gauge outside temperature. I have a plan for where to flush mount it too.
- Thread starter
- #60
Today I finished fitting the first panel, and then made a duplicate for the other side. I also got the mounting holes located and drilled. I still need to make a cut out for the bottle jack holder in the drivers side panel, anyone have any advise on this matter? What did you do with your bottle jack?
I also decided that I am going to relocate the evaporator lines and remove the post they are mounted to, but leave the other post near the fuel filler tube. I am also going to need to figure out what latches to use for the doors.
I cant wait to get the QuietCrap I ordered and start work on that part of the project. It should be interesting to have doors that sound like a modern car!