Midwest 60 owners to help with my de-smog??

This site may earn a commission from merchant affiliate
links, including eBay, Amazon, Skimlinks, and others.

Joined
Sep 13, 2015
Threads
94
Messages
299
Location
midwest (iowa)
I just spent oodles having the engine on my 1987 fj60 rebuilt. I had an engine builder take care of the technical stuff. Spared no expenses... new everything, including an rv cam. In the process of removing the engine, I also removed the smog clutter. ALL of it! I got my carb and dizzy back from Jim, assembled the engine and have been struggling for weeks with the vacuum line routing. I was so excited to get this back on the road.. but im, afraid its becoming a permanent fixture in my shop. I'm going to strangle the next guy who tells me to read the fsm until i understand the system..... It just isn't sticking... I've become neurotic! I have printed out Jim c's desmog instructions and a few others as well. I'm lost almost immediately and when instructions contradict.... forget it. it sounds like a foreign language. Granted, He's been at it long enough that its second nature to him and therefore uses terms, abbreviations etc. as if we all know the meaning. I've bothered him enough times... I have no one in my area or my circle of acquaintances who own a Landcruiser.... I can't take it to any modern mechanic. I'm stuck in the midwest. It's feeling hopeless. I get the shakes reading the printed instructions over and over and over and...... I'm assuming there is a valve in between the starting point and ending point of each vacuum line.... sometimes 5 lines converge at the same valve! I sound clueless when it comes to vacuum lines because I AM. It runs great.... with the choke on... It dies when i push in the choke. I can't set the timing because the vacuum lines are not all hooked up what a vicious cycle! This is giving me fits..
Is there a resource WITH LABELED PICTURES that can help me? Better yet.... Is there someone near Iowa who know their way around a de-smogged fj60?
Advice welcome unless it is "Learn the systems..." I just want this behind me. .Why not dumb this process down for we dummies? "Put vacuum line on this and run it to here" With pictures......
I'm currently searching for a list of abbreviations of valves, ports, etc.
 

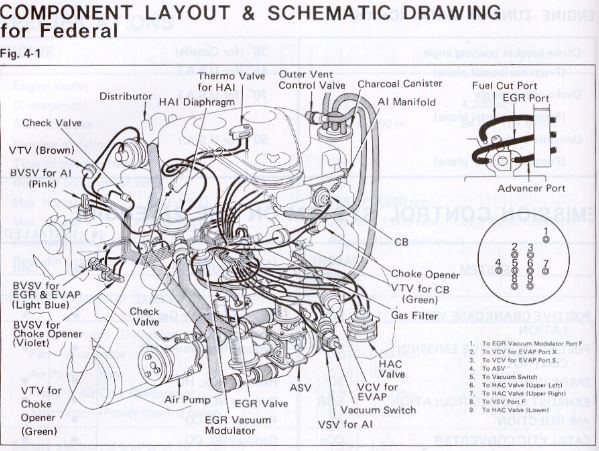
This is from the 1st page of the Emission FSM, prob the best FSM for you to read over.
1646195181505.webp
 
I just spent oodles having the engine on my 1987 fj60 rebuilt. I had an engine builder take care of the technical stuff. Spared no expenses... new everything, including an rv cam. In the process of removing the engine, I also removed the smog clutter. ALL of it! I got my carb and dizzy back from Jim, assembled the engine and have been struggling for weeks with the vacuum line routing. I was so excited to get this back on the road.. but im, afraid its becoming a permanent fixture in my shop. I'm going to strangle the next guy who tells me to read the fsm until i understand the system..... It just isn't sticking... I've become neurotic! I have printed out Jim c's desmog instructions and a few others as well. I'm lost almost immediately and when instructions contradict.... forget it. it sounds like a foreign language. Granted, He's been at it long enough that its second nature to him and therefore uses terms, abbreviations etc. as if we all know the meaning. I've bothered him enough times... I have no one in my area or my circle of acquaintances who own a Landcruiser.... I can't take it to any modern mechanic. I'm stuck in the midwest. It's feeling hopeless. I get the shakes reading the printed instructions over and over and over and...... I'm assuming there is a valve in between the starting point and ending point of each vacuum line.... sometimes 5 lines converge at the same valve! I sound clueless when it comes to vacuum lines because I AM. It runs great.... with the choke on... It dies when i push in the choke. I can't set the timing because the vacuum lines are not all hooked up what a vicious cycle! This is giving me fits..
Is there a resource WITH LABELED PICTURES that can help me? Better yet.... Is there someone near Iowa who know their way around a de-smogged fj60?
Advice welcome unless it is "Learn the systems..." I just want this behind me. .Why not dumb this process down for we dummies? "Put vacuum line on this and run it to here" With pictures......
I'm currently searching for a list of abbreviations of valves, ports, etc.
It would help to have some pictures of what you have going on now. It would also help to know if you're going for a full desmog or a partial desmog. some people leave part of the system in place because they want the High Altitude Compensation. Some people don't need it or it's not working anyway so they delete it. Lets step back for a minute if you're getting so frustrated you're visibly shaken. What do you have in the engine bay right now? Show us some pictures and some more people will likely feel like chiming in. There is really no way to dumb it down any further than it's been dumbed down on this forum, to be honest. It was a complicated system that managed a complicated set of problems. For the most part, you don't need any of the vac lines other than the dizzy advance. Pretty much everything else can go if I remember correctly. I installed a holley sniper EFI system when I did my desmog so I deleted everything except the vac advance and a few vac lines to run a vac gauge in the truck.

It took me a while to figure this out, but when you're looking at the drawings of the vacuum system, the areas inside the valves and whatnot that are filled with solid black show the path of vacuum. If there is black, then it's sucking. If it's white, there is no vacuum applied to that part. This is necessary to understanding what the FSM is telling you about the system and how it operates. It almost reads like computer code... "if this - is true, then this- is also true, and this is false"... does that make sense? If you add 1 and 1 it equals 2. That's what the emissions book is telling you in those graphics and diagrams. If this valve is open and this valve is closed then vacuum should be present 'here'. If vac is not present 'here' and valve is open and valve is closed, then problem is likely 'there'.

If you don't understand how vacuum is created by the engine and why it's useful then I would start by trying to grasp that concept. As the engine explodes fuel and air, it sucks in oxygen for combustion while simultaneously expelling combusted waste gasses and particles out the exhaust. If we didn't have clean air going into the internals of the engine we wouldn't have any explosion. There must be air drawn into the mix. It's a cycle that happens as the engine turns over. It's constantly sucking more air. we can tap into that and use the physical sucking action to manipulate other physical devises that are handy in a vehicle. For instance, an automatic transmission runs on vacuum, or the old ones do anyhow. The harder the engine is working the harder it sucks. When it begins to suck a certain measurable unit (measured in inches) different devices in the vacuum circuit will engage. IE: at idle healthy engines at sea level will suck around 16-17 inches. Barometric pressure will affect this. Higher altitude has less oxygen and therefore will not produce the same amount of vacuum as sea level. This is what the high altitude compensation circuit is for. In Colorado I was pulling around 14 inches and in Florida I'm pulling around 18 inches at idle. When the engine revs it changes the amount of vacuum that is produced. The engineers take advantage of this and design their smog system to engage under different vacuum conditions. If vacuum is lost at a valve it will open allowing vacuum to be drawn from another location allowing exhaust gasses to be recycled back into the engine to be combusted a second time. This is the very basics of how the smog system works on the 2F engine. All that spaghetti of vac lines is there to recycle exhaust gasses to be burned again in order to clean the air coming from the exhaust. Doing this sacrifices some power and performance from the engine. It's not necessary to make the engine run.

There are functions on the carburator that require vacuum. IE the distributor advance. As the engine revs up the vacuum pulls a diaphragm inside the distributor which in turn rotates the distrubutor to adjust the ignition timing. When the throttle plate in the carb is wide open it should be engaging the secondary which increases the fuel mix to compensate for the higher RPMs. It's actually a brilliant solution to a complicated problem.

My suggestion would be to make sure the vacuum advance is hooked up correctly to the carb. Then make sure you have no open vacuum ports anywhere. Get the engine running with bare minimum vacuum accessories and then add what you need from there. Take it one bite at a time. Each system plays off of the other, so try to understand the very basics and get that under control and go from there. Good luck. Were here to help!

Edit: Also, if you didn't have your engine set at top dead center when you installed the distributor then you will always have trouble getting it to idle properly. very very first thing would be verify the dizzy is installed properly and that the vac advance diaphragm is in working order. If you had JimC rebuild and set your carb for a desmog then I would seriously consider having him go through your distributor as well. The two go hand in hand and having them both in perfect working order is going to make things go so much more smooth for you. Especially if you just had the whole engine rebuilt with an upgraded RV cam. Defiantly get that dizzy reworked if you haven't already.

 
Last edited:
The Toyota Emissions manual is probably the most awesome user’s manual in existence (and I used to make technical manuals).
The drawings are excellent and each system has a good drawing how it’s connected and a very good schematic below showing how it works.
I’ve attached a few examples of the drawings here which show how stuff is connected and I’ve also attached the entire emissions manual as a pdf too.

I’d say slow down and start looking over the emissions manual carefully - just one system at a time. Get to understand what that system is doing and how it’s hooked up, then go out to your car and visualize what went where.

Modern engines use electricity flowing through wires to actuate components via electric solenoids. The 2F used the power of engine vacuum (instead of electricity) to actuate components via valves.
The 2F uses air vacuum instead of electricity to make things do stuff.
It’s a much simpler and more reliable way to move actuators.

A29851B5-C0C7-4CF8-88C0-C9FE1BEE403D.webp
D88BA78A-8D5D-4105-A73D-8C9C1C773095.webp
A2EAB2EA-4764-4EBA-B396-3692FDD87830.webp
 

Attachments

OK. I'll jump in. I'm not sure how much these will help since you want to desmog and have already removed many of the components. I've attached various schematics associated with the stock/smogged vacuum routing. It shows similar information in different ways. Maybe knowing "what was" will help you get to where you want to be.

I live in California, and my truck is smogged so I tend to ignore the "desmog" threads. However, the thread that g-man linked looks pretty good, with updated diagrams, etc.

Good Luck
 

Attachments

Yes, there's no way around understanding the FSM. I know it's incredibly frustrating when you have no idea what you're looking at, but that's exactly why that manual exists. Again, I'll say, start with getting your distributor installed correctly and make sure the vacuum advance is hooked up correctly to the carb. All the other bells and whistles can be capped off for now until you get the engine running without the choke. It could be set up just fine but maybe you have a massive vacuum leak. Do you have a vacuum gauge? I would get one for sure if you don't have one already. It will help you visualize what's going on with the vacuum system. If you've got spark and fuel is flowing and the engine turns over and runs with the choke then this is not very far off from running well. You've gotta be close to having it right.
 
Lots of good advice here. I am quite new to wrenching as well. I took that desmog manual and went through it thoroughly and then got out the masking tape and started labeling everything. Once I felt like I understood what each part was and where it was located my confidence was enough to take on the project. Also good information in the “my desmog” thread. It’s about 50 pages long but when I knew nothing about a desmog it was sure helpful. Really no way getting around putting in the dues and trying to figure it out… and making mistakes. None of the mistakes are catastrophic. You got this
 
Lots of good advice here. I am quite new to wrenching as well. I took that desmog manual and went through it thoroughly and then got out the masking tape and started labeling everything. Once I felt like I understood what each part was and where it was located my confidence was enough to take on the project. Also good information in the “my desmog” thread. It’s about 50 pages long but when I knew nothing about a desmog it was sure helpful. Really no way getting around putting in the dues and trying to figure it out… and making mistakes. None of the mistakes are catastrophic. You got this
I appreciate the advice and the encouraging words. I’ll probably tackle it one hose at a time. I can always count on direction from this website as well👍🏼 I’ve been reading the FSM. It is definitely helpful, but there are still some unknowns tripping me up. Likely be posting some pictures with questions in the near future. Thanks
 
T
It would help to have some pictures of what you have going on now. It would also help to know if you're going for a full desmog or a partial desmog. some people leave part of the system in place because they want the High Altitude Compensation. Some people don't need it or it's not working anyway so they delete it. Lets step back for a minute if you're getting so frustrated you're visibly shaken. What do you have in the engine bay right now? Show us some pictures and some more people will likely feel like chiming in. There is really no way to dumb it down any further than it's been dumbed down on this forum, to be honest. It was a complicated system that managed a complicated set of problems. For the most part, you don't need any of the vac lines other than the dizzy advance. Pretty much everything else can go if I remember correctly. I installed a holley sniper EFI system when I did my desmog so I deleted everything except the vac advance and a few vac lines to run a vac gauge in the truck.

It took me a while to figure this out, but when you're looking at the drawings of the vacuum system, the areas inside the valves and whatnot that are filled with solid black show the path of vacuum. If there is black, then it's sucking. If it's white, there is no vacuum applied to that part. This is necessary to understanding what the FSM is telling you about the system and how it operates. It almost reads like computer code... "if this - is true, then this- is also true, and this is false"... does that make sense? If you add 1 and 1 it equals 2. That's what the emissions book is telling you in those graphics and diagrams. If this valve is open and this valve is closed then vacuum should be present 'here'. If vac is not present 'here' and valve is open and valve is closed, then problem is likely 'there'.

If you don't understand how vacuum is created by the engine and why it's useful then I would start by trying to grasp that concept. As the engine explodes fuel and air, it sucks in oxygen for combustion while simultaneously expelling combusted waste gasses and particles out the exhaust. If we didn't have clean air going into the internals of the engine we wouldn't have any explosion. There must be air drawn into the mix. It's a cycle that happens as the engine turns over. It's constantly sucking more air. we can tap into that and use the physical sucking action to manipulate other physical devises that are handy in a vehicle. For instance, an automatic transmission runs on vacuum, or the old ones do anyhow. The harder the engine is working the harder it sucks. When it begins to suck a certain measurable unit (measured in inches) different devices in the vacuum circuit will engage. IE: at idle healthy engines at sea level will suck around 16-17 inches. Barometric pressure will affect this. Higher altitude has less oxygen and therefore will not produce the same amount of vacuum as sea level. This is what the high altitude compensation circuit is for. In Colorado I was pulling around 14 inches and in Florida I'm pulling around 18 inches at idle. When the engine revs it changes the amount of vacuum that is produced. The engineers take advantage of this and design their smog system to engage under different vacuum conditions. If vacuum is lost at a valve it will open allowing vacuum to be drawn from another location allowing exhaust gasses to be recycled back into the engine to be combusted a second time. This is the very basics of how the smog system works on the 2F engine. All that spaghetti of vac lines is there to recycle exhaust gasses to be burned again in order to clean the air coming from the exhaust. Doing this sacrifices some power and performance from the engine. It's not necessary to make the engine run.

There are functions on the carburator that require vacuum. IE the distributor advance. As the engine revs up the vacuum pulls a diaphragm inside the distributor which in turn rotates the distrubutor to adjust the ignition timing. When the throttle plate in the carb is wide open it should be engaging the secondary which increases the fuel mix to compensate for the higher RPMs. It's actually a brilliant solution to a complicated problem.

My suggestion would be to make sure the vacuum advance is hooked up correctly to the carb. Then make sure you have no open vacuum ports anywhere. Get the engine running with bare minimum vacuum accessories and then add what you need from there. Take it one bite at a time. Each system plays off of the other, so try to understand the very basics and get that under control and go from there. Good luck. Were here to help!

Edit: Also, if you didn't have your engine set at top dead center when you installed the distributor then you will always have trouble getting it to idle properly. very very first thing would be verify the dizzy is installed properly and that the vac advance diaphragm is in working order. If you had JimC rebuild and set your carb for a desmog then I would seriously consider having him go through your distributor as well. The two go hand in hand and having them both in perfect working order is going to make things go so much more smooth for you. Especially if you just had the whole engine rebuilt with an upgraded RV cam. Defiantly get that dizzy reworked if you haven't already.

Thanks a ton.... Yes Jim went through the dizzy as well as the carb. I will take your advice and start with the basics. I was frustrated as heck and needed a snickers when i wrote that thread. but I will break it down into small steps..... I will find out if Jim set the idle when he reworked it.... It runs perfect with just a little choke. Ill look again to make sure everything is capped on the carb and see if I can get to idle.... Thanks!
 
T

Thanks a ton.... Yes Jim went through the dizzy as well as the carb. I will take your advice and start with the basics. I was frustrated as heck and needed a snickers when i wrote that thread. but I will break it down into small steps..... I will find out if Jim set the idle when he reworked it.... It runs perfect with just a little choke. Ill look again to make sure everything is capped on the carb and see if I can get to idle.... Thanks!
I'm sure Jim set it up as a drop in system. If everything else is capped off then all you need to do is hook up the carb to the correct vac ports and be done with it. If you ever plan on climbing above Iowa you might need to consider adjusting your timing, but if you plan to basically live at one place with that truck then you don't need the HAC system and all you need is the dizzy advance and the fuel cut solenoid (I think in your case). I would trust Jim to set things up properly. It's possible you're one tooth off on your dizzy install. Double check that. Otherwise get a vac gauge and let us see what you're pulling when you're able to get the engine running.
 
I'm sure Jim set it up as a drop in system. If everything else is capped off then all you need to do is hook up the carb to the correct vac ports and be done with it. If you ever plan on climbing above Iowa you might need to consider adjusting your timing, but if you plan to basically live at one place with that truck then you don't need the HAC system and all you need is the dizzy advance and the fuel cut solenoid (I think in your case). I would trust Jim to set things up properly. It's possible you're one tooth off on your dizzy install. Double check that. Otherwise get a vac gauge and let us see what you're pulling when you're able to get the engine running.
I will do that. I think you’re right on the one tooth off. I’ve got The distributor cranked as far as I can And I’m not quite to the 7° Bb
 
I will do that. I think you’re right on the one tooth off. I’ve got The distributor cranked as far as I can And I’m not quite to the 7° Bb
Do you have a timing light with a digital read out and a tachometer? They aren't necessary but they sure to make things way easier. That combined with a vac gauge will really help you see what's going on. The more you do it the more you'll get a feel for what you're doing.
 
Before first crank after Jim C and desmog I had to stab the dizzy 3 times!!!! before I got it correct. Once was 180 degrees off, then I was a tooth or two off......would not start at all. Make sure your Fuel cut Valve is operational on the fender as well. When I started removing stuff I realized at some point the PO had removed it and did a modified green wire mod. I corrected all that and grounded on the carb. Truck starts and drives better than ever since then.
Somewhere I posted on here about my experience with the dizzy install. The picture in the FSM for me was missleading.
 
Before first crank after Jim C and desmog I had to stab the dizzy 3 times!!!! before I got it correct. Once was 180 degrees off, then I was a tooth or two off......would not start at all. Make sure your Fuel cut Valve is operational on the fender as well. When I started removing stuff I realized at some point the PO had removed it and did a modified green wire mod. I corrected all that and grounded on the carb. Truck starts and drives better than ever since then.
Somewhere I posted on here about my experience with the dizzy install. The picture in the FSM for me was missleading.
Thanks for the advice. The truck starts and runs very well so I’m pretty sure I’ve got the correct orientation on the distributor. My can of ether and I were poking around last night and I think I found a vacuum leak on the intake manifold. That would explain the no idle Without choke. I will have to remove the carburetor And see what I can find. Slowly but surely it’s coming together.
 
Back
Top Bottom