

Beefing Up Small Pattern Knuckles '76-'78

This site may earn a commission from merchant affiliate
links, including eBay, Amazon, Skimlinks, and others.

LC_Hamma

The Anti-Leafer
Joined
Nov 11, 2002
Threads
98
Messages
2,656
Location
Dallas, Georgia
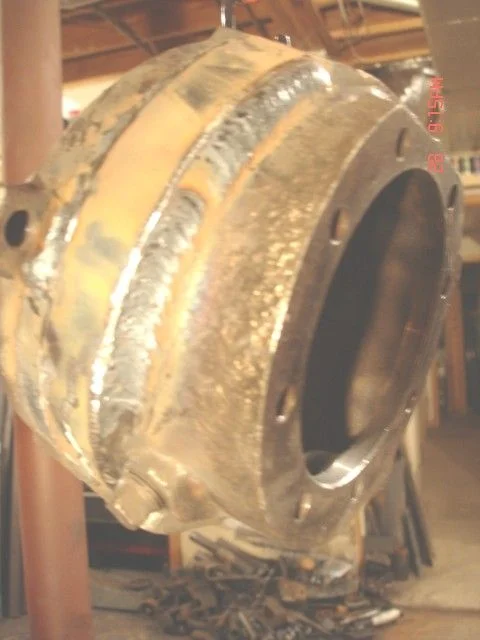
I decided to go ahead & add some material to my spare knuckles cuz I can't wait forever for Marlin's 6 stud design. I welded on some 1/4" plate, cut from 6" dia. pipe. I already retapped the top steering arm holes to 12MM, bought some hardened studs & reamed the cone washers too. So, before I slap on some POR15, is there any other areas I should reinforce, maybe around the top steering arm area somehow? Any ideas?
DSC00373.webp
 
The weak spot is the top of the knuckle. The studs are spaced too close for the torque applied and the studs shear or the holes get ovalled, so 12 mm studs isn't going to make much difference. More studs spaced farther apart or a keyway milled in the top of the knuckle and a matching key in the arm would do the trick.
 
Pin_Head said:
The weak spot is the top of the knuckle. The studs are spaced too close for the torque applied and the studs shear or the holes get ovalled, so 12 mm studs isn't going to make much difference. More studs spaced farther apart or a keyway milled in the top of the knuckle and a matching key in the arm would do the trick.

Yeah, I thought about a key in the arm w/a keyway in the knuckle, but you're right about the studs being too close. I'll see if I can weld in a sliver of metal to the underside of the arm & have the top milled to match it. The keyway will prolly look like a V cuz I'm gonna need some weld on both sides of the sliver. Thanks for the advise dude!
 
If you're not worried about welding on the knuckle housing [which doesn't appear to be the case], then how about welding on top of the knuckle housing, outboard of the arm, something that would not only ride up against the arm, making it harder for the arm to 'flex' but also providing a source for a secondary anchor to your 12mm studs.

Totally bootyfab, and would require cutting into the dust shields [if you're running them] but not really any more bootyfab than the 6" pipe scabs you've got on there now, and they would be in a place where they would provide more theoretical assistance.
 
Pin_Head said:
How did you do the welds on that? It isn't easy to do a continuous weld that big on cast iron without it cracking. Did you preheat it?

Yeah, I put it in my Easy-Bake oven! Naw, I did think about it, but nope. You can see where I stopped the weld, right in the middle where there's an orange spot. I let it cool some then picked back up on that weld pass. I inspected it for cracks & there were none.
 
65swb45 said:
If you're not worried about welding on the knuckle housing [which doesn't appear to be the case], then how about welding on top of the knuckle housing, outboard of the arm, something that would not only ride up against the arm, making it harder for the arm to 'flex' but also providing a source for a secondary anchor to your 12mm studs.

Totally bootyfab, and would require cutting into the dust shields [if you're running them] but not really any more bootyfab than the 6" pipe scabs you've got on there now, and they would be in a place where they would provide more theoretical assistance.

That's a good suggestion too! I'd have to form a piece to wrap around the bulges of the arm. I'd have to check & see if there's enough weld surface on the outer edge to get some sufficent weld there, even with the dust shields cuz I do run them. What's booty about that? It looks clean & is functional. Hehe!
 
bustanutley said:
the knuckles are not cast iron, they are cast steel.


They shure look and act like nodular cast iron to me. Knuckles make powder and not chips when you drill on them and when you do the grinder test they give off orange balls and not sparks and the ground area shows streaks of graphite. All are classic signs of cast iron.

There are a couple of problems with welding to cast iron. Cast iron doesn't have the tensile strength of steel, so when the weld shrinks apon cooling the weld often cracks if you don't peen the bead during cooling to limit its contraction. The fact that the weldment is curved may have helped prevent this cracking.
The other problem is the rate of cooling. If you allow it to cool in air after heating it, the carbon doesn't have time to separate out as graphite and it forms what is known as cementite in the fusion zone. Cementite is iron carbide (or white cast iron) and is very hard and brittle. When any stress is applied, the weld cracks under the bead in this brittle zone. Welding with nickle rod or stainless filler helps prevent this problem with cementite as it doesn't form a carbide during cooling.
 
Pin_Head said:
They shure look and act like nodular cast iron to me. Knuckles make powder and not chips when you drill on them and when you do the grinder test they give off orange balls and not sparks and the ground area shows streaks of graphite. All are classic signs of cast iron.

There are a couple of problems with welding to cast iron. Cast iron doesn't have the tensile strength of steel, so when the weld shrinks apon cooling the weld often cracks if you don't peen the bead during cooling to limit its contraction. The fact that the weldment is curved may have helped prevent this cracking.
The other problem is the rate of cooling. If you allow it to cool in air after heating it, the carbon doesn't have time to separate out as graphite and it forms what is known as cementite in the fusion zone. Cementite is iron carbide (or white cast iron) and is very hard and brittle. When any stress is applied, the weld cracks under the bead in this brittle zone. Welding with nickle rod or stainless filler helps prevent this problem with cementite as it doesn't form a carbide during cooling.

That's good info.

To prevent the iron carbide, couldn't you use a gas BBQ? You could ramp down the temp a little at a time. You could also heat the part in the BBQ before welding.
 
Preheat and slow cooling is good for cast iron. I don't know that a gas BBQ is going to get you the heat you need. The hotter you get it and the slower it cools the better. Heat the whole enchilada to about 1000 F in a gas furnace or with a rosebud and then cover it with dry sand or vermiculite to insulate it after welding. If it is too big to preheat, then weld short segments (1 inch) with nickle rod and peen the bead with your chipping hammer while it is still hot and let it cool before the next bead. That way you minimize the heat input and minimize the cementite in the HAZ.

This is from "Metals and How to Weld Them" published by Hobart
Bros.
 
So let me get this straight. You drilled your steering arms and tapped the knuckle for bigger studs? I thought it wouldn't do any good.

Good to know about the 1000 degree thing Pinhead. I have a kiln with a computerised thermostat I could use just for this. Any advantages to heat treating any metal. Even if you didn't add any metal? I have the ability to ramp up and down in any timeframe as many times as I want.
 
I'll throw this out there at the risk of being...... E-Criticized???

If you are that worried about busting those studs and/or the knuckle, why don't you just weld the arm to the knuckle. Tighten the bolts and lay a fat bead all the way around. You only need to pull the bottom cap to remove the knuckle.....
I have seen this work as a trail repair.
Is it a bad idea because of disimular metals? Heating and cooling of cast parts cracking?
PMK
 
Back
Top Bottom