


I put this drawer system together today and thought you guys might appreciate a gander.
I used Jim Brantley's 60 series drawer system as a starting point since I also own a 62 and wanted to be able to switch between my 2 Cruisers. The 80 series is two inches wider so you can widen everything if you want it specifically for an 80.
I decided I did not want to use drawer sliders so I tweaked his measurements so a drawer would fit in there snugly.
I then thought it would be neat to have a folding bed extension that could fold over on top of the folded seat in the 80(just the first fold to bring the seatback down). So I heightened the drawer so it was level with the tops of the folded seats. As you can see from the pictures, I have not installed it yet. But I have the piece cut and I'll pick up some hinges tomorrow.
I took out the cargo tie-downs, but put the screws back in to keep everything dry from the undercarriage.
I used Gorilla Glue as well as screws to ensure a tight attachment.
I cut 2 openings in the case back and kept the drawer back short so you can get to stuff in the back of the drawer when it's closed.
The bee's wax is rubbed on top of the case bottom and under the drawer bottom. Slides VERY well.
I sanded all the edges and surfaces to smooth everything out.
I had Lowes cut all the pieces...and yes there were some very slight measurement mistakes. Nothing the sander couldn't fix.
I plan on either covering it with marine carpeting or painting it. Leaning towards the marine carpet.
Materials:
3 96" x 48" pieces 3/4" Plywood(I used Lowes #23/32" 4X8 BC PINE ULX EXTERIOR Item#:12229)
Box of Drywall Screws 6x1-5/8(countersinking)
Gorilla Glue
Bar of Bee's Wax
2 Hinges (I used West Marine's Stainless Butt Hinges Model 7219546)
6 Machine Screws "Round Combo w/ Nuts-Zinc 1/4-20 x 1'(Maybe 4 more if you use them to attach hinge to case)
6 Locking Nuts(Instead of nuts that came w/ machine screws; Maybe 4 more if you use them to attach hinge to case)
6 Washers(Maybe 4 more if you use them to attach hinge to case)
Measurements(inches):
Plywood panel #1:
A)Case Bottom 41.75 x 39.50
B)Case Top 41.75 x 39.50
C)Case Back 40.25 x 12.125
Plywood Panel #2:
D)Bed Extension 41.75 x 27.50
E)Drawer Front 40 x 12
F)Drawer Back 40 x 2.8125
G)Case Side 39.50 x 12.125
H)Case Side 39.50 x 12.125
I)Drawer Side 37.25 x 11.125
J)Drawer Side 37.25 x 11.125
Plywood Panel #3:
K)Drawer Bottom 40 x 38
*Remember. These width measurements are for a 60 Series. If you want it specifically for an 80 Series, the width is 2" wider. Just add 2" to blue measurements.*
*The measurements in red are FIRM. These are the measurements that ensure that the bed extension sits level on the folded seats. Also remember that I have removed the tie-downs and returned just the screws for a little more height and stability. If you decide to take the tie-down screws out or leave the tie-downs in, recalculate your height measurements.*
Now, that it's all complete, it looks like I could've lengthened the drawer by 1.75" which would position the back of the drawer right up to the back of the rear seats and the front of the drawer flat against the tailgate. But with this set up, I'd watch your fingers when closing the tailgate 'cause they'll get smashed if you're not careful.
The two symmetric holes in the rear of the drawer to access it while closed are each 10" x 5" and the top of the drawer back is flush with the bottom of the two openings. Measurements for the holes: 6.75" from each side of the case back(C) and 3.5625" from the top and bottom of the case back(C).
The two symmetric "handle" holes in the front were just cut out of convenience AND to get rid of two bigs knots in the wood.
Tools:
Drill
Jig Saw
Sander
Long Level/Ruler
Pencil
Beer & Sunscreen
Total Cost: About $90
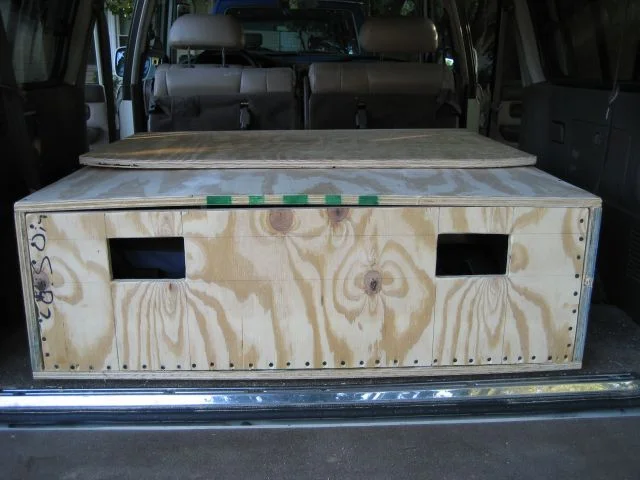
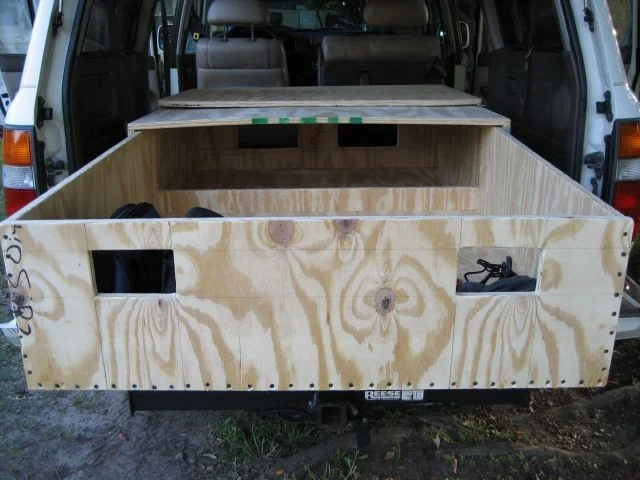
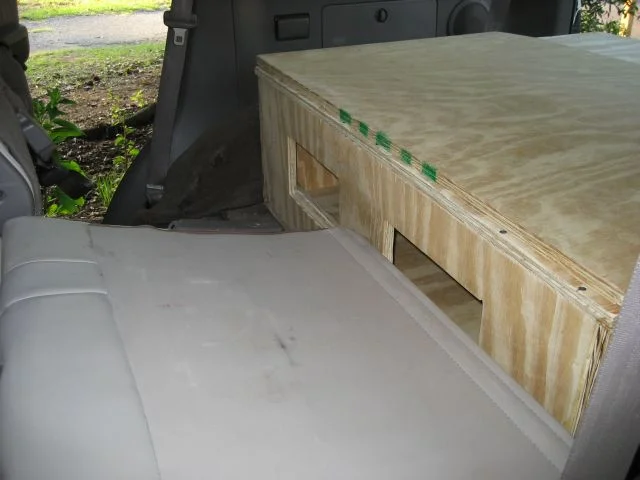
I used Jim Brantley's 60 series drawer system as a starting point since I also own a 62 and wanted to be able to switch between my 2 Cruisers. The 80 series is two inches wider so you can widen everything if you want it specifically for an 80.
I decided I did not want to use drawer sliders so I tweaked his measurements so a drawer would fit in there snugly.
I then thought it would be neat to have a folding bed extension that could fold over on top of the folded seat in the 80(just the first fold to bring the seatback down). So I heightened the drawer so it was level with the tops of the folded seats. As you can see from the pictures, I have not installed it yet. But I have the piece cut and I'll pick up some hinges tomorrow.
I took out the cargo tie-downs, but put the screws back in to keep everything dry from the undercarriage.
I used Gorilla Glue as well as screws to ensure a tight attachment.
I cut 2 openings in the case back and kept the drawer back short so you can get to stuff in the back of the drawer when it's closed.
The bee's wax is rubbed on top of the case bottom and under the drawer bottom. Slides VERY well.
I sanded all the edges and surfaces to smooth everything out.
I had Lowes cut all the pieces...and yes there were some very slight measurement mistakes.
Nothing the sander couldn't fix.I plan on either covering it with marine carpeting or painting it. Leaning towards the marine carpet.
Materials:
3 96" x 48" pieces 3/4" Plywood(I used Lowes #23/32" 4X8 BC PINE ULX EXTERIOR Item#:12229)
Box of Drywall Screws 6x1-5/8(countersinking)
Gorilla Glue
Bar of Bee's Wax
2 Hinges (I used West Marine's Stainless Butt Hinges Model 7219546)
6 Machine Screws "Round Combo w/ Nuts-Zinc 1/4-20 x 1'(Maybe 4 more if you use them to attach hinge to case)
6 Locking Nuts(Instead of nuts that came w/ machine screws; Maybe 4 more if you use them to attach hinge to case)
6 Washers(Maybe 4 more if you use them to attach hinge to case)
Measurements(inches):
Plywood panel #1:
A)Case Bottom 41.75 x 39.50
B)Case Top 41.75 x 39.50
C)Case Back 40.25 x 12.125
Plywood Panel #2:
D)Bed Extension 41.75 x 27.50
E)Drawer Front 40 x 12
F)Drawer Back 40 x 2.8125
G)Case Side 39.50 x 12.125
H)Case Side 39.50 x 12.125
I)Drawer Side 37.25 x 11.125
J)Drawer Side 37.25 x 11.125
Plywood Panel #3:
K)Drawer Bottom 40 x 38
*Remember. These width measurements are for a 60 Series. If you want it specifically for an 80 Series, the width is 2" wider. Just add 2" to blue measurements.*
*The measurements in red are FIRM. These are the measurements that ensure that the bed extension sits level on the folded seats. Also remember that I have removed the tie-downs and returned just the screws for a little more height and stability. If you decide to take the tie-down screws out or leave the tie-downs in, recalculate your height measurements.*
Now, that it's all complete, it looks like I could've lengthened the drawer by 1.75" which would position the back of the drawer right up to the back of the rear seats and the front of the drawer flat against the tailgate. But with this set up, I'd watch your fingers when closing the tailgate 'cause they'll get smashed if you're not careful.
The two symmetric holes in the rear of the drawer to access it while closed are each 10" x 5" and the top of the drawer back is flush with the bottom of the two openings. Measurements for the holes: 6.75" from each side of the case back(C) and 3.5625" from the top and bottom of the case back(C).
The two symmetric "handle" holes in the front were just cut out of convenience AND to get rid of two bigs knots in the wood.
Tools:
Drill
Jig Saw
Sander
Long Level/Ruler
Pencil
Beer & Sunscreen
Total Cost: About $90
Last edited:


 . Piano hinge wont leave a gap but depending on where you mount it, it usually sits a little higher than the wood itself.

 Like I said, I have no carpentry skills. I knew that the drawer front would get the most strain being pushed and pulled so I wanted to be sure it was secure.