Home Forum Gallery Wiki CruiserFAQ Tech Links Product Reviews Store
IH8MUD.com
Go Back   IH8MUD.com > General Tech Forums > Winching and Recovery


Reply
 
LinkBack (28) Thread Tools Display Modes
Old 01-03-08, 01:12 PM   25 links from elsewhere to this Post. Click to view. #1 (permalink)
Site Addict

 
flintknapper's Avatar
 
Join Date: May 2004
Location: Deep East Texas
Posts: 2,262
My WARN 8274 rebuild part 1.....

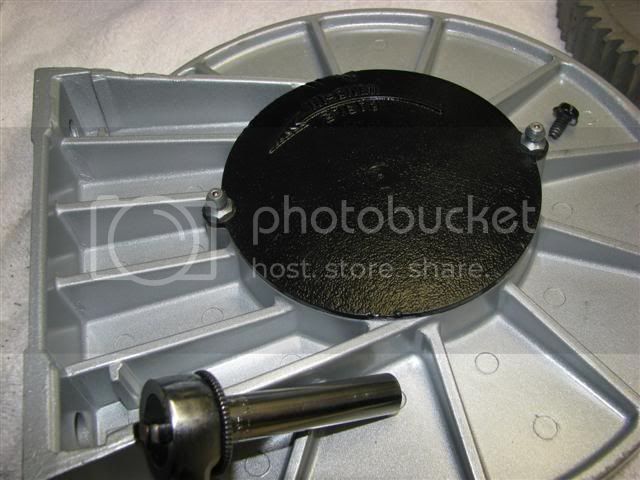
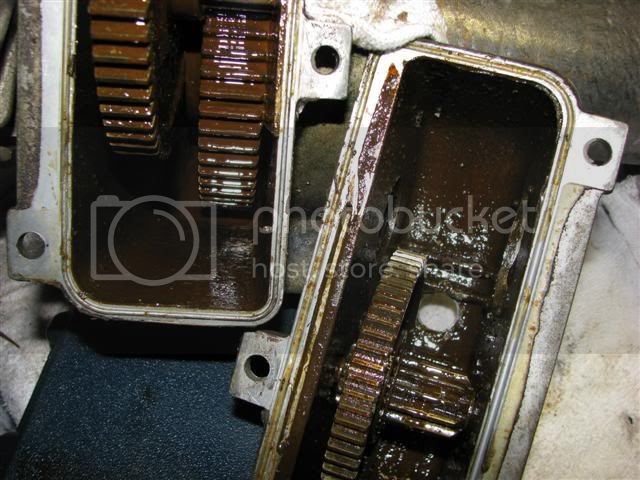
Bought this Warn 8274 new in 1983 and have been using it pretty hard the last 24 years.

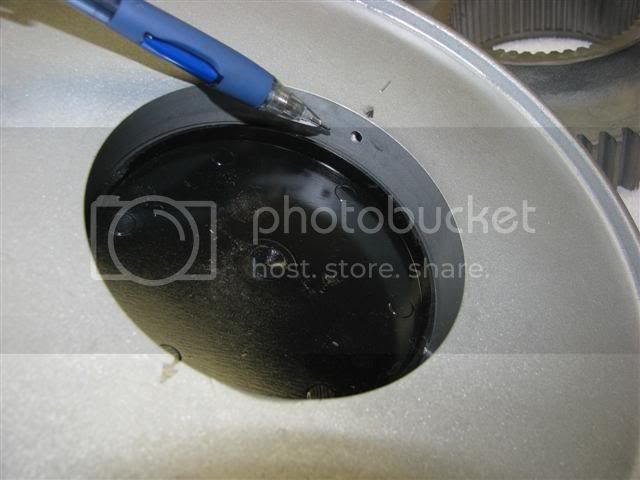
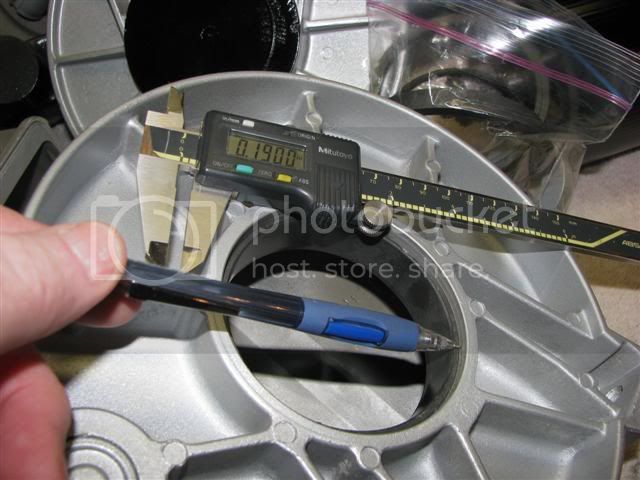
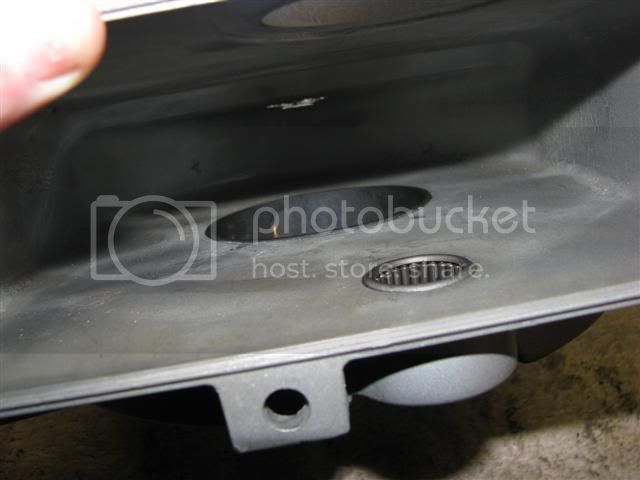
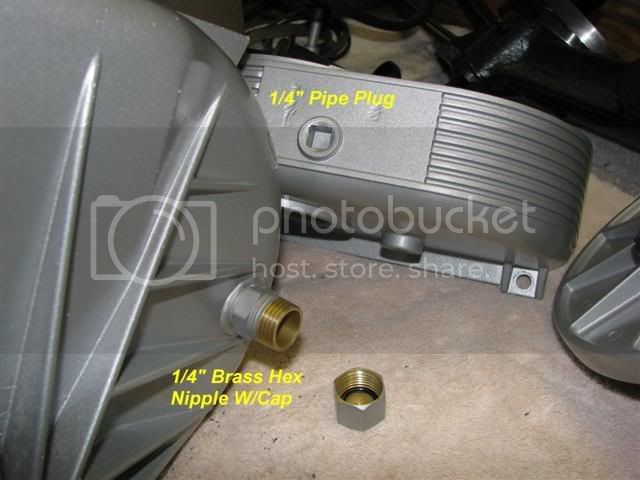
Recently I decided to split the case, change the oil, and install fill and drain plugs (something I’ve been meaning to do for years).

As you can see…it was in dire need of some TLC, but it was still running strong, a testimony to the build quality of this winch and yet another reason why so many of us love this model.


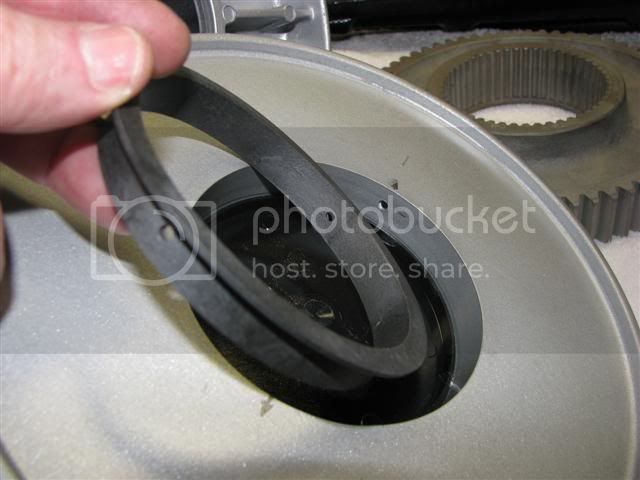
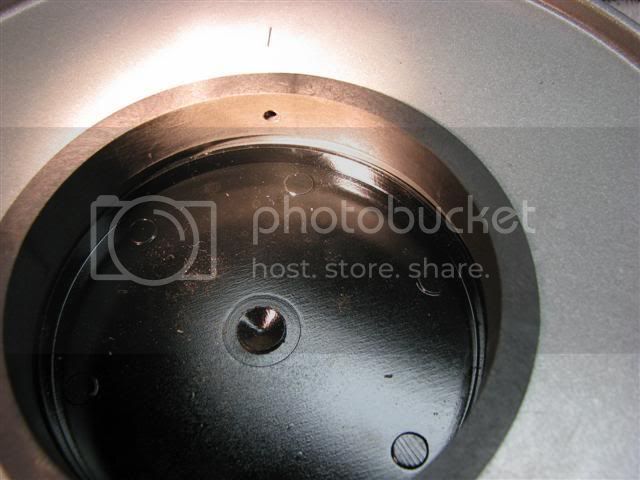
Once I split the case, I decided to go ahead and "freshen" her up.


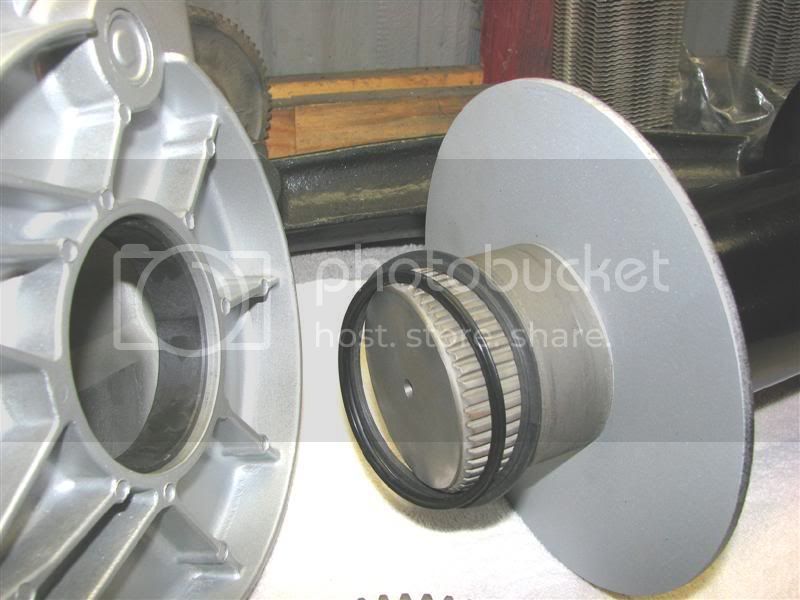
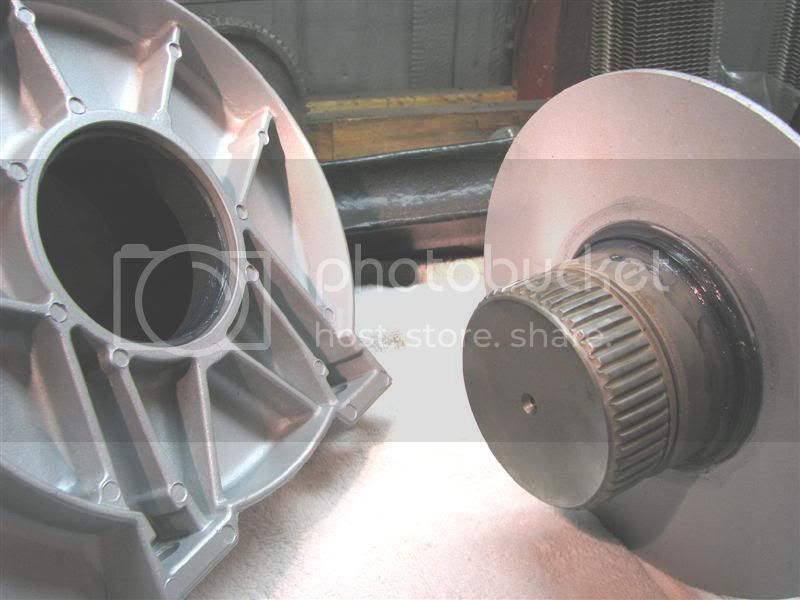
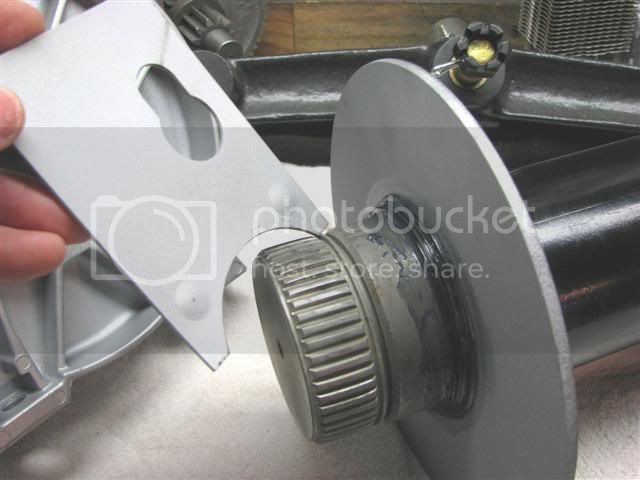
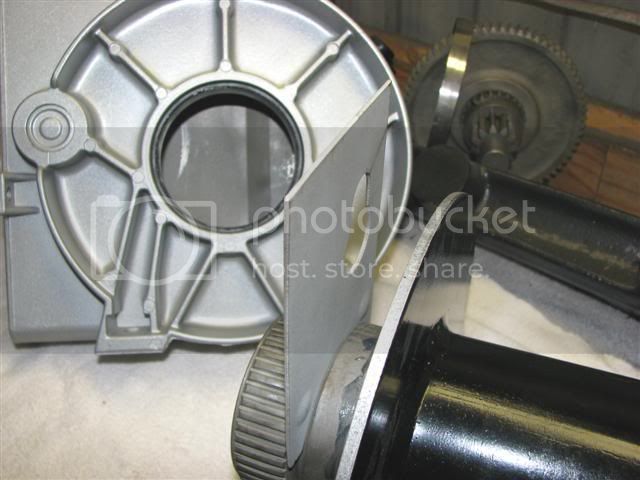
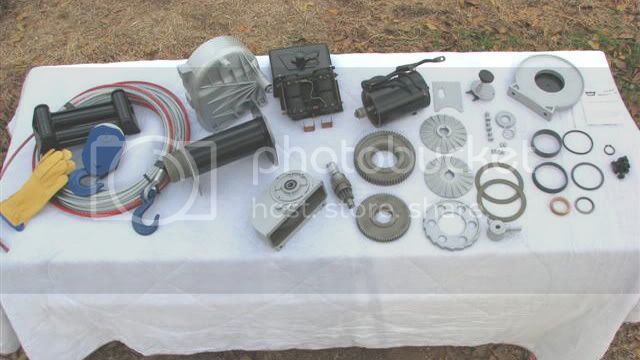
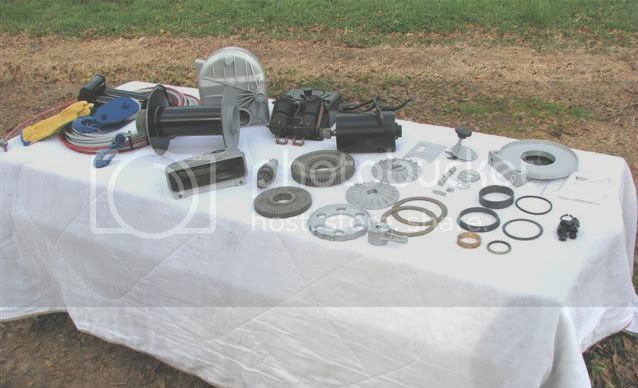
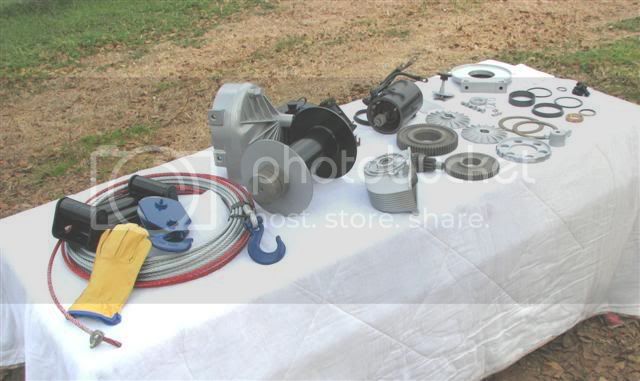
In the post below this, you will see the parts all cleaned up and ready to reassemble. The only new part(s) needed (on mine) were a #8680 lower housing kit, which is comprised of the drum bushings (both ends) and a thrust washer and seal (all related to the drum). Also, I replaced the motor shaft bearing.

See next post:


__________________
Flintknapper:

'97 Land Cruiser, Moonglow Pearl
Chocolate Lab (Kota), I miss you.
ΜOΛΩΝ ΛΑΒΕ (come and take them)

Last edited by flintknapper; 01-11-08 at 01:58 PM. Reason: clarification
flintknapper is offline   Reply With Quote


Old 01-03-08, 01:14 PM   #2 (permalink)
Site Addict

 
flintknapper's Avatar
 
Join Date: May 2004
Location: Deep East Texas
Posts: 2,262
Warn 8274 rebuild part II

Parts cleaned up and ready to reassemble. If anyone would like to see a close up of a part or would like a pic of any assembly phase let me know. I will try to accommodate all requests.


There is a good write up on an 8274 rebuild at the link below, but he didn’t go as far into his winch as I did mine. Very good info though.

Warn 8274 rebuild


Maybe this will be of some help to others. There are a lot of older 8274’s out there that could easily be brought back to nearly new condition with just a little effort.

I will post pics of the finished product in the next week or so.

__________________
Flintknapper:

'97 Land Cruiser, Moonglow Pearl
Chocolate Lab (Kota), I miss you.
ΜOΛΩΝ ΛΑΒΕ (come and take them)
flintknapper is offline   Reply With Quote
Old 01-03-08, 01:38 PM   #3 (permalink)
Beagles Rule!

 
D'Animal's Avatar
 
Join Date: Mar 2006
Location: Central California
TLCA# 17104
Posts: 15,972
Garage
This looks like a great build/rebuild thread covering the 8274. I have to go through 2 of mine before next wheeling season.

__________________
Cruiser Dan at American Toyota Phone is 1-800-432-6668 ext. 8 (I am not cruiser Dan)


Land Cruiser Garage Sale Items <- Link

Get Your Marlin ToyBoxes Now!

Beagle Chariot
1962 FJ40
1964 FJ 40
1968 FJ 40 <- For Sale
FJ 40.5 Build 4BT Cummins Conversion
1976 FJ 40
SPEN Trailer

Last edited by D'Animal; 01-06-08 at 02:53 PM.
D'Animal is online now   Reply With Quote
Old 01-03-08, 01:48 PM   #4 (permalink)
Site Addict

 
flintknapper's Avatar
 
Join Date: May 2004
Location: Deep East Texas
Posts: 2,262
Quote:
Originally Posted by D'Animal View Post
This looks like a great build/rebuild thread covering the 8274. I have to go through 2 of mine before next wheeling season.

Have you thought about moving it to Trails - Gear - Recovery section instead of the 80 series section?
Pretty sure the mods are going to do that. I didn't really know where to put it, but wanted it to get a little exposure in case anyone has questions.

I will be putting it back together some time in the coming week...so when thats done... it will be too late to take any additional pics if requested.

Just trying to help.

__________________
Flintknapper:

'97 Land Cruiser, Moonglow Pearl
Chocolate Lab (Kota), I miss you.
ΜOΛΩΝ ΛΑΒΕ (come and take them)
flintknapper is offline   Reply With Quote
Old 01-03-08, 02:32 PM   #5 (permalink)
250+ Club

 
Firedog's Avatar
 
Join Date: Jul 2007
Location: Southwest Virginia
Posts: 377
I am in the process of doing the same thing to mine!
What are you using to set the depth on the drum bushing?

__________________
Keith
'77 FJ-40 OME, ARB, SM465, Family cage, 33" Swampers, and FOR SALE
'93 FZJ-80 - Flare-less, Factory Lockers, ARB, OME "J" Lift, IPOR Skid Plate, Toyo 315 MT's, Sliders, Side Protection, and Rear Bumper by M&M Fab (http://mandmfab.com/id55.html)...... This is just the begining...
'02 Chevy 2500 Duramax to tow the toys
http://www.4x4bcds.com/
'92 Toyota Celica GT Convertible - The newest Toy, 113,000 miles and unmolested!
Firedog is offline   Reply With Quote
Old 01-03-08, 03:28 PM   #6 (permalink)
Site Addict

 
flintknapper's Avatar
 
Join Date: May 2004
Location: Deep East Texas
Posts: 2,262
Quote:
Originally Posted by Firedog View Post
I am in the process of doing the same thing to mine!
What are you using to set the depth on the drum bushing?

The bushing (from the outside machined surface) needs to be set at a depth of .190

The bushing itself measures .8275 in depth.

The bushing bore (depth) is 1.000 even.

The .190 is necessary to accommodate the thickness of the drum "thrust washer and seal" which protrude into the bore and butt up against the bushing.

To answer your question, I have a set of digital calipers (with depth finder). So it is a simple matter to tap the bushing into the bore and measure the depth at 4 points 90 degs. apart.

You just need to have the bushing in the bore "squarely" and at approx. the proper depth.


The drum seal measures: .1365 thick
The Thrust-Washer lip is: .0685 thick

So overall the two are .2050 thick. This provides about .015 "crush" on the seal when assembled.

Looking at it....it is hard to imagine that this measurement is ultra critical. The entire set up is designed only to contain the oil in a case that is "splash" lubricating the parts. Nothing is under anything much outside of atmospheric pressure.

Too, Warn recommends that you add only 6 ozs. of 30 weight oil. That will hardly even reach the seal.

I am going to use a blend of Mobil 1 gear oil and Marvel Mystery oil for a thicker lubricant (I live in a warm climate).

So, in summary: If you have a means to measure the depth of the bushing, it needs to be .190 or pretty close. If you don't ....tap it in (its not tight) until the opposite lip protrudes just inside the case and stop. This will put you very close to the .190 needed toward the outside of the case.


__________________
Flintknapper:

'97 Land Cruiser, Moonglow Pearl
Chocolate Lab (Kota), I miss you.
ΜOΛΩΝ ΛΑΒΕ (come and take them)

Last edited by flintknapper; 01-04-08 at 06:28 AM.
flintknapper is offline   Reply With Quote
Old 01-03-08, 04:21 PM   #7 (permalink)
The "Chief"

 
Atoyot1031's Avatar
 
Join Date: Nov 2006
Location: Aspen, CO
TLCA# 18402
Posts: 1,586
I love the white table cloth look. Ring the bell, dinner could be served off of those parts!
Atoyot1031 is offline   Reply With Quote
Old 01-03-08, 04:24 PM   #8 (permalink)
Site Addict

 
flintknapper's Avatar
 
Join Date: May 2004
Location: Deep East Texas
Posts: 2,262
Quote:
Originally Posted by Atoyot1031 View Post
I love the white table cloth look. Ring the bell, dinner could be served off of those parts!

Yeah, sorry about that.

I have so many other projects scattered around my shop, I had to move this one outdoors to document it.

Bear with me.

__________________
Flintknapper:

'97 Land Cruiser, Moonglow Pearl
Chocolate Lab (Kota), I miss you.
ΜOΛΩΝ ΛΑΒΕ (come and take them)
flintknapper is offline   Reply With Quote
Old 01-03-08, 04:29 PM   #9 (permalink)
Forum Lifer

 
Cruiserdrew's Avatar
 
Join Date: Mar 2003
Location: Sacramento, CA
TLCA# 11734
Posts: 8,825
Great pics. Detail the reassembly.

My 1990 model looked like the same nasty mess inside when I got into it last year. I also just used plain gear oil 80w-90.

Did you end up doing the drain and fill plugs?

__________________
Andrew
1971 FJ-40 Rubicon tested, 2F powered, SM420, some mods
1976 FJ40 Rusting slowly in the back yard
1984 FJ-60 H41, Toybox, 4.11, SOA, twin sticks and more
1989 FJ-62 125k-Stock, daily driver
1997 FZJ-80 Driveway queen, with door dent
Cruiserdrew is offline   Reply With Quote
Old 01-03-08, 04:33 PM   #10 (permalink)
The "Chief"

 
Atoyot1031's Avatar
 
Join Date: Nov 2006
Location: Aspen, CO
TLCA# 18402
Posts: 1,586
Quote:
Originally Posted by flintknapper View Post
Yeah, sorry about that.

I have so many other projects scattered around my shop, I had to move this one outdoors to document it.

Bear with me.
Seriously, I like it. My projects always have parts put into different boxes, and gnarly ziplock bags. However, I don't think the would appreciate me doing what you did...
Atoyot1031 is offline   Reply With Quote
Old 01-03-08, 04:38 PM   #11 (permalink)
Turbo Diesel Lover

 
Tapage's Avatar
 
Join Date: Apr 2003
Location: Panamá
Posts: 11,426
Quote:
Originally Posted by Cruiserdrew View Post
I also just used plain gear oil 80w-90.
is the recomended oil for this winch .?

__________________
HJ-60 2H-T Intercooled Tencha
HDJ-80 1HD-T not stock at all ! Marilu
FZJ-80 1FZ-FE ready to Play ( wife rig ! )
Join us at our local Panamá Off Road Forum
Quote:
Originally Posted by crushers View Post
if you are achieveing the max boost then it isn't the boost that is going to kill your engine... it is your right foot.
Tapage is offline   Reply With Quote
Old 01-03-08, 04:39 PM   #12 (permalink)
Site Addict

 
flintknapper's Avatar
 
Join Date: May 2004
Location: Deep East Texas
Posts: 2,262
Quote:
Originally Posted by Cruiserdrew View Post
Great pics. Detail the reassembly.

My 1990 model looked like the same nasty mess inside when I got into it last year. I also just used plain gear oil 80w-90.

Did you end up doing the drain and fill plugs?
Yup!

First order of business.

Fill plug I put on top, but in retrospect I would put it in the side of the upper housing if I were to do this again.

Drain plug is at bottom (side) of lower housing between two reinforcing webs. I didn't want it too close to any radius on the case for sake of strength.


__________________
Flintknapper:

'97 Land Cruiser, Moonglow Pearl
Chocolate Lab (Kota), I miss you.
ΜOΛΩΝ ΛΑΒΕ (come and take them)

Last edited by flintknapper; 01-03-08 at 05:59 PM. Reason: add pic
flintknapper is offline   Reply With Quote
Old 01-03-08, 04:45 PM   #13 (permalink)
Site Addict

 
flintknapper's Avatar
 
Join Date: May 2004
Location: Deep East Texas
Posts: 2,262
Quote:
Originally Posted by Tapage View Post
is the recomended oil for this winch .?

6 ozs. of 30 weight is called for by Warn. I am sure this is with consideration to the many climates/temperatures it would be called to serve under.

I will use a blend of syn. gear oil and MM oil, so the lube will "climb" the gears more readily. I live in a warm part of the country..so the higher viscosity shouldn't pose any problems.

__________________
Flintknapper:

'97 Land Cruiser, Moonglow Pearl
Chocolate Lab (Kota), I miss you.
ΜOΛΩΝ ΛΑΒΕ (come and take them)
flintknapper is offline   Reply With Quote
Old 01-03-08, 06:55 PM   #14 (permalink)
250+ Club

 
nodaksn3's Avatar
 
Join Date: Jun 2006
Location: North Andover, MA
Posts: 352
Good build-up, great pics. Wish I'd added the fill plug to mine. Ned

__________________
'95 FJZ80- stock, not locked, PHH, HG, love it
'80 FJ40- stock, '84 2F, mini PS, a/c, still lotsa rust, sold
'88 FJ62- sold
'84 FJ60- sold
'81 FJ40- sold
'71 FJ40 w/factory winch-sold

"Busily stamping out pissants while the pachyderms are running wild"
nodaksn3 is offline   Reply With Quote
Old 01-04-08, 07:06 AM   #15 (permalink)
Site Addict

 
flintknapper's Avatar
 
Join Date: May 2004
Location: Deep East Texas
Posts: 2,262
Quote:
Originally Posted by nodaksn3 View Post
Good build-up, great pics. Wish I'd added the fill plug to mine. Ned

I am surprised Warn didn't provide plugs from the factory. Even though an "oil change" is not often needed under normal use....it would have been a handy addition. I'm sure it had something to do with the damn "bean counters".

As it stands, you have no way of knowing how much oil you have in the case unless you split it.

At the very least....I would want a "drain" plug. Oil could be added by removing the screws holding the clutch mechanism in place and backing it out slightly.

I had at least 4 ozs. of water in my case along with the oil.

__________________
Flintknapper:

'97 Land Cruiser, Moonglow Pearl
Chocolate Lab (Kota), I miss you.
ΜOΛΩΝ ΛΑΒΕ (come and take them)
flintknapper is offline   Reply With Quote
Old 01-04-08, 08:57 AM   #16 (permalink)
Turbo Diesel Lover

 
Tapage's Avatar
 
Join Date: Apr 2003
Location: Panamá
Posts: 11,426
Quote:
Originally Posted by flintknapper View Post
6 ozs. of 30 weight is called for by Warn. I am sure this is with consideration to the many climates/temperatures it would be called to serve under.

I will use a blend of syn. gear oil and MM oil, so the lube will "climb" the gears more readily. I live in a warm part of the country..so the higher viscosity shouldn't pose any problems.
The same as me .. down here in Panamá mwe usually are in 28 - 32şC range .. so higer viscosity it''s a must

__________________
HJ-60 2H-T Intercooled Tencha
HDJ-80 1HD-T not stock at all ! Marilu
FZJ-80 1FZ-FE ready to Play ( wife rig ! )
Join us at our local Panamá Off Road Forum
Quote:
Originally Posted by crushers View Post
if you are achieveing the max boost then it isn't the boost that is going to kill your engine... it is your right foot.
Tapage is offline   Reply With Quote
Old 01-04-08, 09:30 AM   #17 (permalink)
Site Addict

 
Blue77FJ40's Avatar
 
Join Date: Nov 2004
Location: MD
Posts: 1,453
Flintknapper, any thoughts on adding a zerk to the drivers side plate and a bronze bushing there as well?
Ala aussie style?

If so, maybe you could share the part numbers, how to, etc.

__________________
'77 FJ40: HFS, 33's, Locked and Low'd

Last edited by Blue77FJ40; 01-04-08 at 09:39 AM.
Blue77FJ40 is offline   Reply With Quote
Old 01-04-08, 08:19 PM   #18 (permalink)
Site Addict

 
flintknapper's Avatar
 
Join Date: May 2004
Location: Deep East Texas
Posts: 2,262
Quote:
Originally Posted by Blue77FJ40 View Post
Flintknapper, any thoughts on adding a zerk to the drivers side plate and a bronze bushing there as well?
Ala aussie style?

If so, maybe you could share the part numbers, how to, etc.

Sorry to be so long getting back to you.

I had to put a new Hard Drive in my computer this afternoon and clone it. Thought it would take about 2 hours. Nope…..6 hours.

To answer your question, yes I put Zerk (grease) fittings in the drum end support.

I did not try to source a Bronze bushing because I believe the nylon filled bushing to be sufficient.

There was only .005 wear on my old bushing (most of that on the front).

I could have turned it 180 degs. and reused it if I had wanted to. Over the last 24 years…I have used this winch hundreds of hours.

But, I do think Zerk fittings are a good idea so I did install them when I replaced the bushing.

I did mine a little differently than others I have seen though. We will call this the “Flintknapper method” unless someone else can show me they did it first.


Rather than try to put a fitting somewhere in the circumference of the bore, I chose to replace the screws that hold the drum end cover on… with Ľ-28 zerks.

I drilled and tapped the old holes in the end support to ˝” depth (this is a blind hole).

Then I drilled out the screw holes in the plastic cover to Ľ” dia. so the zerks would pass through.


Drilled 1/8” holes 180 degs. apart at an upward angle until they just broke through into the newly tapped holes. Do this with the new bushing in place so the holes will match up.


Put a small amount of silicone on the Zerk threads and tighten down lightly.

Done!


For best lubrication...you’ll want to spool the drum in or out a few revolutions while greasing the bushing. This will help spread the grease evenly.

__________________
Flintknapper:

'97 Land Cruiser, Moonglow Pearl
Chocolate Lab (Kota), I miss you.
ΜOΛΩΝ ΛΑΒΕ (come and take them)

Last edited by flintknapper; 01-05-08 at 09:27 AM.
flintknapper is offline   Reply With Quote
Old 01-05-08, 06:36 PM   #19 (permalink)
Site Addict

 
flintknapper's Avatar
 
Join Date: May 2004
Location: Deep East Texas
Posts: 2,262
Lower end reassembly

O.K lets get started putting the lower end back together.

First we’ll want to reconnect the drum to the lower housing and main gear.

Before we do this, we will need to install the Thrust Washer and Seal (if previously removed).

It is important that the T-Washer be installed as shown below (with lip facing the housing). The Seal is symmetrical and can not be placed on incorrectly.


“Lightly” grease the Seal and Thrust Washer just prior to installing the drum.


__________________
Flintknapper:

'97 Land Cruiser, Moonglow Pearl
Chocolate Lab (Kota), I miss you.
ΜOΛΩΝ ΛΑΒΕ (come and take them)
flintknapper is offline   Reply With Quote
Old 01-05-08, 06:37 PM   #20 (permalink)
Site Addict

 
flintknapper's Avatar
 
Join Date: May 2004
Location: Deep East Texas
Posts: 2,262
The drum when inserted in the case…is held in place by a “lock-plate” (as is the main shaft). Here you can see the lock-plate and the groove that it fits into.


__________________
Flintknapper:

'97 Land Cruiser, Moonglow Pearl
Chocolate Lab (Kota), I miss you.
ΜOΛΩΝ ΛΑΒΕ (come and take them)
flintknapper is offline   Reply With Quote
Old 01-05-08, 06:39 PM   #21 (permalink)
Site Addict

 
flintknapper's Avatar
 
Join Date: May 2004
Location: Deep East Texas
Posts: 2,262
If you removed your main gear for any reason, it is important to note the correct orientation when reinstalling.

You may be tempted to place it back in the case so that it fits on the drum like in the photo below. This is INCORRECT. Note the difference in the height of bosses on the gear.


Below is the CORRECT position of the main gear. If you did not remove the gear upon disassembly/inspection then disregard and go on to the next step.


__________________
Flintknapper:

'97 Land Cruiser, Moonglow Pearl
Chocolate Lab (Kota), I miss you.
ΜOΛΩΝ ΛΑΒΕ (come and take them)
flintknapper is offline   Reply With Quote
Old 01-05-08, 06:40 PM   #22 (permalink)
Site Addict

 
flintknapper's Avatar
 
Join Date: May 2004
Location: Deep East Texas
Posts: 2,262
Place the housing on it’s side, orient the main gear so that it is roughly centered with the bushing bore.


As the drum is inserted… rotate it slightly until you can feel the splines of the drum mesh with the gear. Continue to push downward until the drum is fully seated in the case.

Now turn the assembly back upright and you should be able to see the lock-plate groove on the drum.


__________________
Flintknapper:

'97 Land Cruiser, Moonglow Pearl
Chocolate Lab (Kota), I miss you.
ΜOΛΩΝ ΛΑΒΕ (come and take them)
flintknapper is offline   Reply With Quote
Old 01-05-08, 06:41 PM   #23 (permalink)
Site Addict

 
flintknapper's Avatar
 
Join Date: May 2004
Location: Deep East Texas
Posts: 2,262
If you did not remove the intermediate gear and main-shaft, then simply push the lock-plate down into position, reinstall the drum support (after greasing the bushing) and you’re done with the lower end.


If you DID remove your intermediate gear and main-shaft I can post pics of how to reinstall it along with the bronze bushing and seal.

I have pics of the the upper housing, motor and clutch reassembly ready, but I’m too tired to post it all tonight. So be patient…and I’ll get them done soon.

__________________
Flintknapper:

'97 Land Cruiser, Moonglow Pearl
Chocolate Lab (Kota), I miss you.
ΜOΛΩΝ ΛΑΒΕ (come and take them)
flintknapper is offline   Reply With Quote
Old 01-06-08, 02:30 PM   #24 (permalink)
Site Addict

 
flintknapper's Avatar
 
Join Date: May 2004
Location: Deep East Texas
Posts: 2,262
O.K.,

Threw the top on her today and then bench tested.

I highly recommend you “bench test” your work before sealing up the case halves and reassembling the brake mechanism.

Here I just loosely fitted the solenoid pack and put the top on (without silicone) to test.


Everything went well….so I buttoned it up with sealant and installed the solenoid pack for good.


All I lack now is the brake mechanism (saved the fun part for last).

__________________
Flintknapper:

'97 Land Cruiser, Moonglow Pearl
Chocolate Lab (Kota), I miss you.
ΜOΛΩΝ ΛΑΒΕ (come and take them)
flintknapper is offline   Reply With Quote
Old 01-06-08, 02:32 PM   #25 (permalink)
Site Addict

 
flintknapper's Avatar
 
Join Date: May 2004
Location: Deep East Texas
Posts: 2,262
Just for fun, here is what the solenoid pack should look like (on older models).

From the front:


From the top:


From right:


From left:


__________________
Flintknapper:

'97 Land Cruiser, Moonglow Pearl
Chocolate Lab (Kota), I miss you.
ΜOΛΩΝ ΛΑΒΕ (come and take them)
flintknapper is offline   Reply With Quote
Old 01-06-08, 02:34 PM   #26 (permalink)
Site Addict

 
flintknapper's Avatar
 
Join Date: May 2004
Location: Deep East Texas
Posts: 2,262
Here’s a little trick to make accessing the solenoid pack easier.

“Slot” the three screw holes (2 on top, one on bottom) so you don’t have to fiddle with removing the screws.

Poor connections are the most common source of problems with this winch, clean them from time to time.


__________________
Flintknapper:

'97 Land Cruiser, Moonglow Pearl
Chocolate Lab (Kota), I miss you.
ΜOΛΩΝ ΛΑΒΕ (come and take them)
flintknapper is offline   Reply With Quote
Old 01-06-08, 02:36 PM   #27 (permalink)
Site Addict

 
flintknapper's Avatar
 
Join Date: May 2004
Location: Deep East Texas
Posts: 2,262
I probably won’t document the reassembly of the brake system… as it has been adequately covered by another gentlemen.

Warn 8274 rebuild

If anyone wants detailed pics. of the upper end, bushings, seals, gear relationships, etc… let me know.. and I will post here.

I have pics of nearly all of it. I have posted only what I thought would be the most beneficial to other folks.

I will post the finished product in a few days.

Hope this helps.

__________________
Flintknapper:

'97 Land Cruiser, Moonglow Pearl
Chocolate Lab (Kota), I miss you.
ΜOΛΩΝ ΛΑΒΕ (come and take them)
flintknapper is offline   Reply With Quote
Old 01-06-08, 02:56 PM   #28 (permalink)
Beagles Rule!

 
D'Animal's Avatar
 
Join Date: Mar 2006
Location: Central California
TLCA# 17104
Posts: 15,972
Garage
Did you beadblast or sand blast your housings and your ground straps on the solenoids? They look extremely clean.

__________________
Cruiser Dan at American Toyota Phone is 1-800-432-6668 ext. 8 (I am not cruiser Dan)


Land Cruiser Garage Sale Items <- Link

Get Your Marlin ToyBoxes Now!

Beagle Chariot
1962 FJ40
1964 FJ 40
1968 FJ 40 <- For Sale
FJ 40.5 Build 4BT Cummins Conversion
1976 FJ 40
SPEN Trailer
D'Animal is online now   Reply With Quote
Old 01-06-08, 03:27 PM   #29 (permalink)
Site Addict

 
flintknapper's Avatar
 
Join Date: May 2004
Location: Deep East Texas
Posts: 2,262
Quote:
Originally Posted by D'Animal View Post
Did you beadblast or sand blast your housings and your ground straps on the solenoids? They look extremely clean.


Yup.

Far and away the easiest way to clean up electrical connections is to bead blast.

Every part (gears, case, screws, etc..) on the winch was cleaned in my parts cleaner and then bead blasted. The case parts were then treated to two coats of "Plasti-Kote #282" cast aluminum enamel. It's a high temp (500 deg.) rebuilders paint, very resistant to oil, etc...

I topped it with a single pass of matte clear coat. The finish (to me) looks better than the factory "raw" finish.

The clutch knob was sprayed with "Plasti-Dip", the motor was done in gloss black epoxy, the solenoid cover in semi-gloss plastic paint.

All of this for aesthetics of course. It serves NO purpose in terms of function.

I put 12 ozs. (not 6 as recommended by Warn) of synthetic gear lube in the case (75% GL and 25% MMO). That brought the level up to just about the bottom of the drum seal, maybe a little past. It hasn't leaked so far.

When I'm done, I'll take one final pic. in some "proper" light. Fluorescent is hard to work under.

__________________
Flintknapper:

'97 Land Cruiser, Moonglow Pearl
Chocolate Lab (Kota), I miss you.
ΜOΛΩΝ ΛΑΒΕ (come and take them)
flintknapper is offline   Reply With Quote
Old 01-07-08, 06:28 AM   #30 (permalink)
Site Addict

 
Blue77FJ40's Avatar
 
Join Date: Nov 2004
Location: MD
Posts: 1,453
WOW. Incredible job, both on the rebuild and the detailed article. Thanks!

Any thoughts on drilling the mainshaft end to accept a bolt? There have been tales of the brake assembly flying off along with the ball bearings when the split ring lets go. Gigglepin sells a kit for this, already machined.

__________________
'77 FJ40: HFS, 33's, Locked and Low'd
Blue77FJ40 is offline   Reply With Quote
Reply

Bookmarks


Thread Tools
Display Modes

Posting Rules
You may not post new threads
You may not post replies
You may not post attachments
You may not edit your posts

BB code is On
Smilies are On
[IMG] code is On
HTML code is Off
Trackbacks are On
Pingbacks are On
Refbacks are On


LinkBacks (?)
LinkBack to this Thread: http://forum.ih8mud.com/winching-recovery/197470-my-warn-8274-rebuild-part-1-a.html
Posted By For Type Date
The D-90 Source - Warn 8274 question This thread Refback 11-16-09 08:16 PM
Warn 8274 rebuild - Virtual Jeep Club This thread Refback 11-13-09 08:43 AM
8274 Warn Winch? Who has one? - Front Range 4x4 Forums This thread Refback 10-19-09 12:52 AM
Reconstruccion Warn 8274 - foro.cruiserheads.com This thread Refback 08-16-09 01:01 AM
Warn high-mount service - Australian Land Rover Owners This thread Refback 04-09-09 09:32 PM
Warn 8274 - OFN Forums This thread Refback 03-20-09 05:18 PM
Toyota Celica Convertable, Toyota Celica Backgrounds, Toyota Celica Factory Service Manual - Avantibca4499Ss This thread Refback 03-08-09 12:43 AM
Buy Ford Bronco 4X4 Lifted, Buy Electric Cars, Buy Geo Metro - Yvonneridley This thread Refback 03-07-09 03:24 AM
OT- Warn 8274 overhaul - Jeep Scrambler Forums & Discussions This thread Refback 02-02-09 06:20 AM
OT- Warn 8274 overhaul - Jeep Scrambler Forums & Discussions This thread Refback 01-31-09 04:46 AM
Name that winch! - Herd of Turtles Forums This thread Refback 01-27-09 12:23 PM
Blackjacks 8.7AK - Page 2 - Alaska 4x4 Network This thread Refback 01-04-09 06:22 PM
landrover.startpagina.nl/prikbord - Re: Warn 8274 leeftijd This thread Refback 12-18-08 10:21 AM
landrover.startpagina.nl/prikbord - Re: Warn 8274 leeftijd This thread Refback 12-18-08 09:17 AM
Statistics for flaminfabrications.com.au (2008-12) This thread Refback 12-11-08 11:39 PM
Caxide Aventura 4x4; Foro. :: Ver tema - WARN 8274 Rebuild or Upgrade (enlaces)... This thread Refback 11-29-08 08:55 AM
Rebuilt Warn 8274 - foro.cruiserheads.com This thread Refback 11-29-08 06:31 AM
Toyota Landcruiser serie 70 - WARN 8274 Rebuild or Upgrade (enlaces)... - GENERAL This thread Refback 11-29-08 05:06 AM
ACFA Discussion Board • View topic - Warn 8274 winch rebuild............ This thread Refback 11-18-08 02:01 PM
www.lroc.be - Toon onderwerp - Warn 8274 This thread Refback 09-15-08 04:08 PM
Old warn winch help!| Ford Truck World Topic This thread Refback 09-05-08 02:39 PM
mantenimiento de un winche 8274-50 - foro.cruiserheads.com This thread Refback 07-22-08 06:55 AM
Reconstruir WARN 8274 (Ingles) - foro.cruiserheads.com This thread Refback 07-01-08 03:29 PM
Opinions on Winch's - Page 2 - ClassicBroncos.com Forums This thread Refback 05-01-08 08:20 PM
Opinions on Winch's - Page 2 - ClassicBroncos.com Forums This thread Refback 04-29-08 09:59 PM
Opinions on Winch's - Page 2 - ClassicBroncos.com Forums This thread Refback 04-29-08 09:28 PM
Untitled document This thread Refback 04-26-08 01:03 AM
prep for painting warn winch. - ClassicBroncos.com Forums This thread Refback 03-03-08 03:40 PM


All times are GMT -7. The time now is 09:37 AM.


vBulletin® v3.8.4 ©2000 - 2009, Jelsoft Enterprises Ltd.
Search Engine Friendly URLs by vBSEO 3.3.1
Clubs, Garage Plus vBulletin Plugins by Drive Thru Online, Inc.
©2000-2009 by IH8MUD Inc. - ALL RIGHTS RESERVED


Thanks to all those who have contributed!
One of the largest message boards on the web !