
-
Vehicle-Trailer ClassifiedsStolen Vehicles/Parts FJ40 | BJ40 BJ42 | FJ43 | BJ44 | FJ45 | FJ45LV | HJ47 FJ55 | FJ56 FJ60 | FJ62 | BJ60 | HJ61 BJ74 | VZJ95 | HZJ75 | KZJ90 FJ80 | FZJ80 | LX450 | HDJ81 UZJ100 | LX470 VDJ200 | LX570 FJ Cruiser GX460 | GX470 Stout | Hilux | Minitruck Tacoma Surf | 4Runner Tundra | Sequoia Other Vehicles Trailers | Campers | RVs
Navigation
Install the app
How to install the app on iOS
Follow along with the video below to see how to install our site as a web app on your home screen.
Note: This feature may not be available in some browsers.
More options
You are using an out of date browser. It may not display this or other websites correctly.
You should upgrade or use an alternative browser.
You should upgrade or use an alternative browser.
New bolt-in version of the seat box. (1 Viewer)
- Thread starter kevinmrowland
- Start date
This site may earn a commission from merchant affiliate
links, including eBay, Amazon, Skimlinks, and others.
More options
Who Replied?


And the last

I hope you can see what you need. The rear heater is not installed and I have no intention of installing it again. There is no carpet , underlayment or sound proofing (yet). All brackets are toyota stock and most are not in use and I am sure will be removed upon instalation of the box. The current seats are Corbeau Racing seats and they are a POS I plan on installing procar seats after the box and sound proofing and carpert are installed. Have a good one Kevin. From Kevin")


I hope you can see what you need. The rear heater is not installed and I have no intention of installing it again. There is no carpet , underlayment or sound proofing (yet). All brackets are toyota stock and most are not in use and I am sure will be removed upon instalation of the box. The current seats are Corbeau Racing seats and they are a POS I plan on installing procar seats after the box and sound proofing and carpert are installed. Have a good one Kevin. From Kevin
kevinmrowland
Forum Lifer
- Thread starter
- #43
Yup, that's way more detail that I needed, I just wanted to double check the seat stanchions and see what height your seats were at (sounds like you will be changing them anyway though).
No issues there, pretty straight forward, should be a good fit for you (and a big improvement)
What are you thinking you want to do with the center panel?
No issues there, pretty straight forward, should be a good fit for you (and a big improvement
) What are you thinking you want to do with the center panel?
kevinmrowland
Forum Lifer
- Thread starter
- #45
Ok, that sounds good.
Now it's just a matter of waiting.
I've got hardware on the way but I've been waiting on it for awhile, once that shows up I'll get the production test wrapped up and, well, tested.
I thought I would be taking care of that this week, but still no parts.
Also, we are hitting the road for a trip soon, want to get out of here for the hot month and we will just be camping out of the truck and meandering our way up to AK. I think we can make it since all we've really got to pay for is fuel the way we travel.
I kinda feel bad about leaving WagonGear for the better part of a month, but at the same time it is evident from our accounts that I do all this work for free anyway, so screw it.
I'll keep you posted with pics though.
I would expect a unit of your own to be available in mid september.

KR
Now it's just a matter of waiting.
I've got hardware on the way but I've been waiting on it for awhile, once that shows up I'll get the production test wrapped up and, well, tested.
I thought I would be taking care of that this week, but still no parts.
Also, we are hitting the road for a trip soon, want to get out of here for the hot month and we will just be camping out of the truck and meandering our way up to AK. I think we can make it since all we've really got to pay for is fuel the way we travel.
I kinda feel bad about leaving WagonGear for the better part of a month, but at the same time it is evident from our accounts that I do all this work for free anyway, so screw it.
I'll keep you posted with pics though.
I would expect a unit of your own to be available in mid september.
KR
That's great as far as timing: because it would just sit untll the temp's here get to 80 or so I am not working on the interior of a gray and black cruiser in a steel shop when it is 105 degrees. I also have to line up the spectrum spray on sound dampiner and the insulation oh and a carpet set to boot. Might as well do it right while I am in there, so I'm in no hurry Sept , Oct< NOv. you know I 'm easy. Have a good trip.
kevinmrowland
Forum Lifer
- Thread starter
- #47
You know Kevin, with the seat box the carpet actually gets a lot simpler, take a look through the end of my rebuild thread at the carpet pics.
It's not ideal, but since the seat box flattens out the floor (no more stanchions to go around) and bolts down over the carpet (so it holds it in place) I was able to do a decent carpet job with only 2 seams on each side of the tranny tunnel.
In the back I bolted the side panels down over the carpet and ran one solid piece all the way from the back right up to behind the front seat front mount brace, it just fits.
I carpeted the rear seat back separately since I have it removable anyway and then there was only one moderately complicated piece of carpet to fit around the tunnel.
It was kind of a budget decision, but it actually came out pretty good, I will re-do the same thing next time and fix the mistakes I made. Ends up being a good bit cheaper (materials are still expensive).
KR
If you can , and it's no trouble send me a pic of a general FJ60 floor pan area and mark the brackets that need to be removed prior to the instilation of the box. I've Got the stuff from second skin coming next week and I'm fixing to rip our the interior paint the entire floor area and roof with spectrum and the closed cell liner to supress the howl of the fuel pump and the screem of the aa low gears and the heat from the exhaust as best as possible. So it look''s like in the next couple of weeks I will be drilling and removing those brackets. I am pretty sure on most but some I'm not so sure about. Thanks in advance.
kevinmrowland
Forum Lifer
- Thread starter
- #50
Yeah, you bet Doc.
It's actually pretty easy, they all come out except the one up front that goes all the way across the truck.
You can kind of see what I mean in this dry-ice-asphalt-removal-pic:
And in this carpet pic:
I like to use a pilot drill and then a step drill to take out the whole spot. The key is to drill until it's loose. A lot of folk only take out a bit and then try to tear the rest, don't do that.
The other tool to use is a flash light, with a raking light the spot locations show up very clearly.
KR
It's actually pretty easy, they all come out except the one up front that goes all the way across the truck.
You can kind of see what I mean in this dry-ice-asphalt-removal-pic:

And in this carpet pic:

I like to use a pilot drill and then a step drill to take out the whole spot. The key is to drill until it's loose. A lot of folk only take out a bit and then try to tear the rest, don't do that.

The other tool to use is a flash light, with a raking light the spot locations show up very clearly.

KR
Thanks Kevin, what I will do is take all out except the necessary back part's for the current seat coat the floor and roof put the seat back in and when the box arrives I will only have two brackets to remove and spot coat prior to carpeting. Thanks again and getting ready for the box. Have a good one. Doc
By the way if I can figure someone to help with the hump sewing, I think I will try that indoor outdoor carpet route, on top of the insulation and the sound deadining I think that will be sufficient. By for now.
By the way if I can figure someone to help with the hump sewing, I think I will try that indoor outdoor carpet route, on top of the insulation and the sound deadining I think that will be sufficient. By for now.
kevinmrowland
Forum Lifer
- Thread starter
- #52
That's a leap of faith Doc!
I worked on the seat boxes all day Sunday, looking good. The production test one fit great and I sorted out a sturdy/simple/cost effective latch system.
I'll actually send the files to cut yours this week.
Do you want me to have it powder coated for you?
It will be cost effective and a great option, but if folks plan to weld on them or just want to save the cost (don't know how much yet) then I will plan accordingly.
Yes Black please!!!! Rollbar will be behind and in front of it, not planing on any welding at this time. Drilling oh yeah, but unless I totally mess up no welding.
This is not my first rodeo with Wagongear and Kevin Iknow it will come just like the sunrise in the east. And I have to work on the rig when I am home and believe it or not I have not been home for three weeks, but I have all next week to piddle on the truck and the jungle my yard has become here in the wet wet south east. Hope the tractor starts!!!!!!
This is not my first rodeo with Wagongear and Kevin Iknow it will come just like the sunrise in the east. And I have to work on the rig when I am home and believe it or not I have not been home for three weeks, but I have all next week to piddle on the truck and the jungle my yard has become here in the wet wet south east. Hope the tractor starts!!!!!!
kevinmrowland
Forum Lifer
- Thread starter
- #54
I'll get it welded up soon! (this coming week I hope as long as I get the laser parts)

Just as an FYI, these spot weld cutters work very well and are only $5 :
http://www.harborfreight.com/3-8-eighth-inch-double-sided-rotary-spot-weld-cutter-95343.html
http://www.harborfreight.com/3-8-eighth-inch-double-sided-rotary-spot-weld-cutter-95343.html
Just as an FYI, these spot weld cutters work very well and are only $5 :
http://www.harborfreight.com/3-8-eighth-inch-double-sided-rotary-spot-weld-cutter-95343.html
Thanks spike but I've only got a few to do, and I'll have it done by the time that tool would arrive. Oh Kevin thanks again for the second skin recomendation this stuff is awesome I think the sound problem and the heat are soon to be a thing of the past. I'll post up some pic's when I do the box install. Doc
kevinmrowland
Forum Lifer
- Thread starter
- #57
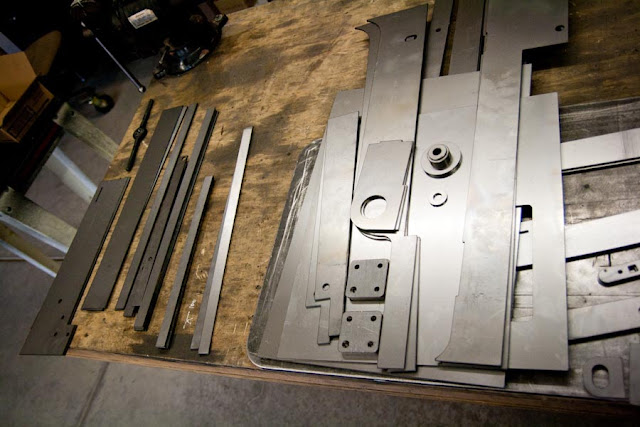
Just got the laser parts for your box yesterday Doc, will be working on welding it today. With the powder coat (wont go to powder till next week) we are doing black, but do you want to do a wrinkle black like I do on all the panels now, or do you want a smooth black?
For me I like the wrinkle, the surface is durable and shows fewer scratches and bits of dirt, but that's just my opinion.
Your box:
For me I like the wrinkle, the surface is durable and shows fewer scratches and bits of dirt, but that's just my opinion.
Your box:

kevinmrowland
Forum Lifer
- Thread starter
- #58
Just as an FYI, these spot weld cutters work very well and are only $5 :
http://www.harborfreight.com/3-8-eighth-inch-double-sided-rotary-spot-weld-cutter-95343.html
These are good, especially if you are trying to only remove certain layers of metal like if you were replacing body panels, the only hole that needs to go all the way through is the pilot.
I still go for the step drill in most cases though since I have control over the final diameter, the hole can be smaller if it's a small spot, or larger if it's a big messy spot. I can drill until the weld is completely gone that way.
Just got the laser parts for your box yesterday Doc, will be working on welding it today. With the powder coat (wont go to powder till next week) we are doing black, but do you want to do a wrinkle black like I do on all the panels now, or do you want a smooth black?
For me I like the wrinkle, the surface is durable and shows fewer scratches and bits of dirt, but that's just my opinion.
Your box:
As the entire truck inside(gray) and out(black &red) is covered in duraback (think rhino liner) the wrinkle coat in black is prefered, will fit right in with all the bumps in the current paint job. And will provide a nice contrast with all the gray interior parts carpet etc.
kevinmrowland
Forum Lifer
- Thread starter
- #60
Got it, wrinkle black it is.
The first real seat box is coming together nicely (Doc's), it's been in the 90s again out here so I've only worked on it in the mornings, but I'm about to finish it up now.
Will hopefully test fit in it my truck later today.
This is what I'm going to do for all the new stuff (and old stuff too as I get around to it) So everyone can see where the funds actually go since all this stuff is so damn expensive, and still doesn't end up paying me anything at the end of the month...
Parts and price breakdown:
The Seat Boxes are a relatively simple project, not a lot of parts. As you can see the biggest thing with them is just the steel and the time.
I have the labor marked down as what I think they should end up taking me to make once I have some practice and figure out the best order, not what it is actually taking me to make right now. (I'm going to have at least 6 hours into Doc's box here by the time I'm done)
I also have the time at my higher rate of $55 since it needs to (hopefully) cover all the overhead and the things that are not counted in the parts breakdown.
If I'm just doing normal mechanical stuff and not using a lot of shop resources I go as low as $35.
Also, the powder coat charge is just my guess at this point, a lot of times they actually surprise me with a bit lower rate than I had in my head, so we will see on that, but with my fudge factor in there we should be able to stay right at about $700-800.
Any business majors are welcome to tell me how stupid my breakdown is and how little chance it stands of making a profit.
But now you know where the funds go at least.
KR
The first real seat box is coming together nicely (Doc's), it's been in the 90s again out here so I've only worked on it in the mornings, but I'm about to finish it up now.
Will hopefully test fit in it my truck later today.


This is what I'm going to do for all the new stuff (and old stuff too as I get around to it) So everyone can see where the funds actually go since all this stuff is so damn expensive, and still doesn't end up paying me anything at the end of the month...
Parts and price breakdown:

The Seat Boxes are a relatively simple project, not a lot of parts. As you can see the biggest thing with them is just the steel and the time.
I have the labor marked down as what I think they should end up taking me to make once I have some practice and figure out the best order, not what it is actually taking me to make right now.
(I'm going to have at least 6 hours into Doc's box here by the time I'm done)I also have the time at my higher rate of $55 since it needs to (hopefully) cover all the overhead and the things that are not counted in the parts breakdown.
If I'm just doing normal mechanical stuff and not using a lot of shop resources I go as low as $35.
Also, the powder coat charge is just my guess at this point, a lot of times they actually surprise me with a bit lower rate than I had in my head, so we will see on that, but with my fudge factor in there we should be able to stay right at about $700-800.
Any business majors are welcome to tell me how stupid my breakdown is and how little chance it stands of making a profit.
But now you know where the funds go at least.
KR
Last edited:
Similar threads
- Replies
- 0
- Views
- 449
- Replies
- 0
- Views
- 574
Users who are viewing this thread
Total: 2 (members: 0, guests: 2)