About time I did a buildup thread (1 Viewer)

This site may earn a commission from merchant affiliate
links, including eBay, Amazon, Skimlinks, and others.

Joined
Jul 13, 2005
Threads
61
Messages
604
Location
Springfield, MO
About time I did a buildup thread (updated 11-26-08)

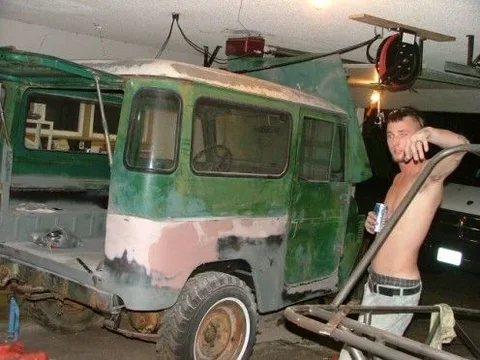
Well, I've been on MUD for a while now. I figured it was time to post a buildup thread of my 09/72 Fj-40. She was pretty rough when I got her, actually traded a mossberg shotgun for it. The truck had been sitting in a field for a few years and very cancerous. Rats nests inside, mud wasp nests EVERYWHERE. Even though the sheetmetal was pretty bad in spots the frame was solid
2005_0522Image0003.jpg
2005_0522Image0005.jpg
2005_0522Image0006.jpg
 
Last edited:
So the wife was a little worried, but since I was only out a shotgun she was OK with it......... Well, until she saw inside. Out came the shop vac and cutoff wheel and it began.
[/ATTACH]
2005_0522Image0011.jpg
2005_0522Image0008.jpg
2005_0522Image0026.jpg
 
I bought a sheet of 16ga steel and a couple pieces of 2x2 angle. Cutting out the cancer and replacing the floors went really fast. I used the angle to "frame" the inside of the pans and give the new metal something solid to mount to. It also added strength to the tub at its least supported area, the door sills.
2005_0522Image0037.jpg
2005_0623Image0001.jpg
2005_0623Image0003.jpg
 
After the front floors were in, I moved to the back. Cut out all the old floors and cut my piece of steel to replace it. Keep in mind the tools I am using are a 4" grinder w/ a cutoff wheel, a BFH, and really not too much else. I scored the steel in 2 lines to "brake" it the redneck way, and made the folds to make the rear sill and rear floor area as 1 piece. It came out really well, except I bent the wrong edge and it was too narrow side to side, and too long front to back!! Hmmm..... More angle iron, mainly as a filler this time. Plus it let me "brake" the front lip to get the sloped piece to the lower section of floor. It came out OK, I was a little pissed for a while. The rear is REALLY strong now, though.
2005_0623Image0019.jpg
2005_0623Image0036.jpg
2005_0623Image0055.jpg
 
The interior was coming along nicely. Instead of finishing it up I got a little ancy about the outside. Out came the cutoff wheel and off with her skins!!
2005_0702Image0001.jpg
Took more 16 ga and started welding. This was a hard step as I had NO help. All the straight parts were ok, but making the bend was a pain.
2005_0715Image0001.jpg
It would have been easier with an auto dark helmet, but all-in-all it came out OKl
2005_0715Image0003.jpg
2005_0702Image0001.jpg
2005_0715Image0001.jpg
2005_0715Image0003.jpg
 
I took the old skins and traced the wheelwell line onto the side. I decided I was going to flip the springs so I moved the line 4.5" straight back.
2005_0715Image0007 (1).jpg
Broke out the harbor freight air reciprocating saw I just picked up for this step. Then I broke the harbor freighr air reciprocating saw I just picked up for this step. Hmmm... Back to the cutoff wheel.
2005_0727Image0035.jpg
I made the cut 1/2" lower than the line so I could fold it over to make a better edge. A pair of vise grips and some patience made a pretty decient edge. Made relief cuts around the curves and hammered it all to where it needed to be.
2005_0727Image0038.jpg
2005_0715Image0007 (1).jpg
2005_0727Image0035.jpg
2005_0727Image0038.jpg
 
Nice sheetmetal work there. keep up the good work, we will be watching. good price too :)
 
After I had gotten all the welds ground down with a 7" disk sander, I used a little filler to smooth things out a bit. While I was doing this, a buddy stopped by and convinced me he could do the other sides filler work for me. I thought "sure, he's taken auto body. Probably knows more about this than me!" I'll show you.
MY SIDE (crappy pic, very thin filler, the grey is primer)
2006_0323Image0007.jpg
HIS SIDE
2005_0923Image0005.jpg
I'm not a fan of filler in the first place, but if I HAVE to use it I will only use the minimum amount needed. Apparently, he thought differently. I know my truck will lean to the passenger side if I leave it like that. And then my wife will freak out thinking its from her. I have some sanding ahead.
2006_0323Image0007.jpg
2005_0923Image0005.jpg
 
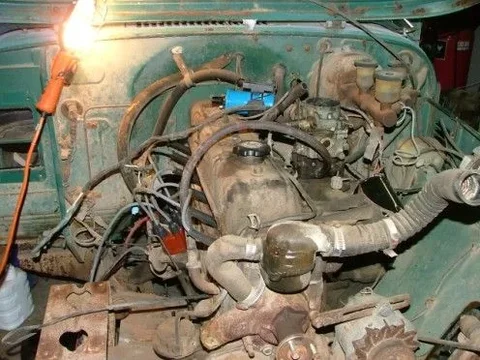
After all that I needed a break from body work. Time to get the motor looking good and running. Ya see, before I started tearing into everything the carb was full of mud dauber nests and the motor looked like a$$.
2005_0522Image0019.jpg
2005_0522Image0030.jpg
2005_0831Image0016.jpg
I rebuilt the carb, not too hard. Put it on, hooked up power, and started cranking. (well, after ner plugs, wires, cap, rotor, and soaking the cylinders in penetrant for a few) She fired.....kinda. ran for about 6 seconds and that was it. Good enough for me. I knew everything was there to make it run, so time to tear into it. Pulled the VC, manifolds, all accessories, etc. Everything was DIRTY.
2005_0522Image0019.jpg
2005_0831Image0016.jpg
2005_0522Image0030.jpg
 
Hope you didn't have to give your favorite shotgun for it. Nice work, especially like the way you redisigned on the fly, least thats what I call it. Minimum tool engineering, mucho respect, chopped an 84 Audi to pieces using the ol cutoff wheel and a hacksaw once. The ol hand sledge always my favorite final solution. Harbour freight, always a gamble as to wether it was worth the gas.
 
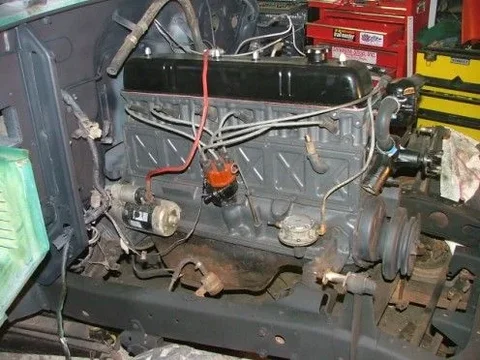
and a wave of my magic wand (or a late night) and I had this......
2005_0928Image0004.jpg
2006_0205Image0008.jpg
2006_0205Image0009.jpg
You must realize, this is before I even knew if it ran or not. I have since found out it does run....... Not that it matters because I have a 3fe, a440f, and a split case coming. That means I have to wave the wand again.

In the meantime I also sprayed my fenders and bezel with Line-X and they came out SWEET!! That day the gun was spraying dead on and the texture came out great. (I spray bedliners, too) I just hope it'll spray that well when I undercoat the body and spray the tub.

TO BE CONTINUED...........
Tim
2005_0928Image0004.jpg
2006_0205Image0008.jpg
2006_0205Image0009.jpg
 
Last edited:
Looks good man you doing it the way it should be done, Fast a with raw material:beer:
 
Hey nice work man what did you clean up the engine with?
 
Hey nice work man what did you clean up the engine with?
Power washer on the block with some degreaser and a wire brush. Also used a wire wheel on the valve cover. What really made the difference was pulling the fenders, hood and bib so I could get to the hard to reach spots.
 
awesome metal work...makes me sick about all the $$$ I just spent on body parts
 
I saw the first pics and wondered how it would come out. You are doing some awesome work!!!
 
The shackles front and rear were pretty rough so I ordered a set of 1.5" lift shackles from Ebay. (bad idea in retrospect. They hang WAY low in the front.) I pulled the axles front and rear, wire wheeled them to death, and gave them a fresh coat of paint. I sprayed them gloss black first with a coat of flat over top. I like flat black better but wanted the better rust protection of gloss. Should've not been so cheap and just gotten POR-15.
2006_0323Image0006.jpg
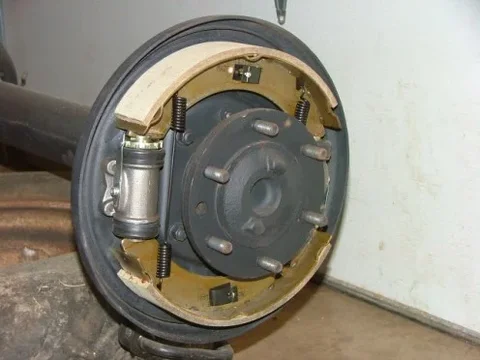
The drums were hard to remove but I finally got them off. New wheel cylinders, shoes, springs, freshly turned drums.... it went together alot easier than coming apart.
2006_0116Image0001.jpg
2006_0323Image0076.jpg
2006_0323Image0006.jpg
2006_0116Image0001.jpg
2006_0323Image0076.jpg
 
I thought this was a joke when I started reading it. I didn't think anyone would even attempt to tackle a project like that.
I'm seriously impressed at the work you've done so far. Keep it up!!! It looks awesome.
 
She was pretty rough when I got her, actually traded a mossberg shotgun for it.

11 years ago I spent $5000 for my '78. Had I only known that all I needed was a $200 Mossberg ZModel 500...:doh:

No kidding about it being rough, but it looks like you're the man for the job. I'm only rusted through at the rear corners, but even that's presently beyond me. I gotta keep readin' and keep learnin'
 

Users who are viewing this thread

Back
Top Bottom