Looking for a better method of centering the steering knuckles?

This site may earn a commission from merchant affiliate
links, including eBay, Amazon, Skimlinks, and others.

Joined
Sep 13, 2008
Threads
65
Messages
4,063
Location
PNW, WA.
Website
forum.ih8mud.com
I've been doing research on steering knuckle centering tools including the Toyota SST which is expensive and hard to come by. I found another centering tool solution that appears to be easy enough to make and should be relatively inexpensive. Courtesy of Pirate4x4.Com
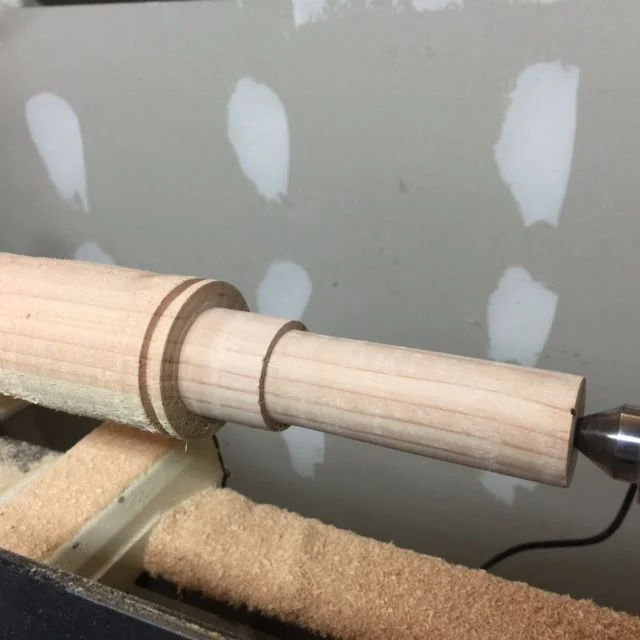
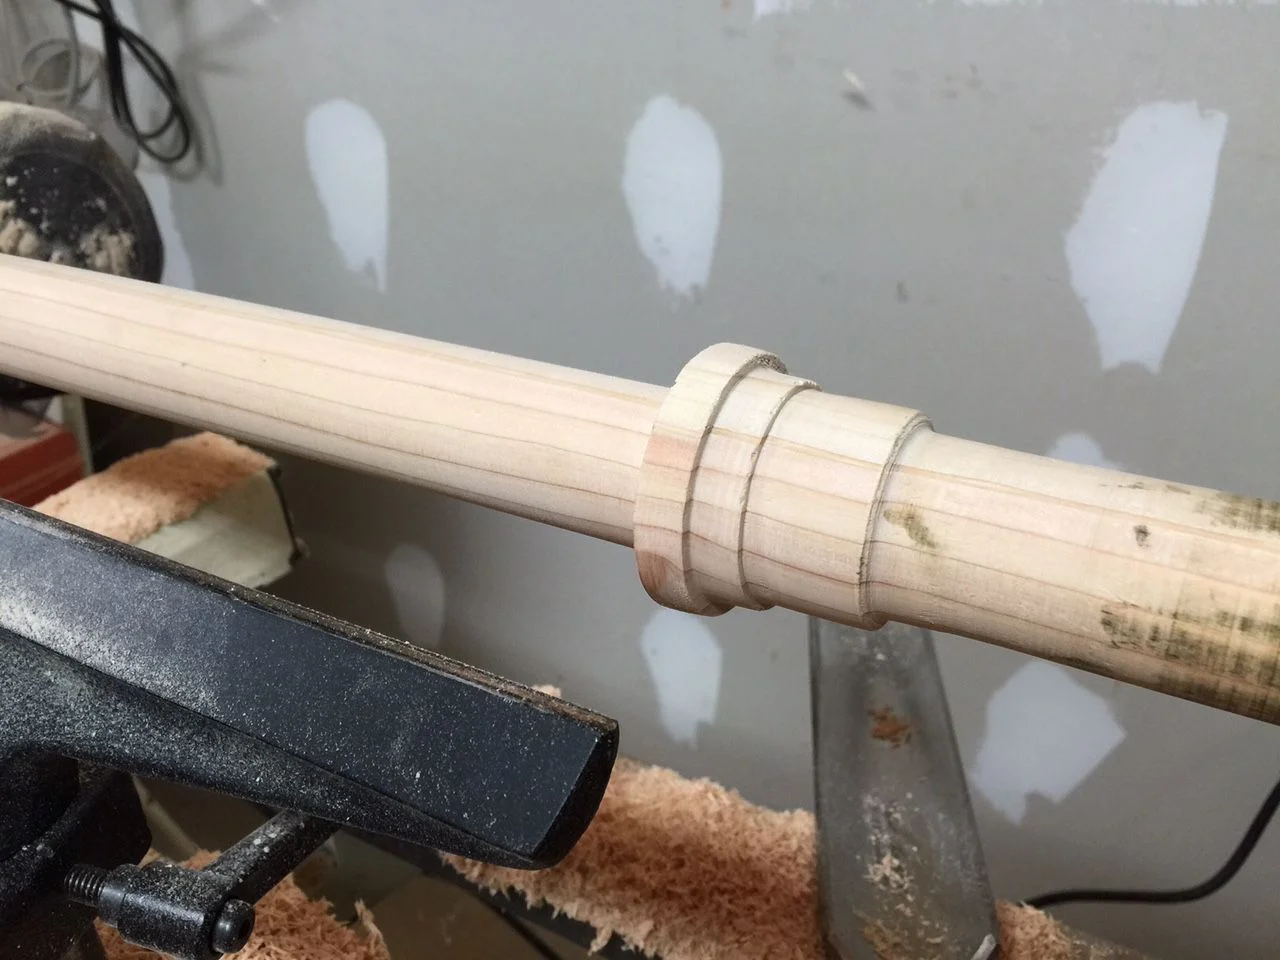
Here's the tool
dummy_shaft.jpg


Specs for tool can be made out of any material
dummybush-1.jpg


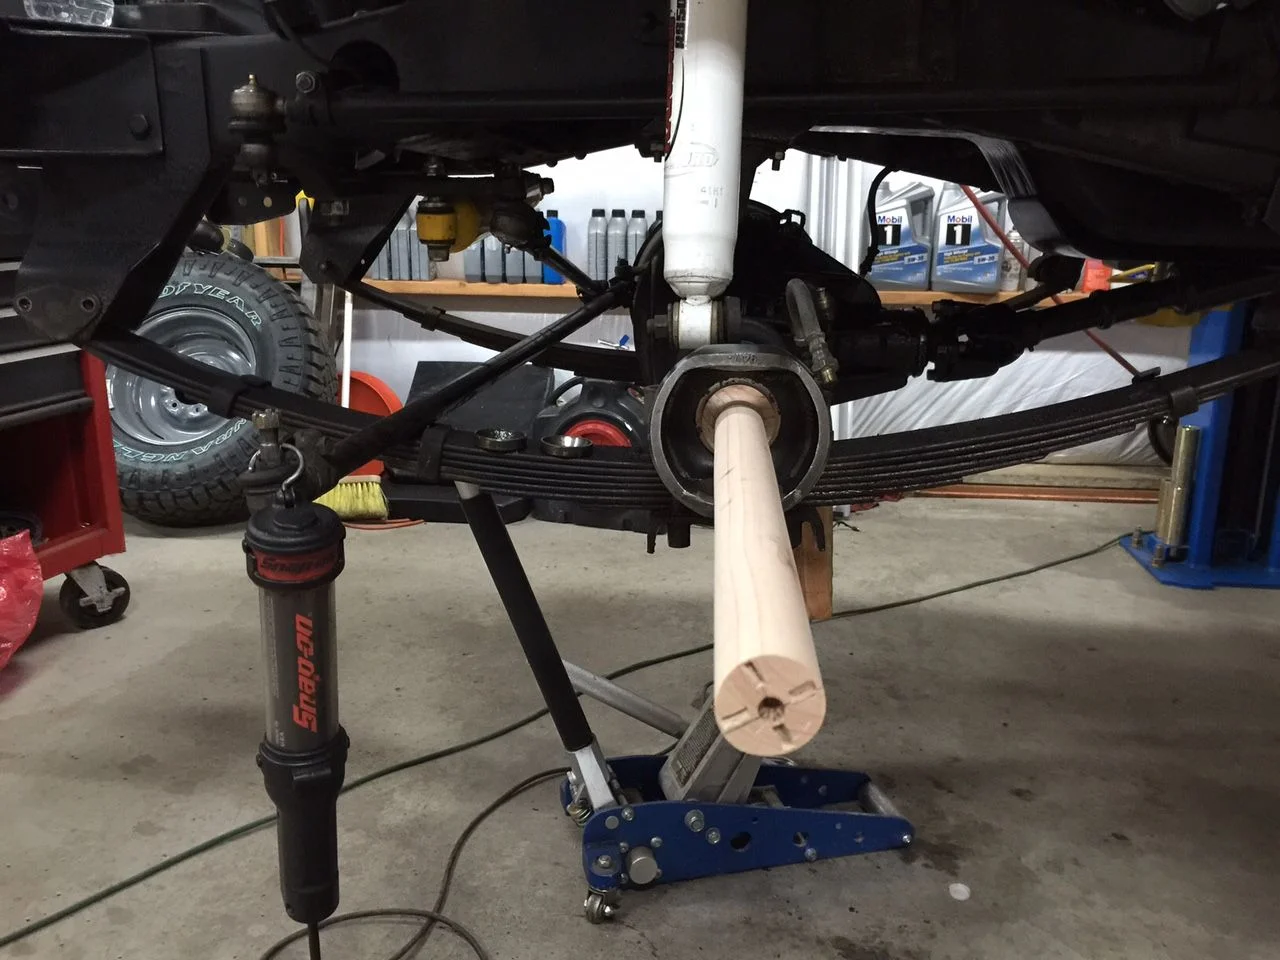
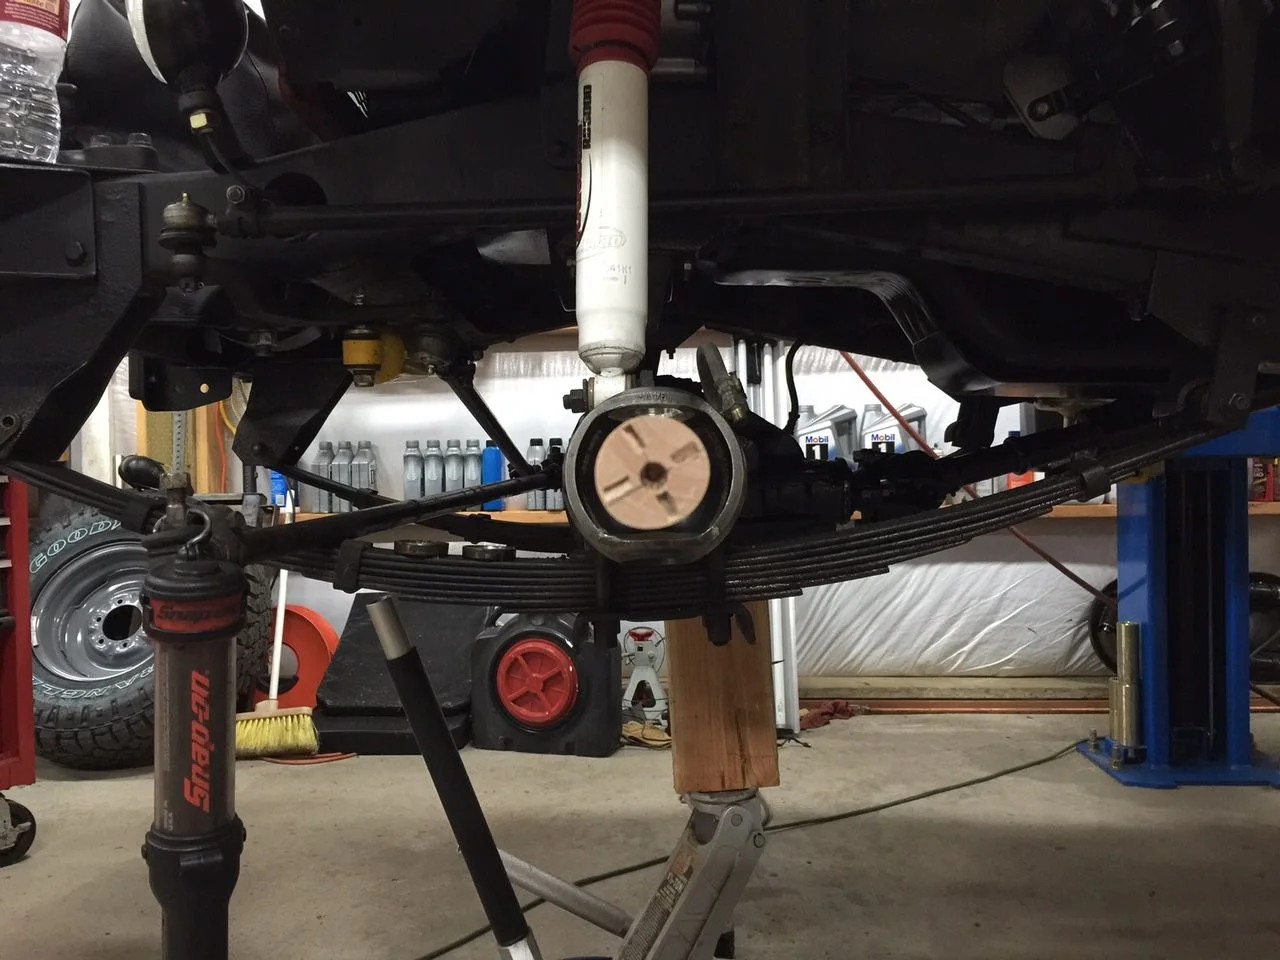
This is how the bushing fits in the axle housing with a dummy shaft to center the knuckle
dummyshaft_2.jpg


dummybush.jpg

Once the knuckle has been centered after you've added the appropriate number of shims to obtain the desired 13Lbs preload then install the real axle and you are done.

Installation and centering procedure here Pirate4x4.Com

Does any one here have a better method of centering the steering knuckles?
http://www.pirate4x4.com/forum/toyota-truck-4runner/734345-setting-up-knuckles-without-sst.html
 
I don't get it? You have to have the bushing and shaft made by a machine shop. I'm guessing that's not cheap, and I don't have the tools to make them. Then, you still are essentially guessing at the proper shim count and placement. Why not just borrow the SST from one of the several members here on Mud that loan them out for free? With the tool, a dial caliper and 30 minutes you will know exactly how many shims you need and the proper placement.

$.02

:cheers:

I agree with what you said! I would love to borrow the Toyota SST tool but I don't know who to contact, do you know who has one to lend me?

Thanks in advance for your assistance!
 
I'd like to buy the Toyota SST but I need it for both small & large pattern knuckles. If I have to get a machine shop to make up the extra piece for the smaller outer bushing, I'm thinking I might as well just have them make up this two piece tool. It'll work on both patterned knuckles. It may take longer to use with the "on off, trial & error" method but it's not like I'm going to be doing this often. Also I wouldn't have to buy another Giant size caliper that I probably wouldn't use for anything else. Less math too! lol

"Edit" I was wrong stating it would work for both knuckle patterns. Obviously it would have to match either one of the two bushing sizes.
 
Last edited:
Honestly, this is dumb. I'm not posting in PBB, but...

How much change is preload does one small shim make? I'm no expert, but I suspect a few shims off in either direction is not measurable by preload only. This is a precise measurement, not something to be done with a fish scale.

Add the giant rack clamp to the costs. $100? Besides the costs of that tool don't seem so much lower than the actual SST. (?)

installshafttemp.jpg


Then figure out a way to keep the bottom cap and steering arm parallel with the knuckle surface while you're using feeler gauges to measure the gap. The bearings have play in them, so they're not going to be good enough, IMO.

It's probably good enough for your rig. :flipoff2:
 
The purpose of centering the knuckle is to make the outer shaft concentric with the inner shaft so that the seal functions properly. It doesn't have to be that accurate to accomplish its purpose. Maybe +/- .01 to .02. The lines scribed on OEM tool are .005 to .010 thick so it is hard to read the distance to .001 accuracy. The shims themselves only come in larger increments of size.

If you wanted to make a cheap and easy tool to estimate the centering, you could do it with two pieces:

1. A shaft that fits exactly in the spindle bushing with a scribe at the inside end. This could be a wooden or plastic dowel, but it has to fit precisely and the scribe on the end has to be concentric.
2. A "target" that fits into the axle seal location. Maybe a piece of aluminum or steel with a painted surface.

Just press the target into the housing, assemble the knuckle and spindle, slide in the scribe tool and mark the target. Then disassemble and measure how far off of center the mark is and adjust the shims to center it.
 
I agree Pinhead. And either homemade tool requires a precise fit but both are two pieces to machine. What I like about the above one is that with the bearings in and preload set, if the shafts slides in and out freely you've got it. It could only be off by the amount of slop in a worn bushing. But then a worn bushing would probably affect the factory tool also.
 
Hmmm. I really thought you were joking but the more I think on it, with a little care you could actually get pretty darn precise with that method. Maybe use aluminum foil tape on the dowel. Once you got the dowel to fit snug with no play then go for the nail. Rolling the dowel on a smooth surface with the nail up against a flat perpendicular surface coated with grease or red lead, you'd scribe a line. Tweak the nail till it doesn't oscillate and it makes a straight line. That's centered. For the target, How about an old seal with a center glued to it or stuffed in tight. Maybe a piece of wood or plastic cut with a hole saw. Even with the expensive tool, precision gets down to how precise you can measure those marks. If you get the dowel to slide in smooth with zero play I believe the marks that it makes would be pretty darn precise. Wow Pinhead! You nailed it. (pun intended)
 
One issue is that the line the scribe makes on the target will change with the angle of the knuckle because of the camber and king pin inclination, but all of these issues could be dealt with by comparing the measurements to those made with the OEM tool in case there is a large enough variation to need a calculated correction factor.
 
I decided to attempt to make one of these centering tools made out of wood. I'm not sure of all the dynamics of this yet and how it will actually work or not work, but I wanted to run this by y'all for some constructive comments, suggestions and improvements or to just trash it, what ever you guys think. So here's what I did:

The original idea from Pirate4x4.Com was this:
dummy_shaft.jpg


Here's my wood contraption on sketch form as a single solid shaft and bushing combined following all the dimensions as indicated
full


I started with a piece of stock wood
full


full


full


full


full


full


I turned the dowel and bushing combo with very tight tolerances
full


It fit like a glove, (very tight glove), in the shaft housing I'm happy with how it turned out but the question is will it work?
full


full
 
[QUOTE="Pin_Head,]One issue is that the line the scribe makes on the target will change with the angle of the knuckle because of the camber and king pin inclination[/QUOTE]

I could see that if the knuckle wasn't pointed straight ahead. In others words, if you rotated the knuckle back and forth while scribing the target with the nail you would get a curved scribe mark on the target like a smile. You would need to aim the knuckle straight ahead and scribe a dot or, measure to the bottom of the smile shaped scribe. I can see camber angle affecting the measurement for shim thickness and you would need to add to the measurement make up for it but if the camber angle is known the correction could be calculated with basic trig. Wuduya think?
 
On the wood tool. Nice lathe work. Is that one or two pieces? Does the shaft slide into the bushing? To mimic the Pirate tool, with out it being two pieces I don't see how you would tell if it has clearance all around the bushing when it's assembled with the knuckle, spindle and bearings in place. If it's one piece and to do Pinheads method you could cut that in two and add the nail.
 
On the wood tool. Nice lathe work. Is that one or two pieces? Does the shaft slide into the bushing? To mimic the Pirate tool, with out it being two pieces I don't see how you would tell if it has clearance all around the bushing when it's assembled with the knuckle, spindle and bearings in place. If it's one piece and to do Pinheads method you could cut that in two and add the nail.

Thanks! Yes it's a single piece tool. I'm have a difficult time visualizing Pin_Head's method, you said cut it in half and add the nail, I can't picture it, a sketch would make it crystal clear for me.
 
After cutting in two, install and center the nail in the dowel, install the target like you did your full piece. Install the knuckle with bearings, arm & cap. Bolt on the spindle. Shim evenly top & bottom for starters until you get the proper preload. Then with the knuckle pointed straight ahead, slide the centering dowel through the spindle & bushing and make a dot on the target. Remove the knuckle & spindle and measure how far off the dot on the target is from being centered up & down. Of course the accuracy would depend on the quality of fit for the two pieces and how well the nail is centered.
Well that's my thoughts anyway. I'll believe it'll work.

Knkl Tool.webp
 
I made one of these a few years back out of delrin. It consists of 3 pieces, a piece that presses into the axle oil seal, a round shaft that is the same OD as the ID of the bronze bushing, and a piece that presses into the end of the spindle.

With everything in place, you simply adjust the shims until the spindle slides into the knuckle smoothly.

I've been using it for 6 years, and it works great.

P1170039.jpg

P1170036.jpg


If I made another one today, i would have made it out of aluminum, and had the end piece threaded to screw onto the end of the spindle.
 
Pinhead, can you explain just where that one degree comes from? Is the spindle tube one degree out of perpendicular to the spindle face? Or does it come from the surface machining of the knuckle face?
 
Back
Top Bottom