
Did you trace the old rear panels to get the size for the new panels?
Navigation
Install the app
How to install the app on iOS
Follow along with the video below to see how to install our site as a web app on your home screen.
Note: This feature may not be available in some browsers.
More options
Style variation
You are using an out of date browser. It may not display this or other websites correctly.
You should upgrade or use an alternative browser.
You should upgrade or use an alternative browser.
Interior Face Lift on a Budget
- Thread starter snye
- Start date
This site may earn a commission from merchant affiliate
links, including eBay, Amazon, Skimlinks, and others.
- Thread starter
- #22
Thanks for the compliments everyone. I'll get the dimensions of the center console in a couple days. My wife is taking me and the kids to Great Wolf Lodge for my 30th birthday. I think she's doing it more for me than the kids, which I'm just a big kid still anyway.
And yes, I just traced the old cargo panels to cut out the new ones.
And yes, I just traced the old cargo panels to cut out the new ones.
- Thread starter
- #23
Console Dimensions
Attached are the console dimensions.
The lid is 1 inch larger than the opening of the console all the way around to allow for some overlap for the upholstery and hinge.
The cup holders are 3.5 inches in diameter, which is perfect for a 32 or 44 oz cup from 7-11. Just make sure you have at least 1" to 1.5" between the two holes so the cups don't smack each other as they taper out at the top. I went ahead and lined my holes with some plastic cups from an OU football game. That way if I spill it is at least contained and not running into my console area.
As far as the bottom diagonal edge, I simply outlined my cut with the old console as a pattern.
For the padding I used 2" foam.
Again, I used 3/4" MDF.
Hope this helps, and feel free to ask for more detail/clarification. Wonder if I should create a new post as a $20 center console.
Attachments
I noticed that you have some carpeting behind that craftsman tool set, did you glue it in? And did you just get rid of the rear window sprayer completely?
Seeing those pics makes me want to take my carpeting out and put down some dynamat and new padding, but my back section of carpet is pretty torn up, so it would probably end up pulling out of the trim strips again. I would love to replace my back half of carpet......If only money grew on trees!
I also really like your center console, I might have to make one sometime soon.
- Thread starter
- #25
The Machinist said:I noticed that you have some carpeting behind that craftsman tool set, did you glue it in? And did you just get rid of the rear window sprayer completely?
Seeing those pics makes me want to take my carpeting out and put down some dynamat and new padding, but my back section of carpet is pretty torn up, so it would probably end up pulling out of the trim strips again. I would love to replace my back half of carpet......If only money grew on trees!
I also really like your center console, I might have to make one sometime soon.
Yes that is carpet in the rear panel storage areas, some scrap pieces lying around the shop. No I did not glue it in, just tucked up in at the top and bottom and it seemed to stay pretty well. Didn't want to glue it in case it gets wet and I need to take it out and dry it.
Yes I did just get rid of the winder washer bag. Didn't work anyway.
For the rear cargo area carpet I just used Home Depot indoor outdoor carpet. A 6x6 piece was $18. Easy to trim and it looks great. You could also buy some foam underlay there, but I didn't feel the need with the big rubber mat back there as well.
As far as the center console goes, it is the best upgrade I've made so far. I love having something to lean on and more importantly, a place to put a Dr. Pepper! It really was easier to put together than it probably looks. Just need a jig saw and a finish staple gun.
Wow that is pretty simple design. Thanks for the dimensions and pics, really the only things I dont have are the jigsaw and the hole saw (both can be acquired easily. I wonder if an auto sealer primer would work well enough to seal the wood should something be spilled on it.
Unrelated to the interior, which you did a great job on BTW. What size tires are you running and what size lift? Very nice cruiser and it sits about as tall as mine does. I want taller wider tires and right now I am running 33x10.5...Great Job!
- Thread starter
- #28
Lizardking said:Unrelated to the interior, which you did a great job on BTW. What size tires are you running and what size lift? Very nice cruiser and it sits about as tall as mine does. I want taller wider tires and right now I am running 33x10.5...Great Job!
Thanks for the props. Tires are Big O Big Foots. 33x12.5. Lift is 4" installed by PO. I'm 6'2" tall and it sits just a tad tall for me. Have to pull myself up with the wheel. Thinking about fabbing some side steps for it.
Great job for not too much bucks! If you have a couple of scraps of your cargo carpet left over covering the rear wheel wells would be a good idea my wife has bruised her ass a couple of times hauling our kid in and out thought about doin something like that for my 62.
Cheers
Steve
Cheers
Steve
So I have been thinking it over these last few days, and I decided that I am going to copy you and make a set of rear panels to replace the old fiberboard ones that are falling apart, and to add more storage like you did.
I just bought two sheets of MDF at the hardware store to jump into this project but I have a few questions for you. 1: How thick was the MDF you used on the rear panels?(I bought 1/2") 2: What is the best method to remove the passenger side panel without breaking it.
I am also going to order some "Quietcrap" from CruiserCrap to lay down, and I'm going to get new carpet padding so I don't feel the ridges in the cargo area when I use it as a bed on trips. And if I'm going to have the carpets out I may as well powerwash them.
I'm excited to start this project!
- Thread starter
- #31
So I have been thinking it over these last few days, and I decided that I am going to copy you and make a set of rear panels to replace the old fiberboard ones that are falling apart, and to add more storage like you did.
I just bought two sheets of MDF at the hardware store to jump into this project but I have a few questions for you. 1: How thick was the MDF you used on the rear panels?(I bought 1/2") 2: What is the best method to remove the passenger side panel without breaking it.
I am also going to order some "Quietcrap" from CruiserCrap to lay down, and I'm going to get new carpet padding so I don't feel the ridges in the cargo area when I use it as a bed on trips. And if I'm going to have the carpets out I may as well powerwash them.
I'm excited to start this project!
Glad to hear I provided some inspiration!
To answer your questions:
1) I used 1/4" MDF for the rear panels. They are pretty sturdy, but I think I would used 1/2" if I were to do it over again. Just give the edges a nice round to them and you won't even notice how thick they are.
2) Not sure I can help you with that one. Both of my panels were already pretty beat up, so they both came out easy. In addition, the PO had installed shoulder belts in the rear, so he had already pulled them out and messed with them.
Some other tips. I used the old panels as a pattern not only for my cuts, but also for drilling the holes to line up with the nutsert holes. I removed all the nutserts and used a 3/4" #10 bolts with a washer and lock washer on the back side. Leave the nutserts in on the very two front holes by the rear door. Too hard to fit your fingers up there to get a nut on. I just put a screw right into the plastic nutsert.
In addition, you'll notice that the passenger side cargo hole is much smaller than the driver's side. This is because I left the rear support bar right in front of the gas fill line intact. Didn't feel it would give me that much more storage if I removed it since all my gas vent lines were re-routed back there anyway. On the driver's side I ended up cutting both supports out, but I wish I would have left the front one in place just in case there is any long term issues with removing those supports. Save some of your quietcrap to line your cargo areas with.
Finally, if you remove the carpet and are thinking of dying it, just call Americolor Dyes - Carpet Dyes, Carpet Cleaning Chemicals, Spot Dye Kits and tell them what color you want. They'll take your CC and address over the phone, $20. I think the online orders are for large quantities.
Feel free to shoot me anymore questions, and be sure to post some pics of your progress.
I like what you did with your rear cargo panels. I was planning to do the same with mine due to them being all beat up and wanting to mount 6x9 speakers, but didn't think of putting doors on them to take advantage of the quarter panel space. The use of diamond plate is slick too and would match what I did to my tailgate. I like it. Gonna have to shamelessly steal your design
As far as materials, I think 3/8 or so of marine grade plywood would be the best way to go. Granted the truck interior stays dry for the most part, any moisture that does get in (and wetness if you cross a river, whether you planned to or not) could mess up the fiberboard or non-marine grade stuff. Just thinking longevity here.
As far as materials, I think 3/8 or so of marine grade plywood would be the best way to go. Granted the truck interior stays dry for the most part, any moisture that does get in (and wetness if you cross a river, whether you planned to or not) could mess up the fiberboard or non-marine grade stuff. Just thinking longevity here.
So I got the panel out fine, they just pop right out with a little pressure around the nutserts, I guess I was just a little over worried about hurting them. I think I'm going to leave the vertical supports in place despite the loss of storage space, I just can't bring myself to cut into my baby! My gas vent lines are attached to one of the supports, so I may have to get a little creative with my storage plans. I am definitely going to use some of the QuietCrap on the inside of the body panels, I always laugh at how if you touch the rear quarter panel while the radio is on, you can feel all of the vibrations.
Spook:
As far as 6x9 speakers go, you may have to make some cuts to one of the inside panels to make them fit, see below. (at least that's what one of the PO's of my truck did)
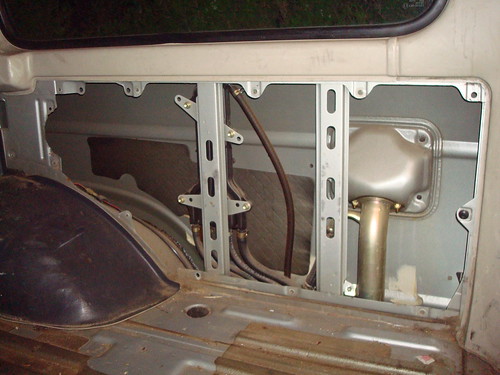
http://www.flickr.com/photos/darrell_vaughn/6850330149/
Spook:
As far as 6x9 speakers go, you may have to make some cuts to one of the inside panels to make them fit, see below. (at least that's what one of the PO's of my truck did)
http://www.flickr.com/photos/darrell_vaughn/6850330149/
Spook:
As far as 6x9 speakers go, you may have to make some cuts to one of the inside panels to make them fit, see below. (at least that's what one of the PO's of my truck did)
http://www.flickr.com/photos/darrell_vaughn/6850330149/
I measured at the stock location a while back, and yes you're right. Fortunately with planning to make new panels from scratch, I can move the speakers themselves a couple inches back and just have the speaker support bracket removed like it is in your pic. That'll save me having to cut into anything.
Only real problem I see is how I'm going to accomodate rear shoulder belts with the new panels. I'll have to see as I go, but hopefully it won't be too difficult. I might just leave it sticking out like snye did and call it good. Save myself some aggravation, ha.
- Thread starter
- #35
I cant sleep. Keep wondering if I should paint or not. In the meantime, I'll post at 2 am!
As far as the supports go, I cut one out and then got smart and just drilled out the spot welds on the other two that I took out. That way I can just bolt them back in if I need/want to.
And the 6x9s sound SO SO much better with some stability back there! Granted the olds ones also had some rips in the cone, but overall a huge improvement.
Just wear your flip flops til you get that sand cleaned up and you'll think you're at the beach!
Looks great. What kind of latches did you use for doors on the rear panels? Don't think I've ever seen any like that before.
Spook - where do you pick up marine plywood? Never heard of the stuff?
Nice work brutha
- Thread starter
- #39
Lated said:Looks great. What kind of latches did you use for doors on the rear panels? Don't think I've ever seen any like that before.
Thanks! Got the latches on eBay. Brand is Southco. The handle flips up and you rotate it a quarter turn to unlatch. They are perfect and were $20 for five.