
This is a super sweet Heater. Where did you find all of the parts to rebuild the Selection Control Lever? Do you have a List of the Parts needed to restore to this level of perfection? I would love to know what it takes to make the mechanism work correctly and to look as nice and tight as this. Where did you get the VENT-HEAT-DEF Selection part from? This is as nice as it gets. Great job!
Navigation
Install the app
How to install the app on iOS
Follow along with the video below to see how to install our site as a web app on your home screen.
Note: This feature may not be available in some browsers.
More options
Style variation
You are using an out of date browser. It may not display this or other websites correctly.
You should upgrade or use an alternative browser.
You should upgrade or use an alternative browser.
Heater restoration kit
- Thread starter Varty Yo
- Start date
This site may earn a commission from merchant affiliate
links, including eBay, Amazon, Skimlinks, and others.
@rstoddard - Thanks!
I ended up re-using most of the nylon/plastic parts on the selectors. A couple of them were too brittle/damaged - For those parts that weren't reusable I just took the control rods and old hardware to the local hardware store (Lowes) and found Nylon spacers/bushings that matches as closely as I could. For the screws, I brought the old rusty screws with me and found something similar in stainless. The heads are larger (not Japanese Industrial Standard) and they are normal Phillips head screws, but I don't think they detract all that much.
For the holes that were actually threaded and tapped, I re-used the original hardware, or, in a few cases (too rusted/broken screws) I replaced them with the correct metric size (again, not JIS, but close enough). Unfortunately I don't have a list but I believe most of the non-sheet metal screws were M4 or M5.
Really nice looking, I am going to tackle mine soon, and this is good inspiration. I was going to use the same technique on the selection switch as I did when restoring the dash knobs = paint pen and lots of scrubbing with cleaner of choice, but it looks like you did something just as nice.
Really nice looking, I am going to tackle mine soon, and this is good inspiration. I was going to use the same technique on the selection switch as I did when restoring the dash knobs = paint pen and lots of scrubbing with cleaner of choice, but it looks like you did something just as nice.
In my younger, nerdier days I used to paint pewter figurines. “Dry brushing” is how you get fine detail onto raised elements of a very small area (like raised lettering) The key is just enough paint on the brush to transfer from the brush to the work piece without running off the raised portion into the cracks between. Then making sure it has time to dry before applying the next coat. Usually 3-4 repeats does the trick.
If the letters were inset, or sunken, in relation to the background (like the dash knobs in the FJ40) I’d use the paint pen/scrubbing technique. This is good for filling a void with paint, then scrubbing brings the original color back to the (higher sitting) background.
Last edited:
Yes. Did the SOR RHD kit for 75' have exact matches for all the original bits
@Varty Yo, I just used SOR heater restoration kit yesterday to freshen up my heater while I replaced a leaky heater core. I bought the RHD kit as I'm working on a 75' RHD 45. I used Shane's kit on my 78' 40 a couple years ago and I can say that there were a couple difference between the 2 kits.
-SOR was a bit more expensive.
-There were no directions with the SOR kit while Shane's had directions. It is pretty obvious where everything goes except I have a lot of left over plastic washers and some little lock washers that make no sense as to where they go as there were no plastic washers or lock washers on the original heater box. There were a couple things I knew to do as this is my second heater rebuild but if it had been my first directions would have been very nice. Case in point I wouldn't have known to use 3M adhesive to adhere the new foam to all the panels. Small gripe but for me it's the little things that matter.
-Shane's kit came with the internal spring, SOR's did not and it looks like they are charging an arm and a leg for just the spring....glad mine had enough life left in it to reuse...
-Shane's kit had exact matches for all the little plastic bits that fit on the control arms. SOR's kit definitely did not. I reused a couple plastic spacers that fit directly in the attachment sites on the control arms as the SOR kit did not come with exact matches (maybe these original plastic bits are unable to be sourced?? Maybe it's cause it's RHD??) Regardless, this is where directions to point this out would have been nice.
Lastly, and this is what really pissed me off about the SOR kit was that the metal washer that you push on to the main control lever (kind of has fingers on it so it can only be removed by ruining it) to lock everything in place in the SOR kit was thin cheap garbage that I destroyed trying to push it on with a socket as per Shane's instructions that came with his kit. Perhaps I should have used a different technique to install that "washer" (I don't know what else to call it) but as there were no instructions provided I wouldn't know. I'll try and snap a picture of what I'm talking about later. Regardless now I have to source a replacement for the ruined one, uhgggg.
Sounds like a lot of griping but I'm just trying to right a review more or less describing my experiences. Would I buy the SOR kit again? Yes as it has everything you need without having to run all over the place sourcing things. Would I be much more careful installing that final "finger lock washer?" Yes. Did the SOR RHD kit for 75' have exact matches for all the original bits and pieces on the heater box?, No....but I'd still buy it again.
There is my 2cents...
Sir, What did you mean by "I wouldn't have known to use 3M adhesive to adhere the new foam to all the panels" Are you referring to the Foam to be installed on the Heater core (does it go all aroud the edge of the heater core?), or the Flap Panels, or both? I Just boughtthe SOR Kit, so I guess I'm in th same boat with no directions and not nowing how those parts are supposed to be installed. I hate it when people do that to you!
- Joined
- Nov 5, 2013
- Threads
- 60
- Messages
- 3,603
My 76 front heater core had OEM foam all around the edges. The doors/flappers had foam on both sides.
- Joined
- Nov 5, 2013
- Threads
- 60
- Messages
- 3,603
Here’s a thread with heater restoration tips and some instructions: https://forum.ih8mud.com/threads/fj40-fj45-fj55-series-heater-restoration-and-service-kits.187235/
Here’s a thread with heater restoration tips and some instructions: https://forum.ih8mud.com/threads/fj40-fj45-fj55-series-heater-restoration-and-service-kits.187235/
Thank you soooo much for your your help, Sir,!
Wait until we put up the wall on our North borderI know its awful hey. Has killed alot of things i was goin to buy south of the border
")
- Thread starter
- #30
Wait until we put up the wall on our North border
Good then we can sell our oil overseas instead to the US at a huge discount! lol
If that scenario were to come true, TRUMP would negotiate a superior trade deal (as always) for that under-performing Canadian oil but no worries, we'll save a little bit for Trudeau to use as lube because he'll need it.Good then we can sell our oil overseas instead to the US at a huge discount! lol


- Thread starter
- #32
If that scenario were to come true, TRUMP would negotiate a superior trade deal (as always) for that under-performing Canadian oil but no worries, we'll save a little bit for Trudeau to use as lube because he'll need it.
Doesnt deserve any lube!!!! Dry and hard please
Doesnt deserve any lube!!!! Dry and hard please
Your wish is my command
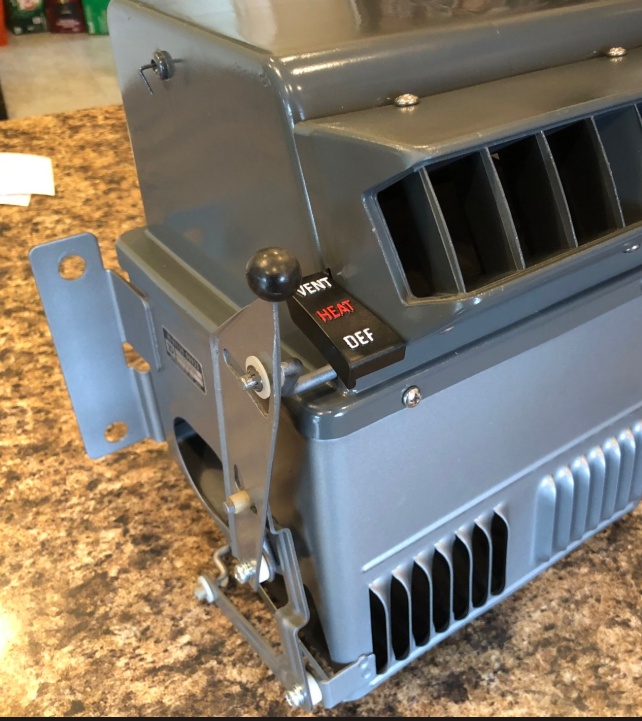
Were you able to salvage the original plastic white washer that attaches just below the manual selector knob (see attached image for reference) or were you able to find a replacement? I'm looking for that exact piece (I accidently broke mine...) but haven't had any luck finding a replacement. Any info would be greatly appreciated!I bought 3M spray adhesive at the hardware store, and cut my own 1/4 neoprene foam from a sheet of it bought on amazon.
For paint I used rustoleum hammered gray on the metal, and I believe rustoleum charcoal gloss on the top. I have the cans at home, so I can check later. It’s the same colors @miller used on his as well.
Ok thing with rustoleum “hammered” paint. It’s designed to give a really mottled, hammered look, but if you spray light coats, you can get it to go on smooth.
For the raised letters, I just dry-brushed some colored acrylic paint with a foam brush - very carefully. I used stainless screws but didn’t bother trying to track down the apropriate JIS small-head screws.
I’m happy with how they turned out!
View attachment 1590937
View attachment 1590938
Is it just me, or is the heater restoration and service kits thread link you provided not working anymore?Here’s a thread with heater restoration tips and some instructions: https://forum.ih8mud.com/threads/fj40-fj45-fj55-series-heater-restoration-and-service-kits.187235/
Is it just me, or is the heater restoration and service kits thread link you provided not working anymore?
Were you able to salvage the original plastic white washer that attaches just below the manual selector knob (see attached image for reference) or were you able to find a replacement? I'm looking for that exact piece (I accidently broke mine...) but haven't had any luck finding a replacement. Any info would be greatly appreciated!
View attachment 2701501
If that was for AtlasX he has long since disappeared and stole my money along with others probably. As for the washer, have you tried McMaster Carr?
merbesfield, that was for "thebigredrocker" but thanks for the McMaster Carr lead... no, I haven't checked them out yet, but I'm searching now. By chance, have you replaced the parts I'm looking for? Wondering if you know which parts will work as good replacements?If that was for AtlasX he has long since disappeared and stole my money along with others probably. As for the washer, have you tried McMaster Carr?
The heater restoration kit/AtlasX was long gone by the time I did mine. I did salvage the plastic washer, but if I hadn’t, McMaster Car would have been where I’d have looked too. The only drawback is you’ll have enough washers to restore 500 heaters. Harder to find are the small, JIS-head Japanese Phillips screws. I just used normal large stainless US screws but my truck isn’t a pristine restoration either.
merbesfield, that was for "thebigredrocker" but thanks for the McMaster Carr lead... no, I haven't checked them out yet, but I'm searching now. By chance, have you replaced the parts I'm looking for? Wondering if you know which parts will work as good replacements?
No I have not done the job yet, but hope to get to that point before I die.
part # for the plastic washer - 90099-01338