Block surface prep question for HG install

This site may earn a commission from merchant affiliate
links, including eBay, Amazon, Skimlinks, and others.

Joined
Jul 7, 2016
Threads
47
Messages
3,080
Location
Twin Ports of Superior, WI and Duluth, MN
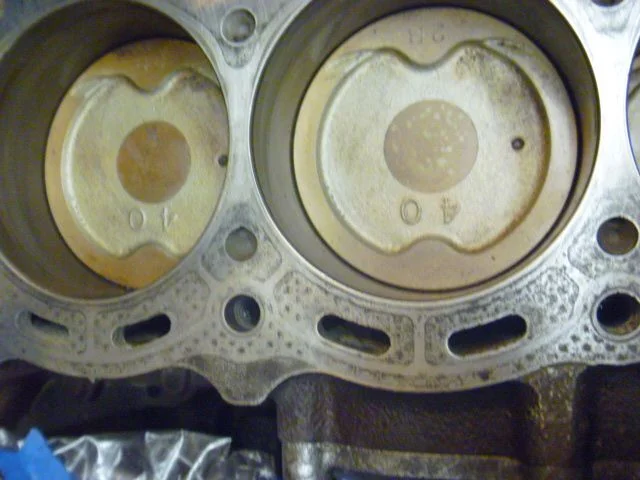
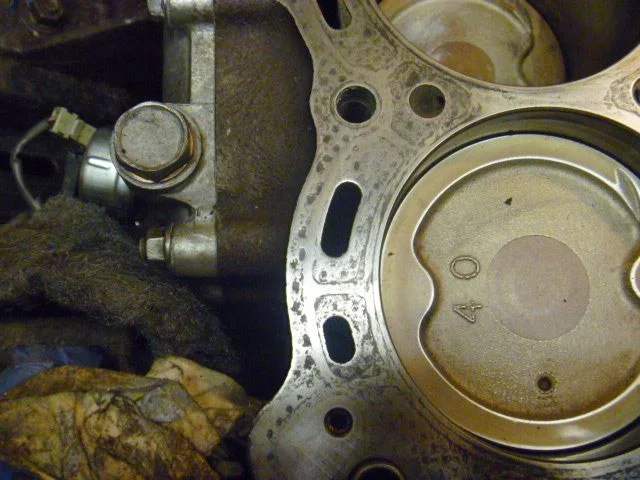
Well, this is the big weekend for my HG install. I had the head sent off for a valve job, cleaning and surfacing and I am ready to put it back together. I have been prepping the surface of the block with 400 grit sandpaper and getting everything cleaned up. I have a number of dimples showing that I really can't feel with my finger, except for a number of them along the outer edge of the block. Jose mentioned in his HG thread(which is fantastic) that he thought about using some JB Weld to fill those with a razor blade.

My question is whether or not I should do that, continue to sand and risk causing a "ravine" or sloped edge on the block or just leave it be and hope the gasket makes up the difference.

If it matters, the HG didn't blow, this ended up PM and a chance to replace everything that might break and a chance to clean the whole thing up.


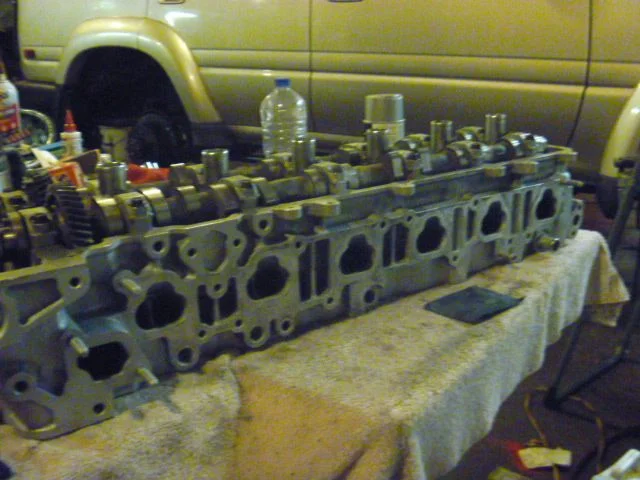
Bonus shot of the head. I think it looks good.
P1000430.webp


P1000431.webp


P1000432.webp
 
Last edited:
I don't think sandpaper is a good idea at all. You don't want to remove metal, only gasket material. The tolerances on the head surface are a few thousands of an inch, plus you don't want abrasive dust in the block.
 
I don't think sandpaper is a good idea at all. You don't want to remove metal, only gasket material. The tolerances on the head surface are a few thousands of an inch, plus you don't want abrasive dust in the block.
Sandpaper is fine, many people use wet/dry paper to prep. I also used a straight razor blade, compressed air and plenty of brake fluid and paint thinner. I have it coated with a thin sheen of clean motor oil right now and I plan on going back in with the brake cleaner and a range of rags while moving the cylinders back and forth before I mount the head.

As far as how far to go, you were thinking what I was thinking. I am going to stop. The only place I can feel the pits is at those outer edges and the gasket caused those.
 
I use a DMT diamond lapping plate. It is flat to .0005 inch and removes metal fast. Put a bead of grease between the pistons and walls to prevent grit from getting in there.
I was using a piece of 1000 year old Coastal Redwood scrap. It is pretty stable at this point and is pretty good as a sanding block. I would have to remove quite a bit to get to the bottom of these in machining standards. I am not decking this block, just getting ready to put the straight and true head back on with a new gasket and then everything else.
 
I don't think sandpaper is a good idea at all. You don't want to remove metal, only gasket material. The tolerances on the head surface are a few thousands of an inch, plus you don't want abrasive dust in the block.
I agree, i wouldn't have sand paper anywhere around my open cylinders. While your sanding, small bits, and pieces of grit are falling down inside your cylinders, making their way to your ring lands. Even if you try to clean this grit out with compressed air, and flush the cylinders with brake cleaner, some grit will still remain. That type of fine grit is not good for long ring life, plus it can promote cylinder wall scoring too.
 
I agree, i wouldn't have sand paper anywhere around my open cylinders. While your sanding, small bits, and pieces of grit are falling down inside your cylinders, making their way to your ring lands. Even if you try to clean this grit out with compressed air, and flush the cylinders with brake cleaner, some grit will still remain. That type of fine grit is not good for long ring life, plus it can promote cylinder wall scoring too.
I understand this concern. That is something that I am struggling with because I know I need to get the block clean, but everything that I could use to do that leaves a residue. My plan is to caulk the cylinders with grease at a low point in the stroke, push them up and down a few times or more and then give everything my best wipe down. The toothpaste is already out of the tube.

The cylinder walls don't have any signs of wear and neither do the cams and I had the valves seated and sealing properly. If something ends up getting hung up, I do plan on changing the oil after I get it warmed up along with the coolant. I am hoping the filter picks most of it up. I am at 253,000 miles. If it makes it another 75-100K on this with out any lower end work, I will be satisfied with my efforts.
 
Um I never seen anyone use sand paper but to each there own. I was taught but top 1fzfe builder to use red scotch brite get gasket and any carbon off then put then layer of hylomar on the surface then lay the gasket with fipg by the timing area. You should also plug the oil passanges there are 2 so you don't get something in there to plug it. Clean around cylinder inside holes for carbon and anything else then oil inside move up and down like you are going to do.
 
Um I never seen anyone use sand paper but to each there own. I was taught but top 1fzfe builder to use red scotch brite get gasket and any carbon off then put then layer of hylomar on the surface then lay the gasket with fipg by the timing area. You should also plug the oil passanges there are 2 so you don't get something in there to plug it. Clean around cylinder inside holes for carbon and anything else then oil inside move up and down like you are going to do.
Do people not understand what 3M sandpaper is? There is no more harmful residue left that the red scotch brite pads that the same company makes. Yes, it's plastic vs. mineral, but the minerals don't come off the paper in a way that you can't work with.
 
Cardboard cut to the shape of cylinder placed into it, there is difference between sand paper and scotch brite
 
Alright, I am over thinking this as usual. I am just going to do my final clean up and put the head on. I realize there is a difference between scotch brite and 400 grit wet dry sandpaper, but I don't think either one matters if the main issue is getting little bits of crud that falls into the cylinder. I will just have to clean it, blow it out and shop vac it and hope for the best.
 
By the way, did you figure out a way to take the head off with the cams installed or did you put the caps on for the glamour shot?
No, I had the valves done and they needed to bolt it back up to adjust the valve lash. I asked them to leave it that way for transport back to my place.

I got it on. I think it should be fine. I spent a bunch of time really going up and down and cleaning the cylinder walls before I put the head back on. The choice to use the sandpaper might have been a mistake, but Jose hasn't reported any problems with his rig as far as I know, so we'll see I guess. I did keep the shop vac running while I removed the big chunks, but as you get down there, I just don't think it's possible to prevent anything from getting down there and cleaning it the best you can seems like the only real option. The cardboard cut out idea seems like to would be tough to get a good seal all the way around since you can really use the head gasket as a template.

I am hoping the oil and coolant change that I will do pretty quickly once I get it running will prevent anything serious as far a wear goes. Considering that people use K&N air filters which allow tons of particulate matter to infiltrate, I can't see how minuscule amounts of 400 grit sandpaper or metal dust can be too much worse.
 
I didn't use anything more than a scraper & a few razor blades while using TriFlo to keep a little film - then just prior to the gasket I used brake cleaner & followed the old "no gasket 'till you'd eat off it" -rule. The gasket is doing the work when the surface is clean.

That's how I was taught clear back to childhood watching Pops do motors & it always worked for him.

To each their own. Unless Robbie does something different, I'll stick to my way.
 
Red Merle, right behind you on the head. I am using an independent that used to work for Toyota. He is extremely knowledgeable but perfection takes time. That and weekend high school football games his grandson plays in.

I have 340,000 so I am looking at decking the block also. I will ask the machine shop about sandpaper when I get there. I realize it will be well after the fact (your install) but information can be useful in the future. I am overwhelmed on my refresh (only have weekends to work on it and the 1 million other household chores) but it can and will come together.

Has anyone been told of a copper colored spray that engine rebuilders use on the head gasket before buttoning everything back up?
 
Back
Top Bottom