Altimeter & Compass Installation (1 Viewer)

This site may earn a commission from merchant affiliate
links, including eBay, Amazon, Skimlinks, and others.

Joined
Feb 18, 2006
Threads
215
Messages
1,289
Location
Seattle
Website
www.rhodescreations.com
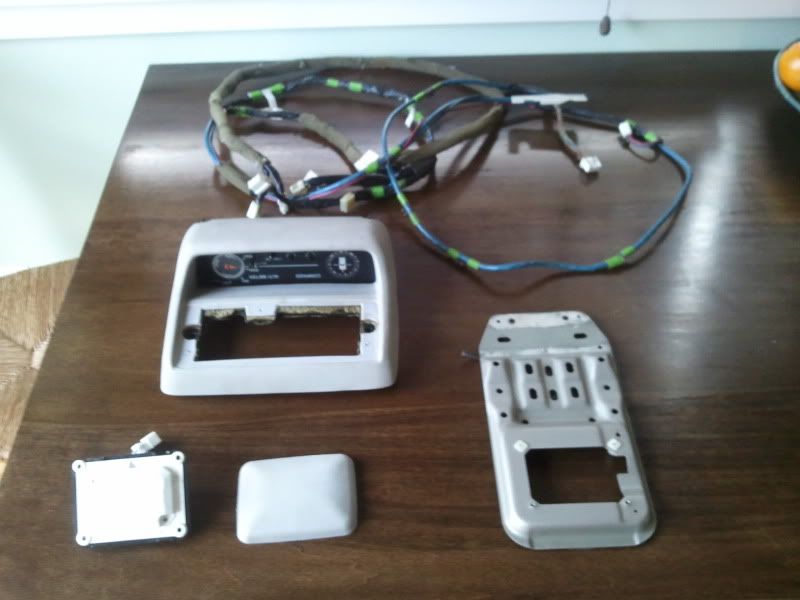
After searching the forum and reading all that seemed relevant I'm going to attempt to install my OEM overhead console. The unit is the compass and altimeter variant rather than the sub-tank version.

First things first, I'm going to break this thing down and clean it thoroughly with goof-off.

The next thing I'm going to do is head to the hardware store and buy some spray paint to try and match my oak interior. I looked for an oak trim model console for a long time and never had any luck.

My plan is to drop the headliner, install the magnetic field sensor and harness, modify the sun visors (I've seen a thread about doing this somewhere), and wire the unit into the switched power from the sunroof motor.

If anyone has suggestions or experience with this install I'm all ears.


:cheers:
 
Personally I'd just call it a waste of time & effort unless you have some specific biological need to install it...

imo it's antique junk that was barely useful pre-gps.... I can see the use for a compass for hiking, but in a 4wd not so much.

I haven't run a dedicated compass in any of my 4wd's for many years now and still haven't got lost :)

trackfb.jpg


cheers,
george.
 
honestly I'm not installing this for functionality. i live in the mountains. if i'm off the trail it doesn't matter what direction I'm going.this is an installation thread. there are a ton on discussion threads about how much of a pita this is to install and how useless it is. i get it. i don't care. i'm doing it anyway.

here are the various connections from the harness:
2011-12-30102910.jpg

to beneath the dash (I'm guessing, this will be the pita splicing part I imagine)
2011-12-30102904.jpg

to the display
2011-12-30102852.jpg

midway along the harness to the sensor... a ground?

and here's the are where the display goes
2011-12-30102627.jpg


and the area under the headliner where the bracket mounts for the sensor. it looks like bracket was previously installed with double-sided tape, so that's the method I'm going to use. I imagine this is done to isolate the bracket from the body of the vehicle. there are no pre drilled holes.
2011-12-30110355.jpg
 
No worries, like I said, it's fine if you have some biological need for it :)

I had a pod (altimeter/fuel gauge) from my subtank install, sold it to a fellow mudder since I couldn't see any (practical) use in installing it.

Have fun with your install. I'm sure you'll sleep much better once it's all done :)

cheers,
george.
 
I have one in mine, as well and I never use it.
Been thinking about using the space to install a couple/few gauges instead.

With that said, if I had never had it I probably would have wanted one also. :D
GOOD LUCK!!!
 
I too went the route of finding a good use for the console itself...installed my HAM radio head onto it. If at some point you get tired of the Alti/Compass, you can always pull the gauge and sell it to another Mudder, and re-purpose the console with switches, a radio, etc, etc. I am always looking for more places for tastefully mounting things in the truck.

cyclosteve-albums-yaesu-ft-8900-install-picture20838-both-visors-installed-down-position.jpg


FYI, you can get the visors from Dave at Japan4x4 for about $55 a piece...these are the simple ones without lamps, but do not sag like most folks oldies. PM me if anyone needs the PN's, and should be able to dig them up somewhere.

MOT if you want to set it up for switches just have TAP Plastics bend you a piece of black 3/16" plexiglas 1" x 3" x 9" at a 100 degree angle...runs something like $14 out the door. You would need to do the final cutting with a dremel to fit, but could then mount at least six Mr. T switches into that spot. Surprised that no one has done this yet.

cyclosteve-albums-yaesu-ft-8900-install-picture20798-plexiglas-panel-outside-console.jpg


:cheers:

Steve
 
Last edited:
5 hours later, it's mostly installed...
Once the headliner was down I installed the magnetic field sensor bracket. I tried double sided tape but it wasn't thick enough. I had a roll of thicker adhesive, sort of like epoxy but not hard when set that I used to mount the bracket.
2011-12-30124224.jpg

The harness provided had a number of redundant/not used wires so I removed them. The reason for this is the lack of space up in the headliner and down the pillars to the firewall. Here's the stuff you don't need:
2011-12-30144120.jpg

There is basically one harness that runs to the sensor and another that runs down to the fuse panel area. They are connected by a shared ground wire only. I ran the sensor harness, then the pared down power harness down the pillar (not inside it... this is the main reason I got rid of the redundant stuff. it's already there and the space is tight).
2011-12-30124208.jpg

2011-12-30132754.jpg
 
mounted the sensor and cover
2011-12-30134332.jpg

chopped the headliner to fit the console
2011-12-30141150.jpg

installed console
2011-12-30144003.jpg

here's the last bit of wiring to be done
2011-12-30134538.jpg

the plug that connects to the console at the other end of this has only three pins in use...
WIRING2.jpg

it is connector "A" on the diagram. pins 4, 3 and 1 are in use. 4 is the green wire at the fuse panel, 3 is black and white and 1 is yellow and blue. I'm not going to start splicing these today, but it's clear one is power, one is ground, and the third... maybe key-on power?
 
I should also not that I opted not to paint. The panel for the roof was actually grey and I had never noticed. It looks fine grey.
 
Isnt the compass sensor rather further forward in your truck than stock? Kinda close to the dome light? That compass is pretty useless as a navigational instrument, but you know that....
 
I guess I am like you and like the purpose of the altimeter. I have one on my Lowrance Baja but it only goes to 9,999 feet. I may look into this install as well.
 
Mot if your looking to sell it PM me and ill take it off your hands :grinpimp:
 
Nicely done, and definitely quick, congratulations.

Have you powered it up yet? Based on the Subtank version of the wiring the following pins should be the very close with this setup...Pin 1 = Yellow +12v IGN (tap into the ECU-B Fuse @ fusebox), Pin 3 = Green +12v from rheostat for dash lights, Pin 4 = White/Black ‐12v from rheostat for dash lights. This would allow you to dim the lights in the console with the dash lights, and to switch them off with the push button. You could just have + and - wired to Pins 3 and 4, but would not have the dimming capability. YMMV.

I seem to recall that the lights on the OH consoles were all toast on mine, and others have said that they do not last too long. Be sure to keep the green "condoms" from the meter lights, and to swap them to new bulbs which you can get from either CDan or your local dealer IIRC.

:cheers:

Steve
 
Last edited:

Users who are viewing this thread

Back
Top Bottom