Fergytoy"s 1978 FJ40 frame off resto. (1 Viewer)

This site may earn a commission from merchant affiliate
links, including eBay, Amazon, Skimlinks, and others.

Joined
Jun 25, 2013
Threads
10
Messages
327
Location
Grand Junction, CO
So it begins. Been wanting to do a frame-off restoration for quite a few years now but have been putting it off over the last 5 years for several reasons. My wife has been pushing me to start it and make it a winter project.

I purchased the side/rear quarter panels from CCOT in 2008 and held on to them for this ocassion. My 40 is a JAN 1978 model and I had purchased it from the original owner in 2000 in Pennsylvania. The PO was in the Navy and had purchased it new when he was stationed in southern California. He gave me all the original California registrations since it was new. Have the original Owners Manual, plug-in trouble light and canvass door straps as well.

Hope to have it done in time for Spring but it may take a bit longer. Mechanically it is nearly 100% but taking care of body rust issues was my main focus. I'll post pics as it goes along as I know these build threads are worthless without pics.........:)
 
Subscribed. Cool!
 
wedding day 035.jpg
This is a pre-restoration pic. My rig looks decent from 50 feet away as I had done some temporary body work over the years to keep the rust in check for the time being. However, as any 40 owner can attest, each of us knows where the rust is worse in our rigs.

wedding day 035.jpg
 
Last edited:
FJ40 Restoration 007.jpg

FJ40 Restoration 008.jpg

The tub was removed from the chassis and is sitting on saw horses in my garage. It took 5 hours for my father in law, my buddy Pua and I to remove the tub from the chassis. Not too bad considering we had air tools and the wood stove fired up in the garage. You can see the typical rust on the rear quarter panels where the factory spot welds tie the wheel wells to the rear quarter panel.

I had installed aluminum diamond plate on top of the rear quarter panels in 2006 after I temporarily patched some rust. It was apparent that the diamond plate trapped moisture and most likely accelerated the rust problem. :crybaby:

FJ40 Restoration 007.jpg


FJ40 Restoration 008.jpg
 
Last edited:
FJ40 Restoration 022.jpg

FJ40 Restoration 023.jpg

FJ40 Restoration 024.jpg

I had purchased a new driver's floor from Real Steel Parts which is a great business that was referred by other members on 'Mud. Good prices and fast delivery. I am satisfied with the quality and fit of their panels so far. I was test fitting the new driver's floor panel in these pics to see how much I was going to use to patch the rusted hole in my floor. :clap:

FJ40 Restoration 022.jpg


FJ40 Restoration 023.jpg


FJ40 Restoration 024.jpg
 
FJ40 Restoration 031.jpg

FJ40 Restoration 032.jpg

FJ40 Restoration 033.jpg

Here is the tub loaded up and ready to head to the Sandblaster. My intent is to have it sandblasted as clean as possible so that any other rusty areas can be identified and cut out. I also had the hood, fenders and all other body parts blasted as well. :clap:

FJ40 Restoration 031.jpg


FJ40 Restoration 032.jpg


FJ40 Restoration 033.jpg
 
AAAHHHH......back from the Sandblaster. Looks a heck of a lot better! Now you can see how honeycombed the top edge of the upper rear quarter panels are. At least it is a fresh canvass to see what work needs to be done.


FJ40 Restoration 045.jpg

FJ40 Restoration 046.jpg

FJ40 Restoration 047.jpg

FJ40 Restoration 048.jpg

FJ40 Restoration 049.jpg

FJ40 Restoration 045.jpg


FJ40 Restoration 046.jpg


FJ40 Restoration 047.jpg


FJ40 Restoration 048.jpg


FJ40 Restoration 049.jpg
 
All these areas of the body need attention by cutting out the areas of rust damage and patching them back in with new 18 gauge cold rolled sheet steel. :wrench::wrench:

FJ40 Restoration 052.jpg

FJ40 Restoration 053.jpg

FJ40 Restoration 055.jpg

FJ40 Restoration 057.jpg

FJ40 Restoration 058.jpg

FJ40 Restoration 052.jpg


FJ40 Restoration 053.jpg


FJ40 Restoration 055.jpg


FJ40 Restoration 057.jpg


FJ40 Restoration 058.jpg
 
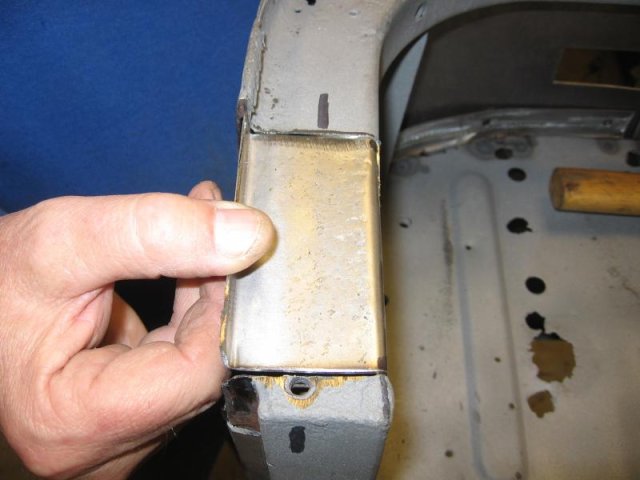
I started to cut out and replace the rust damaged sections of the body at this point. Both ends of the main support box that runs from side to side of the tub and connects the front of the tub to the rear, were rusted out as visible in these pics.. I cut out the damaged section and then used it to make a pattern on fresh 18 gauge sheet steel. I added about 1" inch of extra steel on each side of the newly fabricated box piece to tie it back into the remaining solid tub sections just like Toyota had done on the production line decades ago. I used my small Harbor Tools sheet metal bender and new body tools to form these pieces. I also fabbed up new 16 gauge hot rolled sheet steel to make the front seat support bracket that is welded to the underside of this patch piece. I welded new zinc coated nuts to the support piece for the seat bracket bolts to thread into just like the factory. :grinpimp:

FJ40 Restoration 060.jpg

FJ40 Restoration 061.jpg

FJ40 Restoration 062.jpg

FJ40 Restoration 063.jpg

FJ40 Restoration 064.jpg

FJ40 Restoration 060.jpg


FJ40 Restoration 061.jpg


FJ40 Restoration 062.jpg


FJ40 Restoration 063.jpg


FJ40 Restoration 064.jpg
 
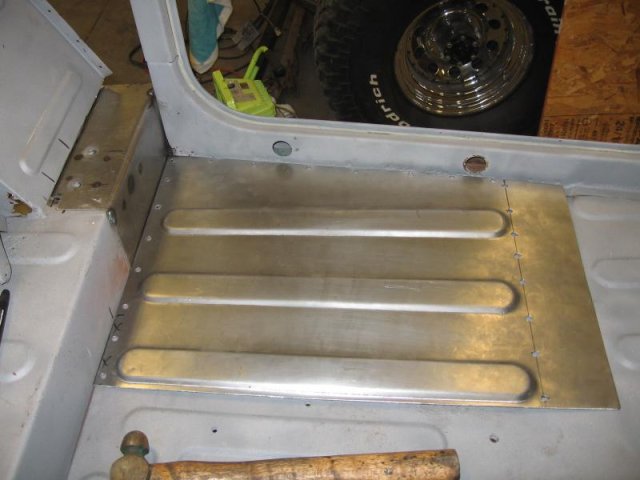
Started working on the patch panel on the driver's floor section. Decided that I did not need the entire replacement patch panel but only a portion of it. I had cut my original floor out so that the forward edge of the opening would be on the flange of the under floor support. This way the new patch panel would rest and weld directly to the floor support on the bottom side of the tub. Instead of butt welding the new panel to the original floor section on the passenger side of the same hole, I just lapped it over and welded it. I also drilled spot weld holes thru the new patch panel to better weld it to the tub. Starting to come together..........:clap:


FJ40 Restoration 065.jpg

FJ40 Restoration 066.jpg

FJ40 Restoration 067.jpg

FJ40 Restoration 068.jpg

FJ40 Restoration 069.jpg

FJ40 Restoration 065.jpg


FJ40 Restoration 066.jpg


FJ40 Restoration 067.jpg


FJ40 Restoration 068.jpg


FJ40 Restoration 069.jpg
 
I then turned my attention to cutting off the flange of the top of the wheel wells where they spot weld to the rear quarter panels. Both sides were in rough shape and I had to cut off most of these flanges on both wheel wells. I then fabbed up several new flanges by cutting several 2" inch wide strips of 18 gauge sheet and then bent them in half. This gave me a 1" inch "ear" that I spot weld to the underside of the wheel well top and later to the rear quarter panel. When it came to attaching these flanges to the radiused rear portion of the wheel wells, I had to figure out a way to get a straight piece of 90 degree bended steel to wrap around the radius and then be able to spot weld it to the wheel well top. I decided to " v notch" the underside of the flange and "work" it around the radius and spot weld it as I went. This way it kept the same radius as the wheel well and would match the radius of the rear quarter panel when it would be installed later. It worked really well. :beer:


FJ40 Restoration 070.jpg

FJ40 Restoration 071.jpg

FJ40 Restoration 072.jpg

FJ40 Restoration 070.jpg


FJ40 Restoration 071.jpg


FJ40 Restoration 072.jpg
 
I then worked on attaching the driver's side rear quarter panel. Tacked it up to the top bed rail. Then worked on a rusted section of the top rail and tried to match the shape/bend of how Toyota had formed it originally.

FJ40 Restoration 073.jpg

FJ40 Restoration 074.jpg

FJ40 Restoration 075.jpg

FJ40 Restoration 076.jpg

FJ40 Restoration 077.jpg

FJ40 Restoration 073.jpg


FJ40 Restoration 074.jpg


FJ40 Restoration 075.jpg


FJ40 Restoration 076.jpg


FJ40 Restoration 077.jpg
 
Moved on to the passenger side box section and replaced the rust damaged section with fresh 18 gauge. Took careful measurements of the factory seat bracket holes where the welded nuts are attached. Newly fabbed 16 gauge support bracket welded on underneath just like the factory did it.

FJ40 Restoration 079.jpg

FJ40 Restoration 080.jpg

FJ40 Restoration 081.jpg

FJ40 Restoration 082.jpg

FJ40 Restoration 083.jpg

FJ40 Restoration 079.jpg


FJ40 Restoration 080.jpg


FJ40 Restoration 081.jpg


FJ40 Restoration 082.jpg


FJ40 Restoration 083.jpg
 
This upper rail area on the passenger side of the tub at the rear was the most difficult to repair. The radius of the tub along with the beveled angle took me some time to get the patch piece fabbed correctly. I "v-notched" the upper lip to make the radius possible and then welded it.

FJ40 Restoration 088.jpg

FJ40 Restoration 089.jpg

FJ40 Restoration 090.jpg

FJ40 Restoration 091.jpg

FJ40 Restoration 088.jpg


FJ40 Restoration 089.jpg


FJ40 Restoration 090.jpg


FJ40 Restoration 091.jpg
 
Last edited:
I had checked out several other "Mud member's Threads on how they fabricated new rear sills. I did not think the $400 asking price from CCOT or other suppliers for new complete sills was worth it. Besides, I like fabbing up things.
I bought a scrap piece of 2"x2" square tubing that was 10 gauge to make into a new sill center section. I then traced the radius of one end of my old sill where it meets the rear quarter panel onto a scrap piece of 16 gauge hot rolled sheet steel. Then took the plasma torch and cut it out. Made 4 pieces and then 2 "center section" pieces and began to weld them up. My vise came in handy to hold the square tubing and then the clamps to hold the radiused end pieces. I also had ordered a new Real Steel Parts sill skin as I could not fab the intricate bends so easily. I notched the 2x2 square tubing to allow the skin to fit tighlty over it to eliminate any water intrusion.

FJ40 Restoration 094.jpg

FJ40 Restoration 095.jpg

FJ40 Restoration 096.jpg

FJ40 Restoration 097.jpg

FJ40 Restoration 098.jpg

FJ40 Restoration 094.jpg


FJ40 Restoration 095.jpg


FJ40 Restoration 096.jpg


FJ40 Restoration 097.jpg


FJ40 Restoration 098.jpg
 

Users who are viewing this thread

Back
Top Bottom