Builds 1972 fj40 build-up thread (1 Viewer)

This site may earn a commission from merchant affiliate
links, including eBay, Amazon, Skimlinks, and others.

spent some more time wiring last weekend and have everything just about done now. every knob and control on the dash is in and working (minus the windshield washer, but only because i dont have a washer to hook up). the hardest part was definitely the hazard switch/turn signal switch/brake switch. i tried to wire it up according to the service manual, but it didnt work. i searched on the internet and found only one other suggested way of wiring it, which got me closer, but still didnt work right. i tried all kinds of combinations of wires - some didnt work at all, some gave me dim or intermittent blinkers, some gave me blinkers but only when the brakes were off, brakes lights that were on constantly, or setups that only worked when the key was off. i finally started from scratch, bypassed the harness, and took one wire at a time. i worked through it until i had a set up that worked, then i started integrating the harness back in. when i was done, i had it set up to use the provided harness wires, the stock hazard switch, turn signal switch, and brake switch, and no additional parts (such as extra relays).

dash_almost.jpg


in the meantime, i needed to finish up wiring the headlights. i decided to put each light and each high/low beam on a seperate relay. all i needed to do was find a good place to mount the relays. i made up some brackets out of sheet metal that i could mount using the bolts that hold the front bib in place.

headlight_relay_brackets.jpg


with the relays mounted on the brackets

headlight_relay_brackets2.jpg


whole thing mounted to the cruiser. i think they turned out pretty nice.

headlight_relays_mounted2.jpg


headlight_relays_mounted.jpg


now that all of the under dash wiring was complete, the next thing to do was to turn to the steering. i need to weld the steering column to the lower firewall support, so i needed to mock it all up to get the right position for the steering wheel. here is the steering wheel in place, ready to measure. i am going hiking this weekend, but hopefully i can get the steering wrapped up next week. after that, i just need to run the brake lines and bolt a bunch of stuff back on and she will be ready to go (well, at least ready to gingerly back out of the garage under her own power).

steering_wheel_mockup.jpg
 
So I assume you've made the move out of the Phoenix furnace?

Looking great!
 
So I assume you've made the move out of the Phoenix furnace?

Looking great!

hey cliff!

yes, we moved up to whidbey island (washington state) in december. i am sure you thought i had wrapped up this build a long time ago, but things have been slow with moving and all. but it is moving along again now - hopefully will be driving it before summer is through (and i wont miss the phoenix heat one bit).
 
Hey, welcome to Washington, that sure is some nice work you've been doing. Dig the color, and I drove a 72/40 from Auburn to Renton field for about a month without any overheating problems in that 85-90 degree weather we had last month without a problem running the stock radiator and a 350.

Overheating a small block all depends on how your engines set up. Going wild is going to result in higher heat and the need of extra cooling capacity. I think i'll have to probably put a oil cooler and higher capacity rad in mine, but my 350 in my 66 is pretty built.

Kevin
 
Hi mattcrandle,
It looks really cool, Lots of times involve with this great job.....
I am in the process of going to install 3F EFI engine from my FJ62-1989 to my FJ40-1974. I am thinking of puting my FJ40 over my FJ62 main chassis (Frame)
I just wonder if any of you know that will be the possibility? I knew the 62 frame is few inches wider than the 40. Any help will be greatly appreciated.
 
radiator redux

after seeing all of the rust and gunk that was in my radiator and heater hoses, i finally decided to do what i had known i was going to have to do all along: get a whole new radiator. i had already spent time adapting the taurus fan to work with the stock radiator and moving the radiator mounts to clear the water pump, but the old stock radiator was just too crusty to try to make work. i just spent a lot of money on rebuilding the landcruiser, and i didnt want to ruin the engine with inadequate cooling. although a new radiator was going to be more money and more work, when i finally removed the old radiator, i could heard the chunks of rust sloshing around inside, and i knew i had made the right decision.

after tons of research and comparing the pros and cons of various radiator replacements, i decided to go with an oversized aluminum radiator (made by <a href="http://www.rondavisradiators.com/Radiators.htm" target="_blank">Ron Davis Radiators</a> and sold by Man-a-Fre). i considered a stock replacement copper radiator, but i had heard a lot of people say that they were marginal at best when cooling a V8. i also looked at several other aluminum radiators, including a few drop-in replacements (Man-a-Fre, Be-Cool, and others), but i was looking for something a) a little bigger, b) cross-flow, and c) with a built-in transmission cooler. The Ron Davis/MAF radiator seemed to be just what i was after.

aluminum_radiator.jpg


new aluminum radiator with aluminum transmission cooler fittings installed

since i had moved my stock radiator forward a couple of inches, and this new radiator was quite a bit bigger, i was worried about it fitting, but it fit like a glove. i the mounting system that the radiator came with is pretty slick, so installation was really easy. the upper radiator mount also came with some support arms that extend out to the firewall. in order to provide a solid mounting point at the correct angles, i decided to use some heim joints and make some custom brackets.

radiator_support_bracket1.jpg


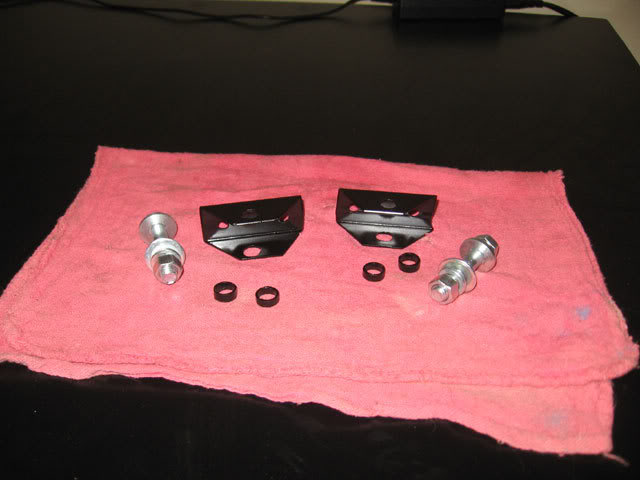
here are the brackets i cut out of some 1" square tubing and the spacers i used to center the heim joint

radiator_support_bracket2.jpg


here are the heim joints i used. they are 3/8" with 3/8" female threads (from McMaster-Carr)

radiator_support_bracket3.jpg


here are the heim joints attached to some threaded rod and to the radiator support arms. by using the threaded rod, the support arms are adjustable in length

radiator_support_bracket4.jpg


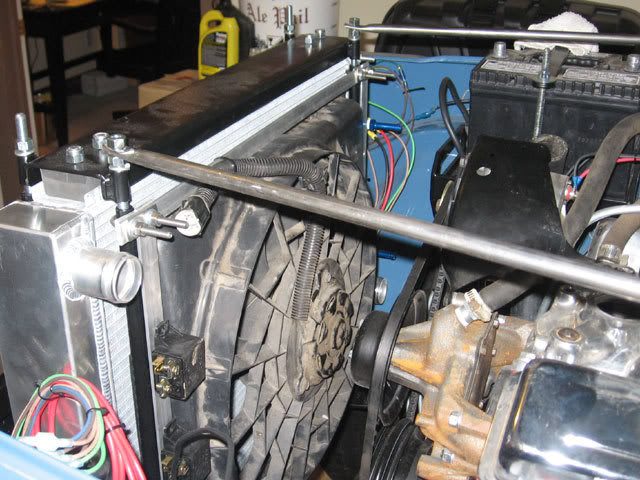
here is a test fitting of the setup. since the heim joint is centered, it is free to move side to side 180&deg; and up and down a total of 24&deg;

radiator_support_bracket5.jpg


here are the brackets after a quick coat of paint

radiator_support_bracket6.jpg


here is the assembled unit, ready to install

radiator_support_bracket7.jpg


here is the finished product installed. you cant tell from this picture, but the arms angle out enough to clear the master cylinder just perfectly

radiator_support_bracket8.jpg


radiator_support_bracket9.jpg


the rest of the finished installation

since the new radiator has the transmission cooler built-in, i decided to modify my existing transmission cooler lines for a cleaner install. i re-bent the lines from the transmission up and around the starter. from there, they follow the same upward curves as the oil pan. i made a bracket that bolts near the mechanical fuel pump that the other end of the hard lines connect to. at that point, they terminate into hose barbs, and then i run rubber flexible hoses from there up to the radiator fittings. this set up keeps the hard lines up and out of the way, and allows some flex/movement of the engine, frame, and radiator.

cooler_lines_bracket.jpg


cooler_lines_bracket3.jpg


cooler_lines_bracket2.jpg


now that the new radiator is in, the next project is the brake lines. after that, just finish up the welding on the steering and it *could* possibly be drivable =)
 
once you start, you cant stop

my dad was coming up the next day to weld the steering components and help finish up a few other things, so i was trying to wrap up everything else. the last thing i wanted to get done was to finish flushing the cooling system. i had flushed it a few times already and this was going to be the final time. i started up the engine and let it run for about 10 minutes. then i turned the key off to shut off the engine and...nothing happened. the motor just kept running as usual. i turned the key back to ON and then OFF again - nothing. i turned it over to the accessory position - nothing. i finally grabbed the coil wire and pulled it off the distributor and the motor died.

after doing some research, i discovered that an internally-regulated distributor will actually feed power back up the exciter wire and keep the coil powered, even when the ignition is off. the fix is to either wire the exciter wire through a dashboard light, or install a diode in the wire - in either case, it only allows the power to flow one-way and solves the problem. so, i made a quick trip to radio shack and picked up a diode and a fuse holder. as i was checking out, the radio shack clerk said 'lemme guess, motor starts but wont turn off when you turn off the key?'. guess i was not the first person to run into this issue =)

diode.jpg


here is the diode i used

diode2.jpg


i bent the diode wires into a spiral to form the rough shape of a fuse

diode3.jpg


once bent up, the diode fit in the fuse holder perfectly

i plugged the fuse holder/diode into the exciter wire, started the engine, switched the key back to OFF, and the motor died - problem solved.
 
steering and brakes

my dad showed up monday evening and was ready to get to work on the welding, so we dived in. first thing was to weld the steering column to the firewall dash support.

steering_column_weld.jpg


next up was welding the actual steering shaft to the u-joint. this was the critical weld, and i think my dad was impressed with the way it turned out.

steering_shaft_weld.jpg


we did a few other miscellaneous things, and finally decided to call it a night at midnight. the next morning, i got all of the welded parts primed and painted while my dad started welding the steering box plates to the frame. there was quite a bit to weld, and some upside-down crazy angles, but in the end, it turned out good and most importantly, strong.

steering_box_weld.jpg


once everything was welded up and painted, we installed the brake pedal and then slid the steering column into place. we had to spend a little time getting the steering wheel adjusted just right so that it was not too compressed against the column, but we finally got it perfect.

steering_complete.jpg


with the steering finished, next up was the brakes. my dad donated his original brake booster that was in much better shape than mine. after some scrubbing with the brillo pad, it looked just like new. we bolted up the new master cylinder (from an fj80 with no ABS) and installed the whole unit. a few days before, i had run the remaining brake lines, so finishing the brakes was as easy as screwing in the two hard lines.

brake_booster.jpg


brake_booster2.jpg


the next thing to complete was the transmission cooler lines. after a quick trip to the parts store for some vacuum hose and transmission cooler hose, we were back at it. the lower bracket that i had made where the hard lines connected to the rubber lines bolted on in a hard-to-get-to spot that took some time to work out, but we finally got it. we put the radiator back in, hooked up the transmission cooler lines and the radiator hoses and crossed that off the list.

cooler_lines2.jpg


cooler_lines.jpg


the only thing left to do before we could test drive it was to bleed the brakes. with my dad and ryan doing most of the dirty work, we did the front two in a matter of minutes and it was on to the back. try after try, no fluid was making it to the calipers. i suspected that maybe something was clogging the lines, but we finally figured out that no fluid was even coming out of the master cylinder for the back brake circuit. we tried everything, but we couldnt get fluid out of it. we finally took a break to come in and eat some pizza and think things over. after dinner, i did some research on the internet and based on that, decided that we needed to 'bench bleed' the master cylinder. so we drained it, took it off, and used some old brake lines and some windshield washer tubing to make a make-shift bleeder kit. with the first long push of the rod, lots of air and then fluid finally came out of the back brake circuit. we finished bench bleeding the master cylinder and then installed it back into the landcruiser. we re-bled the front brakes just in case, and then did the back. they bled fine this time, but now there was a new problem - the lines were leaking at almost every connection. oops - i had installed those almost two years ago and never did tighten them. we tightened them up, but two connections were still leaking. my dad was headed out early the next morning, but i finally decided that we just needed to call it a night.

the next morning i spent some time thinking abou the issues and how to solve them. that afternoon when i finally had the chance to spend some time working on it again, i decided to take the whole back portion of the brake lines off and re-assess everything. ryan helped me by cleaning up the tee fitting and the hose ends, while i made a new bracket to position the tee in a better spot. we re-connected all of the lines to the tee and double checked that everything looked good before installing the whole unit back under the landcruiser. i pumped up the brakes and there were no leaks. we went ahead and re-bled the front brakes and then did the rear. they finally bled properly and with no leaks. at that point, i had power, steering, and brakes - all of the ingredients required to actually drive the thing for the first time.
 
Hey Matt, great build-up... thanks for all of the info and pics. Great to see how you tackled your build issues, you have a very good methodical approach to problem solving.

What part of Whidbey are you living on? I grew up there, just curious.

Cheers,
Gadget
 
I know this is an older thread, but I was wondering where did you get those radiator arm mounts or did you build them yourself....thanx.
 

Users who are viewing this thread

Back
Top Bottom