
Been wanting to post my build here for awhile. Finally getting around to it...
First of all... Where did "BugEater" come from? Well, I'm a Cornhusker (Huskers now) at heart. Back in the early 1900's the Nebraska football team's name was actually the BugEaters. So there you have it. The "BugEater" is set-up for emergency response and recovery on a daily basis. It converts to expedition mode in a few hours time. It likes to play rough occasionally too. I bought it 3 months after they released the FJ-Cruiser. I bought it fully loaded minus the roof rack. I perform all my own work on my rig except for front end alignments.
Just a baby with 200 miles on it...

Here's as she sets today...


Here's a shot of me in front of it. A few of us were featured on Land Cruiser magazine. I got this shot on the day of the photo shoot.

SUSPENSION & DRIVE TRAIN:
ProComp Xtreme Mud Terrains (305/70/17's) on PrComp Wheels
Icon Racing Front Coilovers
OME Heavy Coils in the Rear with Sway-A-Way Racerunner Shocks
Factory Rear Electric locker
Active Traction Control (A-TRAC) - Factory
A-TRAC Hack (Allows use of A-TRAC and Rear Diff Lock at the same time on older FJC's)
VSC Disable Mod
Rear Locker Anytime Mod
ARMOR:
ARB Front Winch Bumper w/Warn CE XD-9000 Winch
Warn Rear Bumper
OEM Rock Rails
All-Pro Skid Plates (Front, Transmission, Transfer Case, and Rear Diff)
Self fabricated rear control arm forward mount armor.
Self fabricated rear control arm armor. (Encase factory control arms in 304 SS tubing.)
Communications:
Kenwood TM-D710 Dual Transceiver Radio w/APRS (GMRS/FRS Capable)
Yaesu FT-857D Multi-Band (2M to 80M) HF Tranceiver w/ATAS-120 Screwdriver Antenna (GMRS/FRS and 11M Capable)
Uniden CB w/Firefly antenna on a Bandi mount
SPOT Messenger
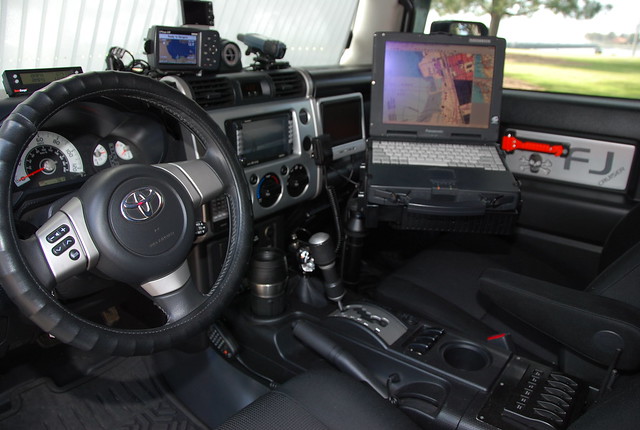
NAVIGATION:
Garmin GPSMap 478 Chartplotter
Garmin GPSMap 60Cx
APRS linked with GPSMap 478 Chartplotter
HP Pavillion Laptop (on RAM Mount) linked with GPSMap 478 Chartplotter for running Delorme 6.0, TOPO 4.0, and Google Earth (when available).
ILLUMINATION
(4 ea) PIAA 510's facing forward on roof rack.
(2 ea) PIAA HID RS800 9-Inch Shock Lamps on Front Bumper
Hella Fog Light on each side of roof rack for side illumination.
(2 ea) Rear facing Hella fog lights for rear illumination.
(6 ea) Peanut lights on undercarriage for rock lights.
Red LED inside dome light conversion for night vision protection.
Hi/Lo HID headlight conversion.
MISCELLANEOUS:
Twin VIAIR 480 Compressor System w/2 Gallon Air Tank
Dirty Parts Dual Battery System
Odyssey PC-1700 MJT Primary Battery
Dual Optima Yellow-Top Batteries for additional juice.
50 Quart ARB Frig-Freeze
10 lb Self Made CO2 System
ARB X-Jack
Molly Rear Cargo Barrier w/Gun Rack
7 Trumpet Train Horn and Alarm System
Blue Sea Lighting Control System controlling all exterior lighting.
ARB Safari Snorkel
Scan-GuageII Engine Monitoring Computer
Oil-less MAF Engine Air Intake Filter
Internal On-Dash Video Camera Mount for awesome action footage.
Self-Fabricated Gear Storage Box (POW-MIA)
First of all... Where did "BugEater" come from? Well, I'm a Cornhusker (Huskers now) at heart. Back in the early 1900's the Nebraska football team's name was actually the BugEaters. So there you have it. The "BugEater" is set-up for emergency response and recovery on a daily basis. It converts to expedition mode in a few hours time. It likes to play rough occasionally too. I bought it 3 months after they released the FJ-Cruiser. I bought it fully loaded minus the roof rack. I perform all my own work on my rig except for front end alignments.
Just a baby with 200 miles on it...
Here's as she sets today...
Here's a shot of me in front of it. A few of us were featured on Land Cruiser magazine. I got this shot on the day of the photo shoot.
SUSPENSION & DRIVE TRAIN:
ProComp Xtreme Mud Terrains (305/70/17's) on PrComp Wheels
Icon Racing Front Coilovers
OME Heavy Coils in the Rear with Sway-A-Way Racerunner Shocks
Factory Rear Electric locker
Active Traction Control (A-TRAC) - Factory
A-TRAC Hack (Allows use of A-TRAC and Rear Diff Lock at the same time on older FJC's)
VSC Disable Mod
Rear Locker Anytime Mod
ARMOR:
ARB Front Winch Bumper w/Warn CE XD-9000 Winch
Warn Rear Bumper
OEM Rock Rails
All-Pro Skid Plates (Front, Transmission, Transfer Case, and Rear Diff)
Self fabricated rear control arm forward mount armor.
Self fabricated rear control arm armor. (Encase factory control arms in 304 SS tubing.)
Communications:
Kenwood TM-D710 Dual Transceiver Radio w/APRS (GMRS/FRS Capable)
Yaesu FT-857D Multi-Band (2M to 80M) HF Tranceiver w/ATAS-120 Screwdriver Antenna (GMRS/FRS and 11M Capable)
Uniden CB w/Firefly antenna on a Bandi mount
SPOT Messenger
NAVIGATION:
Garmin GPSMap 478 Chartplotter
Garmin GPSMap 60Cx
APRS linked with GPSMap 478 Chartplotter
HP Pavillion Laptop (on RAM Mount) linked with GPSMap 478 Chartplotter for running Delorme 6.0, TOPO 4.0, and Google Earth (when available).
ILLUMINATION
(4 ea) PIAA 510's facing forward on roof rack.
(2 ea) PIAA HID RS800 9-Inch Shock Lamps on Front Bumper
Hella Fog Light on each side of roof rack for side illumination.
(2 ea) Rear facing Hella fog lights for rear illumination.
(6 ea) Peanut lights on undercarriage for rock lights.
Red LED inside dome light conversion for night vision protection.
Hi/Lo HID headlight conversion.
MISCELLANEOUS:
Twin VIAIR 480 Compressor System w/2 Gallon Air Tank
Dirty Parts Dual Battery System
Odyssey PC-1700 MJT Primary Battery
Dual Optima Yellow-Top Batteries for additional juice.
50 Quart ARB Frig-Freeze
10 lb Self Made CO2 System
ARB X-Jack
Molly Rear Cargo Barrier w/Gun Rack
7 Trumpet Train Horn and Alarm System
Blue Sea Lighting Control System controlling all exterior lighting.
ARB Safari Snorkel
Scan-GuageII Engine Monitoring Computer
Oil-less MAF Engine Air Intake Filter
Internal On-Dash Video Camera Mount for awesome action footage.
Self-Fabricated Gear Storage Box (POW-MIA)


")


