
Just thought I would share my ScanGauge II installation, using a modified version of Gone Bush Expeditions
Gone Bush Expeditions- Follow Us- Official Blog- Overlanding, Off-Roading, Caravanning, Backpacking, Bushcrafting
The original intent was to install exactly as was done in the above link. This install had the ScanGauge attached to the cupholder insert above the radio. However, a few things happened that caused me to rethink the location.
After having a friend Fab the metal bracket, I noticed that he drilled the hole on the opposite side of the metal faceplate. Not a big deal, but it allowed me to consider mounting the plate from the underside of the cupholder insert vs. the top of it. Either way would work. Unfortunately, the problem with this cupholder insert is that it is pretty flimsy, and they seem to get even more brittle with age. I tried to be careful in removing this plastic insert but I broke the tabs off that clipped it into place.
I started looking online for another cupholder insert, but I got to thinking that since I don't smoke, another location could be to mount it to the ashtray. This actually worked out better because the ashtray is a much more solid platform for the mounting bracket and it is designed to be easily removed and reinstalled as needed.
Upon lining up the metal bracket with the ashtray, it fit perfect when attached from the bottom! In fact, that is the only way it can attach.
So that little mistake my friend made in drilling the hole for the ScanGauge cable on the wrong side of the faceplate, actually worked out better!
The only changes I made to Gone Bush Expedition's install were:
1. Drill hole in metal bracket faceplate on OPPOSITE side (mirror image)
2. Attach bracket upside down, to underside of Ashtray.
3. Modify Ashtray to route cable through to the attached ScanGauge
Here's some pics of my install. Hope it gives another option for people thinking of a removable ScanGauge installation.
http://farm8.staticflickr.com/7142/6697320083_e724ffb6f9_z.jpg
OBD II connection: Remember to re-orient the plug facing down. Remove bottom panels and route wire under dash and through to the ashtray location.
http://farm8.staticflickr.com/7175/6697331817_22769dbd2c_z.jpg
Top of Ashtray: I drilled a hole in the back and front of the ashtray to accommodate the ScanGauge cable. Be careful drilling. Start with a small drill bit and work your way up. Then carefully file to fit the rectangular end of the cable. Otherwise, you risk cracking the tray.
http://farm8.staticflickr.com/7167/6697328001_18f9f4b1a4_z.jpg
Top of Ashtray
http://farm8.staticflickr.com/7167/6697324359_50a0be7778_z.jpg
Bottom of Ashtray: Again, be careful drilling. Start with a small pilot hole then work your way up to the appropriate size of the screw/nut combo.
http://farm8.staticflickr.com/7019/6697315095_97cfc1c272_z.jpg
Drivers Seat View
http://farm8.staticflickr.com/7012/6697309937_fdc9842326_z.jpg
Passenger Seat View
Gone Bush Expeditions- Follow Us- Official Blog- Overlanding, Off-Roading, Caravanning, Backpacking, Bushcrafting
The original intent was to install exactly as was done in the above link. This install had the ScanGauge attached to the cupholder insert above the radio. However, a few things happened that caused me to rethink the location.
After having a friend Fab the metal bracket, I noticed that he drilled the hole on the opposite side of the metal faceplate. Not a big deal, but it allowed me to consider mounting the plate from the underside of the cupholder insert vs. the top of it. Either way would work. Unfortunately, the problem with this cupholder insert is that it is pretty flimsy, and they seem to get even more brittle with age. I tried to be careful in removing this plastic insert but I broke the tabs off that clipped it into place.
I started looking online for another cupholder insert, but I got to thinking that since I don't smoke, another location could be to mount it to the ashtray. This actually worked out better because the ashtray is a much more solid platform for the mounting bracket and it is designed to be easily removed and reinstalled as needed.
Upon lining up the metal bracket with the ashtray, it fit perfect when attached from the bottom! In fact, that is the only way it can attach.
So that little mistake my friend made in drilling the hole for the ScanGauge cable on the wrong side of the faceplate, actually worked out better!
The only changes I made to Gone Bush Expedition's install were:
1. Drill hole in metal bracket faceplate on OPPOSITE side (mirror image)
2. Attach bracket upside down, to underside of Ashtray.
3. Modify Ashtray to route cable through to the attached ScanGauge
Here's some pics of my install. Hope it gives another option for people thinking of a removable ScanGauge installation.
http://farm8.staticflickr.com/7142/6697320083_e724ffb6f9_z.jpg

OBD II connection: Remember to re-orient the plug facing down. Remove bottom panels and route wire under dash and through to the ashtray location.
http://farm8.staticflickr.com/7175/6697331817_22769dbd2c_z.jpg
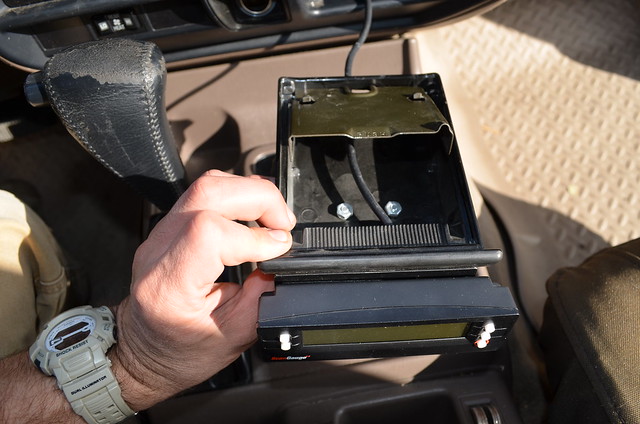
Top of Ashtray: I drilled a hole in the back and front of the ashtray to accommodate the ScanGauge cable. Be careful drilling. Start with a small drill bit and work your way up. Then carefully file to fit the rectangular end of the cable. Otherwise, you risk cracking the tray.
http://farm8.staticflickr.com/7167/6697328001_18f9f4b1a4_z.jpg
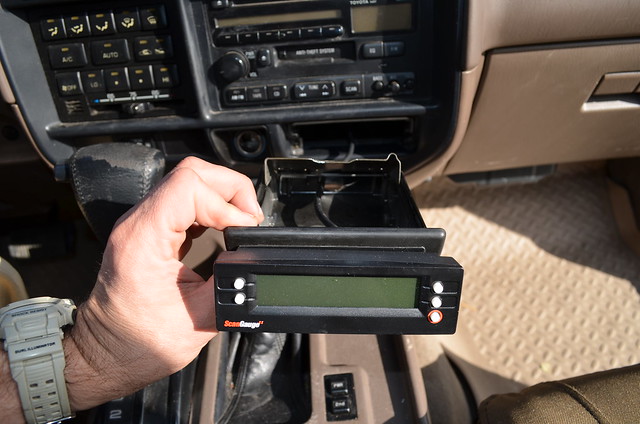
Top of Ashtray
http://farm8.staticflickr.com/7167/6697324359_50a0be7778_z.jpg
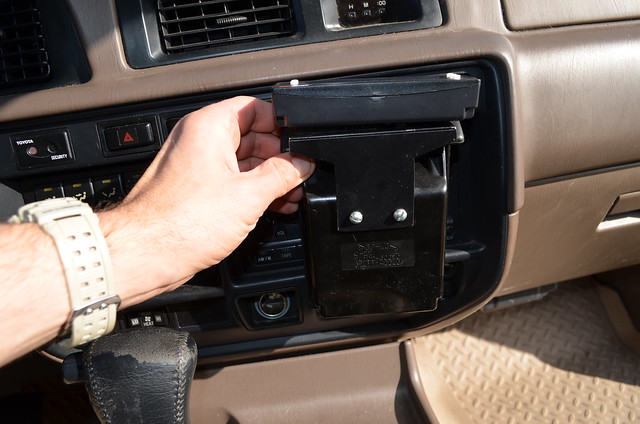
Bottom of Ashtray: Again, be careful drilling. Start with a small pilot hole then work your way up to the appropriate size of the screw/nut combo.
http://farm8.staticflickr.com/7019/6697315095_97cfc1c272_z.jpg
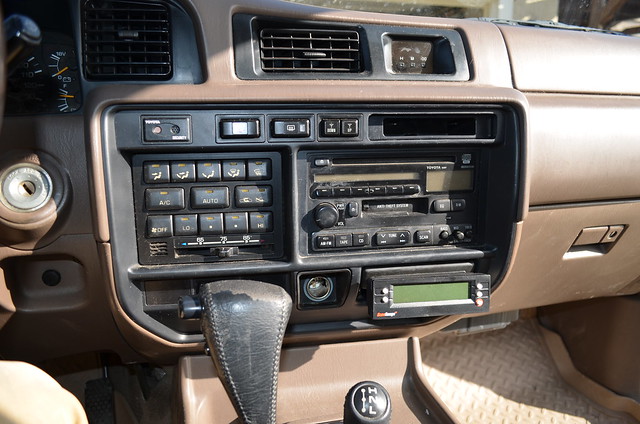
Drivers Seat View
http://farm8.staticflickr.com/7012/6697309937_fdc9842326_z.jpg
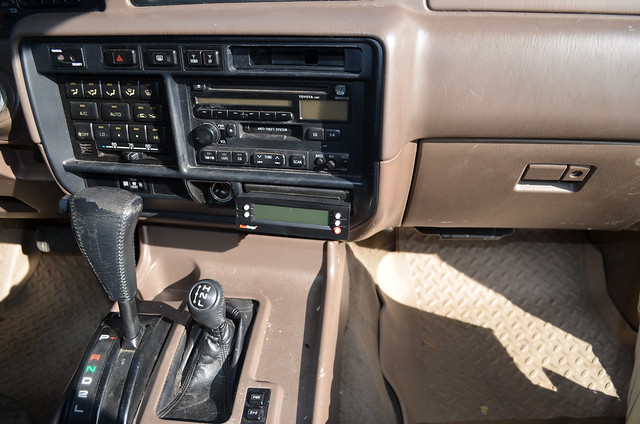
Passenger Seat View

