Nate's HDJ100 Build

This site may earn a commission from merchant affiliate
links, including eBay, Amazon, Skimlinks, and others.

Joined
Nov 23, 2010
Threads
11
Messages
145
Location
Rockhampton, QLD, Aust
Welcome to my latest build thread. I've decided to start a new thread for my new 100 series. The 1HD-FTE powered HDJ100. As some of you may know I've already transferred over a lot of parts from my previous V8 UZJ100 series but for the sake of having it included on this thread, here is a list of the current bits and pieces I've put onto the new cruiser;

Part-time 4X4 kit incl. Free wheeling hubs
Front UCA's
Timbren Bumpstops
King 2.5" remote res. Shocks
ARB Bullbar
ARB Siderails/sidesteps
Slee Rear Bar
Powerful 4x4 Roof rack
Warn 9.5XP Winch
IPF Spotlights
Rear adjustable Panhard Rod
Rear adjustable Lower Control Arms
Safari Snorkel

For the write up, pictures of most of these items being fitted and soon to come, pictures of the V8 after she's been all tidied up and is ready to be put up for sale, check the original "Nate's Down Under Build" thread. The link can be found in my Signature at the bottom of every post.

In comparison to the V8, in short, it's got less get up and go down low, but more pull (extra torque) at higher speeds. I don't notice the extra weight of the diesel engine itself. I'm not sure how much heavier they are than the V8 engine, but with the King Shocks being as stiff as they are, if anything the front suspension is better suited to this vehicle. The power off the line obviously isn't as good as the V8 but at 100km/h it's just as good if not better for overtaking as the extra torque helps it along. The best thing is that given the nature of the turbo diesel, getting extra power is relatively cheap compared to the V8. I've built a straight through 3" exhaust that I'm yet to put on as I'm waiting for the opportunity to run a before and after dyno test which I will post up. But that was done for just over $500. I've picked up a second hand DP chip (new in April 2012) for $600 and down the track I plan on an intercooler upgrade which should be between $500-$1000 depending on what I do there. So all of these mods will take it to well beyond the V8's power for less than the cost of a decent full exhaust system for the V8.

And there's also the massive difference in fuel consumption, with the TD using around 12L/100km (19.6 MPG) fully loaded with roof racks on, compared to 19.5L/100km (12 MPG) in the V8 on the highway and around town it's about 14L/100km (16.8 MPG) compared to 25L/100km (9.4 MPG) respectively.

So in this build thread I'll be posting up a write up and the pending Dyno results for the aforementioned mods. Along with a few new upgrades including;

My 'home-made' Jerry Can holder
New roof lights and wiring
An Eaton E-locker for the rear diff (and possibly front down the track) :hhmm:
And lots of other stuff as I get the money/permission ;)

If there's anything in particular you guys want to know don't hesitate to ask!
 
First cab off the rank is the Jerry Holder. I made this with about $50 worth of steel and the use of the awesome "Fatz Fabrications" workshop thanks to Nathan. It holds three 20L Jerry Cans giving me the ability to carry an extra 60L of fuel or any fuel/water jerry can combo. With the frame bolted up to the first and second ladder rungs I have about a 1.5" gap between it and the tyre, it sits flush with the tyre in terms of rear protrusion and it doesn't come out passed the join between the inside and outside tail light assembly.

Here is a photo, sorry I don't have any close ups of the mounting but you get the idea.

IMG_1257.webp
IMG_1257.webp
 
That jerry can rack wobble much?

Any problems carrying 3 full cans on bad roads?
 
This photo was taken on the test run for the Jerry holder to make sure it would be ok before I tidied it up and painted it. The roads in and out from this beach location are fairly horrendous with a lot of heavy corrugations and some big wash outs. From what I can see through the rear vision mirror and post trip inspection there is little to no movement/vibration when loaded up with the 3 full Jerry cans. I am going to keep an eye on the swing out on future trips but if the Tyre carrier handles the 35" tyre and Hi-Lift jack which together weigh between 55 and 60Kg then I can't see that being a problem.

Here is a photo of the bracket itself.

IMG_1343.webp
IMG_1343.webp
 
OK! So I'm back after a long break, travelling overseas during the Christmas new year period and work is under way on the 100. This morning I took the car into a local workshop, ProDyno, to give it a quick power run to see what power it has standard, with 31" tyres. I have fitted a Boost and EGT gauge inside so I could also make note of the temps and pressures that the car is running as standard as well. Both gauges are VDO brands and I've fitted them into an A-pillar dual pod set up.

RESULTS:
Standard boost on these HDJ100's according to the gauge is 12 PSI which according to the dyno readouts is pretty accurate, they read a peak of 13PSI.

Exhaust Temps during normal operation range anywhere from 150 to 720 degrees celcius. The reason it is higher than you normally hear is because I have fitted the temp probe directly into the exhaust manifold where the EGR pipe would normally be. Cruising at 100km/h the temps will range from 300 to 550 degrees C depending on inclines and declines in the road. With the peak of 720 degrees C achieved whilst under full throttle acceleration from 0 to 140km/h.

I got a few different print outs of the power run on the Dyno but here are the two I thought people would be most interested in following through the upgrade process.

First is the Power in kW and Torque in Nm
The red line was a run we did with the airbox open to see the restriction it was causing. Not for any real reason, just to see. And the flare up on that line was the auto trying to drop back into second gear.

Standard kW and Nm.webp

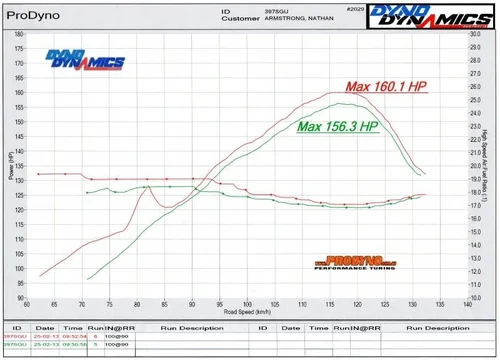
The second one is Power in Hp and the Air Fuel Ratio

Standard Hp and AFR.webp


Basically, my plan is to document all of my major upgrades in order of what people are most likely to do to their HDJ100's and post up the dyno results after each one so you guys can know roughly what to expect from the modifications you're doing on your own cars without necessarily having to go to the effort of running them up on a dyno. So first cab off the rank will be a 3" straight through exhaust that I'll be fitting up this weekend.

Now some feedback would be helpful as to what order you guys think I should carry out the rest of the mods in. In terms of which you would be most likely to do yourselves. My list in order after the 3" exhaust would be as follows;

Upgraded Inter-cooler (HPD)
Performance Chip (ChipIT)
Water-Methanol Injection (AEM)
Turbo Upgrade (Bad Boy Turbo from GBentink)
Upgraded Injectors (Also done by GBentink)
Rebuild the Auto with heavy duty Torque Converter and Valve Body (Wholesale Autos)

So let me know if you would like me to carry out these mods in a different order, if enough people want it differently I'd be happy to re-consider!

Standard kW and Nm.webp


Standard Hp and AFR.webp
 
My list in order after the 3" exhaust would be as follows;

Upgraded Inter-cooler (HPD)
Performance Chip (ChipIT)
Water-Methanol Injection (AEM)
Turbo Upgrade (Bad Boy Turbo from GBentink)
Upgraded Injectors (Also done by GBentink)
Rebuild the Auto with heavy duty Torque Converter and Valve Body (Wholesale Autos)

So let me know if you would like me to carry out these mods in a different order, if enough people want it differently I'd be happy to re-consider!

Have a chat to Graeme first Nathan. I wouldn't be too concerned about what others want you to do, it's more about the appropriate order to install. I did the 3" first, and last month Graeme installed and tuned his chip and boost controller. Luckily being in Perth, I was able to drive around for an hour while he played on his laptop. We have boost cut issues at 18psi, which we havent really sorted yet, but I have been busy. Seems happy at 17psi.

I would guess he would recommend 3" first, intercooler, then get the chip and perhaps turbo, and have the chip setup for those mods. Injectors can come later. He suggested to me that mine are fine, so no point spending money on that bit just yet. He's a mine of information - tap into it!!
 
I would guess he would recommend 3" first, intercooler, then get the chip and perhaps turbo, and have the chip setup for those mods. Injectors can come later. He suggested to me that mine are fine, so no point spending money on that bit just yet. He's a mine of information - tap into it!!


Yeah that's pretty much the order I have it down for, obviously freeing up the system with the exhaust is the main priority then its just a matter of cooling the intake charge to gain the most power possible with the other mods.

I got around to fitting the 3" exhaust last weekend and at the same time I did the air box modification detailed on the LCool forums here http://www.lcool.org/forum/viewtopic.php?t=2191 My 100 has the later model safari snorkel on it which negates the need for the inner guard modifications, I just removed the dust spinner tube section leading into the air box and removed the tin plates in the actual box. But here are some photos comparing the standard exhaust with the new one.

IMG_1900.webp

IMG_1898.webp

IMG_1899.webp

I bought both the dump pipe and the tail pipe that goes over the rear diff, and made up the bit in the middle with no muffler, as every kit I could find came with a reasonably large muffler still in that part. I also modified the rear section by adding a hot dog and 3.5" chrome tip to take the bark out of it and also add a nice finishing touch :cool: as it was just normal pipe right to the end.

IMG_1900.webp


IMG_1898.webp


IMG_1899.webp
 
IMG_1901.webp

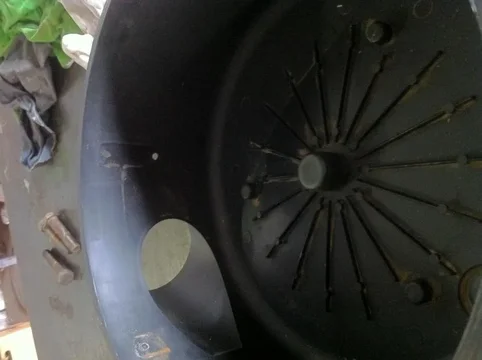
The Air Box mod was fairly simple as well, I just removed the whole lower half of the box to do the work. As it goes through in the Lcool forum thread I just drilled out the rivets, put some bolts with sealant on them back in the holes that go through into the box and fitted it all back in, good as gold! Here are some pictures of the process.

The removal of the tin plates on the inside of the box:

IMG_1903.webp

IMG_1904.webp

IMG_1901.webp


IMG_1903.webp


IMG_1904.webp
 
And the mod to the tube leading into the air box. The orignal pipe just gets replaced with some PVC pipe cut to suit. Then quite a large quantity of silicone to seal her all up! ;)

IMG_1902.webp

IMG_1905.webp

Bolts in the old rivet holes.

IMG_1906.webp

IMG_1902.webp


IMG_1905.webp


IMG_1906.webp
 
THE RESULT!

After carrying out these two mods I've experienced a very noticeable power gain with a lot more response from the turbo and cooler EGT's. The turbo is operating at higher average boost pressures and I've gained about 1 PSI peak boost increase with the more free flowing intake and exhaust set up and it is also holding that boost pressure at a constant 12 PSI where as before it would drop off higher in the rev range. The EGT's are down by about 40 to 50 degrees Celcius across the board with it peaking now at about 670 Degrees C.
This morning I went back into ProDyno to carry out another power run, to see the difference on paper and I was very surprised at the result.

Horsepower and Torque in FtLb's

3inch and Air Box Mod - Hp and FtLb.webp

Kilowatts and Torque in Nm's

3inch and Air Box Mod - kW and Nm.webp

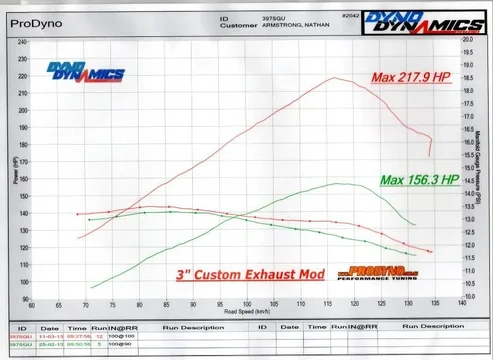
Horsepower and Manifold Air Pressure

3inch and Air Box Mod - Hp and MAP.webp

3inch and Air Box Mod - Hp and FtLb.webp


3inch and Air Box Mod - kW and Nm.webp


3inch and Air Box Mod - Hp and MAP.webp
 
Looking good Nathan! I have removed the intake spinner and boom bottle, but hadn't thought of removing the tin plate inside the airbox.

I am off to Melbourne for the F1 on thursday and am leaving my car with Graeme to see if he can sort out the boost cut problem. When I get back I will be sourcing a 4" intercooler with 3" inlet/outlet and starting to play with a 3" intake.
 
Nate,

Why Chipit and not a chip through Graeme to match the turbo and injectors?

Cheers,
Andrew
 
Looking good Nathan! I have removed the intake spinner and boom bottle, but hadn't thought of removing the tin plate inside the airbox.

I am off to Melbourne for the F1 on thursday.

Yeah Brad at ProDyno mentioned that they remove that inner part as well, makes sense I guess. I'll be at the F1 as well! Who's your money on this year for constructors and drivers champs?

Nate,

Why Chipit and not a chip through Graeme to match the turbo and injectors?

Cheers,
Andrew

Andrew, nothing is locked in yet in regards to the chip. I have to discuss it with Graeme more, but the ProDyno guys in town here sell and tune the ChipIT chips which would make it easy to get set up. However if Graeme's chip is going to be easy enough to tune on a laptop or similar then I would probably lean more towards his. Still up in the air at the moment though.

In the meantime I've got the HPD intercooler which I'll hopefully fit tomorrow and post up results once I've been back to the dyno in another couple of weeks.
Pending the gains I get from that I will then decide whether to fit the Water/Meth injection before the chip, or chip first.
 
Who's your money on this year for constructors and drivers champs?
I reckon I'll stick with RBR for the Constructors, as for Drivers...... I doubt Vettel will do it again, I reckon Alonso will be there at the end, maybe (hopefully) Button and I'd like Webber to get there, we'll see!


In the meantime I've got the HPD intercooler which I'll hopefully fit tomorrow and post up results once I've been back to the dyno in another couple of weeks.

What are the specs of the HPD intercooler? And pricing?
 
Ok so I've had the HPD Intercooler fitted for a couple of weeks now and I went back to ProDyno for another power run to see where we're at... BUT!! It seems, as I'd suspected by the overly high figures, that the dyno was a fair way out of calibration last time I was in there for the power run on the exhaust. Since then they have had the dyno calibrated, Brad apologized for the drama and didn't charge me for today's run.
So unfortunately the figures shown in the last few dyno sheets I put up are not consistent with the real numbers we're getting. Which buggers up my plan a little bit to show everyone what increases you can expect for the different mods, but from here on out, they should be pretty spot on.
All the info on the HPD Front Mount Intercooler Kit I purchased can be found on their site: http://hpdiesel.com.au/toyota-landcruiser/100-series-landcruiser/toyota-landcruiser-100-105-series-intercooler-upgrade

My honest opinion on this kit. The cooler itself is a high quality piece, however the fitting instructions and fasteners supplied to do the job leave a little to be desired. The instructions consist of two A4 pages with a bunch of pictures on them, no written directions at all, and the bolts supplied were barely long enough to be properly secured. So much so that I ended up getting longer bolts to do the job. But, if you've got this information and have longer bolts ready, the fitment is probably a 6 or 7 out of 10 for difficulty to do yourself. Only because you have to do some trimming of the grill to get it to fit nicely.

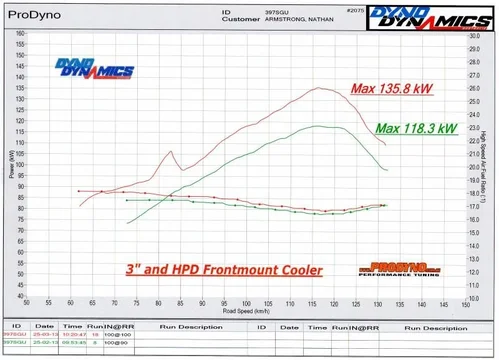
Anyway, onto the results! Now on a recently calibrated dyno. Keep in mind that the standard reading that we are comparing this power run to was probably a little on the high side as well due to the poor calibration of the dyno at the time. The flare up you can see on the red line is just from the Auto trans locking up the Torque Converter.

As for the real world results that I've noticed behind the wheel. The car feels like it has a lot more torque now with the cooler along with the exhaust. The dyno results show we're now at just over 400 Nm or nearly 300 FtLb of torque. With EGT's dropping by about another 30 to 40 degrees Celsius across the board. All in all I'd say the two mods compliment each other well and if you aren't looking for massive power figures but want a bit more grunt and drive-able power then these two upgrades are a good bet. With the both of them costing me roughly $1600 to do, (fitting myself, which saves a bit of money in labour) it's pretty decent bang for your buck in my opinion.

Here is the power in imperial measurements
3 Inch and HPD Intercooler - Hp and FtLb.webp

And in Metric
3 Inch and HPD Intercooler - kW and Nm.webp

And Metric with AFR
3 Inch and HPD Intercooler -kW and AFR.webp

3 Inch and HPD Intercooler - Hp and FtLb.webp


3 Inch and HPD Intercooler - kW and Nm.webp


3 Inch and HPD Intercooler -kW and AFR.webp
 
Nathan, have you done Graemes turbo and chip/injectors yet? I'm yet to dyno mine after my latest mods, but at a guess i''d be saying 160-180kw easily. And superb driveability and fuel economy too, i'm gettig bang on 12l/100km, which gives me a range of 2400km (182L LR tank installed)
 
Janek - I am currently in the process of getting my Turbo, Injectors and Chip through Graeme. I have been busy lately, giving the car a major service/overhaul for its 300,000km service, so once she's all done and dyno tested I'll be posting up the results and what I've done as part of the service.

STAY TUNED! :popcorn:
 
OK. So things may have gotten a little out of hand... :meh:
Firstly, sorry for the long time between updates, life has been a little hectic lately! I'll start with the major service I did for the 300,000km milestone. I wanted to give the 100 a bit of a makeover as part of this service so I did up a list of service items and upgrade items and got to it.

Here is a list of the work I did as part of the service:
* Timing Belt & Tension er
* Fan Belts (A/C & Alternator)
* New Fuel Injector Lines
* Air / Fuel / Oil Filters (along with the engine oil change of course)
* Engine mounts
* Brake Pads & Discs all round
* Braided brake lines and Full brake fluid flush
* Removed intake manifold and cleaned
* Full Automatic Trans system flush with Synthetic oil
* Replaced the seals and shafts in my rear King Shocks
* Steering Rack change out with a new one

And here is the list of parts that I upgraded/modified at the same time. (This is where I went a little overboard.)
* Fuel Injectors - Upgraded to the DC2's from Graeme at GTurbo
* Turbo - Upgraded to the Bad Boy model from GTurbo
* Fitment of a UniChip - Supplied by GTurbo
* Removed the Auto and replaced the Torque Converter and Valve body with Heavy Duty replacements from Wholesale Automatics
* Custom 4" exhaust dump from Turbo
* Larger Intercooler with custom 2.25" piping (Still in the process of finishing)
* Heavy Duty 400Kg Constant Load rear springs
* Oil/Air Separator or Catch Can installation

I'm pretty sure I haven't missed anything! I did most of the work back in June/July but it's taken me this long to get time to write it up. Basically, as it stands now, I've just got to finish off the last of the Intercooler piping. I had it done at Fatz Fabrications in town here but we're just waiting on some more bends to turn up to tidy the last of it up. Then she'll be ready for a "FINAL" dyno test to see what the end result is.

The reason I say that the upgrades got a little out of hand is because I didn't originally plan to upgrade the intercooler again however upon fitting the chip, the intake system was not flowing well enough with the HPD Cooler and the EGT's were climbing too quickly and getting too high. After discussing my options with Graeme from GTurbo I decided to go to a bigger front mount cooler and re-do the plumbing to fix this issue. As it was, with the HPD Cooler I was pushing 240Hp, and now would be the best time to mention that since my last dyno run, I am now running 35" tyres. Once the last of this intercooler plumbing is finished I will switch back to 31's for the dyno run to gain an accurate comparison to the earlier dyno test.

I'll gather together some pictures to go along with the work I've done and load them onto the computer when I get some more free time but for now I just thought I'd post a quick update to let you know where I was at.
 

Users who are viewing this thread

Back
Top Bottom