

King 2.5 front install notes

This site may earn a commission from merchant affiliate
links, including eBay, Amazon, Skimlinks, and others.

I think I read about that possibility. Pics are always good!
I’ll post some tomorrow. It’s nothing crazy but good to go in informed.
 
Second post in this thread shows the PS clearance issue.

For the LCA to strut mounting pocket.. I'd use whatever size socket fits as a spacer then start prying with a pry bar of some type.
 
I think I read about that possibility. Pics are always good!
Passenger side:
IMG_3370.webp
IMG_3371.webp


Drivers side:
IMG_3372.webp


I had a prominent Cruiser shop do my install and they said that these particular brackets were different than what they had seen in the past on other Kings installs. Mine came from Filthy Motorsports so idk if they are unique to them or not. Regardless, this was their solution to the clearance issue.
 
Went to loosen the LCA a bit more to make things easier and discovered both sides rear cam bolts are frozen to the bushings. Soaking with kroil now. If I can’t break them loose with a breaker bar, I’ll try an impact. I’ve already tried a 3lb hammer on the nut side.


IMG_2262.webp
 
Went to loosen the LCA a bit more to make things easier and discovered both sides rear cam bolts are frozen to the bushings. Soaking with kroil now. If I can’t break them loose with a breaker bar, I’ll try an impact. I’ve already tried a 3lb hammer on the nut side.


View attachment 4173175
Bolt side side turned ok?

Edit: never mind.. forgot the bolt side is the rear on these.

If you remove the nut and washers on the front that’ll be your best path to get a penetrating lubricant into the bushing sleeve.
 
Bolt side side turned ok?

Edit: never mind.. forgot the bolt side is the rear on these.

If you remove the nut and washers on the front that’ll be your best path to get a penetrating lubricant into the bushing sleeve.
Just ordered new LCAs. Was on hold forever and then got a new guy who had new guy issues. Silver lining though is it took so long that when I got back in the shop, the kroil had done its thing. Pro tip from @bloc was totally removing the nut and washer. Doing so exposes the v-grooves in the bolt which allow the oil to penetrate down the length of the bolt.

Lesson leaned here is to bust those things loose as PM. Maybe even at oil changes.
 
Just ordered new LCAs. Was on hold forever and then got a new guy who had new guy issues. Silver lining though is it took so long that when I got back in the shop, the kroil had done its thing. Pro tip from @bloc was totally removing the nut and washer. Doing so exposes the v-grooves in the bolt which allow the oil to penetrate down the length of the bolt.

Lesson leaned here is to bust those things loose as PM. Maybe even at oil changes.
Just pull the bolts and put anti-seize on them? I don’t think it needs to be some sort of annual PM
 
Just pull the bolts and put anti-seize on them? I don’t think it needs to be some sort of annual PM
I just had that thought. See my most recent post edit.
 
Yeah.. I wouldn’t be loosening them any more than necessary. You’d basically need an alignment every time.
 
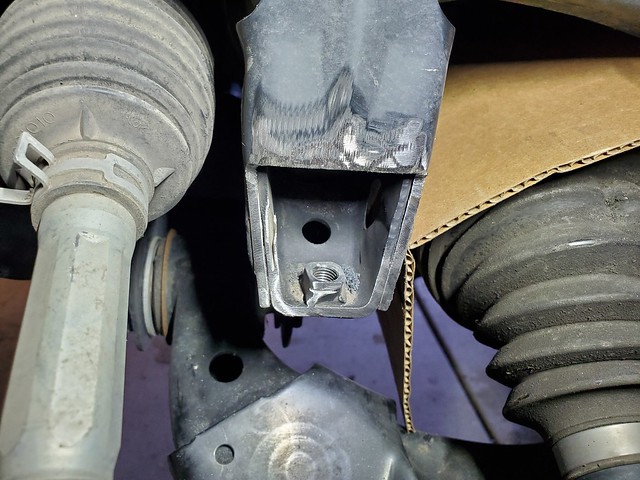
Getting there slowly. Have a little more grinding to do get a little more clearance on the bump stop. Before I pull the shock out to do the grinding I decided to try and see how the reservoir amount would go. It’s not straightforward either. they’ve provided a fancy bracket rather than the hose clamp of the older design, which I think is gonna push up against the KDSS hose I also have to delete the KDSS bracket. they provide a relo KDSS bracket, but it requires a threaded hole in the shock mount which I do not have. I suppose I could drill a hole and tap it or weld in a captive nut or something, but I’m gonna have to ride with an unsupported KDSS hose in the meantime.
IMG_2266.webp
 
Went that route right out of the gate and it made the install relatively easy. There is plenty of metal even after cutting the front of the bump stop housing off. I bet if you left it like that you would not have any issues long term. Probably 45 min per side including cut, grind, cut patch, weld, grind, paint. The Nitro UCAs I installed came with some small diameter slightly extended bump stops that required no trimming. I don't have any pics at full droop but there is now a ton of clearance in this area.
52651892948_8450c0751b_z.jpg

I’m essentially right here. I spent a day trying to get the clearance I need. I was hitting on two coils after I ground the bottom down to the rubber. I inadvertently went through and when I realized how thin I had gotten in the metal, I just took the thin stuff out.

IMG_2290.webp

In the neutral position, I clear with a fair amount of margin, but when I adjust the front to where my original alignment was, it would contact.

I have a timbren bump stop on the rear one which is extended and I don’t even think I ever make contact with that front bump stop so I’m not too worried. I just put a coat of paint on it and we have to leave it alone until Monday so I don’t have time to work on it anymore. I’m running out of time. I gotta get this thing into alignment so I can go to Colorado next week.

Super frustrating as I bet I had that coil over in and out of the truck 10 times and spent an entire day jacking with this.
 
Last edited:
Wow, you had to do a ton more gtinding than I did. I just ground part of the metal off the bottom part that screws into the frame mount.
 
Wow, you had to do a ton more gtinding than I did. I just ground part of the metal off the bottom part that screws into the frame mount.
I was gonna say the same thing. I did have to get into the frame mount but not nearly that much.
 
Finished my install a day or so before COTR. About 2400 total mile trip. Kings performed well. Love the ride. I didn’t mess with adjusting them yet. Kept the initial soft (7 clicks) for the trip. Will play with that some now.
 
Back
Top Bottom