
Vehicle: 2006 LX470
Parts needed:
-Morimoto M-LED projectors https://www.theretrofitsource.com/bi-led-morimoto-m-led-2-headlight-projectors-P-M-LED2?quantity=1
-Morimoto butyl tape https://www.theretrofitsource.com/morimoto-retrorubber-butyl-glue-A-BUTYL?quantity=1
-Some sort of H1 to 9006 adapter (www.amazon.com/Adapter-Conversion-Adapters-Headlight-Retrofit/dp/B0BLC4WGMD/ref=sr_1_14?crid=3E0RAN68B9MTZ&keywords=h1+to+9006&qid=1690033636&sprefix=h1+to+9006%2Caps%2C99&sr=8-14)
-75mm dust covers https://www.theretrofitsource.com/rubber-housing-caps-A-HCAP?quantity=1
-OEM Lexus LX470 headlights approx $700 total (Call local dealer & beg for discount, or check eBay)
-OEM headlamps do not come with bulbs or dust covers FYI. Save your old ones.
-Drop in brackets for M-LED projectors Lexus Lx470 (Low Beam) Brackets - https://lightwerkz.net/products/lexus-lx470-low-beam
-Take your projector brackets to Home Depot specialty hardware section and grab a couple screws, nuts, washers to mock your projector into place. (needed for testing fitting)
Tools needed:
-Oven set at 220 degrees
-Basic hand tools and plastic pry tools
-Latex gloves
-Dremel w/ metal grinding attachments (not needed if using Morimoto Mini D2S, only needed if using M-LED)
-Kitchen table
-Blue loctite
Time needed: 5 hours if prior experience w/ retrofitting and maybe 1-2 days if not.
We used the M-LED projector because it doesn't need bulbs, ballasts, or relay harnesses ( less mess in engine bay). The output is powerful but not too blinding for oncoming traffic (my LX470 is lifted about 2") and the flicker is absolutely brilliant. From a distance at night coming toward you it looks like a Lamborghini Aventator is headed your way. The cutoff/flicker line is a thicc beautiful shade of purple and blues. I have used Morimoto's FXR, mini D2S 4.0 in past projects and the M-LED is my favorite. And since its LED there is not warm up time and low power draw. I used the lightwerkz brackets because they were only $30 on eBay. LB makes these as well and provides excellent support: LX470 Retro-Bracket Kits - https://lbbuiltwerks.com/shop/ols/categories/lx470-retro-bracket-kits
This is a "Bi-Lens" projector. Watch this if your not familiar ( ...https://youtu.be/3-lhk07Suvg... ). Meaning, this projector is your low beam and your highbeam. Your factory high beam is the inside bulb (closest to your main grille). You can remain using it as a factory high beam, leave it unplugged (You wont have DRL), or even retrofit the highbeam with another aftermarket unit (we will revisit this on another thread). For now, your new projector will be your low and highbeams. Note: since the LX470 sends a little power to the highbeam during the daylight while in "Drive", the highbeams illuminates slightly. This can be annoying if you chose to connect the 9005 highbeam directly to the M-LED "highbeam" input because it is enough power to illuminate the M-LED's highbeam mode and you will be driving around in the daytime blasting highbeams. Any electrical experts please leave some feedback for us!
Installation:
-Make space in your oven for a headlamp and set bake for 220-240F.
-Remove the existing headlamps. (Find a good youtube video. ) apprx 15 min.
-Install new lamps, park on level surface and aim them against flat wall at about 30 feet from wall. Remove lamps and go inside.
(I highly recommend doing this. I wrongly assumed Lexus would have aimed brand new lamps from factory but I was WAY wrong. They were pointing in completely different directions unknowingly to me and this led me to trimming my chrome plastic projector shrouds which was probably unnecessary to begin with. Lesson learned.)
-Bake a headlamp for about 15 minutes but before doing so remove everything that can be removed from the lamp: bulbs, dust covers low and high beam, screws on lens, metal clips on lens, and the adjuster mechanism (see pics).
-Technically you do not have to remove the high beams lens covers or clips.
 LED retrofit by
This is the adjuster. It adjust both low and high beams at same time when turning the nut. You do not have to reinstall if you wish to adjust factory low/high beams individually. Only remove my missing screws.
[url=https://flic.kr/p/2oR2Bt3] LED retrofit by
Remove the lamp from oven with your gloves (its gonna be hot) and place in your lamp. Start prying around lens edges with thin plastic pry tools. Work fast. Move around edges of lens creating a couple MMs of gap. The factory glue will give and it is very sticky and stringy. Try not to let it get on the headlamp chrome parts inside because its impossible to remove it. It will give and remove entire low beam lens. Clean the large excess glue from lens and housing. We are going to replace most of it with the new black morimoto glue when done.
Use your fingers and pry the chrome projector shroud from housing.
[url=https://flic.kr/p/2oR1EXS] LED retrofit by
[url=https://flic.kr/p/2oQXFVR] LED retrofit by
[url=https://flic.kr/p/2oR4bD3] LED retrofit by
^^^^ See the upper left and lower right adjusters? Spin the nuts on back side of housing until they release the factory projector.
See that upper right corner weird look swivel adjuster? Remove the two phillips head screws from backside. It is tricky. Go in from back at angle.
[url=https://flic.kr/p/2oQXFCg] LED retrofit by
It will look like this when done. You need to surgically remove that plastic swivel. DO NOT bend or break the metal swivel mount. This will be game over if you do.
[url=https://flic.kr/p/2oR4bA7] LED retrofit by
Time to unbox. Look how much room is in here!
[url=https://flic.kr/p/2oR4btU] LED retrofit by
Size comparisons
[url=https://flic.kr/p/2oR1F2E] LED retrofit by
Take you home depot hardware and mock the projector onto bracket. It wont mount flush so use extra nuts a spacer. NOTE the position of the llightwerks provided plastic new adjuster nuts. NOTE they are inserted from backside.
[url=https://flic.kr/p/2oQXFBQ]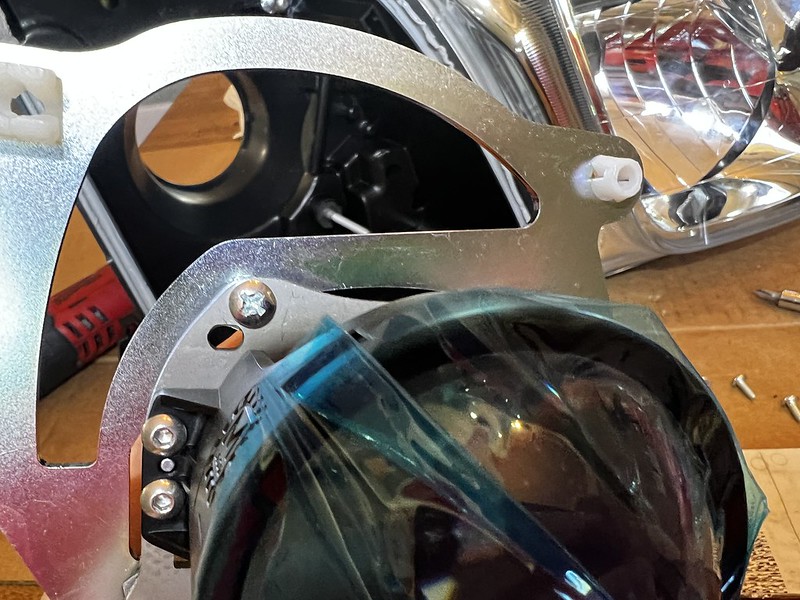 LED retrofit by
Mocking into position using spaced hardware. (Lightwerkz provides the actual hardware we will use in the final mounting)
[url=https://flic.kr/p/2oR1Fav] LED retrofit by
See the upper two tiny torx bolts and how that part of the M-LED projector is hitting the bracket? Were gonna trace that area with a sharpie and and trim it off with dremel. Once you trim it, the projector will fall into place and attach to bracket using the original 4 holes for Projector and bracket.
[url=https://flic.kr/p/2oQXFGp] LED retrofit by
[url=https://flic.kr/p/2oR1F2Q]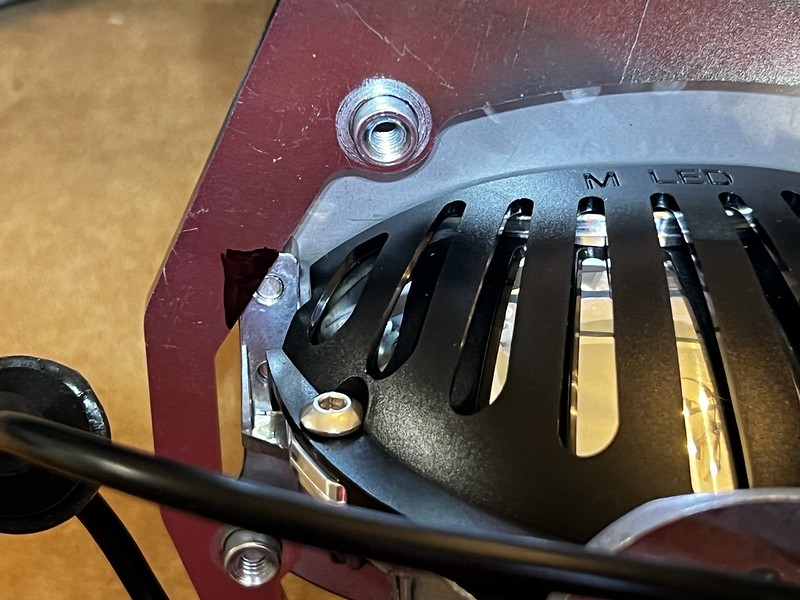 LED retrofit by
[url=https://flic.kr/p/2oR4bxm] LED retrofit by
Trimmed and mounted
[url=https://flic.kr/p/2oR4bx6] LED retrofit by
NOTE again the position of the new white adjuster plastic nuts. Has to be in this configuration.
[url=https://flic.kr/p/2oR3EmX] LED retrofit by
Dont forget loctite!!
Start screwing backside of housing adjuster nuts into position until projector is on. If you aimed your lamps before starting the retrofitting then the chrome shroud should fit over the projector just fine. Keep tightening the adjuster bolts until projector shroud isnt touching the glass lens on the new projector.
[url=https://flic.kr/p/2oR1F8B] LED retrofit by
If your lamps aren't aimed then you will have to do what i did and dremel the plastic chrome shroud until it fits over the projector lens. Trim in small increments. Go slow. Use the round wheel. Constantly test fit and mark your area with sharpie where you want to trim. NOTE any mistakes you make here will be seen when lamps are done. Anyone who walks up to your headlamps will see an imperfections in the chrome shroud.
[url=https://flic.kr/p/2oR4byD] LED retrofit by
SORRY but i did not take photos of the next steps.
-Once your chrome shield fits back over the projector. You're ready to reseal the outer lens back on.
-Take the new black butyl tape. Pinch off about 8". Roll between your fingers and pull it apart. You need like 2" diameter of it to lay in the headlamp lens cracks. Make a complete pass around the lamp with NO BREAKS in the butyl. This is where you make it water tight.
-CLEAN CLEAN CLEAN the inside of your outer lenses. Get all lint and fuzz out now. You wont have another chance.
-Press your outer lens back on firmly. You will not have room to reinstall the clips and screws that hold down the lens UNTIL after its been baked again.
-Place back in over for 15 min.
-Remove and place in lap: press outer lens firmly onto housing. Press firmly until housing and lens are mated enough to reinstall screws and lens clips. This shouldn't be easy. if it is easy you probably don't have enough butyl in the channel. Throw the lamp back in oven it if cools down too much. Idea is to squish hot butyl in the channel and secure with clips while it is hot.
-Reinstall all your lens clips, high beam bulb, screws, and adjusters.
Create a small pass through hole on your new low beam dust covers and run the single wire out the back.
[url=https://flic.kr/p/2oR2BGK] LED retrofit by
SORRY! I did not take pics of installation back into the truck but it is as easy as they came out. Wiring is as below.
-Attached H1 to 9006 adapters on your LX existing engine bay wiring.
-Attach the 9006 end to the LED control unit.
-At this point you can also attached your factory high beams 9005 end to the LED controller. I chose to not do this and use my factory highbeams. The LX leaves the low beams on anyways when using highbeams.
I spent about 2 hours on this post before realizing ih8mud only allows 20 pics. SO click on any of the photos and follow to my FLIKR account for more photos and action shots. Ive been daily driving and using this setup since March 2023. No leaks or failures. Let me know if you have any questions.
Parts needed:
-Morimoto M-LED projectors https://www.theretrofitsource.com/bi-led-morimoto-m-led-2-headlight-projectors-P-M-LED2?quantity=1
-Morimoto butyl tape https://www.theretrofitsource.com/morimoto-retrorubber-butyl-glue-A-BUTYL?quantity=1
-Some sort of H1 to 9006 adapter (www.amazon.com/Adapter-Conversion-Adapters-Headlight-Retrofit/dp/B0BLC4WGMD/ref=sr_1_14?crid=3E0RAN68B9MTZ&keywords=h1+to+9006&qid=1690033636&sprefix=h1+to+9006%2Caps%2C99&sr=8-14)
-75mm dust covers https://www.theretrofitsource.com/rubber-housing-caps-A-HCAP?quantity=1
-OEM Lexus LX470 headlights approx $700 total (Call local dealer & beg for discount, or check eBay)
-OEM headlamps do not come with bulbs or dust covers FYI. Save your old ones.
-Drop in brackets for M-LED projectors Lexus Lx470 (Low Beam) Brackets - https://lightwerkz.net/products/lexus-lx470-low-beam
-Take your projector brackets to Home Depot specialty hardware section and grab a couple screws, nuts, washers to mock your projector into place. (needed for testing fitting)
Tools needed:
-Oven set at 220 degrees
-Basic hand tools and plastic pry tools
-Latex gloves
-Dremel w/ metal grinding attachments (not needed if using Morimoto Mini D2S, only needed if using M-LED)
-Kitchen table
-Blue loctite
Time needed: 5 hours if prior experience w/ retrofitting and maybe 1-2 days if not.
We used the M-LED projector because it doesn't need bulbs, ballasts, or relay harnesses ( less mess in engine bay). The output is powerful but not too blinding for oncoming traffic (my LX470 is lifted about 2") and the flicker is absolutely brilliant. From a distance at night coming toward you it looks like a Lamborghini Aventator is headed your way. The cutoff/flicker line is a thicc beautiful shade of purple and blues. I have used Morimoto's FXR, mini D2S 4.0 in past projects and the M-LED is my favorite. And since its LED there is not warm up time and low power draw. I used the lightwerkz brackets because they were only $30 on eBay. LB makes these as well and provides excellent support: LX470 Retro-Bracket Kits - https://lbbuiltwerks.com/shop/ols/categories/lx470-retro-bracket-kits
This is a "Bi-Lens" projector. Watch this if your not familiar ( ...https://youtu.be/3-lhk07Suvg... ). Meaning, this projector is your low beam and your highbeam. Your factory high beam is the inside bulb (closest to your main grille). You can remain using it as a factory high beam, leave it unplugged (You wont have DRL), or even retrofit the highbeam with another aftermarket unit (we will revisit this on another thread). For now, your new projector will be your low and highbeams. Note: since the LX470 sends a little power to the highbeam during the daylight while in "Drive", the highbeams illuminates slightly. This can be annoying if you chose to connect the 9005 highbeam directly to the M-LED "highbeam" input because it is enough power to illuminate the M-LED's highbeam mode and you will be driving around in the daytime blasting highbeams. Any electrical experts please leave some feedback for us!
Installation:
-Make space in your oven for a headlamp and set bake for 220-240F.
-Remove the existing headlamps. (Find a good youtube video. ) apprx 15 min.
-Install new lamps, park on level surface and aim them against flat wall at about 30 feet from wall. Remove lamps and go inside.
(I highly recommend doing this. I wrongly assumed Lexus would have aimed brand new lamps from factory but I was WAY wrong. They were pointing in completely different directions unknowingly to me and this led me to trimming my chrome plastic projector shrouds which was probably unnecessary to begin with. Lesson learned.)
-Bake a headlamp for about 15 minutes but before doing so remove everything that can be removed from the lamp: bulbs, dust covers low and high beam, screws on lens, metal clips on lens, and the adjuster mechanism (see pics).
-Technically you do not have to remove the high beams lens covers or clips.
LED retrofit by This is the adjuster. It adjust both low and high beams at same time when turning the nut. You do not have to reinstall if you wish to adjust factory low/high beams individually. Only remove my missing screws.
[url=https://flic.kr/p/2oR2Bt3]
LED retrofit by Remove the lamp from oven with your gloves (its gonna be hot) and place in your lamp. Start prying around lens edges with thin plastic pry tools. Work fast. Move around edges of lens creating a couple MMs of gap. The factory glue will give and it is very sticky and stringy. Try not to let it get on the headlamp chrome parts inside because its impossible to remove it. It will give and remove entire low beam lens. Clean the large excess glue from lens and housing. We are going to replace most of it with the new black morimoto glue when done.
Use your fingers and pry the chrome projector shroud from housing.
[url=https://flic.kr/p/2oR1EXS]
LED retrofit by [url=https://flic.kr/p/2oQXFVR]
LED retrofit by [url=https://flic.kr/p/2oR4bD3]
LED retrofit by ^^^^ See the upper left and lower right adjusters? Spin the nuts on back side of housing until they release the factory projector.
See that upper right corner weird look swivel adjuster? Remove the two phillips head screws from backside. It is tricky. Go in from back at angle.
[url=https://flic.kr/p/2oQXFCg]
LED retrofit by It will look like this when done. You need to surgically remove that plastic swivel. DO NOT bend or break the metal swivel mount. This will be game over if you do.
[url=https://flic.kr/p/2oR4bA7]
LED retrofit by Time to unbox. Look how much room is in here!
[url=https://flic.kr/p/2oR4btU]
LED retrofit by Size comparisons
[url=https://flic.kr/p/2oR1F2E]
LED retrofit by Take you home depot hardware and mock the projector onto bracket. It wont mount flush so use extra nuts a spacer. NOTE the position of the llightwerks provided plastic new adjuster nuts. NOTE they are inserted from backside.
[url=https://flic.kr/p/2oQXFBQ]
LED retrofit by Mocking into position using spaced hardware. (Lightwerkz provides the actual hardware we will use in the final mounting)
[url=https://flic.kr/p/2oR1Fav]
LED retrofit by See the upper two tiny torx bolts and how that part of the M-LED projector is hitting the bracket? Were gonna trace that area with a sharpie and and trim it off with dremel. Once you trim it, the projector will fall into place and attach to bracket using the original 4 holes for Projector and bracket.
[url=https://flic.kr/p/2oQXFGp]
LED retrofit by [url=https://flic.kr/p/2oR1F2Q]
LED retrofit by [url=https://flic.kr/p/2oR4bxm]
LED retrofit by Trimmed and mounted
[url=https://flic.kr/p/2oR4bx6]
LED retrofit by NOTE again the position of the new white adjuster plastic nuts. Has to be in this configuration.
[url=https://flic.kr/p/2oR3EmX]
LED retrofit by Dont forget loctite!!
Start screwing backside of housing adjuster nuts into position until projector is on. If you aimed your lamps before starting the retrofitting then the chrome shroud should fit over the projector just fine. Keep tightening the adjuster bolts until projector shroud isnt touching the glass lens on the new projector.
[url=https://flic.kr/p/2oR1F8B]
LED retrofit by If your lamps aren't aimed then you will have to do what i did and dremel the plastic chrome shroud until it fits over the projector lens. Trim in small increments. Go slow. Use the round wheel. Constantly test fit and mark your area with sharpie where you want to trim. NOTE any mistakes you make here will be seen when lamps are done. Anyone who walks up to your headlamps will see an imperfections in the chrome shroud.
[url=https://flic.kr/p/2oR4byD]
LED retrofit by SORRY but i did not take photos of the next steps.
-Once your chrome shield fits back over the projector. You're ready to reseal the outer lens back on.
-Take the new black butyl tape. Pinch off about 8". Roll between your fingers and pull it apart. You need like 2" diameter of it to lay in the headlamp lens cracks. Make a complete pass around the lamp with NO BREAKS in the butyl. This is where you make it water tight.
-CLEAN CLEAN CLEAN the inside of your outer lenses. Get all lint and fuzz out now. You wont have another chance.
-Press your outer lens back on firmly. You will not have room to reinstall the clips and screws that hold down the lens UNTIL after its been baked again.
-Place back in over for 15 min.
-Remove and place in lap: press outer lens firmly onto housing. Press firmly until housing and lens are mated enough to reinstall screws and lens clips. This shouldn't be easy. if it is easy you probably don't have enough butyl in the channel. Throw the lamp back in oven it if cools down too much. Idea is to squish hot butyl in the channel and secure with clips while it is hot.
-Reinstall all your lens clips, high beam bulb, screws, and adjusters.
Create a small pass through hole on your new low beam dust covers and run the single wire out the back.
[url=https://flic.kr/p/2oR2BGK]
LED retrofit by SORRY! I did not take pics of installation back into the truck but it is as easy as they came out. Wiring is as below.
-Attached H1 to 9006 adapters on your LX existing engine bay wiring.
-Attach the 9006 end to the LED control unit.
-At this point you can also attached your factory high beams 9005 end to the LED controller. I chose to not do this and use my factory highbeams. The LX leaves the low beams on anyways when using highbeams.
I spent about 2 hours on this post before realizing ih8mud only allows 20 pics. SO click on any of the photos and follow to my FLIKR account for more photos and action shots. Ive been daily driving and using this setup since March 2023. No leaks or failures. Let me know if you have any questions.