
i find PLA + to be pretty strong, where PETG has a little more flexibility. but PLA is terrible with any heat so that might compromise it in a hot car interior. PETG handles the heat good.I used Matte Black PLA: https://www.amazon.com/gp/product/B089S2QDHD/?tag=ihco-20
I should have used PETG, it would be stronger. If I print it again, I'll use PETG. Love that stuff and prints great on my Creality K1 Max.
Navigation
Install the app
How to install the app on iOS
Follow along with the video below to see how to install our site as a web app on your home screen.
Note: This feature may not be available in some browsers.
More options
Style variation
You are using an out of date browser. It may not display this or other websites correctly.
You should upgrade or use an alternative browser.
You should upgrade or use an alternative browser.
Best phone mount and location GX 460
- Thread starter skey44
- Start date
This site may earn a commission from merchant affiliate
links, including eBay, Amazon, Skimlinks, and others.
Heat... Exactly why I chose PETG over PLA. Even though I have the Ecru interior, we sometimes do Death Valley and other deserts and my rig doesn't fit in our garage, so it's out 24/7/365.i find PLA + to be pretty strong, where PETG has a little more flexibility. but PLA is terrible with any heat so that might compromise it in a hot car interior. PETG handles the heat good.
Yeah, it is kind of flexy, but it doesn't snap and break as easy.
Also, PETG is very near in price to PLA and I have it dialed in on my Creality K1 Max.

For those looking for a no drill option for the 2022-2023 GX's, the Ohana Rig Supply Dash Mount dropped a month or two back. I just received mine a few weeks ago and just got around to installing it.


The dash panel has two rubber bumper supports that thread into the panel from underneath and rest on the dash to provide lateral support.


Installation only took about 20 minutes, and was certainly not complicated.
The dash panel has two rubber bumper supports that thread into the panel from underneath and rest on the dash to provide lateral support.
Installation only took about 20 minutes, and was certainly not complicated.
I actually like how the ORS dash panel hides behind the navigation. It gives the setup a clean look.
(Front view looking through the windshield).
-01.webp")
I only have two minor gripes about the ORS dash panel.
First, the center speaker cover/grill snaps back down over the top of the ORS mounting panel. Because of the tight clearance of the speaker cover, with the ORS panel installed, it doesn't lay down completely flat as it did previously. You can see the cover sticking up in the rear, underneath of the panel if you look closely.
My second gripe has to do with the spacing of the threaded mounting holes closest to the windshield. The four mounting holes are not all perfectly spaced apart. You can mount a AMPS plate w/ diagonal spacing (like the 67 Designs Diamond Plate Alternative) on the left or right side, but the spacing in the middle is not the same. If you want to mount something in the center of the mount, you'll have to go about it differently. I'm not sure if this was a defect or not, but is a minor annoyance.
.webp")
I went with 67 Designs on everything but the phone mount itself. I like that they are 100% American made and, so far, have been impressed with the quality.
No mounting bolts or hardware were included to mount the 67 Designs Diamond Plate Alternative 20mm ball mounts, and I wanted a cleaner look than the typical socket head cap screws, so I ordered some flanged button head screws in black oxide from McMaster-Carr. (M6x1.00 x 10 Part # 92137A525). The width of the flange on the screws is perfect size for the 67 Designs mounts, and looks like they were made for each other.

For the phone mount itself, I went with the Hondo Garage mount as mentioned here and elsewhere. So far I really like it. It's likely way over built for the task, but I like how secure the device/s are when mounted. Since I was already planning to use flanged button head screws for the 67 Designs mounts, I wanted all the hardware to match and found some 10-32 x 3/8 flanged button head scews in black oxide (Part # 91355A076) for the Hondo Garage phone mount as well.
.webp")

Overall, I'm pleased with the way it turned out. At some point I will likely grab another Hondo Garage mount with the built in wireless charger to use in the driver position, and move the standard mount over to the passenger side for my wife to use. The 67 Designs arm pictured above is their "small" arm, which is listed at 6.5" and is just about the perfect length for this setup.
(Front view looking through the windshield).
I only have two minor gripes about the ORS dash panel.
First, the center speaker cover/grill snaps back down over the top of the ORS mounting panel. Because of the tight clearance of the speaker cover, with the ORS panel installed, it doesn't lay down completely flat as it did previously. You can see the cover sticking up in the rear, underneath of the panel if you look closely.
My second gripe has to do with the spacing of the threaded mounting holes closest to the windshield. The four mounting holes are not all perfectly spaced apart. You can mount a AMPS plate w/ diagonal spacing (like the 67 Designs Diamond Plate Alternative) on the left or right side, but the spacing in the middle is not the same. If you want to mount something in the center of the mount, you'll have to go about it differently. I'm not sure if this was a defect or not, but is a minor annoyance.
I went with 67 Designs on everything but the phone mount itself. I like that they are 100% American made and, so far, have been impressed with the quality.
No mounting bolts or hardware were included to mount the 67 Designs Diamond Plate Alternative 20mm ball mounts, and I wanted a cleaner look than the typical socket head cap screws, so I ordered some flanged button head screws in black oxide from McMaster-Carr. (M6x1.00 x 10 Part # 92137A525). The width of the flange on the screws is perfect size for the 67 Designs mounts, and looks like they were made for each other.
For the phone mount itself, I went with the Hondo Garage mount as mentioned here and elsewhere. So far I really like it. It's likely way over built for the task, but I like how secure the device/s are when mounted. Since I was already planning to use flanged button head screws for the 67 Designs mounts, I wanted all the hardware to match and found some 10-32 x 3/8 flanged button head scews in black oxide (Part # 91355A076) for the Hondo Garage phone mount as well.
Overall, I'm pleased with the way it turned out. At some point I will likely grab another Hondo Garage mount with the built in wireless charger to use in the driver position, and move the standard mount over to the passenger side for my wife to use. The 67 Designs arm pictured above is their "small" arm, which is listed at 6.5" and is just about the perfect length for this setup.
First of all, looks great!
Can you please upload manual of how to install it?
Does it require entire console disassembly like for 2021 and pre models?
Their site has only video manual for 2021 and earlier models.
Thank you!
Can you please upload manual of how to install it?
Does it require entire console disassembly like for 2021 and pre models?
Their site has only video manual for 2021 and earlier models.
Thank you!
Great photos, BTW. Very clean looking. Still confused about how the "tray" is mounted to the dash without drilling through the dash. How is it held in place?
I'll have to check and see if I still have the installation paperwork somewhere. It's basically identical to the 2010-2021 models, with the only difference being two extra 10mm bolts (8 total bolts vs 6 on the 2021 and previous models) located behind the navigation assembly, directly to the left and right of the nav screen. On the installation paperwork they link "How to remove the radio for Lexus GX" by Beat-Sonic.First of all, looks great!
Can you please upload manual of how to install it?
Does it require entire console disassembly like for 2021 and pre models?
Their site has only video manual for 2021 and earlier models.
Thank you!
Here's the link to the YouTube video included on the install paperwork:
How to remove the radio for Lexus GX
Basically, just remove the leather/nuluxe covered side pieces from the center console (I didn't even need tools to do so as it was pretty simple to pop them off).
Once you've done that, you unscrew the shifter knob and pull the boot up to clear. You can then pull up on the shifter bezel/panel to get it free of the center console. Underneath there are five (I think) connections you'll have to carefully disconnect from the shifter bezel/panel assembly, which allows you to remove it entirely.
After that, you'll pop the push to start button/bezel off to gain access to the bolts on the left side of the navigation assembly. On the opposite side, you'll pop off the leather/nuluxe covered trim panel located above the glove box to gain access to the bolts on the right side.
There are two 10mm bolts on the left and right of the nav screen, just behind the nav assembly. Two more 10mm bolts per side are roughly halfway up the nav assembly on the left and right side. The final two 10mm bolts are on the bottom of the nav assembly, where the center console and nav assembly meet. You'll see those after removing the shifter panel/bezel.
The bolts on the right/passenger side are the easiest. The left side bolts are a little more difficult with the steering wheel in the way. Using a swivel joint socket extension made that portion much easier.
Really shouldn't take more than 20 minutes or so with the right tools.
Thank you so much for detailed explanation. Yes, I have seen that video and glad that it works for 22+ as well.
Also thank you for mentioning about 2 extra bolts.
I will install this panel together with front camera (Beat-Sonic CS11A Lexus Front Camera Interface - https://www.beatsonicusa.com/cs11a.html) so I will kill two birds with one stone.
The ORS dash panel is actually comprised of two different panels. I was able to snag some pictures tonight to show the lower panel that actually mounts to the vehicle.Great photos, BTW. Very clean looking. Still confused about how the "tray" is mounted to the dash without drilling through the dash. How is it held in place?
You can see in this picture below that there are two "arms" that reach down into the speaker cover hole. The retaining tabs/clips of the speaker cover are what keep the front portion of the panel in place. In the rear (closest to the nav screen) there is another arm with square portion machined into the arm. This square portion slides over a large square piece located behind the navigation panel where the male tab/clip on the navigation assembly snaps in. (I'll drop a picture from ORS website showing this square portion of the panel below my picture).
This is from ORS website. You can see the rear arm with the square cutout located on the bottom panel.
Once the bottom panel is installed, you simply bolt the top panel in place with the (4) M6 screws, and your all set.
Hopefully this clears it up a bit.
Have you tried Gaia on carplay?
Do you need to completely wrap your car in tinfoil, conspiracy, and shame to have it work properly?
How do you like now that you have some months with it? Its the one I'm looking, so your experience would be helpfulGot the OffRoam mount today. Shipping took a few days to arrive, pretty quick. The packaging is very nice. Everything has its own box and a little kit with a wedge tool and Allen key are included.
All components are aluminum and the fit/finish is quite impressive for the price point. I paid more for my Tacoma setup and the arm components were all plastic.
Took 2 minutes to install. Solid and easy setup. This is exactly what I’ve been looking for.
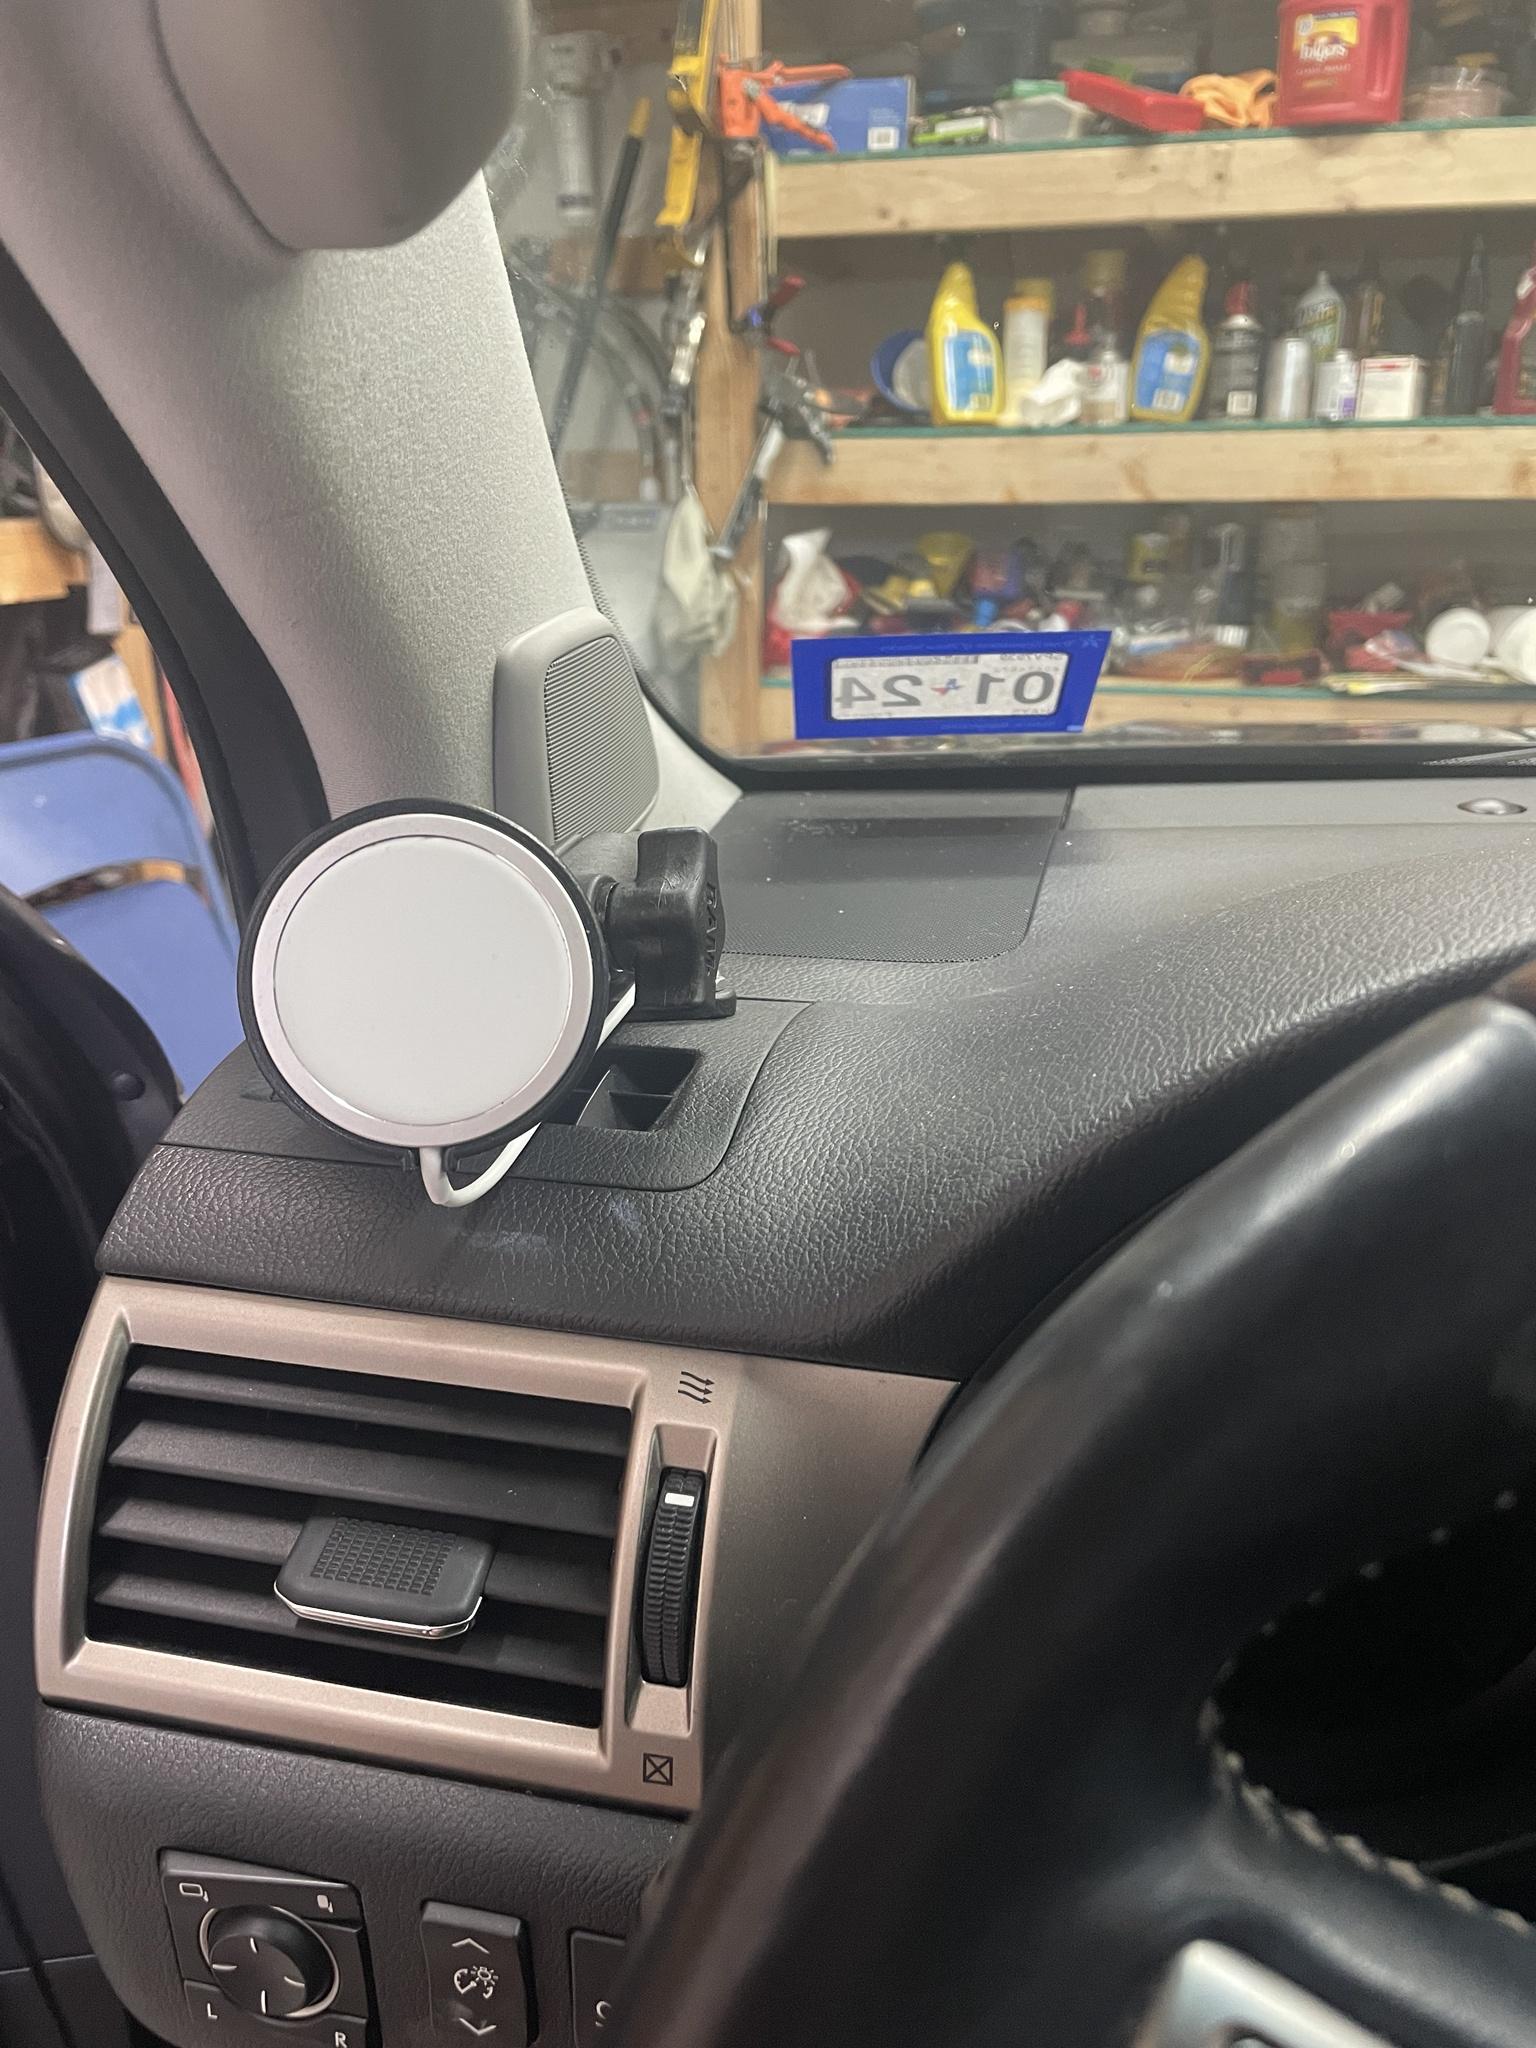
Mounted the OffRoam mount today and am pretty happy with the fit. Holds phone up and away from the vent and doesn't impede function of the vent or the flow of air. Threaded the cable down behind the trim and connected to the USB outlet from the beatsonic carplay unit under the console. I went with the magsafe holder and love the ease of use and it seems secure enough. Will find out on next trip to the beach!

I wanted to update this now that I have been on some very rough terrain with this setup. I really thought I’d need the ram spider mount but this thing held up great the last two days. Very rough terrain and hard bumps and it stuck great. I do use a case that has a metal kickstand to help the charger hold it but it performed perfectly.I use a MagSafe charger in a ram mount. Wouldn’t hold off-road but I have a spider mount I can swap for that. For daily use, this is great. I like this location because wireless charging in Texas summers is tough but the vent keeps the phone cool.

My case is like this.
I like that case, thanks for the link! I just have a cheapo version with the magsafe built in. I imagine that kickstand provides a better magnetic connection.
It definitely does and after almost a year the kickstand still closes well and doesn’t flop around like some do.I like that case, thanks for the link! I just have a cheapo version with the magsafe built in. I imagine that kickstand provides a better magnetic connection.
Mounted the OffRoam mount today and am pretty happy with the fit. Holds phone up and away from the vent and doesn't impede function of the vent or the flow of air. Threaded the cable down behind the trim and connected to the USB outlet from the beatsonic carplay unit under the console. I went with the magsafe holder and love the ease of use and it seems secure enough. Will find out on next trip to the beach!
View attachment 3701157
Hi,
I'm confused. You say you mount the the offroam, AND the magsafe. They're 2 different mounts, arent they? Or did you use parts from two different mounts. Can you explain please? Also, how does the offroam attach to the vehicle. Does the set screw dig into the trims plastic?
This is the version I got. It's a combo of their mount which mounts to the top of your air vent and a qi-charging magsafe holder. You can just get the mount and attach any other type of ball-mounted holder.Hi,
I'm confused. You say you mount the the offroam, AND the magsafe. They're 2 different mounts, arent they? Or did you use parts from two different mounts. Can you explain please? Also, how does the offroam attach to the vehicle. Does the set screw dig into the trims plastic?
The mount attaches by a clamp. You push the top trim back a bit for it to attach before clamping it in place. It's pretty seamless, no drilling or gluing.
They should be paying me to advertise!
never mind - got all the answers to the questions I askedThis is the version I got. It's a combo of their mount which mounts to the top of your air vent and a qi-charging magsafe holder. You can just get the mount and attach any other type of ball-mounted holder.
The mount attaches by a clamp. You push the top trim back a bit for it to attach before clamping it in place. It's pretty seamless, no drilling or gluing.
They should be paying me to advertise!
Last edited:
no worries.thanks - can you explain "push the top trim back a bit"? or is it in the instructions, or is there a video? I really like the offroam and 99% going to get it
Also, where does the magsafe come in to play, or is the Qi2 the magsafe? Sorry for my confusion
The kit comes with a small trim tool and there are instructions on how to push back the trim. It's the junction between the hard plastic above the vent and the soft plastic of the dash. You are just pushing the soft plastic back a bit for the clip to clip onto the hard plastic edge. It's less of a deal than it sounds, take all of 5 seconds to accomplish and is detailed in the instructions.
The magsafe is the system used by iPhone 12 and higher to magnetically secure to magsafe holders. The Qi2 is the wireless charging system. So the holder I got is both magsafe and Qi charging.
Thanks! I actually found the answers just now. I wonder if any magnetic case wireless charging compatible would workno worries.
The kit comes with a small trim tool and there are instructions on how to push back the trim. It's the junction between the hard plastic above the vent and the soft plastic of the dash. You are just pushing the soft plastic back a bit for the clip to clip onto the hard plastic edge. It's less of a deal than it sounds, take all of 5 seconds to accomplish and is detailed in the instructions.
The magsafe is the system used by iPhone 12 and higher to magnetically secure to magsafe holders. The Qi2 is the wireless charging system. So the holder I got is both magsafe and Qi charging.