



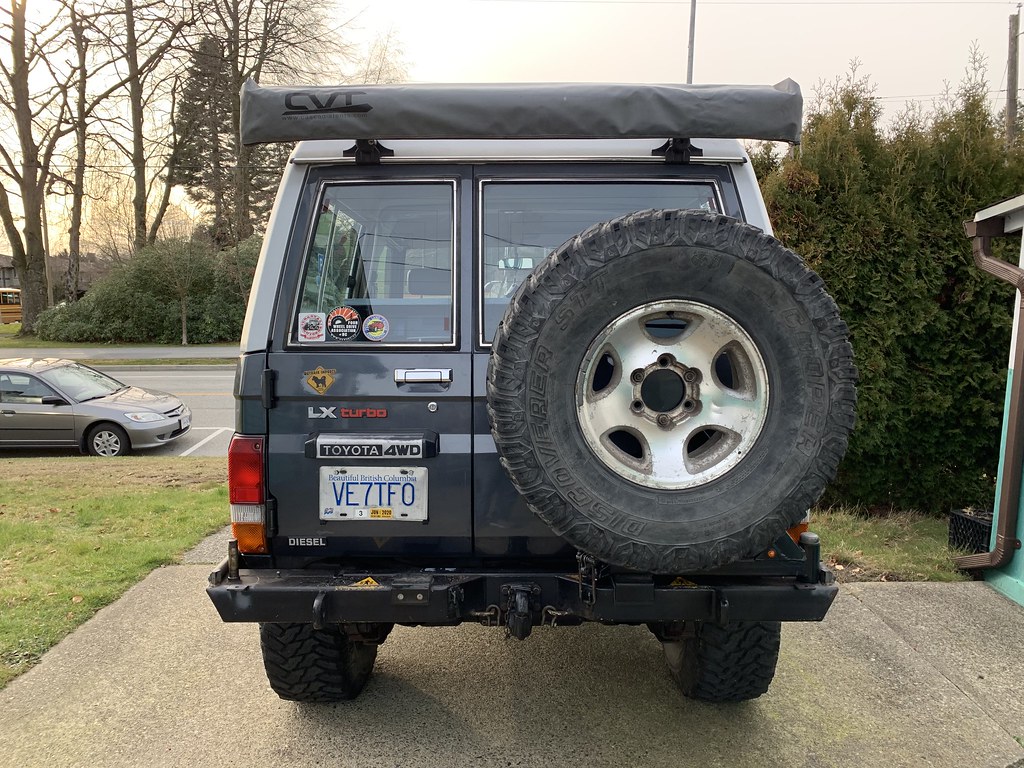
Not sure if this has been asked before but where did you get that top from . Looks like it fits very nicelyHere is where I'm at now. Functioning half doors! Even have the license plate light working. Ha-ha, coppers.
View attachment 3944255
View attachment 3944256
View attachment 3944257
Navigation
Install the app
How to install the app on iOS
Follow along with the video below to see how to install our site as a web app on your home screen.
Note: This feature may not be available in some browsers.
More options
Style variation
You are using an out of date browser. It may not display this or other websites correctly.
You should upgrade or use an alternative browser.
You should upgrade or use an alternative browser.
Build 97 HZJ73
- Thread starter Guyute
- Start date
Member Builds and Stories
This site may earn a commission from merchant affiliate
links, including eBay, Amazon, Skimlinks, and others.


- Thread starter
- #142
Hey Joe!Not sure if this has been asked before but where did you get that top from . Looks like it fits very nicely
It's from Andre, in Portugal. Fit and build are great and he was super easy to work with.
CAPOTAS | Terrazul - https://www.terrazul.pt/
- Thread starter
- #143
@Guyute
I was very unsuccessful at removing the brackets from the frame, without snapping off the bolts.
Mine look like various versions of this.
Before, with the bracket attached to the frame with the two bolts:
View attachment 4036703
After with the bracket off. Bolts sheared off due to the harsh winters with lots of salty roads
View attachment 4036702
Did you have an easy or hard time, getting the bolts out? I’ve had zero luck. Any advice?
These are the only bolts I had issues with >
LHS -
RHS
@LDRF - I pulled a set of steps off my HZJ77 way back. Used some of those bits/bob for this project...so have a mixed box of 73/77 brackets I'll likely never use. They look to be in a little better shape than yours. DM me if you're in need and we can work something out. Each bracket has a little different angle to the dangle but believe the front three are the same 77 to 73.

Your underneath is significantly cleaner than mine. My bits and bobs are rusty but usable. Most, if not all of the rivets that held the aluminum step to the brackets have corroded away. Every bolt but a few that attach the step to the side brackets broke off.

To get at the inner/outer rockers, I’ve had to take of the side brackets. The bolts broke as seen in my prev post. I figure I’ll just drill out the bolts and re-tap them, and just rivet the steps, through the top to the brackets. It will be a fun day when I do that. Your offer is an excellent one … so thanks, but I’m going to use what I have, as it’s still repairable without too much work. My biggest challenge is removing the broken bolts from the inside frame rails so I can bolt the assembly back on.
To get at the inner/outer rockers, I’ve had to take of the side brackets. The bolts broke as seen in my prev post. I figure I’ll just drill out the bolts and re-tap them, and just rivet the steps, through the top to the brackets. It will be a fun day when I do that. Your offer is an excellent one … so thanks, but I’m going to use what I have, as it’s still repairable without too much work. My biggest challenge is removing the broken bolts from the inside frame rails so I can bolt the assembly back on.
- Thread starter
- #145
Finished the door and quarter panel sound deadening project over the weekend. It was a slow process and LHS (passenger) door was the last to do. Not sure if I'll do the floors or not. It still has all the factory stuffs in good condition. Seals are all new now so it's pretty damn quiet compared to my 77. The doors don't sound tinny when you close them now. That always bugged me so that was mostly my goal. My hands and arms look like I reached into a barrel of feral cats. Sharp AF edges inside the doors!
Don't think it's ever been un-vapor barrier.


Thud. Makes a huge difference.

Replaced all the window runs

Out with the oldish in with the new

Guess I do still have the FRP sliding windows seals to do. Have all new stuff already but the originals are in pretty decent shape and I'm super afraid of taking them out AND getting them back in.
Don't think it's ever been un-vapor barrier.
Thud. Makes a huge difference.
Replaced all the window runs
Out with the oldish in with the new
Guess I do still have the FRP sliding windows seals to do. Have all new stuff already but the originals are in pretty decent shape and I'm super afraid of taking them out AND getting them back in.
- Thread starter
- #146
Pulled the top and installed the back half doors in mid-May. Reminded me that I have some work to do on that silly project.
These are Prado doors. Had pulled one window frame then just cut the the other last year.

Easier this way >

The hole left behind

Ran them all last summer like this. Open for all the world to see the gooey insides.

Got a wild hair to just JB Weld TF out of them. Thought I'd fill the gaps with JB, grind, then do some bondo over it, then maybe high-fill primer, and DIY paint them with aerosol Dupli-Color 045 and clear. Cheap and easy. They only see sunny days and have them on for just 4 months if we are lucky here.

Good enough for who it's for or whatever.
TBC
These are Prado doors. Had pulled one window frame then just cut the the other last year.
Easier this way >
The hole left behind
Ran them all last summer like this. Open for all the world to see the gooey insides.
Got a wild hair to just JB Weld TF out of them. Thought I'd fill the gaps with JB, grind, then do some bondo over it, then maybe high-fill primer, and DIY paint them with aerosol Dupli-Color 045 and clear. Cheap and easy. They only see sunny days and have them on for just 4 months if we are lucky here.
Good enough for who it's for or whatever.
TBC
- Thread starter
- #147
Think it will be cheaper and easier (on me) to now drop them off at a Maaco or small body shop and let them bondo, sand, paint. What a pain in the messy a$$. But you can't into the hole anymore.


- Thread starter
- #148
Summer flew by here! Last topless hoorah beer a couple weeks ago...

... then a few more beers and buddies and the FRP was back on.

Then I promptly stripped the Prado half doors and dropped them off at a small body shop. Picked them up last week. Stoked.


... then a few more beers and buddies and the FRP was back on.
Then I promptly stripped the Prado half doors and dropped them off at a small body shop. Picked them up last week. Stoked.
- Thread starter
- #149
Built out the1/2 doors over the weekend. Had some new hardware for them but ended up swapping the new stuff onto the full doors. Then used the ultrasonic cleaner doo-dad on the '73 hardware for these. They turned out good. Wish I wasn't packing them away for winter.


- Thread starter
- #150
Question and opinions wanted on the emblems.
I bought the aftermarket ZX badge. 3D printed and it's okay. These are NLA, correct?
Is there an all adhesive Toyota Sombrero badge in the correct size available? No holes for pins on these Prado doors.
Diesel badge was on the Prado doors when I bought them. Stock? It's angled and was in this location.
Anyone know somewhere to grab the load kg sticker in the states? Don't have a need to order from Japan/UAE right now.
All that said... thought on this badging approach?
Here is what I have on-hand placed.

Here is the full size door

The Toyoya badge I have is tiny. Not sure where it came from and the door doesn't have holes for clips.

I bought the aftermarket ZX badge. 3D printed and it's okay. These are NLA, correct?
Is there an all adhesive Toyota Sombrero badge in the correct size available? No holes for pins on these Prado doors.
Diesel badge was on the Prado doors when I bought them. Stock? It's angled and was in this location.
Anyone know somewhere to grab the load kg sticker in the states? Don't have a need to order from Japan/UAE right now.
All that said... thought on this badging approach?
Here is what I have on-hand placed.
Here is the full size door
The Toyoya badge I have is tiny. Not sure where it came from and the door doesn't have holes for clips.

So much to respond to here. That license plate holder/adapter is  . I think that diesel badge in that location is correct, but uncertain. Further research required. I feel like one of @janyyc trucks has it there... maybe. Can offer no help on the ZX badge. Or the flaccid sombrero, except if it was me, I'd ditch the sombrero. Sorry, no help at all; the half doors look great though!
. I think that diesel badge in that location is correct, but uncertain. Further research required. I feel like one of @janyyc trucks has it there... maybe. Can offer no help on the ZX badge. Or the flaccid sombrero, except if it was me, I'd ditch the sombrero. Sorry, no help at all; the half doors look great though! 
I believe the diesel badge goes where your load sticker is on the full door.
My BJ74, but just looked at pics of friends' 73s and that's how they were too, with the load sticker to the right of the badge.
Love the half doors!
My BJ74, but just looked at pics of friends' 73s and that's how they were too, with the load sticker to the right of the badge.
Love the half doors!
- Thread starter
- #153
Ahh. Thank you both! Google image search was showing a metric sh1t ton of emblem configurations. I do like the Diesel badge on the lower left of the tiny door.
Got itchy and placed an order from that sketchy VintageTEQ guy for the 400kg sticker. See if it shows. Figure I have 8 months of rain before the 1/2 doors come out again so there is time to FAFO.
Hoped a Camry/Corolla/4Runner Sombrero emblem was the same size. They look way larger though. Like twice the size so I also placed a Tosshin order on the correct part number (75441-16290). I'll try trimming the mounting posts off and go with just adhesive.
Looks like the schematic also shows the Diesel badge/ load sticker in those locations. Duh. Should have looked there sooner.

Silencers showed up yesterday at my local dealership. That is not 7X part number... trimmed it a bit. So that's done now.

May paint the AL panels grey. Funny how I went from feeling like the hacked down Prado doors in a different color with gaping holes and non working parts was fine for summer mode to whatever I am now about the doors. But... they do pull the entire room togther.

Got itchy and placed an order from that sketchy VintageTEQ guy for the 400kg sticker. See if it shows. Figure I have 8 months of rain before the 1/2 doors come out again so there is time to FAFO.
Hoped a Camry/Corolla/4Runner Sombrero emblem was the same size. They look way larger though. Like twice the size so I also placed a Tosshin order on the correct part number (75441-16290). I'll try trimming the mounting posts off and go with just adhesive.
Looks like the schematic also shows the Diesel badge/ load sticker in those locations. Duh. Should have looked there sooner.
Silencers showed up yesterday at my local dealership. That is not 7X part number... trimmed it a bit. So that's done now.
May paint the AL panels grey. Funny how I went from feeling like the hacked down Prado doors in a different color with gaping holes and non working parts was fine for summer mode to whatever I am now about the doors. But... they do pull the entire room togther.