Rods 65 FJ 40 thread (1 Viewer)

This site may earn a commission from merchant affiliate
links, including eBay, Amazon, Skimlinks, and others.

Icantdive55

SILVER Star
Joined
Nov 26, 2006
Threads
27
Messages
439
Location
N. Calif. Redding
With the groups blessing I would like to start a rebuild thread on my 65 FJ 40. I've had it for a few years now and my intentions are to keep it as stock as possible (read "as $$ allow"). All the inforamtion on this side of MUD is what I need. Pics to follow if the group lets in another 40.

Rod
 
Maybe we'll have to get the section changed to 25's and early 40's. ;) Be glad to have it as long as you understand we don't have the traffic of the other sections and we're mostly labelled as "purists" although I'm liking "old school" although I think it that means sometime in the 80's or 90's to some people................ :lol:
 
Thanks for the welcome.

The purist or Old School is exactly why I want to post here. If I do something in my restoration that isn't stock I want to know and I think this is the best place to find out.

A little history if I may. My Dad purchased the familys first LC in 66 or 67. It was a used 45 wagon from Deal N Davy in Susanville CA. We had it until my brother talked him into trading it in for a 72 40. Ya I know, I would love to have that rig now. Anyone know where it's at? The plate was TOG 774. In 75 I bought a used 72 40 for myself,wrecked it around 82. Fixed it and then sold it for a 76 55 in the late 80's. Sold that and now I have my project. Wish I still had the 45 the 55 and my 65 but oh well.

This is how the project came home

66LC1.jpg
66LC2.jpg
66LC3.jpg

Now I'll have to figure out how to upload more than 3 pics. I bought a star yesterday just for that reason.

I've already gained a wealth of information from some of you here and am looking foreward to the rest of the project.
66LC1.jpg
66LC2.jpg
66LC3.jpg
 
How she looks now

Current photos

I still have motor mounted to the frame. it's a great place to store it for now.
Frame 2.jpg
Frame 3.jpg

I put the tub on a Poor mans rotisserie for some body work. Besides having a 1/2" of bondo on one corner the PO drilled over 100 holes. 3 of them were to mount a 3 point Roll bar to the frame. It has the typical rust but I don't think it's too bad for a 65. The 3 holes have been filled and I'm working on the rust now.
Tub 6.jpg

Thanks for looking.

Rod
Frame 2.jpg
Frame 3.jpg
Tub 6.jpg
 
Windshield Frame

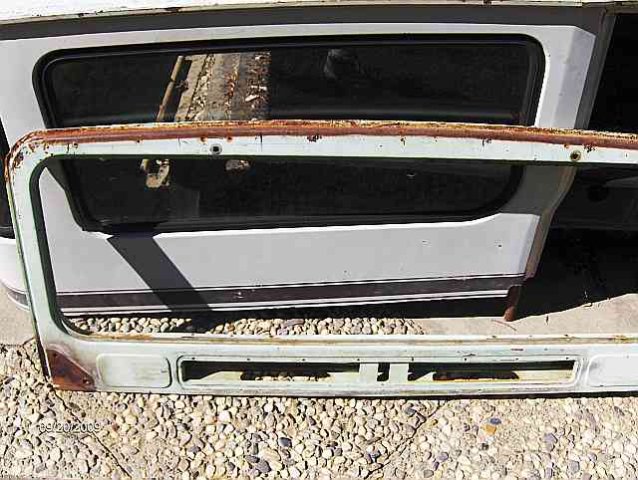
Observant eyes mentioned to me in a different thread that my top (newer) didn't fit the windshield frame correctly. So I went and got the frame out of the shed and took some pics. It amazes me how observant some of you are! I will get a Paki Top to complete this rig so I may not do much to repair the current top. But just in case, ANY ideas on how to get a good fit would be nice.

No holes in the frame to bolt the top to. I won't be drilling any either so what ever I come up with have to work around that.
WS Frame 2.jpg

The top was cut away in the corners and notched for the wipers.
Hard Top WS rail 2.jpg
Hard Top WS rail 1.jpg

This top was never attached to the rig. I set in place to tow it home. I think that the PO bought it and tried to get a fit. He told me that it wasn't very good and may not work. I thought I had it figured out when I did a little body alingment but never checked it out. Eventually it will have a PAki top so I may just have trading material here. We'll see.

Rod
Hard Top WS rail 1.jpg
WS Frame 2.jpg
Hard Top WS rail 2.jpg
 
Filling holes

Thought I would try my luck a filing a hole creatd by the PO. I read on one of the sites about using a washer so I went to the store and bought some the same thickness as the tub steel and with as small a hole in the center as possible.
Filling hole 2.jpg
I put a small magnet underneath, set it in place and welded it in very slowly.
filling hole 1.jpg
All in all I think it came out OK. What method do you use to fill holes. Most of mine arn't this big
filling holes 3.jpg

Rod
Filling hole 2.jpg
filling hole 1.jpg
filling holes 3.jpg
 
Weld nuts

During the disassembly several bolts twisted off inside the weld nuts. I looked all over for the correct one to replace them. All I could find were the ones from McMaster Car. I took a grinder to them to get a better OE look. Any one have a source for the real thing?
weld nuts.jpg

I also need a few of the captured weld nuts that are around the tranny hump. No pic of those.

Rod
weld nuts.jpg
 
Great lookin' project! I'll be keeping an eye on it.;)
 
Color Questions

Year of vehicle is early 65. Feb/March.

On my rig i noticed that the turn signals were the same color as the body so were the rear bumpers. I thought that is was a P/O think but i now know it's the correct way. But what about under the hood, body color or balck. And what about in the cab, seat frames and fuel tank.

Rod
 
under hood and front of cowl is black. seat frames pewter and fuel tank same as body color
 
During the disassembly several bolts twisted off inside the weld nut Any one have a source for the real thing?

I also need a few of the captured weld nuts that are around the tranny hump. No pic of those.

Rod

I've used the nut-serts (pop rivet type). Not having the proper installing tool I tacked them on the exposed collar and compressed them with a regular bolt. :hillbilly:

The captured nuts around the tranny hump are regular nuts in a welded on cage, you can open the cage and slip in a new nut.
 
Small update

Thanks for the replies. Having the fuel tank the same color as the body will be nice. I'll be able to paint it the Spring Green I think it was originally and if I don't like it, choose a different color for the tub.

I will have to look into the nut serts, sounds like a way to go. When I was removing my tranny hump I used an air ratchet and it made a pretzel out of a couple of the captured weld nuts. I found these at McMaster Carr.
LC 0022.jpg

I also tried my luck at recreating one of the ribs for a rusted area of the wheel well. Used the techniques learned in a thread elsewhere in MUD. (sorry not sure how to link that here). Not to bad but I think I'll have another go at it to see if I can make it a little narrower. I used sheet metal that is 1/16 in thick and it is tough to hammer. I may have to go a little less than 1/16 to get the look I want. Has anyone esle tried the hammer and chisel/brick bolster method and have any other helpful hints. I only used a chisel but that darn thing took me SEVERAL hours to make! My hands are sore! :crybaby:

Rod
LC 0022.jpg
 

Users who are viewing this thread

Back
Top Bottom