OEM Subtank Retrofit/Install Project With Pics & Part Numbers
EDIT>> Sunvisor modifications added 4/7/08, pics and details are at the bottom of this first post #1.
There are several dozen posts here related to the 80 Series non-USA factory subtank system. After reading all the posts on existing hybrid installs and the debates
about whether or not our trucks were wired for an OEM system, I decided to investigate this further. I began searching for a tank, dual filler neck and transfer pump, thinking OEM would be the easiest (and I am a vintage kinda guy.) Last July (2007) while bidding on a subtank transfer pump on eBay Oz, the Seller also had listed a little metal box called a fuel transfer ECU. I emailed him and he replied from the top of a Ranger station tower somewhere in the Australian Outback to tell me that this little box held all the brains for the OEM subtank transfer system. Oooo, that sounded nifty. So I asked him where it connected and he pointed me to look behind the driver’s side rear cargo interior panel and sure enough there it was, a connector. The project had begun.
As a result of obtainng the ECU, I contracted Subtank-itis over the past 8 months. I have sent dozens of emails, begged for scans and photos and sifted through hundreds of part numbers in my quest. I have accumulated numerous photos and wiring diagrams from Canada, France, the UK, Japan and Australia. I think I probably have EVERY OEM and aftermarket wiring diagram ever published for this system, petrol or diesel, from 1991 through 1997. (Some of them aren’t entirely accurate actually.) And as medicine for Subtank-itis I managed to obtain my very own personal copy of the Toyota MicroCat electronic parts catalogue (which is the coolest Cruiser accessory on the planet, bar none.) And with that I was able to compare my truck to those built with subtanks and subsequently nail down the required parts to do this 100% OEM.
Credits…
Thanks to all of you who have corresponded with me over the last year about this; you know who you are. Special thanks to Dave Stedman (IH8Mud member Japan4X4 and owner of Japan 4X4) for patiently supplying all the non-USA parts. If you need parts from overseas, I highly recommend Dave (sales@japan4x4.com.) Also thanks to Dan Busey (Mud member CDan/American Toyota) for providing some parts but more importantly some subtle, “sage” advice (like to not use a Sawzall to cut the main gas tank supply pipe.) And a special thanks to my new long distance friend Steve in Adelaide, Australia. I won his eBay auction for the subtank and little did he know that he was subsequently adopting me. He babysat me through making comparisons between our trucks so I could figure out if this was even possible. He even undertook a partial disassembly of his truck to answer some key questions. The global reach of the Cruiser community is just unbelievable.
Okay, enough of that crap…
OEM Subtank 101
Prior to January 1995, non-USA petrol trucks used logic in a stand-alone ECU to control the fuel transfer system. From January 1995 onward, that logic was programmed into the main truck ECU. However, neither the transfer logic nor the correct pin-outs are present in the USA ECU. Therefore, I reverted back to the pre-January 1995, non-USA OEM wiring diagram as the basis for my install. Ironically, in the case of my 1997 truck, the rear harness is wired for BOTH internal and external ECU configurations. Gotta love Mr. T.
System Highlights:
- The tank, transfer pump, solenoid and fuel transfer ECU all use the existing wiring in the USA truck from the driver’s kick panel back, no modifications necessary, EXCEPT, the existing USA sub-harness between the main fuel tank sender/pump and the truck (connecting under the driver side passenger door) is replaced by a new non-USA OEM sub harness. This new sub-harness not only contains the wiring for the main tank pump/sender, but also includes connections for the transfer pump/solenoid and main tank level switch.
- This system uses all Toyota parts including subtank, dual filler neck/hoses, fuel transfer pump/solenoid, main tank level switch, fuel transfer ECU, dash switch and the non-USA tank harness with both main fuel pump AND subtank connections.
- The system is connected into the truck’s Data Link Connector circuit to enable OEM diagnostics. I even found the section of the non-USA FSM that explains how to use the DLC to decode the ECU’s diagnostic signals (finding that was better than the Christmas morning when I got a Red Ryder BB gun.) By jumpering the DLC under the hood, the ECU sends intermittent flashes to the light in the dash switch in case of a fault.
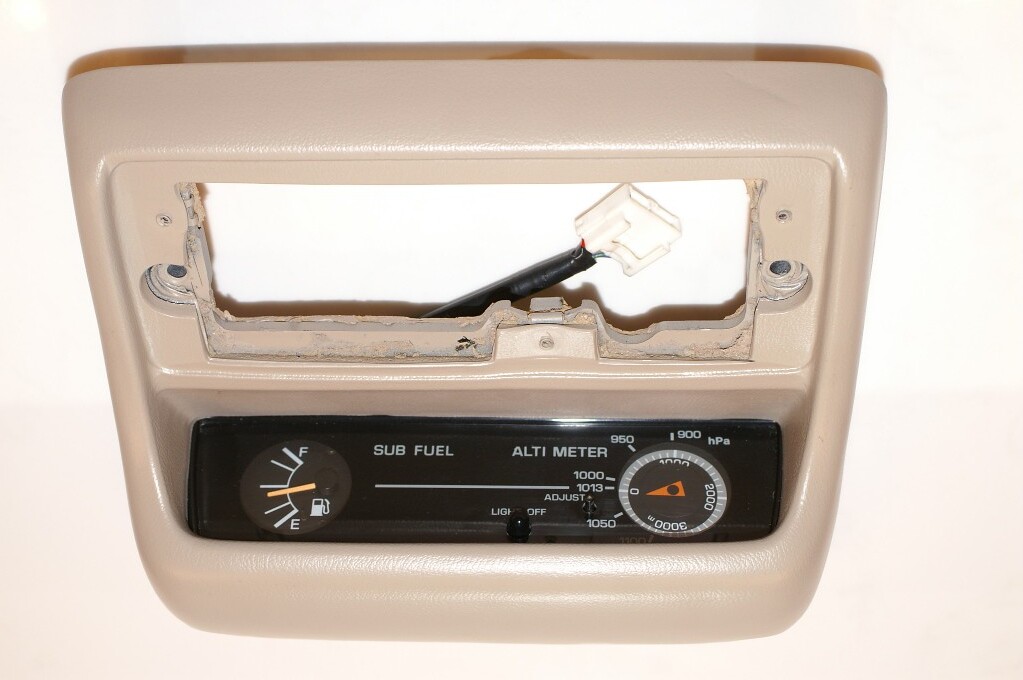
- The OEM wiring harness is also now in place for the overhead console with gauge and altimeter, to be installed shortly.
Above I mention something called a “main tank level switch.” USA trucks are NOT fitted with this switch. The switch is installed in the top of the main tank on a flat boss adjacent to the main fuel pump bracket (that you access through the oval access panel under the middle seats.) This switch tells the ECU if the tank is above or below 75% full. If it is above, no transfer permitted. If it is below, it will permit a transfer until the main tank is back to 75%, then it shuts off automatically. To retrofit this switch involves either having an Oz or Japanese main tank from a subtank truck sent over, or in this case, dropping the main tank and having a hole cut in the tank and a bung/mounting ring welded on in which to mount the new switch. It then mounts with threaded OEM screws just like the subtank fuel sender. Not a big deal if you have a gas tank repair shop nearby (and I have the local machine shop ready to make more weld-on bung rings if needed.) The subtank system supplies fuel to the main tank via a fill pipe that passes through the non-USA main tank fuel pump bracket. This bracket bolts right into the USA main tank using the existing fuel pump and sending float.
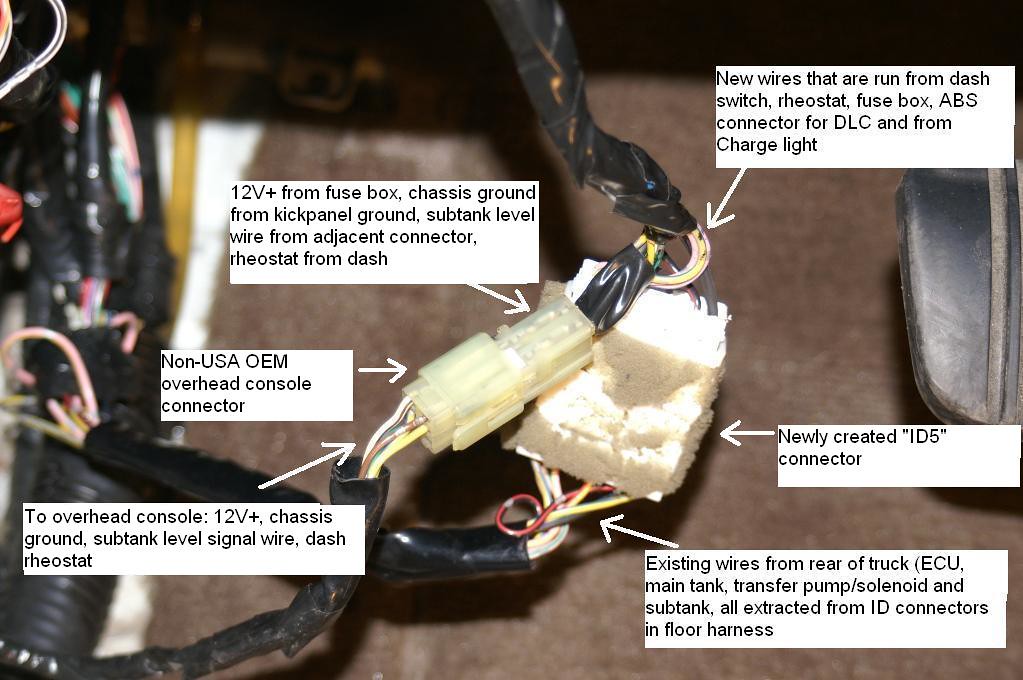
Wiring for the subtank sender, transfer pump assembly and ECU all travel forward in the floor harness up to the kick panel where the harness terminates in two open connectors. After separating the 6 or 7 required wires from the existing connectors I grouped them together into their own connector. Into that connector I brought power, switching from the dash switch, the DLC wire and the signal wire to the overhead console. So the only fundamental difference from a factory assembly-line install is this small amount of wiring to bring the switch and power into the floor harness. All of those connections use OEM Toyota connectors supplied by CDan, American Toyota. I even sourced a USA 80 Series wiring harness from a wreck so I could maintain color consistency with the dash switch and power source wiring up front to the circuits in the back.
My overhead console is installed using an OEM harness that came with the console from Oz. Beige/tan consoles are very rare in salvage yards and I am not sure you can still get them from Toyota either. So I sprayed my used gray Oz console using Toyota Oak 42-colored spray dye from Classic Dye Products and it matches perfectly and looks brand new. Their stuff is OEM grade and awesome. There were very few 80s produced outside the USA with sable/beige/oak interiors. As a result, beige visors and consoles are impossible to find in overseas salvage. There are over 200 part numbers for 80 Series visors in my EPC and no matter what we order, they all show up gray, even the ones with tan color suffixes. So the sable/beige/oak visors are no more from what I can tell, though I am now checking South America. So until I stumble across a set, I modified mine by removing the "wing" portion that interferes with console. Pics below.
I am embarrassed to say how many hours I have in reading, researching, comparing and gathering everything together to make this work. I am not much of a wiring guy (or at least I wasn’t before this) so it took me a while to grasp it all. Fortunately, this system is a circuit unto itself within the truck, so it started making sense after staring at the diagrams a while (as in ….2 months.) Suffice it to say I am “very” well versed on all the various 80 Series OEM subtank systems (there are at least 4) as well as Toyota wiring now.
This is a fairly straightforward project, certainly no tougher than nor nearly as dirty as a knuckle rebuild. I estimate that I have about $1200 in the installation including all parts and some labor to add the level switch to the main tank. It a safe design/installation, anyone driving the truck can use it and should it ever fail me, I can diagnose it and replace with OEM parts.
Joel Hocker in Arizona (Mud member JPHockerAZ) contacted me a few months back wanting to go OEM as well so we have been working in parallel on our installs, swapping part numbers and working out the various details. I am sure he will be contributing his information and pics.
I am tidying up some final bits and pieces this weekend but if anyone wants to take a stab at this, let me know and I can help you with the part numbers to get it done.
If you have any questions/comments or picture requests, fire away. I prefer email as opposed to a PM.
Jim
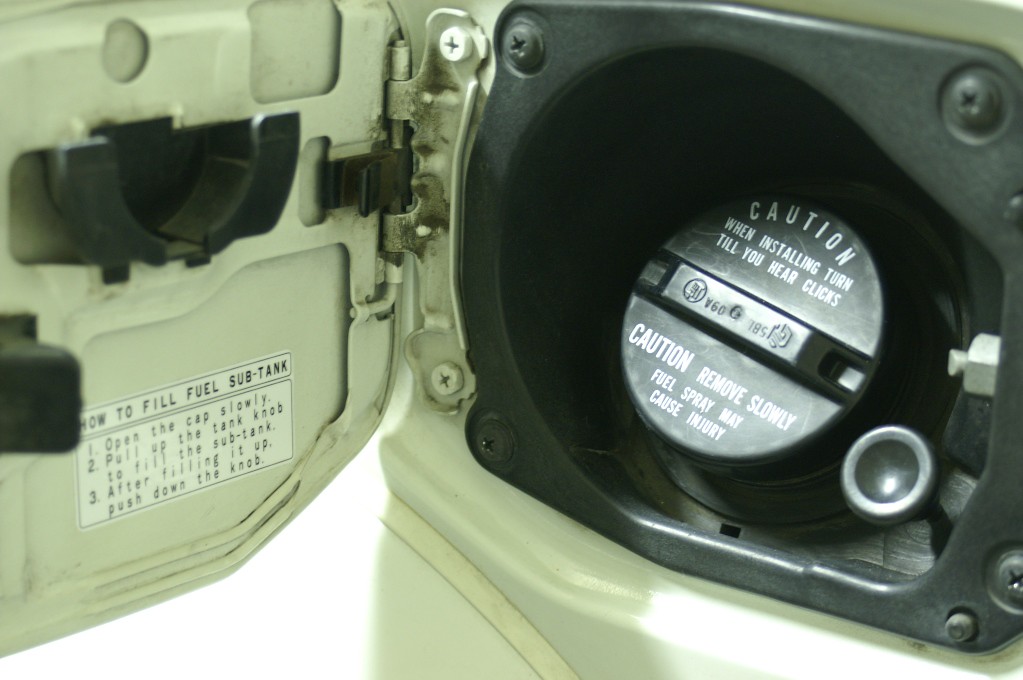
The finished look:
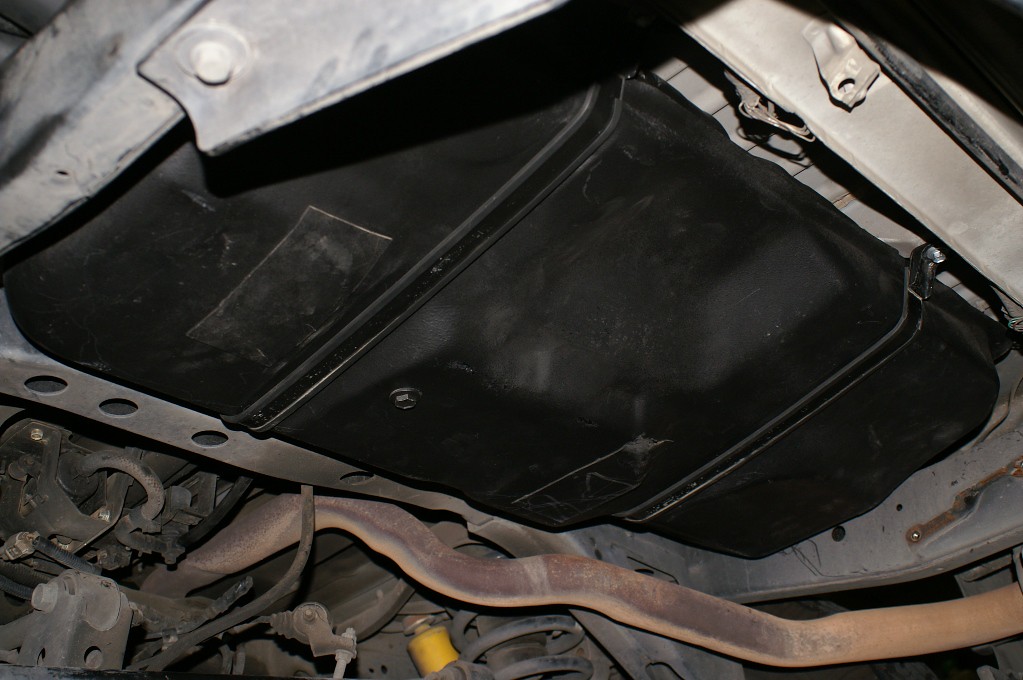
Tank installed and plugged into existing harness:
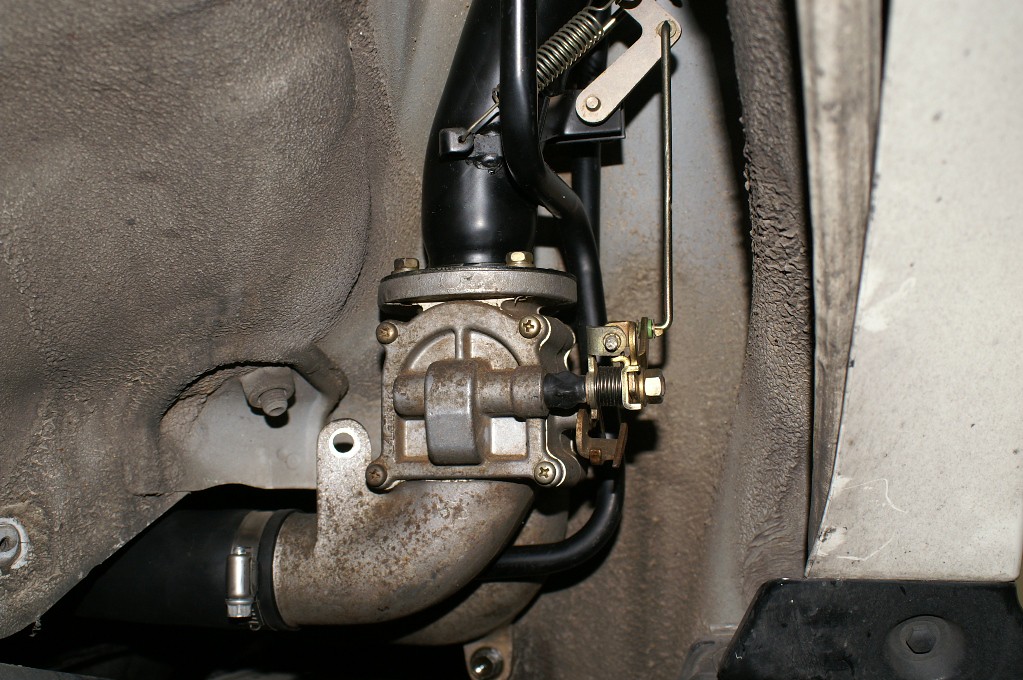
Dual filler neck:
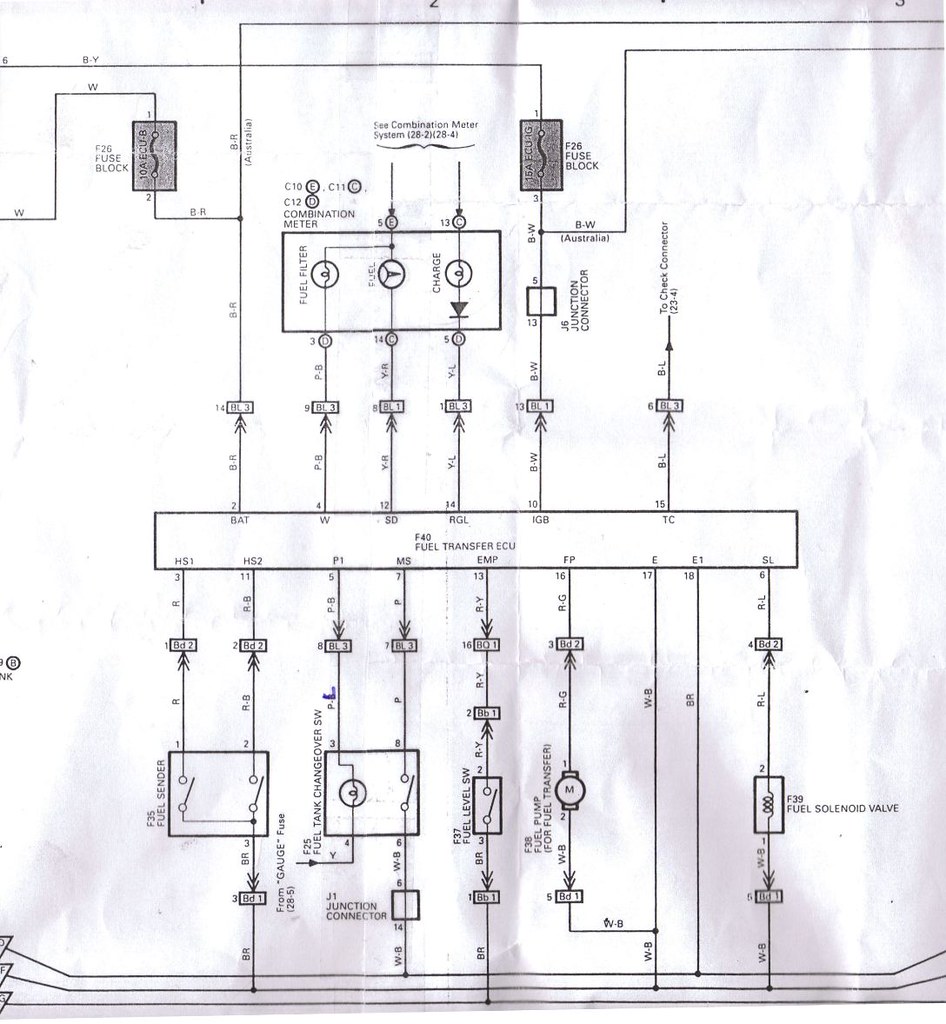
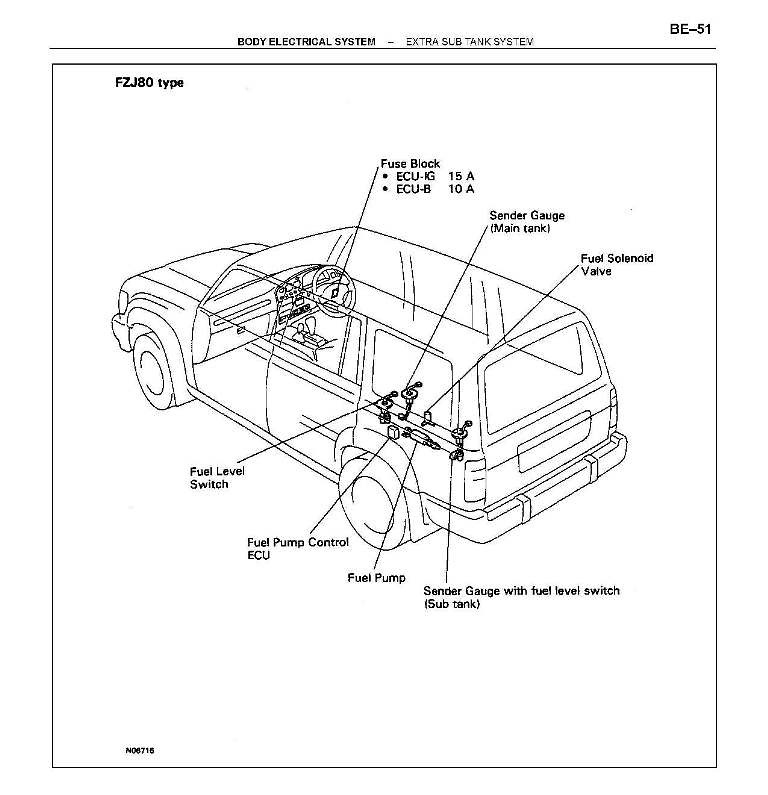
The master OEM diagram:
MicroCat EPC parts system

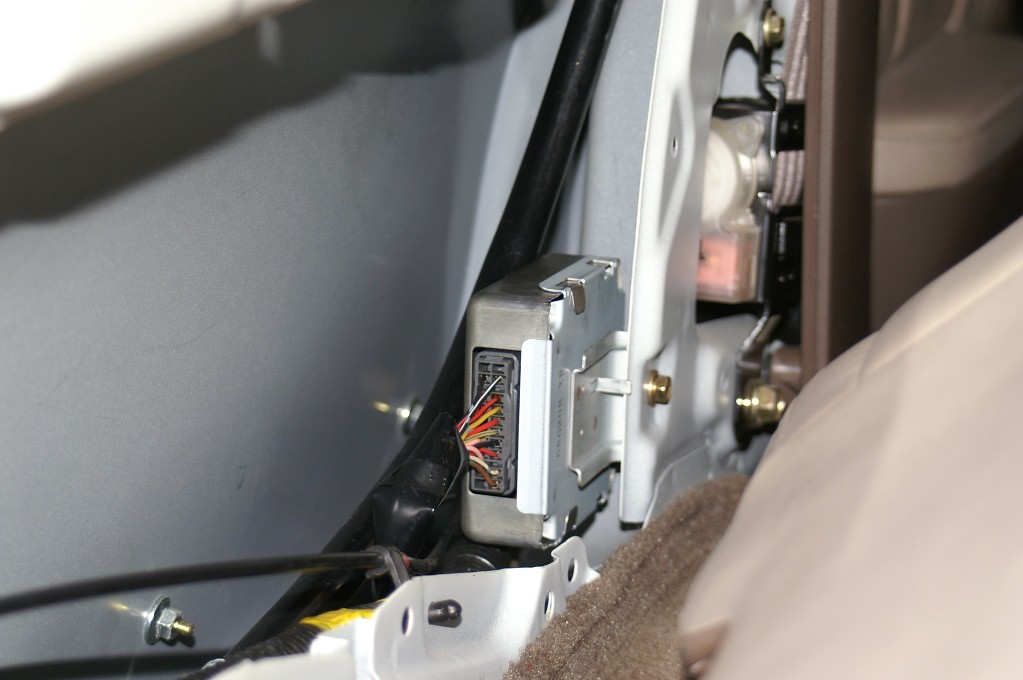
ECU mounted:
Two of the ten OEM diagnostic pages:

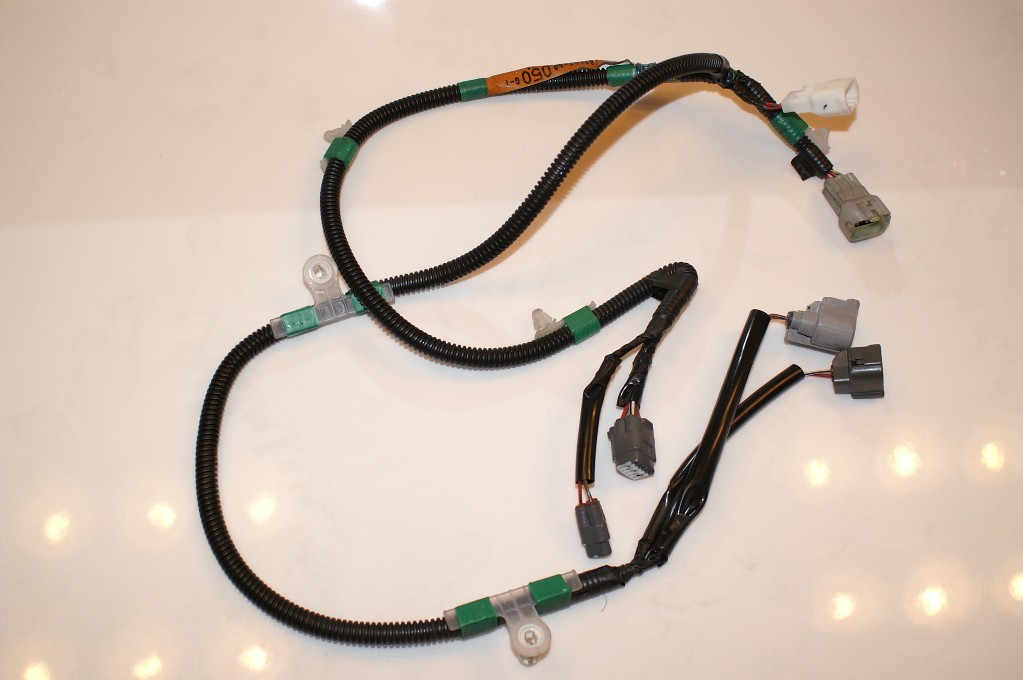
Replacement wiring harness (for connecting subtank pump, solenoid, main tank pump and level switch to sill/floor harness):
Replacement main tank bracket with extra pipe for attaching line from subtank:
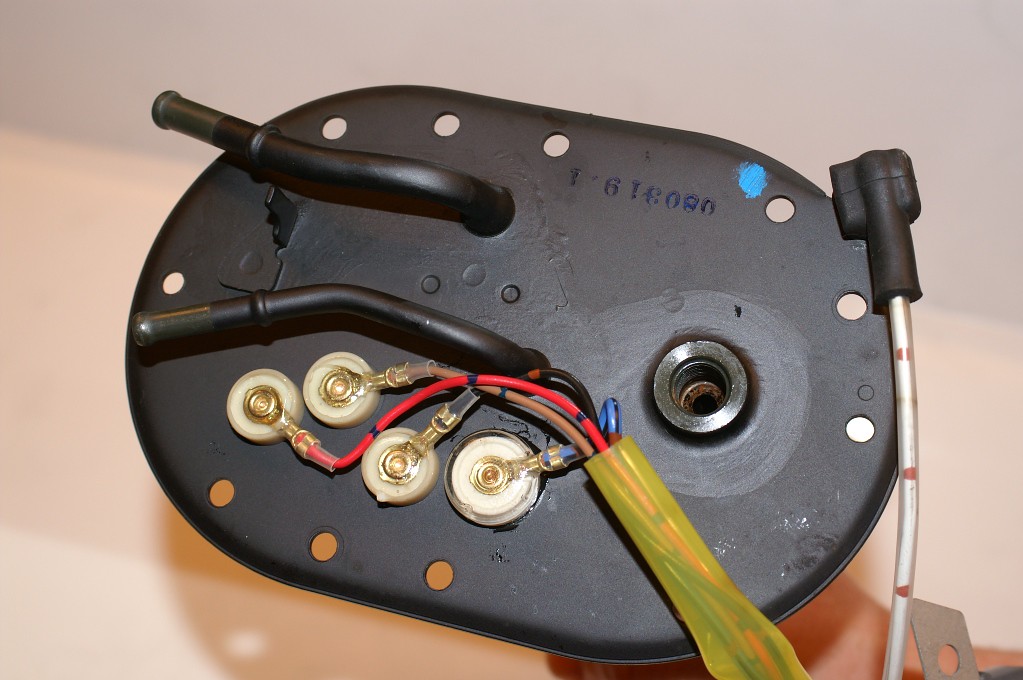
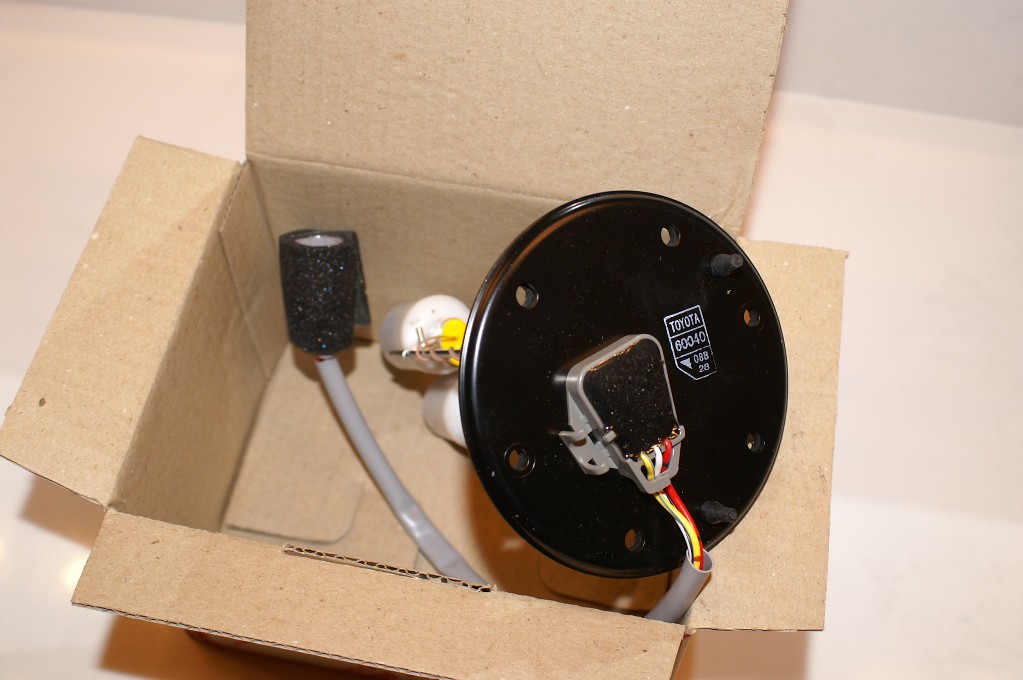
The fuel level switch for the main tank:
Overhead Console:
Kick Panel Wiring Connectors (power and switching wires and overhead console harness):
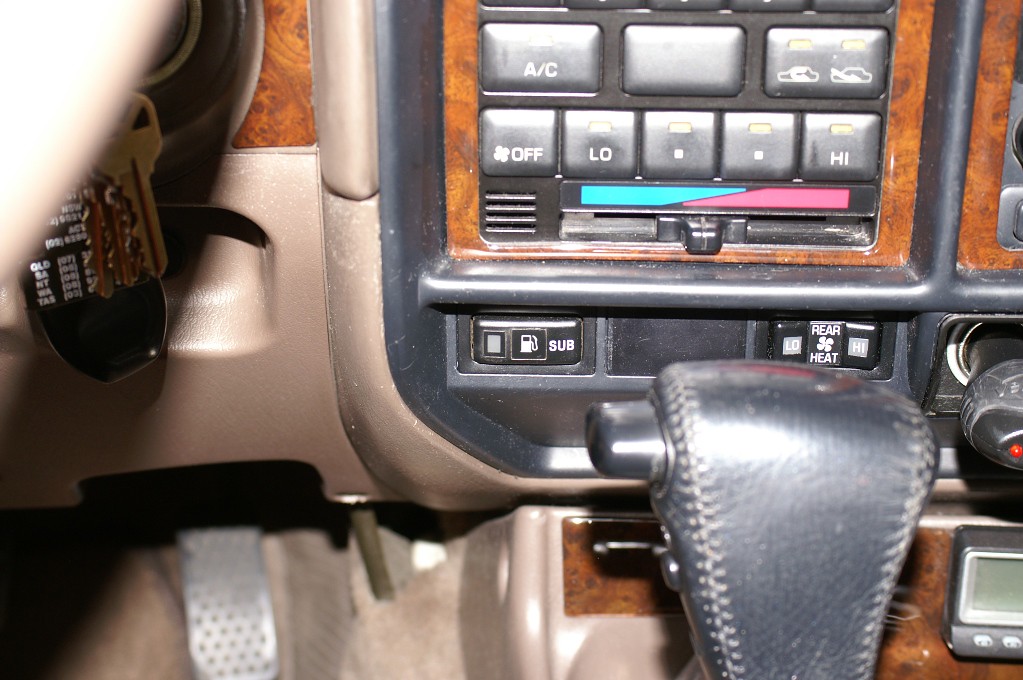
The "Switch":
Here is a list of part numbers that should cover the majority of the major items, exlcuding a few bolts and nuts. I recommend sourcing a tank, transfer pump assembly and dual filler neck either on eBay OZ or from an Oz salvage yard. If you decide to buy new ones, email me and I can give you part numbers.
Fuel transfer ECU , 89570-60110
Fuel transfer dash switch (momentary 7-pin), 84560-60020
Female plug for dash switch, 90980-10801
Wires splices for dash switch(6) , 82998-12340
Housing for kickpanel connection, 90980-10807
Wire splices for kickpanel connector, 82998-12340
Fuel system wiring harness (wire #2), 82182-60050
Overhead console roof wire harness (w/moonroof), 82171-60241
Fuel pump bracket, 23206-66030
Fuel pump bracket gasket, 77169-60010
Fuel pump in-tank filter, 23217-16490
Main tank level switch w/gasket, 83330-60040
Screws for tank switch (6), 90159-A4010
Large fuel hose (2), 77213-60090
Large clamp (4), 90460-55030
Small vent hose (2), 95311-13022
Small clamp (4), 90467-20134
Dual filler neck mounting bracket (1) 90119-08686
Fuel line gasket for banjo fitting (2), 90430-12026
Fuel tank drain plug gaskets (2), 90430-12245
Fuel door decal (1) 74572-60010
Subtank, sender, mounting straps (RH and LH), Used
Tank mounting bolts (4), 90129-08001
Dual filler neck, Used
Transfer pump and solenoid assembly, Used
Overhead console w/accessory meter, Used
5/16" fuel hose
Custom mounting ring for main fuel tank switch (available from El Mariachi)
If you have a diesel donor tank, your fuel pickup assembly may have dual pipes, one for the fuel pickup and one for fuel return. The return line is not needed on petrol installs so if you want to replace the pickup with the correct part, the part # is 77017-60300.
Update>> I gave up on finding tan non-USA visors with vanity lights, so I modified my USA sunvisors to accommodate the overhead console, as follows:
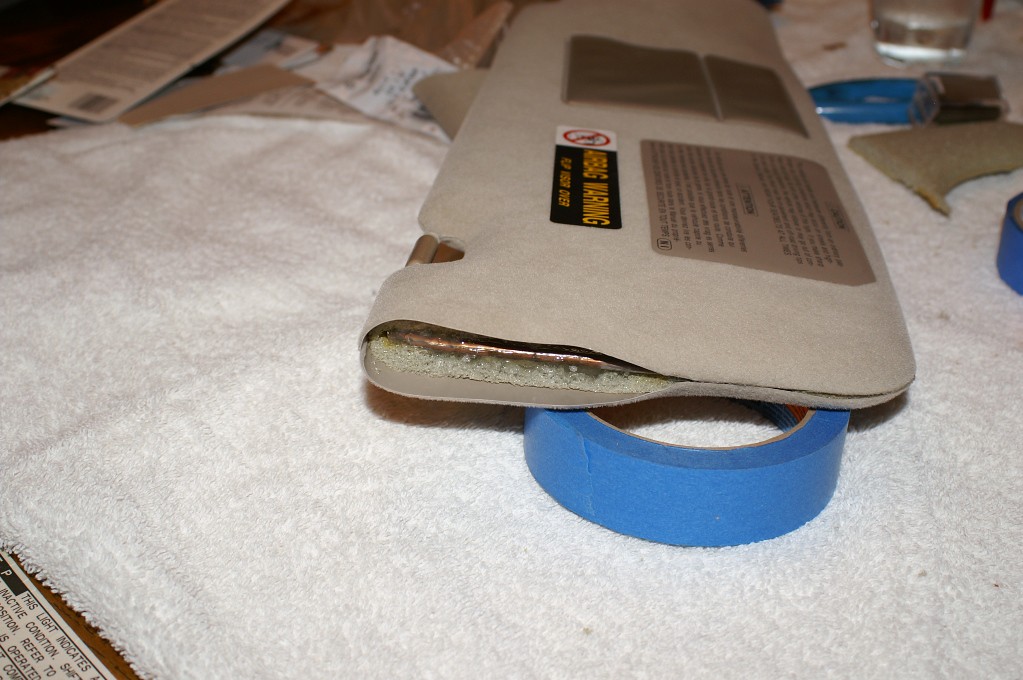
Using a razor blade I carefully cut the outer visor material exactly on the heat seam:
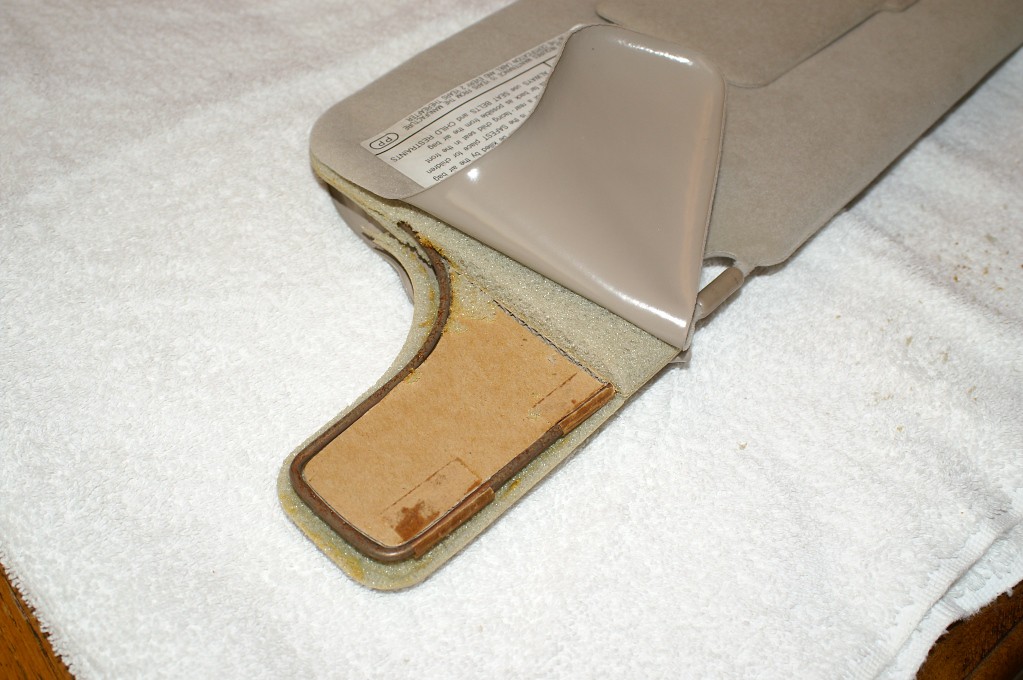
I then marked a right-angled edge and cut the "wing" off, including the cardboard insert, exposing the frame wire:
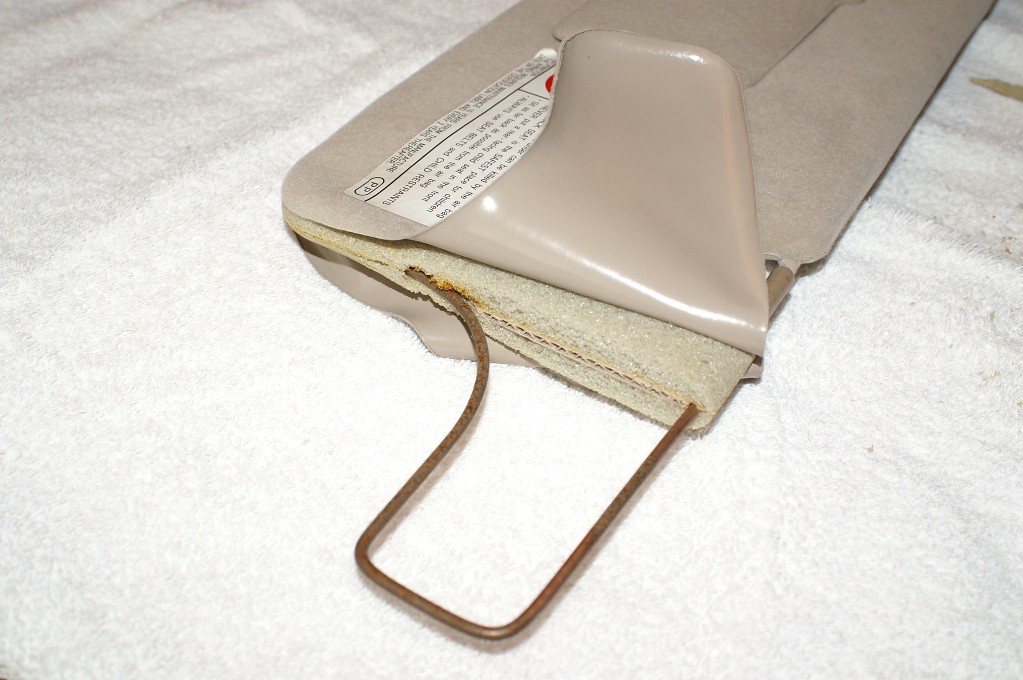
I used some small aluminum splices I found in the parts bin at Home Depot (they called them spacers) to join the wires together.
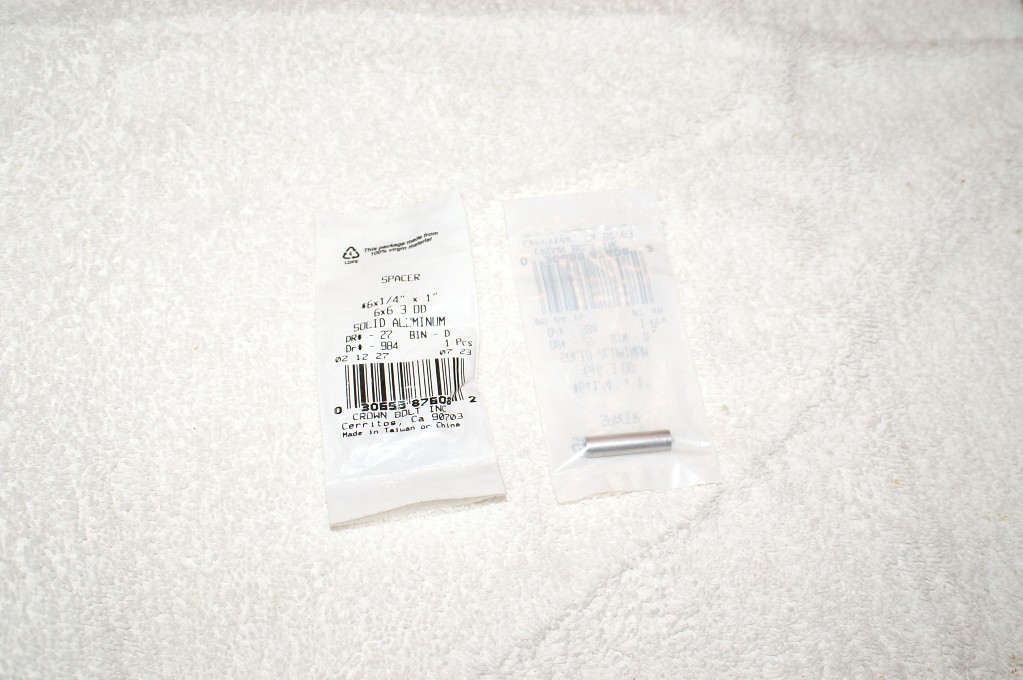
After cutting the wire and making the new bend, I inserted each end into the aluminum spacer and crimped it in a few places. They fit perfectly in the splice: :
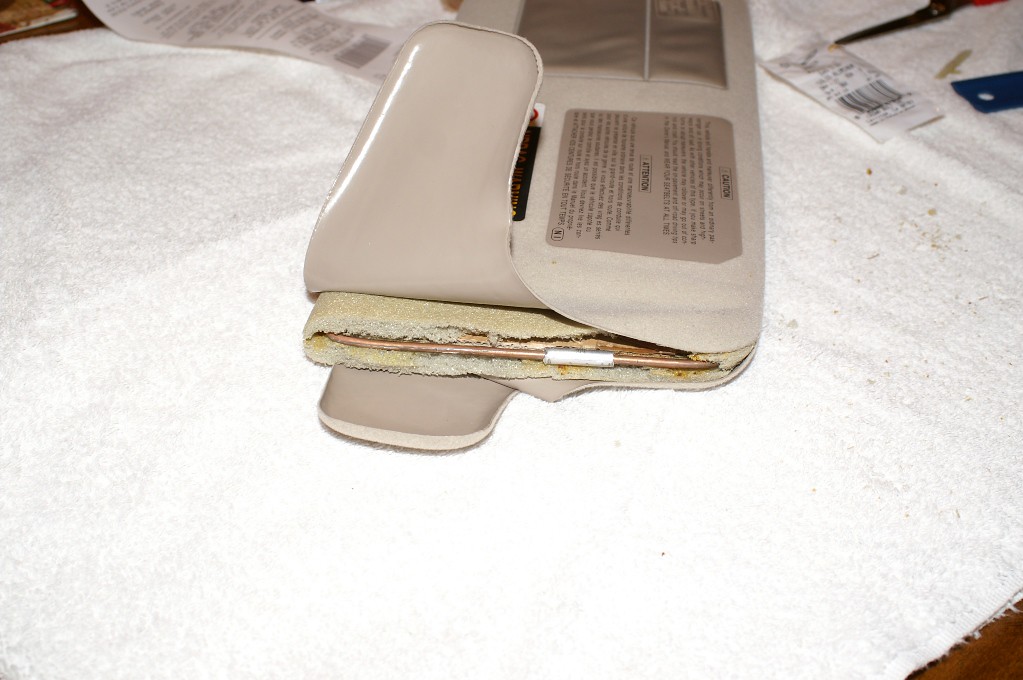
I slowly began rebonding the seam a couple inches at a time with Liquid Nails Adhesive "Perfect Glue," which dries clear and sets up in 10 minutes. I used masking tape to hold the seam while drying.
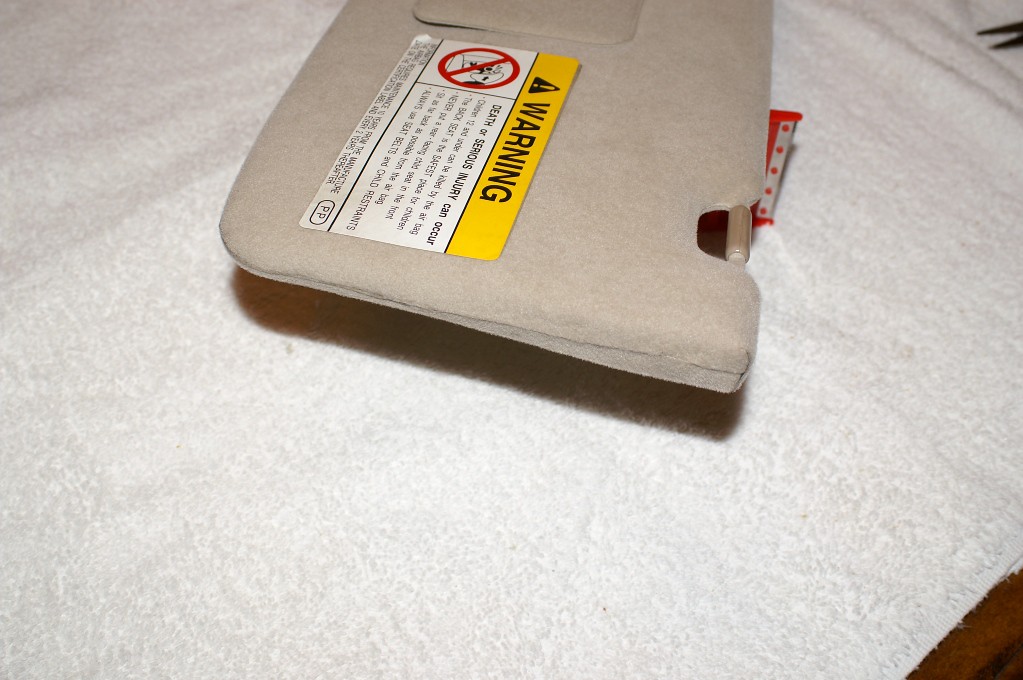
Finished visor. Its a slight bit wavy on the edge because I had lost some of the foam while messing with the wire, but the seam is nearly perfect and I saved $350.
EDIT>> Sunvisor modifications added 4/7/08, pics and details are at the bottom of this first post #1.
There are several dozen posts here related to the 80 Series non-USA factory subtank system. After reading all the posts on existing hybrid installs and the debates
about whether or not our trucks were wired for an OEM system, I decided to investigate this further. I began searching for a tank, dual filler neck and transfer pump, thinking OEM would be the easiest (and I am a vintage kinda guy.) Last July (2007) while bidding on a subtank transfer pump on eBay Oz, the Seller also had listed a little metal box called a fuel transfer ECU. I emailed him and he replied from the top of a Ranger station tower somewhere in the Australian Outback to tell me that this little box held all the brains for the OEM subtank transfer system. Oooo, that sounded nifty. So I asked him where it connected and he pointed me to look behind the driver’s side rear cargo interior panel and sure enough there it was, a connector. The project had begun.
As a result of obtainng the ECU, I contracted Subtank-itis over the past 8 months. I have sent dozens of emails, begged for scans and photos and sifted through hundreds of part numbers in my quest. I have accumulated numerous photos and wiring diagrams from Canada, France, the UK, Japan and Australia. I think I probably have EVERY OEM and aftermarket wiring diagram ever published for this system, petrol or diesel, from 1991 through 1997. (Some of them aren’t entirely accurate actually.) And as medicine for Subtank-itis I managed to obtain my very own personal copy of the Toyota MicroCat electronic parts catalogue (which is the coolest Cruiser accessory on the planet, bar none.) And with that I was able to compare my truck to those built with subtanks and subsequently nail down the required parts to do this 100% OEM.
Credits…
Thanks to all of you who have corresponded with me over the last year about this; you know who you are. Special thanks to Dave Stedman (IH8Mud member Japan4X4 and owner of Japan 4X4) for patiently supplying all the non-USA parts. If you need parts from overseas, I highly recommend Dave (sales@japan4x4.com.) Also thanks to Dan Busey (Mud member CDan/American Toyota) for providing some parts but more importantly some subtle, “sage” advice (like to not use a Sawzall to cut the main gas tank supply pipe.) And a special thanks to my new long distance friend Steve in Adelaide, Australia. I won his eBay auction for the subtank and little did he know that he was subsequently adopting me. He babysat me through making comparisons between our trucks so I could figure out if this was even possible. He even undertook a partial disassembly of his truck to answer some key questions. The global reach of the Cruiser community is just unbelievable.
Okay, enough of that crap…
OEM Subtank 101
Prior to January 1995, non-USA petrol trucks used logic in a stand-alone ECU to control the fuel transfer system. From January 1995 onward, that logic was programmed into the main truck ECU. However, neither the transfer logic nor the correct pin-outs are present in the USA ECU. Therefore, I reverted back to the pre-January 1995, non-USA OEM wiring diagram as the basis for my install. Ironically, in the case of my 1997 truck, the rear harness is wired for BOTH internal and external ECU configurations. Gotta love Mr. T.
System Highlights:
- The tank, transfer pump, solenoid and fuel transfer ECU all use the existing wiring in the USA truck from the driver’s kick panel back, no modifications necessary, EXCEPT, the existing USA sub-harness between the main fuel tank sender/pump and the truck (connecting under the driver side passenger door) is replaced by a new non-USA OEM sub harness. This new sub-harness not only contains the wiring for the main tank pump/sender, but also includes connections for the transfer pump/solenoid and main tank level switch.
- This system uses all Toyota parts including subtank, dual filler neck/hoses, fuel transfer pump/solenoid, main tank level switch, fuel transfer ECU, dash switch and the non-USA tank harness with both main fuel pump AND subtank connections.
- The system is connected into the truck’s Data Link Connector circuit to enable OEM diagnostics. I even found the section of the non-USA FSM that explains how to use the DLC to decode the ECU’s diagnostic signals (finding that was better than the Christmas morning when I got a Red Ryder BB gun.) By jumpering the DLC under the hood, the ECU sends intermittent flashes to the light in the dash switch in case of a fault.
- The OEM wiring harness is also now in place for the overhead console with gauge and altimeter, to be installed shortly.
Above I mention something called a “main tank level switch.” USA trucks are NOT fitted with this switch. The switch is installed in the top of the main tank on a flat boss adjacent to the main fuel pump bracket (that you access through the oval access panel under the middle seats.) This switch tells the ECU if the tank is above or below 75% full. If it is above, no transfer permitted. If it is below, it will permit a transfer until the main tank is back to 75%, then it shuts off automatically. To retrofit this switch involves either having an Oz or Japanese main tank from a subtank truck sent over, or in this case, dropping the main tank and having a hole cut in the tank and a bung/mounting ring welded on in which to mount the new switch. It then mounts with threaded OEM screws just like the subtank fuel sender. Not a big deal if you have a gas tank repair shop nearby (and I have the local machine shop ready to make more weld-on bung rings if needed.) The subtank system supplies fuel to the main tank via a fill pipe that passes through the non-USA main tank fuel pump bracket. This bracket bolts right into the USA main tank using the existing fuel pump and sending float.
Wiring for the subtank sender, transfer pump assembly and ECU all travel forward in the floor harness up to the kick panel where the harness terminates in two open connectors. After separating the 6 or 7 required wires from the existing connectors I grouped them together into their own connector. Into that connector I brought power, switching from the dash switch, the DLC wire and the signal wire to the overhead console. So the only fundamental difference from a factory assembly-line install is this small amount of wiring to bring the switch and power into the floor harness. All of those connections use OEM Toyota connectors supplied by CDan, American Toyota. I even sourced a USA 80 Series wiring harness from a wreck so I could maintain color consistency with the dash switch and power source wiring up front to the circuits in the back.
My overhead console is installed using an OEM harness that came with the console from Oz. Beige/tan consoles are very rare in salvage yards and I am not sure you can still get them from Toyota either. So I sprayed my used gray Oz console using Toyota Oak 42-colored spray dye from Classic Dye Products and it matches perfectly and looks brand new. Their stuff is OEM grade and awesome. There were very few 80s produced outside the USA with sable/beige/oak interiors. As a result, beige visors and consoles are impossible to find in overseas salvage. There are over 200 part numbers for 80 Series visors in my EPC and no matter what we order, they all show up gray, even the ones with tan color suffixes. So the sable/beige/oak visors are no more from what I can tell, though I am now checking South America. So until I stumble across a set, I modified mine by removing the "wing" portion that interferes with console. Pics below.
I am embarrassed to say how many hours I have in reading, researching, comparing and gathering everything together to make this work. I am not much of a wiring guy (or at least I wasn’t before this) so it took me a while to grasp it all. Fortunately, this system is a circuit unto itself within the truck, so it started making sense after staring at the diagrams a while (as in ….2 months.) Suffice it to say I am “very” well versed on all the various 80 Series OEM subtank systems (there are at least 4) as well as Toyota wiring now.
This is a fairly straightforward project, certainly no tougher than nor nearly as dirty as a knuckle rebuild. I estimate that I have about $1200 in the installation including all parts and some labor to add the level switch to the main tank. It a safe design/installation, anyone driving the truck can use it and should it ever fail me, I can diagnose it and replace with OEM parts.
Joel Hocker in Arizona (Mud member JPHockerAZ) contacted me a few months back wanting to go OEM as well so we have been working in parallel on our installs, swapping part numbers and working out the various details. I am sure he will be contributing his information and pics.
I am tidying up some final bits and pieces this weekend but if anyone wants to take a stab at this, let me know and I can help you with the part numbers to get it done.
If you have any questions/comments or picture requests, fire away. I prefer email as opposed to a PM.
Jim
The finished look:
Tank installed and plugged into existing harness:
Dual filler neck:
The master OEM diagram:
MicroCat EPC parts system
ECU mounted:
Two of the ten OEM diagnostic pages:
Replacement wiring harness (for connecting subtank pump, solenoid, main tank pump and level switch to sill/floor harness):
Replacement main tank bracket with extra pipe for attaching line from subtank:
The fuel level switch for the main tank:
Overhead Console:
Kick Panel Wiring Connectors (power and switching wires and overhead console harness):
The "Switch":
Here is a list of part numbers that should cover the majority of the major items, exlcuding a few bolts and nuts. I recommend sourcing a tank, transfer pump assembly and dual filler neck either on eBay OZ or from an Oz salvage yard. If you decide to buy new ones, email me and I can give you part numbers.
Fuel transfer ECU , 89570-60110
Fuel transfer dash switch (momentary 7-pin), 84560-60020
Female plug for dash switch, 90980-10801
Wires splices for dash switch(6) , 82998-12340
Housing for kickpanel connection, 90980-10807
Wire splices for kickpanel connector, 82998-12340
Fuel system wiring harness (wire #2), 82182-60050
Overhead console roof wire harness (w/moonroof), 82171-60241
Fuel pump bracket, 23206-66030
Fuel pump bracket gasket, 77169-60010
Fuel pump in-tank filter, 23217-16490
Main tank level switch w/gasket, 83330-60040
Screws for tank switch (6), 90159-A4010
Large fuel hose (2), 77213-60090
Large clamp (4), 90460-55030
Small vent hose (2), 95311-13022
Small clamp (4), 90467-20134
Dual filler neck mounting bracket (1) 90119-08686
Fuel line gasket for banjo fitting (2), 90430-12026
Fuel tank drain plug gaskets (2), 90430-12245
Fuel door decal (1) 74572-60010
Subtank, sender, mounting straps (RH and LH), Used
Tank mounting bolts (4), 90129-08001
Dual filler neck, Used
Transfer pump and solenoid assembly, Used
Overhead console w/accessory meter, Used
5/16" fuel hose
Custom mounting ring for main fuel tank switch (available from El Mariachi)
If you have a diesel donor tank, your fuel pickup assembly may have dual pipes, one for the fuel pickup and one for fuel return. The return line is not needed on petrol installs so if you want to replace the pickup with the correct part, the part # is 77017-60300.
Update>> I gave up on finding tan non-USA visors with vanity lights, so I modified my USA sunvisors to accommodate the overhead console, as follows:
Using a razor blade I carefully cut the outer visor material exactly on the heat seam:
I then marked a right-angled edge and cut the "wing" off, including the cardboard insert, exposing the frame wire:
I used some small aluminum splices I found in the parts bin at Home Depot (they called them spacers) to join the wires together.
After cutting the wire and making the new bend, I inserted each end into the aluminum spacer and crimped it in a few places. They fit perfectly in the splice: :
I slowly began rebonding the seam a couple inches at a time with Liquid Nails Adhesive "Perfect Glue," which dries clear and sets up in 10 minutes. I used masking tape to hold the seam while drying.
Finished visor. Its a slight bit wavy on the edge because I had lost some of the foam while messing with the wire, but the seam is nearly perfect and I saved $350.
Last edited:
 I dropped my main tank and had it modified to install the fuel level switch instead of buying a new main tank (See first picture of location before reinstallation).
 skills will ever be up to it!


