How to replace your seat bottom foam (1 Viewer)

This site may earn a commission from merchant affiliate
links, including eBay, Amazon, Skimlinks, and others.

Joined
Sep 23, 2009
Threads
207
Messages
3,938
Location
Arizona
This is the first time I have done this so there may be a better way, the following is just the way I did it.

The part numbers I am showing is for a 1993 with manual controls and cloth interior.
CushionPart#.jpg

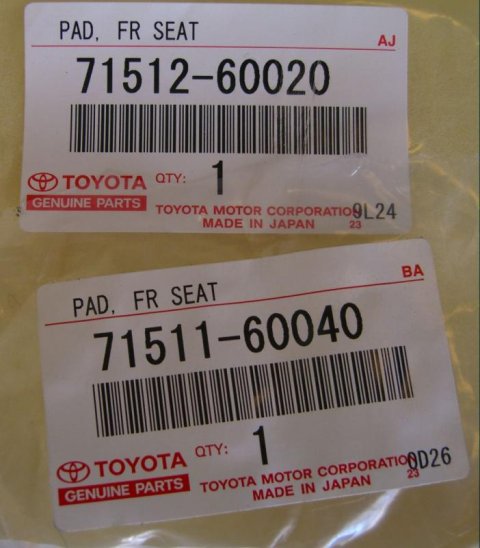
71512-60020 is the driver seat and 71511-60040 is the passenger seat. You will also need the rings to attach the material to the seat cushion and then to the seat frame
RingPart#.jpg
These come in packs of 10 and you will need 4 packs (40 rings total).
A few handy tools to have are these
Tools.JPG
CushionPart#.jpg
RingPart#.jpg
Tools.JPG
 
1) Remove seat(s). Simple 4 bolts holding them to the floorboard and any electrical wires that may be connected.
2) If you have a work bench big enough that will do but I put mine on the top of my trash bin which made for a perfect height standing.
3) Remove the plastic pieces from both sides taking care to remember where the hardware goes (one small and one larger screw).
4) The seat back is held to the seat bottom with 4 bolts (2 per side) as shown here
Bolts.jpg
Bolts-2.jpg
I would highly recommend removing the 2 bolts from the side the recline handle is on first. I say this because when the pieces start to separate and your alone the long metal piece that goes toward the front goes under the material and could rip the material if you are not careful.

5) Once these 4 bolts are removed, then you can remove the sliding rails. It looks like there are 4 bolts to remove but you only need to remove 3 of those 4.

6) Put the seat back to the side and turn the seat bottom upside down on your work area. You will see 10 rings holding the material to the frame as seen here
SeatBottom.jpg
7) Remove these rings by either bending them open or cutting them taking care not to cut the material.
8) Around the seat front and 2 front corners the seat material has a plastic piece attached to it and tucks between the wire frame. Take note how this is done because in the later steps you have to put it back the same way. Remove the plastic reinforced material from between the two wire frame.
Bolts.jpg
Bolts-2.jpg
SeatBottom.jpg
 
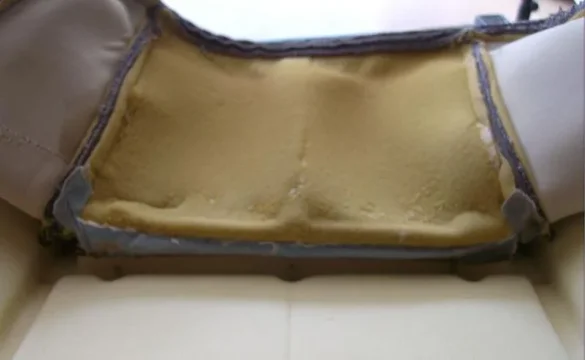
9) Once the rings are removed and the plastic piece reinforced material edges are taken out from between the two wire frame rails, turn the seat bottom right side up. Roll the seat material up towards the top of the seat bottom as shown here
Step8.jpg
Using the trash bin was convenient for me because the foam was falling apart and is quite messy.
Pieces.jpg
10) With the sides pulled up towards the seat top, carefully roll it up until you get to the wire reinforced part of the seat bottom and you will see the metal rings that are holding the wire on the seat material to the wire on the foam material. These need to be removed the same way you did it earlier. There are 10 rings total in the square section of the seat bottom.
Step9.jpg
Step8.jpg
Pieces.jpg
Step9.jpg
 
Last edited:
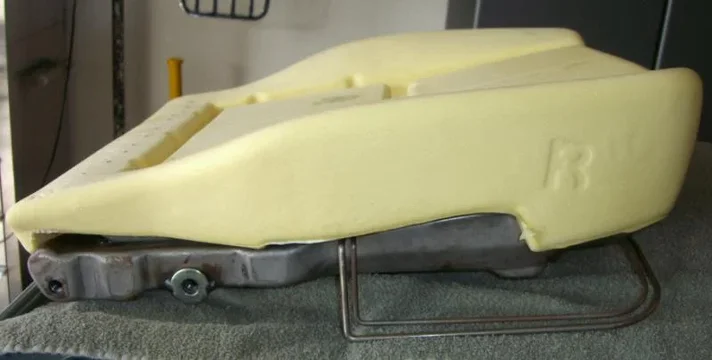
11) Take your old foam off the seat frame and dispose of properly. This is my old foam and the new foam side by side
CompareBot.jpg
CompareTop.jpg
12) This is a shot of the seat frame you will be placing your new foam onto
Frame.jpg
CompareBot.jpg
CompareTop.jpg
Frame.jpg
 
13) Place your foam on the frame just like the old foam came off, it is formed to fit so if it does not look or fit right rotate it 180 and it should fall into place. Almost like it was made for it.
FrameFoam.jpg
14) I looked at this for a while trying to decide how to tackle it and this is what I did. Looking at the square recess in the foam you can see the 10 positions the new rings go.
FoamTop.jpg
15) I took all 10 rings and put them in place and placed the open end of the rings facing out towards the seat edges. This would allow me to place the material where it needed to go and work the open point around the wire on the seat material and have the open face toward me so I can see what I am doing.
Ring.jpg
FrameFoam.jpg
FoamTop.jpg
Ring.jpg
 
16) So with the material inside out, place it on top of the foam making sure it is oriented correctly. Once in place and the wire of the material is lined up with the recess in the foam, you are ready to start bending the rings.
SeatMaterial.jpg
17) This was another one of my creative ways of doing this since it was my first time. I worked the top of the ring around the wire on the material (you should be able to see the hole the old ring used) to where it came around the wire and stuck through the material. I used the long handled angled pliers shown in the beginning to grab the open end of the ring closest to the seat foam and used the regular needle nose pliers to grab the open end of the ring that went around the wire in the seat material. Once I had them both in a good grip I started bending them towards one another. When you get them close to being closed you can use one of the pliers (I preferred the long handle ones) to clamp the rings closed. I made the rings look like they did when I removed them as shown here
RingClosed.jpg
18) Work your way around the square making sure you have all 10 of the rings in place. I also made sure the sharp ends of the rings were facing down away from the sitting surface to prevent any discomfort.
19) Once you are done with the top 10 rings, work the material over the edges carefully remembering the material is old. Once you have it pulled around all sides, turn over carefully (remember there is nothing holding the foam to the frame yet) and prepare for the bottom 10 rings.
20) Remember earlier when the plastic reinforced material was in place, now you have to put it back in place. The trick is to have the edge of the plastic that has the material sewn to it go between to two wire frames first (basically the plastic material and the seat fabric are at a V shape with the point of the V going into the wire frame).
21) Once the plastic piece is in between the two wire frames you can start putting the rings on the bottom as you took them off. Here is a shot of the bottom with some of the rings in place
Bottom'.jpg
SeatMaterial.jpg
RingClosed.jpg
Bottom'.jpg
 
22) Attach the seat frame rails to the seat bottom. Now turn the bottom over and admire your work
FinishedSeat.jpg
23) Attach the seat back to the seat bottom in reverse order you took it apart, attach the plastic side pieces and bolt back to your floor.

It is now time for a cold one :beer:…. Or to start the other side!! :clap:
FinishedSeat.jpg
 
Only things I did different was
1. Used hog ring pliers
2. Used spray glue on the cushion foam to the metal frame...
(I used to do production line auto trim for fomoco back in my youth)

Only regret I had was that I don't know anyone with a air powered hog ring gun...the job would have taken half as long
 
Well Done Tony! I cant believe how the old foam looks and compares vs the new. Nice detailed report on the job. Your truck sure has changed alot since i saw it the first time over a year ago!
 
Looks like there's some foam sewed into the underside of the cloth cover? Wonder if that can be replaced, and if leather seats have that also? Either way, was it worth the effort, softer seat now??
 
I ran out of the rings for my drivers seat but when I do that seat I will post another comparison pic. My drivers seat is completely collapsed on the outer edge and I clean foam up off the carpet each time I get in it.

Thanks Murf, you "told me" to take pics so careful what you ask for. :flipoff2:
 
Excellent report and very timely since I need to redo my driver's seat foam too.
Ned
 
What makes the foam turn brown like that?
(wait for it...)
 
I don't like to restore back to stock... I was thinking about putting some memory foam in mine. And I think they make pliers for that called hog ring pliers? I'm ditching the leather and going cloth.
 
Very nice write up! How much is the foam per seat?
 
As for the color I was not around for the first 16 years but I will ask my wife what has been going on over there :rolleyes:

Yes there are pliers for this job if you want to buy them for one job, I opted out of that.

From riding my Harley for years I will say that memory foam was never liked after people spent the money to have their seats done. When you sit on something for a long period you want support and memory foam just does not provide that. Just my .02 worth.

As for cost I have posted up the part numbers for the cloth seats with manual controls, leather and electric are different and may be different prices. Call you local Toyota dealer or Cdan/Beno for pricing.
 
You might be ok with the medium weight foam (like stock) with an inch or so layer of memory foam on top of it. I'm a cheapskate and repaired the nasty seat foam myself. It's not too hard to replace sections of the original foam. I bought some medium weight foam from an upholstery shop. You can get a cheap electric meat carving knife and easily cut pieces of the original foam out and replace with a new piece of foam glued in with spray adhesive (like 3M 90 or 88). Carve the shape with the knife and further shape it with a sanding disc. I think I had about $30 into materials that should be good for at least 6 seat repairs. New foam seat cushions would be ideal, but mine turned out to be very comfortable. I also had to weld the steel seat frame wire pieces back together as one of the welds had broke. It would be the wire on the right side of step 12 pic in post #4 above.
 
They carry hog rings and hog ring pliers at Home Depot fer cheap. Just so's ya know ;)
 
Today I followed the steps provided here by azTony and all went well, same part #, cloth seats manual. I used zip-ties instead of hog rings when buttoning things back up, which worked like a charm. Also stuck a 3.5" length of Gorilla tape onto the factory reinforcement cut-out section underneath the cushion for additional reinforcement. Tomorrow, will bolt the seat back in and see how it feels down the road. I'm certain that my back will benefit from replacing the 25-year old cushion. This was the plan A option; if improvement is not significant enough, drastic action could follow, as in $cheel-mann aftermarket seats.
 

Users who are viewing this thread

Back
Top Bottom