
Head Unit write-up
searching around, one would be hard pressed to find a whole lot of stuff on how to install and configure a new head unit. so as my first write up, and the first modification to the pigbuggy, here it is...
there are a couple ways you could go about doing this. since i was doing this completly on random advice and tid bits, it took a while, and with any project, I ran into a few glitches. nonetheless, it was pretty straight foward, and in taking my time, and researching carefully, i didnt have to go back and redo anything. it should also be noted, that these steps could be a little different depending on the year of your truck, and what kind of head unit you go with. so, keep that in mind.
Cruiser was a 1996
Head unit was a Double Din, Kenwood DPX 301.
You'll need a few things to start:
a wiring harness is a must have.

you will probably get some kind of harness with the head unit, and most likely, one end will plug into the back of the unit, and the other end will be a mess of wires that you will need to crimp or solder to the new wiring harness.
don't try to rip into the factory wiring harness, because you will most likely kick yourself if you do. i'm quite sure it would take a lot of time, be very confusing, and pretty much leave you SOL if you screw it up. rather, buy one from circuit city or someplace else, and it will clip into 2 separate connections on the factory harness. depending on what is on the other end of your new harness, you may not have to crimp or solder at all.
here is the link to the wiring harness that i got. it didn't match my head unit so i ended up cutting it. i think it matches to pioneer or jensen. that being said, check the back of your new Head unit to see what the male end of the harness will look like. count the pins and look at the shape of it. do this before you order, so you know what to get.
http://www.circuitcity.com/ssm/Metr...41015/catOid/-15882/rpem/ccd/productDetail.do
if you cant find one that fits your new head unit, don't waste your money thinking you'll just cut off the one side. go to the site below, and you can buy one for $10 less, and you can just crimp or solder it onto the harness that came with your head unit. unless of course, you like the wiring to be easy, and uncluttered. in which case, for an extra $10 or $20 they have new wiring harnesses that will plug into the factory harness and plug into the back of your new head unit. no soldering, no crimping, nothing to go wrong, just plug it in and go. i would highly recommend it.
http://www.installer.com/wires/
other things of necessity:
Phillips head screwdriver
flat head screwdriver
wire cutters (if you plan on soldering or crimping.)
wire strippers (if you plan on soldering or crimping.)
wire connectors(...yet again.)
flashlight
i used 10 or so styrofoam cups to keep the screws organized.
I started by taking the screws out from under the ash tray, and removed the useless cubby trey thing to take out 2 more screws behind that.

before i completely took off the control panel, I turned the ignition (dont turn on the car) pressed the brake, and moved the shifter back to D. this will made taking off the panel a little easier. the right side of the panel came out fine, but i had to run the flat head screw driver across the top of the left side, gently prying on the driver to release it.

there are be 3 plugs across the top of the back of the panel. I unhooked those, and worked my way down to the climate control plugs. took those out, and went to the cigarette lighter and removed those two plugs. the last two didn't really need to come out, so i just let the panel rest on the seat with the last 2 wires connected. you should have enough room to do what you need to do.

there are 4 Phillips screws on the old head unit. i took those out and gently removed the unit until i could access the wires in back. unhooked the wiring harness and then used the pliers to remove the other cable (it's black, round, and connects to the antenna) the head unit was now free.


I was able to reuse the brackets from the original HU. just unscrew them from the old, and put it back on the new.
now, next was cutting and crimping the wires. I ended up ordering the wrong part, so i had to cut the plug i didn't need off. there are a lot of wires by using both of the harnesses, so i would recommend cutting off an inch or so of wire from each harness just so you have enough room for the head unit, and so it isn't so crowded. *if all you need to do is connect your new harness to the factory harness and the back of your HU, cut off the blue wire. i believe that is an antenna control and could really screw things up.

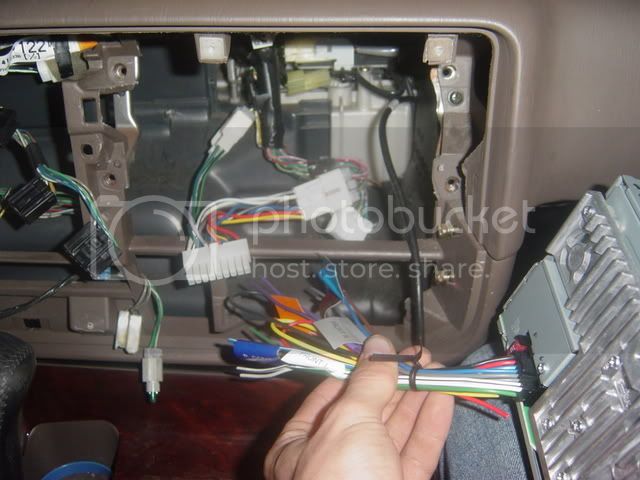
I started by stripping the ends of the wires. the cables were color coded so matching them wasn't too difficult. i had 3 wires i didn't use. a mute wire (brown), the blue antenna wire (cut this wire from both wiring harnesses.) and a blue and white wire for an external amp. (i didn't have one) matched the wires from the HU harness to the wires of my new harness and twisted the ends together.

i then took the wire connectors and screwed those on. I came up with a jumbled mess like this, but it worked. for anybody needing to connect the wires like this, i would recommend using butt connectors, instead of wire nuts, or if you really know what your doing, i guess you could solder and heat shrink your connections. whatever works best.

I have and auxiliary input in the back of my new unit, so i can hook up my mp3 player. i got the necessary input adapter (6ft. long) and then proceeded to devise a plan so no excess wires would show. i ended up taking out the center console, and the one in front of it so i could run the wire underneath those.

after i removed those, and ran the wire underneath, i went up through the bottom of of the center console, through the backside of the middle part, and up through to the very top of the console, following the path of the built in telephone wire. worked out pretty slick.


I then took my mess of wires and hooked up harness to the 2 gray plugs in the factory plug (the white one on the factory harness was not be used) I then pluged the antenna cable into the new head unit, and then finished it off by connecting the wiring harness to the head unit.

I put the head unit in, (didn't screw it in yet) aligned it with the screws, and then sorted out the mess of wires behind the unit so it would fit properly. then i screwed it in and made sure it worked. (make sure you do this before you go and put everything back together, because if it doesnt work, you'll have to take everything apart again.)

then it was just a matter of putting everything back together. started by hooking the plugs back into the control panel, and then the two screws under the ash tray, and behind the pocket.

since most (if not all) new HU's come with built in apms, theres no reason to use the crappy factory amp anymore. so, i removed the glove box, and took a look around.

the amp is the sliver box directly behind the speaker next to the glove box. there were two sets of wires coming out of it, so it was a simple matter of just unplugging them. some people prefer to unscrew the whole thing all together and completely take it out, but i just left it.

screwed in the glove box and then sat back to admire my handiwork.
overall this wasn't at all a very complex job at all. if anything, i hope some find it helpful in sorting things out. thanks for reading.

searching around, one would be hard pressed to find a whole lot of stuff on how to install and configure a new head unit. so as my first write up, and the first modification to the pigbuggy, here it is...
there are a couple ways you could go about doing this. since i was doing this completly on random advice and tid bits, it took a while, and with any project, I ran into a few glitches. nonetheless, it was pretty straight foward, and in taking my time, and researching carefully, i didnt have to go back and redo anything. it should also be noted, that these steps could be a little different depending on the year of your truck, and what kind of head unit you go with. so, keep that in mind.
Cruiser was a 1996
Head unit was a Double Din, Kenwood DPX 301.
You'll need a few things to start:
a wiring harness is a must have.
you will probably get some kind of harness with the head unit, and most likely, one end will plug into the back of the unit, and the other end will be a mess of wires that you will need to crimp or solder to the new wiring harness.
don't try to rip into the factory wiring harness, because you will most likely kick yourself if you do. i'm quite sure it would take a lot of time, be very confusing, and pretty much leave you SOL if you screw it up. rather, buy one from circuit city or someplace else, and it will clip into 2 separate connections on the factory harness. depending on what is on the other end of your new harness, you may not have to crimp or solder at all.
here is the link to the wiring harness that i got. it didn't match my head unit so i ended up cutting it. i think it matches to pioneer or jensen. that being said, check the back of your new Head unit to see what the male end of the harness will look like. count the pins and look at the shape of it. do this before you order, so you know what to get.
http://www.circuitcity.com/ssm/Metr...41015/catOid/-15882/rpem/ccd/productDetail.do
if you cant find one that fits your new head unit, don't waste your money thinking you'll just cut off the one side. go to the site below, and you can buy one for $10 less, and you can just crimp or solder it onto the harness that came with your head unit. unless of course, you like the wiring to be easy, and uncluttered. in which case, for an extra $10 or $20 they have new wiring harnesses that will plug into the factory harness and plug into the back of your new head unit. no soldering, no crimping, nothing to go wrong, just plug it in and go. i would highly recommend it.
http://www.installer.com/wires/
other things of necessity:
Phillips head screwdriver
flat head screwdriver
wire cutters (if you plan on soldering or crimping.)
wire strippers (if you plan on soldering or crimping.)
wire connectors(...yet again.)
flashlight
i used 10 or so styrofoam cups to keep the screws organized.
I started by taking the screws out from under the ash tray, and removed the useless cubby trey thing to take out 2 more screws behind that.
before i completely took off the control panel, I turned the ignition (dont turn on the car) pressed the brake, and moved the shifter back to D. this will made taking off the panel a little easier. the right side of the panel came out fine, but i had to run the flat head screw driver across the top of the left side, gently prying on the driver to release it.
there are be 3 plugs across the top of the back of the panel. I unhooked those, and worked my way down to the climate control plugs. took those out, and went to the cigarette lighter and removed those two plugs. the last two didn't really need to come out, so i just let the panel rest on the seat with the last 2 wires connected. you should have enough room to do what you need to do.
there are 4 Phillips screws on the old head unit. i took those out and gently removed the unit until i could access the wires in back. unhooked the wiring harness and then used the pliers to remove the other cable (it's black, round, and connects to the antenna) the head unit was now free.
I was able to reuse the brackets from the original HU. just unscrew them from the old, and put it back on the new.
now, next was cutting and crimping the wires. I ended up ordering the wrong part, so i had to cut the plug i didn't need off. there are a lot of wires by using both of the harnesses, so i would recommend cutting off an inch or so of wire from each harness just so you have enough room for the head unit, and so it isn't so crowded. *if all you need to do is connect your new harness to the factory harness and the back of your HU, cut off the blue wire. i believe that is an antenna control and could really screw things up.
I started by stripping the ends of the wires. the cables were color coded so matching them wasn't too difficult. i had 3 wires i didn't use. a mute wire (brown), the blue antenna wire (cut this wire from both wiring harnesses.) and a blue and white wire for an external amp. (i didn't have one) matched the wires from the HU harness to the wires of my new harness and twisted the ends together.
i then took the wire connectors and screwed those on. I came up with a jumbled mess like this, but it worked. for anybody needing to connect the wires like this, i would recommend using butt connectors, instead of wire nuts, or if you really know what your doing, i guess you could solder and heat shrink your connections. whatever works best.
I have and auxiliary input in the back of my new unit, so i can hook up my mp3 player. i got the necessary input adapter (6ft. long) and then proceeded to devise a plan so no excess wires would show. i ended up taking out the center console, and the one in front of it so i could run the wire underneath those.
after i removed those, and ran the wire underneath, i went up through the bottom of of the center console, through the backside of the middle part, and up through to the very top of the console, following the path of the built in telephone wire. worked out pretty slick.
I then took my mess of wires and hooked up harness to the 2 gray plugs in the factory plug (the white one on the factory harness was not be used) I then pluged the antenna cable into the new head unit, and then finished it off by connecting the wiring harness to the head unit.
I put the head unit in, (didn't screw it in yet) aligned it with the screws, and then sorted out the mess of wires behind the unit so it would fit properly. then i screwed it in and made sure it worked. (make sure you do this before you go and put everything back together, because if it doesnt work, you'll have to take everything apart again.)
then it was just a matter of putting everything back together. started by hooking the plugs back into the control panel, and then the two screws under the ash tray, and behind the pocket.
since most (if not all) new HU's come with built in apms, theres no reason to use the crappy factory amp anymore. so, i removed the glove box, and took a look around.
the amp is the sliver box directly behind the speaker next to the glove box. there were two sets of wires coming out of it, so it was a simple matter of just unplugging them. some people prefer to unscrew the whole thing all together and completely take it out, but i just left it.
screwed in the glove box and then sat back to admire my handiwork.
overall this wasn't at all a very complex job at all. if anything, i hope some find it helpful in sorting things out. thanks for reading.
Last edited:


 . Nice head unit too!
")