Changing Replacing Fuel Sock Steps

This site may earn a commission from merchant affiliate
links, including eBay, Amazon, Skimlinks, and others.

Hornd

SILVER Star
Joined
Dec 18, 2013
Threads
69
Messages
3,146
Location
Toledo, OH
Pretty simple job, but if not careful could be your last job.
  • Disconnect - Post of Battery with 10mm wrench
  • Remove plastic covers on Bolts holding both rear seat in (4 covers) then remove 14mm bolts (8).
  • Remove seats and set aside and fold back carpet
  • Put out your Cigar or Cigarette, and release gas cap, and put on Nitrile Gloves
  • Remove 3 Philips screws in Tank Inspection cover and pry off cover using putty knife and set aside
  • Unhook Electrical Connector and push to side
  • Using 17mm Socket Remove Banjo Bolt and put fuel line aside (you will get some gas leakage)
  • Using Needle Nose Remove Clamp on fuel line and force line off
  • Using 8mm Nut Driver remove 8 bolts that hold cover on. Blow top of tank clean so debris does not go in tank.
  • Remove tank plate and finesse unit out without bending sender float
  • Bend Ring holding pump in place and retain rubber washer.
  • Using a knife pry off the retainer holding Fuel sock.
  • Reassemble using new components. FSM said gasket should not be reused, but mine was in good shape.
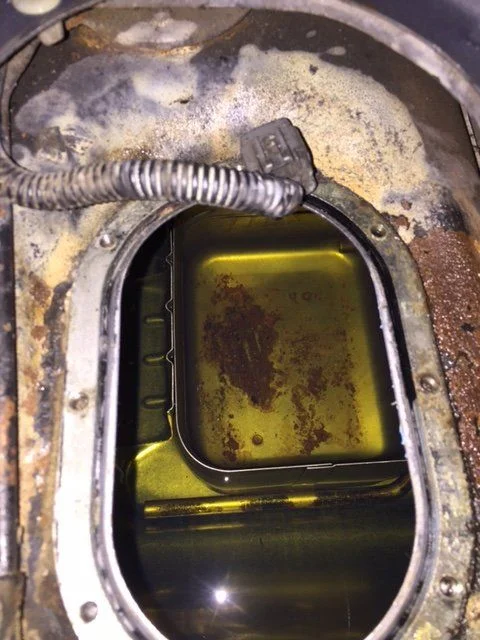
  • Tank had some debris in it (See Pic)
  • I intend to give the whole top a good coating of Fluid Film before putting inspection cover back.
What a great design to give access to tank under seats. 10X easier than dropping tank.

New 8mmx1.25 Screws (90159-50219) are $.89 and new rubber gasket (77178-35030) is ~$5
IMG_5935.webp
IMG_5933.webp
 
Last edited:
Nice work. Mine was similar to yours, but did it anyway.
 
Yup similar fashion to mine. I did my Turbo Supra fuel pump upgrade at the same time ;)
 
Had tons of trouble getting Gas Fitting on Top of tank to stop leaking.
Had to remove seats again and inspection cover again.
In hindsight, test fittings before re-assemly by turning key on to pressurize the line (run the fuel pump).

Ended up making 2 new Copper Washers and polishing the banjo fitting top and bottom and tapped hole in tank with 80-grit then emery cloth.

Autozone sells a kit of Copper Banjo Washers with about 8 assorted sizes for about $5. Used deburring tool to open inside till it fit.
 
Pretty simple job, but if not careful could be your last job.
  • Disconnect + Post of Battery with 10mm wrench

Not just no, but HELL NO!!!!!

Never, ever disconnect the positive post on a battery first. Did you notice how sparks flew everywhere every time you do it this way? That is called a "clue".

Great way to get into serious trouble.

Always, always, ALWAYS remove the NEGATIVE terminal first.
 
Not just no, but HELL NO!!!!!

Never, ever disconnect the positive post on a battery first. Did you notice how sparks flew everywhere every time you do it this way? That is called a "clue".

Great way to get into serious trouble.

Always, always, ALWAYS remove the NEGATIVE terminal first.

You are correct that is typo, now fixed.
Remove the Ground Side 1st always.
 
To add to above: I attached a 12 foot ground wire attached to a seat bolt hole and then out to a pipe that was in the ground to bleed off any static charge while I had the tank open.
 
To add to above: I attached a 12 foot ground wire attached to a seat bolt hole and then out to a pipe that was in the ground to bleed off any static charge while I had the tank open.

Belt PLUS suspenders, I like it :clap:
 
Back
Top Bottom