

2F Seized

This site may earn a commission from merchant affiliate
links, including eBay, Amazon, Skimlinks, and others.

The cylinder bores appear to be factory size. Also, honing is still evident in the cylinders.

Perhaps when the cracked intake manifold was repaired, the head got a couple of non Toyota exhaust valves. Anyone have recommendations on a valve spring compression tool?
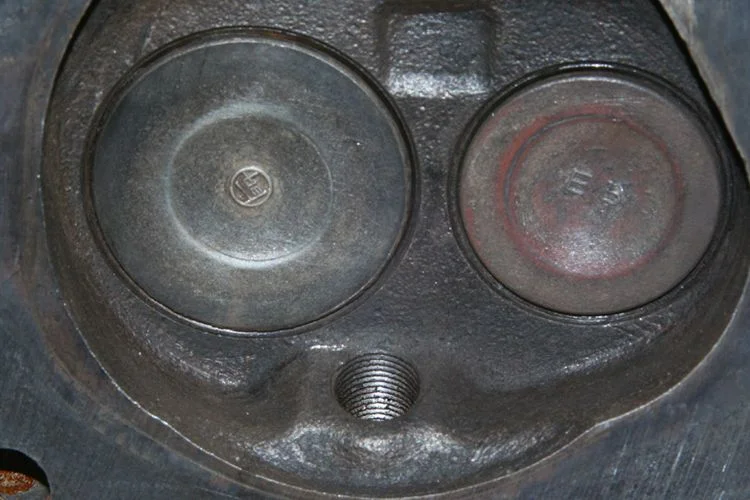
valves2.webp


My plan of attack is to get the block out of the truck and start with the block and crankshaft. Because my magnet isn't strong enough to work out all of the lifters, I figure that the camshaft is going to stay put, or should I just pull the crankshaft timing gear? By the way, the crankshaft pulley has quite a bit of lateral movement, that can't be a good sign, right? While I am tool shopping, what do I need for the input shaft bearing? And, is there a method of pulling the block out of the truck without the head on?
 
as for pulling a short block couple of bolts and a length of chain... i made some brackets years ago out of angle iron to bolt to the deck, but you can bolt the chain into the head bolt holes with short bolts and washers ...

Input shaft bearing?? Pilot bearing/bushing or the one in the trans???
 
Anyone have recommendations on a valve spring compression tool?

To change my valve seals I got the OTC 4573 compressor tool and it didn't work for me. I ended up making my own real quick out of 3/4 electrical strut and a screw hook. Worked like a champ. My keepers were stuck to the valve stem and some suggested hitting the valve stem with a hammer first to break them free. I used a 1/4 brass pipe nipple that fit over the valve stem and gave it just one wack. Worked great. I used my diy compressor tool and a magnet pulled out the keepers.
Unlike you, my head was in place and I used compressed air through the spark plug hole to hold the valves in place. If you used my tool design, You'd need to hold back the valve with something while compressing.
Maybe there a good tool out there but after buying one I wasn't going to buy another and wait on it.

My tool is in "This" thread.
 
The input shaft bearing is described in the FSM between the crank and the transmission, I gather that it is pressed into the flywheel?
 
I really didn't want to go this route, because when I thought that my 2F was in need of a rebuild, I figured that I wouldn't let much stand in my way, I kinda bought the truck with the intention of renewing the existing engine before I set out on the road. However the thought of getting that crank reworked and spinning, and the entire engine block and head redone was shadowed by the availability of another drivetrain from a '75 for sale. So, I jumped on it. And, now, I have a pair of engines, clutches, transmissions, and transfer cases, one which I can rebuild at my leisure, hopefully, after I have been out with the rig on the trail.

drivetrain.webp
 
Upon comparison of the two 2F starters, I discovered that the casting portion that maintains the spindle bearing on the far side of the pinion was destroyed on the seized motor. With further inspection, it is clear that there is a chunk of cast aluminum from the remanufactured starter stuck way up between the flywheel and the bellhousing.

So, if that is the cause of seizure, it should be alive again after I pull the flywheel and put everything back together. I need advice regarding removal of the non-OEM head gasket on the block. That was a major chore on the head, and I put a gouge or two in it in the process of refining my technique.
 
I was supposed to do tail light electrical today. However, I was gonna just work on the 40 today, actually. The shade tree mechanic season is getting short, and I'm waiting on stuff for suspension, but the weather is beautiful. So, I actually started off my day by cleaning up a mouse house under the hood of a Buick. The 2F is kinda near that, so I thought that it is time to check things out. I pulled the double tarps to make sure that the motor wasn't getting rained on. Sure enough, hackberry seeds in the exhaust port of like cylinder #5. Well, that explains that cat that has been on patrol lately. Again, ShopVac to the rescue.

So, I never removed that front side part of the inspection cover on the bellhousing when I pulled the engine last year. In doing so, I learned that the lobes on the block corresponds to the location pins for the bellhousing and that there are possibly two bolts that can be reached with the clutch and flywheel still on (the crank won't turn so I can't remove the clutch pressure plate bolts). The lower bolts were a challenge, but they only required the open side of a crescent wrench, and flipping the wrench to take advantage of the offset angle before it fit on an adjacent hex surface of the bolt, and, not enough room for the box end. The top bolts, easy. So, I get the bellhousing just slightly loose by moving those lower bolts (which I didn't find tight in the first place) slowly with a super limited range of motion. Then I got out the jumbo Unimog socket used to turn the nut on the front of the Land Cruiser crankshaft. I gave it a counter-clockwise twist, and it finally moved with the bellhousing in this looser position. The chunk of broken starter hit the ground. The engine is unseized! @lurch @Tank5

But, that victory is almost overshadowed by the fact that two of the six bellhousing-to-block-bolts appear to have not been installed, which probably made it way easier. But, lets just say that the starter was always alright, could you imagine a loose bellhousing, which is also half of the motor mounts, somewhere in traffic?

IMG_20191104_135150.jpg


That rebuilt starter left chalk-like marks were it was stuck in between the bellhousing and flywheel (above). And, here is what remains of the starter (below).

IMG_20191104_135245.jpg


My big mistake in this project was not realizing that part of the starter was missing when I pulled it. There is a cracked edge on the starter, hello, but I missed it. And I wasn't thinking about the missing shaft bushing, assumed that was by design and there was one in the bellhousing.

IMG_20190523_175033.jpg


IMG_20190523_175016.jpg


So, for the rest of the afternoon, I worked on cleaning up the motor. I loosely assembled the 2F bellhousing flywheel, and clutch, for storage purposes. I'm gonna have to see what is going on with the harmonic balancer, why it is loose, and fix the oil leak(s) that is on the front of the crank. I'll have to properly assemble the head, after I clean up the remaining head gasket on the block. And, I'll need either an unoccupied chassis, or a stand, to begin to build-up the motor, and see if I can get as many vital signs out of it, so I can figure out a plan for this 2F.
 
Last edited:
Back
Top Bottom