
Once again Slee Offroad is pumping out new tricks and gadgets for us 100 Series owners. This Backup Camera Bracket is for those of us with OEM backup camera and a rear bumper with tire carrier. The tire blocks the camera and one way to fix that was to relocate the camera over to the drivers side and drill new holes in your lift gate. I don't like that for a few reasons. 1. Your camera is way off center and you do still see the tire a little. 2. You can't really tell how close your tire is to whatever your backing up to.
Slee and Joe Risavi to the rescue. Here's how to remove your backup camera, rewire it and reinstall it on the mounting bracket. The bracket mounts to the spare tire carrier.

The camera mounts to the bracket via tabs provided in the kit and the screws that were holding the camera in its original location.

First, you need to remove the camera from your hatch. You could do it a couple ways. Pop the license plate lights out and remove the screws holding the camera to the hatch. Then try and get your fingers in there and release the tabs. Or Joe's recommended method, remove the screws from the camera and use a step drill and just drill out the plastic tabs. Slee will most likely provide new ones in their kit


The camera will come right out. Pull it out as far as you can and clip the wires past the wire connector. You'll only get a few inches of wire past the connecter, but get as much as you can.


Unplug the connector and mount the camera to the bracket.

Now you need to get to the camera wires that feed up to your in-dash display. They are located in the rear quarter panel near your jack. First remove the flap that covers the gap between your cargo area and back hatch. It's 5 or 6 screws. Then remove the T that's used to secure your cargo net. This T just twists and pulls out. There is a screw behind there that needs to be removed.

Now you can pull that panel away enough to access the camera wires.

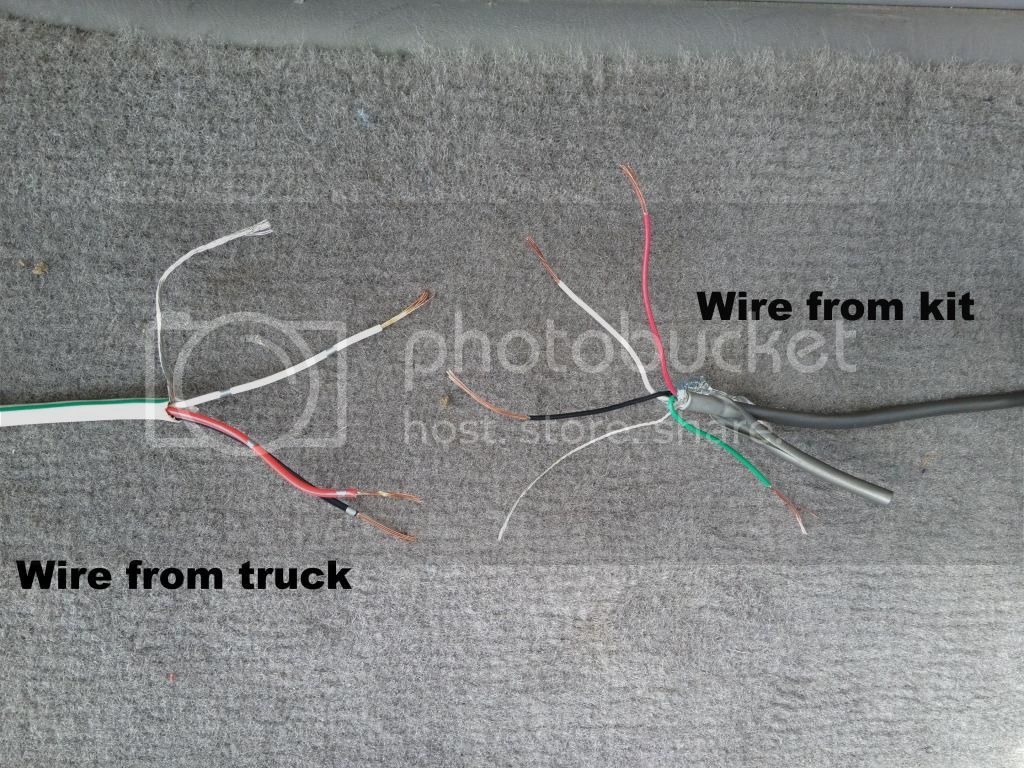
The bundle you're looking for has 4 wires going into the connector. A Black, White, Red and a Bare wire covered in black tape. The whole bundle is covered by a white/Green wire cover a few inches up from the connector.

Unplug the connector and clip the wires leaving about 6 or 7 inches to work with.

There is a black plastic oval plug that's down below those wires. If you go under the truck it's easy to see. This needs to be popped out.

Use a long screwdriver and just pop it out and set it aside. It will fall out pretty easy.


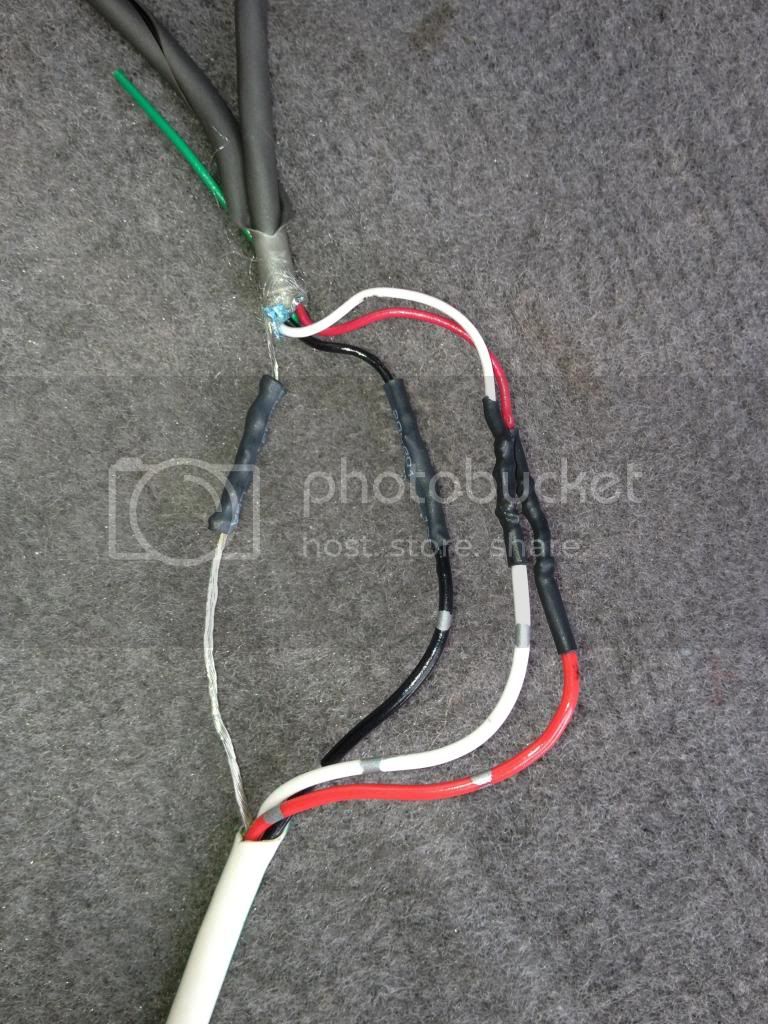
Now it's time to solder some wires together. Using the connecter and 6-7 inches of wire you just clipped, solder everything together with the wire provided by Slee. The wire Slee provides is just 22ga home security wire used for wiring homes/business. (Great find Joe)
This bundle has 5 wires in it. Red, Black, White, Bare and Green. You're going to match color to color with your clipped bundle and just disregard the green wire, it's not used.
Now that you've just extended that wire, take the black oval piece you popped out before and drill a small hole in the center enough for the security wire top pass through.

The next step can be done a few different ways. What I did was feed the security wire through the opening in the body where I popped the black oval plug out. I pulled all the security wire through and fed it through the black oval plug. EDIT:This next picture shows the wire feeding through the plug the WRONG way. Feed it through the waffle side of the oval.

Then I reinstalled the black plug into the body. I used a little silicone around the hole the security wire passed through just to seal that plug back up from water/mud in case I ever get that deep. You can plug that connector back together now. All you were doing was extending that part of the wire five or six feet with the security wire.
Next, I ran the security wire underneath the truck/bumper to the passenger side and up between the bumper and the body where your license plate light wire is run. (I hope that makes sense, Ill snap a pic tomorrow) Basiclly it's run to the swingout just like the wire that provides power to the LED licence plate lights on the bumper. I also zip tied the security wire up under the bumper to keep it out of the way.
Now you have to solder the security wire to the section of wire you clipped when you first pulled the camera out of the hatch. You only have a few inches of wire to work with here, so do it right the first time. Match color to color again disregarding the green from the security wire. This time the Brown wire from the camera side connects to the Bare wire on the security side. I didn't take a picture of the two connecting, but this is the plug and few inches of wire I'm talking about.

Slee and Joe Risavi to the rescue. Here's how to remove your backup camera, rewire it and reinstall it on the mounting bracket. The bracket mounts to the spare tire carrier.
The camera mounts to the bracket via tabs provided in the kit and the screws that were holding the camera in its original location.
First, you need to remove the camera from your hatch. You could do it a couple ways. Pop the license plate lights out and remove the screws holding the camera to the hatch. Then try and get your fingers in there and release the tabs. Or Joe's recommended method, remove the screws from the camera and use a step drill and just drill out the plastic tabs. Slee will most likely provide new ones in their kit
The camera will come right out. Pull it out as far as you can and clip the wires past the wire connector. You'll only get a few inches of wire past the connecter, but get as much as you can.
Unplug the connector and mount the camera to the bracket.
Now you need to get to the camera wires that feed up to your in-dash display. They are located in the rear quarter panel near your jack. First remove the flap that covers the gap between your cargo area and back hatch. It's 5 or 6 screws. Then remove the T that's used to secure your cargo net. This T just twists and pulls out. There is a screw behind there that needs to be removed.
Now you can pull that panel away enough to access the camera wires.
The bundle you're looking for has 4 wires going into the connector. A Black, White, Red and a Bare wire covered in black tape. The whole bundle is covered by a white/Green wire cover a few inches up from the connector.
Unplug the connector and clip the wires leaving about 6 or 7 inches to work with.
There is a black plastic oval plug that's down below those wires. If you go under the truck it's easy to see. This needs to be popped out.
Use a long screwdriver and just pop it out and set it aside. It will fall out pretty easy.
Now it's time to solder some wires together. Using the connecter and 6-7 inches of wire you just clipped, solder everything together with the wire provided by Slee. The wire Slee provides is just 22ga home security wire used for wiring homes/business. (Great find Joe)
This bundle has 5 wires in it. Red, Black, White, Bare and Green. You're going to match color to color with your clipped bundle and just disregard the green wire, it's not used.
Now that you've just extended that wire, take the black oval piece you popped out before and drill a small hole in the center enough for the security wire top pass through.
The next step can be done a few different ways. What I did was feed the security wire through the opening in the body where I popped the black oval plug out. I pulled all the security wire through and fed it through the black oval plug. EDIT:This next picture shows the wire feeding through the plug the WRONG way. Feed it through the waffle side of the oval.
Then I reinstalled the black plug into the body. I used a little silicone around the hole the security wire passed through just to seal that plug back up from water/mud in case I ever get that deep. You can plug that connector back together now. All you were doing was extending that part of the wire five or six feet with the security wire.
Next, I ran the security wire underneath the truck/bumper to the passenger side and up between the bumper and the body where your license plate light wire is run. (I hope that makes sense, Ill snap a pic tomorrow) Basiclly it's run to the swingout just like the wire that provides power to the LED licence plate lights on the bumper. I also zip tied the security wire up under the bumper to keep it out of the way.
Now you have to solder the security wire to the section of wire you clipped when you first pulled the camera out of the hatch. You only have a few inches of wire to work with here, so do it right the first time. Match color to color again disregarding the green from the security wire. This time the Brown wire from the camera side connects to the Bare wire on the security side. I didn't take a picture of the two connecting, but this is the plug and few inches of wire I'm talking about.
Last edited:


