



Since lifting my truck with OME Heavies and using OME CC bushings, I have never been satisfied with the handling performance, especially on the highway with cross winds. I knew my castor must be on the low side and I would need to find another correction method. I wanted to post up my experience for another point of reference for others.
A trip to the alignment shop verified my concerns, my readings (with the OME CC bushings in) were -0.9* on each side (nice to find them even however), well under the specified range of 2.0*-4.0*
When considering correction, I wanted something that was within my mechanical abilities, this eliminated the washer method (I don't know how to weld). I considered Slee bushings (not enough correction)
MAF Drop brackets (http://www.man-a-fre.com/pa/4plus80seriesdropbrackets.htm) could interfere with future slider install
Slee Plates (http://www.sleeoffroad.com/products/suspension_pieces_spacers.htm) unpredictable effect on driveline issues
Landtank's Plates (https://forum.ih8mud.com/showthread.php?t=58518&highlight=castor)
After reading thread after thread about drive-line issues, and lots of questions exchanged with Landtank, I settled on his approach as it's the only one that would address both my castor issue and have a predictable result with the drive-line and I would be able to install these on my own and learn more about my truck in the process.
I knew we would be lining up the front pinion for a Double Cardan shaft and elected to have one made by a local shop. I used the shaft from a Pre-Runner and my own front shaft. My next step was to remove the OME bushings from the arms and replace with OEM and then get another castor reading. I dropped the arms, found a local shop to do the pressing for $20, reinstalled and headed back down to the same alignment shop. My castor readings now -3.2* each side and the truck drove like crap. I got the truck home, installed the DC shaft and took some measurements. After looking at the numbers, I believe we settled on 7.0* of correction (Rick, jump in and correct me if we went with more). Rick pre-drilled the plates, put together a drill kit and shipped it off to me.
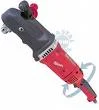
I have to admit, I was a little intimidated at first, but knew if I took it slow and followed Rick's directions, it would be fine, and once I got going all worries went away. One thing thing that did trip me up was the right angle drill. Millwaukee makes several models with the same chuck size, so you need to make sure you don't rent "The Hawg"
and instead, rent one that looks like this. You can notice that the head behind the chuck is much thicker on The Hawg and the passenger side knuckle gets in the way.
The install went very smoothly. Rick included some very clear directions and I followed them closely, taking my time. He included a drill "kit" which included 2 sets of bits, 4 different sizes and two shaft lengths. Starting on the passenger side was a good idea for several reasons, I got the toughest drilling (around the pass knuckle) and the plates will only align one way do to the diff housing. Arm fatigue was the hardest part as you have the drill up there for a long time, slowly drilling each hole out bit by bit. I did find that turning the wheels once direction or the other made it a bit easier to get the drill in there and see what you are doing. After all the holes were drilled, it was a matter of bolting everything in place, installing the DC shaft and taking it out on a test run. In the end, I think the actual install of the plates was in the 6-7 hour range. I think it's a fair assessment for the average DIY guy. I took my time, but I did not waste my time either. I am VERY pleased with the results, the truck now handles like I want, no darting, tracks straight, the wheels want to return to center etc. I have not been back to the alignment shop yet for new numbers, but will update this post once I have.
The day after install, I loaded the Cruiser down with 100's of pounds of "crap" and we headed home to Missoula, MT for X-Mas (500 miles) and I could not have been more pleased with the handling. I did have a slight vibration which I later figured out was my overfilling of the slip yoke on the DC shaft. I pulled the zerk to relieve pressure and the vib is all but gone. I am still going to drop it, purge the syn I have in there and replace with dino.
I have to say, getting the castor straight AND no driveline issues are well worth the effort.
I'd be happy to field any questions and I'm sure Rick would be happy address anything as well.
Hope this helps other Cruiserheads in the future with their decision making process.
Good additional reading;
DC Shaft https://forum.ih8mud.com/showthread.php?t=29715&highlight=double+cardan
Vibes https://forum.ih8mud.com/showthread.php?t=68938&highlight=castor
A trip to the alignment shop verified my concerns, my readings (with the OME CC bushings in) were -0.9* on each side (nice to find them even however), well under the specified range of 2.0*-4.0*
When considering correction, I wanted something that was within my mechanical abilities, this eliminated the washer method (I don't know how to weld). I considered Slee bushings (not enough correction)
MAF Drop brackets (http://www.man-a-fre.com/pa/4plus80seriesdropbrackets.htm) could interfere with future slider install
Slee Plates (http://www.sleeoffroad.com/products/suspension_pieces_spacers.htm) unpredictable effect on driveline issues
Landtank's Plates (https://forum.ih8mud.com/showthread.php?t=58518&highlight=castor)
After reading thread after thread about drive-line issues, and lots of questions exchanged with Landtank, I settled on his approach as it's the only one that would address both my castor issue and have a predictable result with the drive-line and I would be able to install these on my own and learn more about my truck in the process.
I knew we would be lining up the front pinion for a Double Cardan shaft and elected to have one made by a local shop. I used the shaft from a Pre-Runner and my own front shaft. My next step was to remove the OME bushings from the arms and replace with OEM and then get another castor reading. I dropped the arms, found a local shop to do the pressing for $20, reinstalled and headed back down to the same alignment shop. My castor readings now -3.2* each side
and the truck drove like crap. I got the truck home, installed the DC shaft and took some measurements. After looking at the numbers, I believe we settled on 7.0* of correction (Rick, jump in and correct me if we went with more). Rick pre-drilled the plates, put together a drill kit and shipped it off to me.I have to admit, I was a little intimidated at first, but knew if I took it slow and followed Rick's directions, it would be fine, and once I got going all worries went away. One thing thing that did trip me up was the right angle drill. Millwaukee makes several models with the same chuck size, so you need to make sure you don't rent "The Hawg"
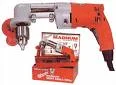
and instead, rent one that looks like this. You can notice that the head behind the chuck is much thicker on The Hawg and the passenger side knuckle gets in the way.
The install went very smoothly. Rick included some very clear directions and I followed them closely, taking my time. He included a drill "kit" which included 2 sets of bits, 4 different sizes and two shaft lengths. Starting on the passenger side was a good idea for several reasons, I got the toughest drilling (around the pass knuckle) and the plates will only align one way do to the diff housing. Arm fatigue was the hardest part as you have the drill up there for a long time, slowly drilling each hole out bit by bit. I did find that turning the wheels once direction or the other made it a bit easier to get the drill in there and see what you are doing. After all the holes were drilled, it was a matter of bolting everything in place, installing the DC shaft and taking it out on a test run. In the end, I think the actual install of the plates was in the 6-7 hour range. I think it's a fair assessment for the average DIY guy. I took my time, but I did not waste my time either. I am VERY pleased with the results, the truck now handles like I want, no darting, tracks straight, the wheels want to return to center etc. I have not been back to the alignment shop yet for new numbers, but will update this post once I have.
The day after install, I loaded the Cruiser down with 100's of pounds of "crap" and we headed home to Missoula, MT for X-Mas (500 miles) and I could not have been more pleased with the handling. I did have a slight vibration which I later figured out was my overfilling of the slip yoke on the DC shaft. I pulled the zerk to relieve pressure and the vib is all but gone. I am still going to drop it, purge the syn I have in there and replace with dino.
I have to say, getting the castor straight AND no driveline issues are well worth the effort.
I'd be happy to field any questions and I'm sure Rick would be happy address anything as well.
Hope this helps other Cruiserheads in the future with their decision making process.
Good additional reading;
DC Shaft https://forum.ih8mud.com/showthread.php?t=29715&highlight=double+cardan
Vibes https://forum.ih8mud.com/showthread.php?t=68938&highlight=castor


 and had no problems, Rick did an excellent job in the directions.

